- Support
- Interface Port Labels
- Viewing the Default Configuration
- Information Needed for Configuration
- Configuring Basic Parameters
- Configure Global Parameters
- Configure Fast Ethernet LAN Interfaces
- Configure WAN Interfaces
- Configure the Fast Ethernet WAN Interface
- Configure IP Address Settings on a Switch using the CLI
- Objective
- Applicable Devices
- Software Version
- Configure the IP Address of the Switch through the CLI
- Configure Static IP Address
- Configure the IP Address through DHCP
Support
This chapter provides procedures for configuring the basic parameters of your Cisco router, including global parameter settings, routing protocols, interfaces, and command-line access. It also describes the default configuration on startup.
Note Individual router models may not support every feature described throughout this guide. Features not supported by a particular router are indicated whenever possible.
This chapter contains the following sections:
•Interface Port Labels
•Viewing the Default Configuration
•Information Needed for Configuration
•Configuring Basic Parameters
•Configuring Static Routes
•Configuring Dynamic Routes
•Configuring Enhanced IGRP
Each section includes a configuration example and verification steps, as available.
For complete information on how to access global configuration mode, see the «Entering Global Configuration Mode» section in Appendix A, «Cisco IOS Basic Skills.» For more information on the commands used in the following tables, see the Cisco IOS Release 12.3 documentation set.
Interface Port Labels
Table 1-1 lists the interfaces supported for each router and their associated port labels on the equipment.
Viewing the Default Configuration
When you first boot up your Cisco router, some basic configuration has already been performed. All of the LAN and WAN interfaces have been created, console and VTY ports are configured, and the inside interface for Network Address Translation has been assigned. Use the show running-config command to view the initial configuration, as shown in Example 1-1.
Example 1-1 Cisco 851 Default Configuration on Startup
Router# show running-config Current configuration : 1090 bytes
service timestamps debug datetime msec
service timestamps log datetime msec
no service password-encryption
speed basic-1.0 basic-2.0 basic-5.5 6.0 9.0 basic-11.0 12.0 18.0 24.0 36.0 48.0
Information Needed for Configuration
You need to gather some or all of the following information, depending on your planned network scenario, prior to configuring your network
•If you are setting up an Internet connection, gather the following information:
– Point-to-Point Protocol (PPP) client name that is assigned as your login name
–PPP authentication type: Challenge Handshake Authentication Protocol (CHAP) or Password Authentication Protocol (PAP)
–PPP password to access your Internet service provider (ISP) account
–DNS server IP address and default gateways
•If you are setting up a connection to a corporate network, you and the network administrator must generate and share the following information for the WAN interfaces of the routers:
–PPP authentication type: CHAP or PAP
–PPP client name to access the router
–PPP password to access the router
•If you are setting up IP routing:
–Generate the addressing scheme for your IP network.
–Determine the IP routing parameter information, including IP address, and ATM permanent virtual circuits (PVCs). These PVC parameters are typically virtual path identifier (VPI), virtual circuit identifier (VCI), and traffic shaping parameters.
–Determine the number of PVCs that your service provider has given you, along with their VPIs and VCIs.
–For each PVC determine the type of AAL5 encapsulation supported. It can be one of the following:
AAL5SNAP—This can be either routed RFC 1483 or bridged RFC 1483. For routed RFC 1483, the service provider must provide you with a static IP address. For bridged RFC 1483, you may use DHCP to obtain your IP address, or you may obtain a static IP address from your service provider.
AAL5MUX PPP—With this type of encapsulation, you need to determine the PPP-related configuration items.
•If you plan to connect over an ADSL or G.SHDSL line:
–Order the appropriate line from your public telephone service provider.
For ADSL lines—Ensure that the ADSL signaling type is DMT (also called ANSI T1.413) or DMT Issue 2.
For G.SHDSL lines—Verify that the G.SHDSL line conforms to the ITU G.991.2 standard and supports Annex A (North America) or Annex B (Europe).
Once you have collected the appropriate information, you can perform a full configuration on your router, beginning with the tasks in the «Configuring Basic Parameters» section.
Configuring Basic Parameters
To configure the router, perform one or more of these tasks:
•Configure Global Parameters
•Configure Fast Ethernet LAN Interfaces
•Configure WAN Interfaces
•Configuring a Loopback Interface
•Configuring Command-Line Access to the Router
A configuration example is presented with each task to show the network configuration following completion of that task.
Configure Global Parameters
Perform these steps to configure selected global parameters for your router:
For complete information on the global parameter commands, see the Cisco IOS Release 12.3 documentation set.
Configure Fast Ethernet LAN Interfaces
The Fast Ethernet LAN interfaces on your router are automatically configured as part of the default VLAN and as such, they are not configured with individual addresses. Access is afforded through the VLAN. You may assign the interfaces to other VLANs if desired. For more information about creating VLANs, see Chapter 5 «Configuring a LAN with DHCP and VLANs.»
Configure WAN Interfaces
The Cisco 851 and Cisco 871 routers each have one Fast Ethernet interface for WAN connection. The Cisco 857, Cisco 877, and Cisco 878 routers each have one ATM interface for WAN connection.
Based on the router model you have, configure the WAN interface(s) using one of the following procedures:
•Configure the Fast Ethernet WAN Interface
•Configure the ATM WAN Interface
Configure the Fast Ethernet WAN Interface
This procedure applies only to the Cisco 851 and Cisco 871 router models. Perform these steps to configure the Fast Ethernet interface, beginning in global configuration mode:
Router(config)# interface fastethernet 4 Configure IP Address Settings on a Switch using the CLI
The documentation set for this product strives to use bias-free language. For the purposes of this documentation set, bias-free is defined as language that does not imply discrimination based on age, disability, gender, racial identity, ethnic identity, sexual orientation, socioeconomic status, and intersectionality. Exceptions may be present in the documentation due to language that is hardcoded in the user interfaces of the product software, language used based on RFP documentation, or language that is used by a referenced third-party product. Learn more about how Cisco is using Inclusive Language.
Objective
The switch can have multiple IP addresses. Each IP address can be assigned to specified interfaces or ports, Link Aggregation Groups (LAGs), or Virtual Local Area Networks (VLANs). To remotely manage the device, an IP address must be defined to access the switch. This allows you to easily configure or troubleshoot the device through the web-based utility, Telnet, or Secure Shell (SSH). The IP address of the switch can be manually configured or automatically received from a Dynamic Host Configuration Protocol (DHCP) server. If there are no DHCP servers available, the switch will use its factory default IP address which is 192.168.1.254. This article provides instructions on how to configure the IP address settings of your switch through the Command Line Interface (CLI). If you are unfamiliar with terms in this document, check out Cisco Business: Glossary of New Terms.
Applicable Devices
Software Version
Configure the IP Address of the Switch through the CLI
Important: If your switch is in one of the stacking modes with a Standby Switch present, it is recommended to configure a static IP address to prevent disconnecting from the network during a Stacking Active switchover. This is because when the standby switch takes control of the stack, when using DHCP, it might receive a different IP address than the one that was received by the original active-enabled unit of the stack.
Configure Static IP Address
In this scenario, the switch is set up without the availability of a DHCP server. Follow the steps below to configure a static IP address on the switch:
Step 1. Connect your computer directly to the switch using a serial cable.
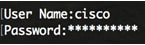
Step 2. Log in to the switch console. The default username and password is cisco/cisco. If you have configured a new username or password, enter the credentials instead.

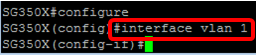
Step 3. From the Privileged EXEC mode of the switch, enter the Global Configuration mode by entering the following:
Step 4. In the Global Configuration mode, enter the interface context by entering the following:
SG350X(config)#interface [interface-id | vlan-id
Step 5. Enter the IP address interface configuration command to define an IP address for an interface by entering either of the following:
- ip address [ip-address]mask | prefix-length>>— Use the reload command to reload the switch immediately.
- ip address [ip-address]mask | prefix-length>>[default-gateway-ip-address] — Use the reload > command to specify scheduled switch reload.
- ip address — Specifies the IP address.
- mask — Specifies the network mask of the IP address.
- prefix-length — Specifies the number of bits that comprise the IP address prefix. The prefix length must be preceded by a forward slash (/). The range is 8 to 30.
Step 6. (Optional) To remove an IP address from an interface, use the no form of the IP address command by entering the following:
SG350X(config-if)#no ip address
Step 7. Enter the end command to go back to the Privileged EXEC mode of the switch.

SG350X(config-if)#end
Step 8. (Optional) To display the IP address configuration and information on the interface, enter the following command in the Privileged EXEC mode:

Step 9. (Optional) To save the configured settings to the startup configuration file, enter the following:

SG350X#copy running-config startup-config
Step 10. (Optional) Press Y for Yes or N for No on your keyboard once the Overwrite file [startup-config]… prompt appears.

You should now have successfully configured the static IP address settings of your switch.
Configure the IP Address through DHCP
In this scenario, the switch is connected to a router which acts as an active DHCP server. Follow the steps below to configure the IP address of the switch through DHCP.
Step 1. Connect your computer directly to the switch using a serial cable.
Step 2. Log in to the switch console. The default username and password is cisco/cisco. If you have configured a new username or password, enter the credentials instead.
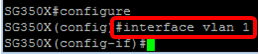
Step 3. From the Privileged EXEC mode of the switch, enter the Global Configuration mode by entering the following:
Step 4. In the Global Configuration mode, enter the interface context by entering the following:
SG350X(config)#interface [interface id | vlan-id]
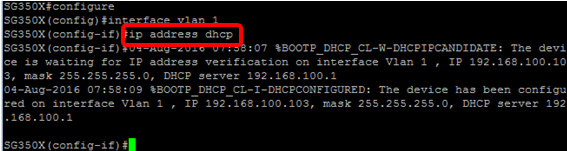
Step 5. In the interface context, acquire an IP address from the DHCP server by entering the following:
SG350X(config-if)#interface [interface id | vlan-id]
You will receive a notification that the device has been configured on the specified interface.
Step 6. (Optional) To remove an IP address from an interface, use the no form of the IP address DHCP command by entering the following:
SG350X(config-if)#no ip address dhcp
Step 7. Enter the end command to go back to the Privileged EXEC mode of the switch.
Step 8. (Optional) To display the IP address configuration and information of the interface, enter the following command in the Privileged EXEC mode:
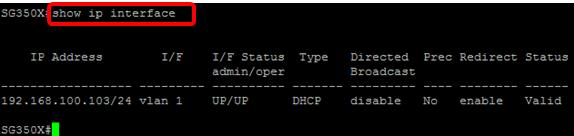
Step 9. (Optional) To display the IP address configuration and information on the DHCP client interface, enter the following command in the Privileged EXEC mode:

SG350X#show ip dhcp client interface
Step 10. (Optional) To save the configured settings to the startup configuration file, enter the following:

SG350X#copy running-config startup-config
Step 11. (Optional) Press Y for Yes or N for No on your keyboard once the Overwrite file [startup-config]… prompt appears.

You should now have successfully configured the DHCP IP address settings on your switch.