Лабораторная работа №5: Cisco Packet Tracer: Wi-Fi (10.05.2018)
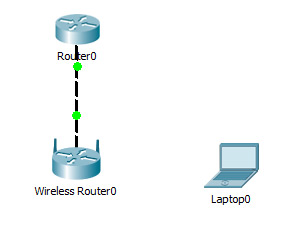
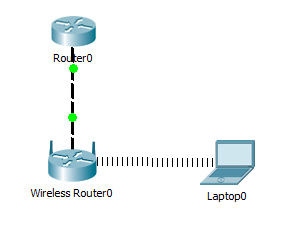
Создать модель локальной сети, состоящей из обычного домашнего wi-fi роутера и маршрутизатора, который имитирует провайдера Интернета. Использовать интерфейс Fast Ethernet. Добавим ещё пользовательское устройство, например ноутбук. Установим модуль wi-fi (WPC300N) в ноутбук.
Настройка модели
1)Настройки маршрутизатора провайдера Router0 (жирным выделено то, что необходимо ввести с клавиатуры:
Router>en
Router#
Router#conf t
Enter configuration commands, one per line. End with CNTL/Z.
Router (config)#int fa0/0
Router (config-if)#ip address 210.210.0.1 255.255.255.252
Router (config-if)#no shutdown
Router (config-if)#
%LINK-5-CHANGED: Interface FastEthernet0/0, changed state to up
%LINEPROTO-5-UPDOWN: Line protocol on Interface FastEthernet0/0, changed state to up
Router (config-if)#end
Router#
%SYS-5-CONFIG_I: Configured from console by console
Router#wr mem
Building configuration.
[OK]
2)Настройки домашнего wi-fi маршрутизатора Wireless Router0
выполняется с помощью веб интерфейса.
Настройка внешнего интерфейса во вкладке Setup показана на рисунке.

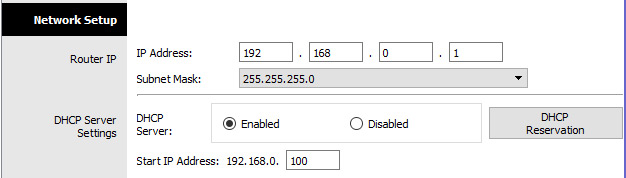
Настройка локальной сети (Network Setup)
Выбираем по умолчанию ip-адрес 192.168.0.1, маска 24-битная 255.255.255.0, разрешён DHCP-сервер, начало раздачи с адреса 192.168.0.100 и всё. После чего незабываем сохранить настройки, нажать на кнопку внизу формы Save Settings.
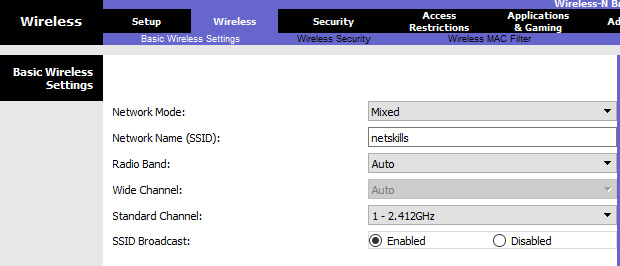
Настройки во вкладке Wireless, т.е. wi-fi. Выбираем основные настройки вайфая: режим (mode), мы выбираем смешанный (mixed); идентификатор сети (SSID) — netskills; ширина канала (Radio Band) — auto; частоту — 1-2.412HGz; видимость сети (SSID Broadcast) — видимая (enable). Сохраняем настройки.
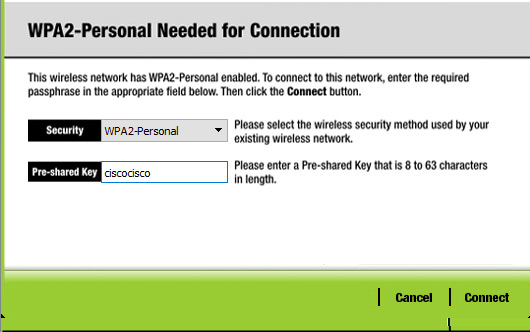
Переходим ко вкладке Wireless Security. Выбираем режим шифрования WPA2 Personal, алгоритм шифрования AES, ключевое слово для выбранного режима шифрования не менее 8 символов. Сохраняем.

3)Настройка wi-fi адаптера на ноутбуке. Вкладка Desktop->PC Wireless->Connect. Смотрим доступные нам сети. Нажимаем кнопку Connect для подключения к сети netskills.
Если настройки произведены верно, то появиться пунктирная линия между wi-fi маршрутизатором и ноутбуком как на рисунке.
Введём на ноутбуке в командной строке команду ipconfig, чтобы проверить правильность настроек. Из рисунка видно, что DHCP- сервер присвоил правильный ip 192.168.0.100 Пропингуем шлюз (wi-fi маршрутизатор) и пропингуем адрес интернет провайдера. На рисунке видно, что в обоих случаях пинг идёт.
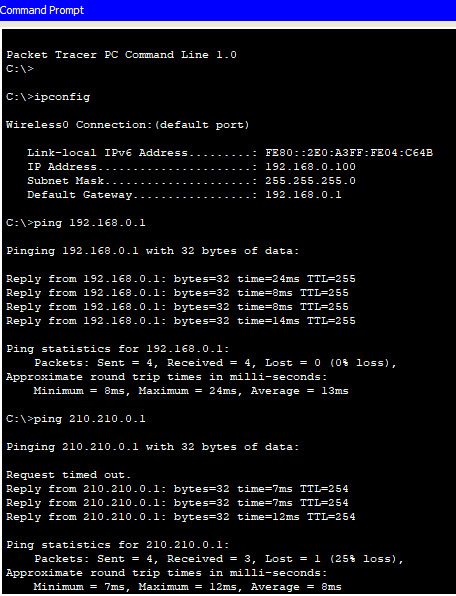
При этом NAT мы не использовали, так как практически на всех wi-fi маршрутизаторах NAT используется по умолчанию.
Если у вас возникли трудности с выполнением задания, вы всегда сможете найти толкового исполнителя здесь: work-zilla.com
Кол-во просмотров: 53005
Возможно, Вам будет интересно почитать:
1 комментарий к “ Лабораторная работа №5: Cisco Packet Tracer: Wi-Fi ”
WLAN Configuration on Packet Tracer
WLANs (Wireless LANs) are very common in today’s World. Everywhere there are a lot of wireless networks. Even now, you are in many of these wireless signals. It is not an healthty life but they are in our lives. In this lesson we will focus WLAN Packet Tracer Configuration and we will learn How to Configure a WLAN on Packet Tracer.
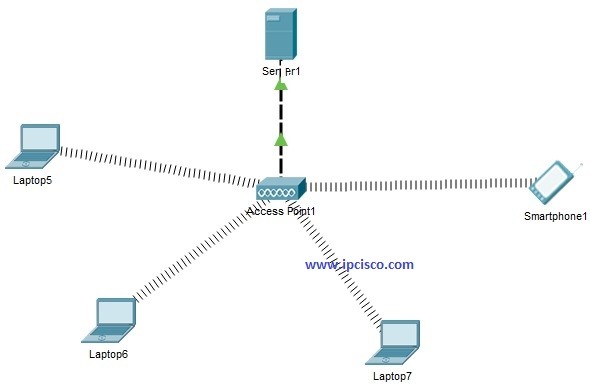
For Our WLAN Configuration on Packet Tracer, we will use the below topology that is consist of one One Wireless Access Point, One Server , Three Laptops and One Smartphone. Smartphones are everywhere, even in Cisco Packet Tracer for many years : )
You can reach all Cisco packet tracer config files on Cisco Packet Tracer Lab Page.
Now, let’s sumamrize what will we do for Packet Tracer WLAN Configuration :
- Place Wireless Interface Card to Laptops
- IP Check on WLAN Devices
- DHCP Server Configuration
- IP Check on WLAN Devices again
Place Wireless Interface Card to Laptops
By default laptops has classic Ethernet card. To involve in a wireless network, we should have wireless interface card. So, in each laptop, we should turn off the laptop, remove the classical Ethernet, instead of it we place Wireless Interface Card (WPC300N). Then, we power on the laptop again.
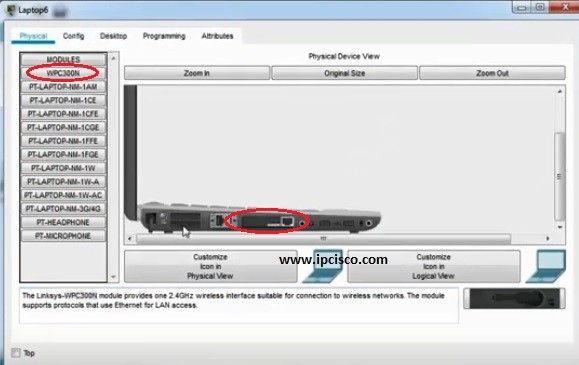

After this processi each laptop connects to th wireless Access Point in Packet Tracer. Smartphone devices in Packet Tracer connects to Access Points (AP) by default. So, there is nothing to do on them.
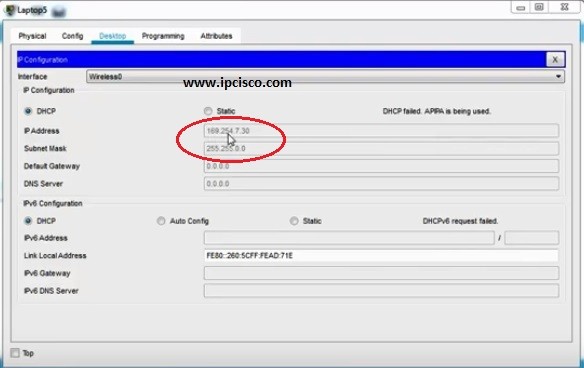
IP Check on WLAN Devices
We will check the IPm addresses of the laptops. For now, chekcing only one of them is enough. Because, at the beginning if there is no Static IP Configuration and no DHCP, an IP from a special block is assigned to the devices. This is APIPA (Automatic Private IP Addressing) addresses. These addresses are from the block “169.254.x.x/25”. Simple, when we say this type of IP address in a device, we can say that it has no IP address.
DHCP Server Configuration
In this step, we will configure our DHCP Server in the WLAN. This server will give IP addresses to our devices who are connected to the Access Point.
In the Services tab of Server, we will go through the DHCP at the left hand. In here, we will define our IP Pool. For this configuration example our DHCP Pool’s name is “IPCisco Pool”. Beside, we will configure the Default Gateway, DNS Server IP addresses. After that we will configure the starting IP and Subnet Mask. DHCP server will start IP asssignition with this IP. And for this example, we have created 254 IP for our IP Pool. We also assign this value on this screen.
After this configuration, we should not forget to “on” our DHCP Service at the top and then, we add our DHCP Pool to the configuration with “add” button.
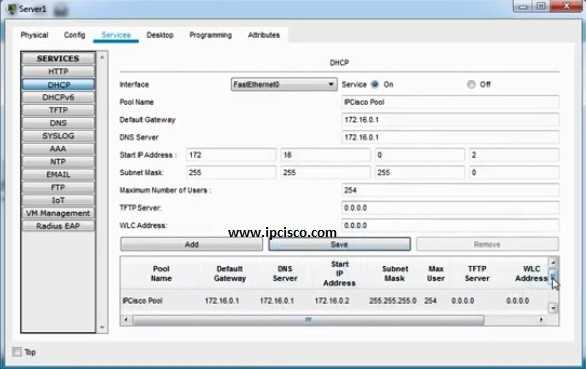
After DHCP Services configuration on DHCP Server, we will configure one more thing on this DHCP Server. This is the IP address and subnet mask of the Server. Here, our Servr IP address will be 172.16.0.1 and the mask will be 255.255.255.0.