- How to connect two routers in a Cisco packet tracer
- Serial connection explanation and configuration in packet tracer
- Serial interface configuration
- Learn Linux CCNA CEH IPv6 Cyber-Security Online
- static routing configuration using serial port in cisco packet tracer
- Static routing Configuration on ROUTER0:
- Static routing configuration on ROUTE 1:
- Static Routing configuration on ROUTER 2:
- Static routing configuration on ROUTER 3:
- Static routing configuration on ROUTER 4:
- Cisco packet tracer соединение роутеров через serial
- Схема подключения и оборудование Cisco
- Настройки COM-порта
- Команды в терминале Cisco
- Популярные Похожие записи:
How to connect two routers in a Cisco packet tracer
While designing a network in the packet tracer, we must know the basics of network devices so that we can configure them easily and as per our requirements.
Connecting two routers is not hard however configuration varies according to the setup and the technology used in the connection.
We can connect two Cisco routers using various types of available connections on the router so both routers should have the same connection available to establish the connection.
The following type of connection can be configured to connect routers.
An Ethernet connection can be established using the Ethernet cable which connects to the RJ45 connector on the routers.
We have to use a crossover cable for the connection between two routers when connecting the routers using an Ethernet port. Using the other cable will not work.
Fast Ethernet
Fast Ethernet connection can be established using the Ethernet cable or fiber optic cable however fiber optic cable uses different types of connectors. We must use a crossover cable in this connection as well.
Gigabit Ethernet
A Gigabit Ethernet connection can be established using both Ethernet and fiber optic cable. Again, a crossover cable must be selected to connect the routers.
The serial connection can also be used to connect two routers in which we have to configure the DTE side of the router while the DCE interface will be configured by the service provider however in packet tracer; we have to configure both sides.
Once we have connected the router with the correct port and cable then we can bring up the connection, we have to configure the IP addresses on the connected interfaces.
To bring up the connection between routers, we have to follow two steps
The IP address assigned to the router should be from the same subnet and after assigning the IP address, we have to bring the interface up using the ‘no shutdown’ command.
By default, interfaces of routers are administratively down.
While configuring the serial connection, we must also enable the clocking on the DCE side as this is required for the serial connection.
If we have connected the routers via serial connection then make sure that both routers are using the same language or protocol as a mismatch of the protocol will not let the line come online.
If we are facing any issue with the connection then we must make sure that the basic configuration is correct.
Serial connection explanation and configuration in packet tracer
The Serial Connection is used to create a WAN connection with the help of a service provider who offers a dedicated leased line to its customers.
Business organizations buy leased lines to establish a WAN connection to connect with different offices and business sites that could physically be thousands of miles apart. Businesses have to pay for these leased lines according to the service availed. And accordingly, the service providers charge for this service i.e. based on the bandwidth they offer to their client organizations.
One of the connections used for a leased line is the Serial Connection in Cisco based networks. If we have Cisco routers on both sides of the network then the default encapsulation known as HDLC will be used by the Cisco routers. However, this will not work with other brands routers (i.e. with the non-Cisco routers) because this protocol is solely a Cisco proprietary.
If we want to establish successful connection with router of other vendor then we must configure the same data link protocol on both router. If there will be a mismatch then connection cannot be established and we will see the status of the interface as down under data link.
If we are configuring new cisco router then by default the data link protocol would be HDLC however if we are configuring old device then we should check the configuration and if there is a mismatch then we have to configure the same protocol on both routers.
Although HDLC works out of box on all cisco routers however it is not widely used because of its propetery nature and it does not provide much feature so PPP protocol is used by most organization. Even on cisco routers, organizations prefer PPP protocol over HDLC protocol due to its advance features and benefits.
In this lab, we will configure a Serial Connection between the routers. We will set up a clock rate at 56000, which will provide the speed of 56 Kbps. In a real world, the DCE side of the cable is configured by the service provider. Generally, the clock speed is configured according to the availability of the bandwidth speed that the service provider is offering.
The following lab uses a serial cable that will simulate a service provider. We will configure the clock speed on the router that has DCE side connected.
Serial interface configuration
1. Assign IP address to both routers and turn them on
2. Set clocking on DCE side, which is router 0
Router(config)#interface serial 0/1/0
Router(config-if)# ip address 192.168.1.1 255.255.255.0
Router(config)#interface serial 0/1/0
Router(config-if)# ip address 192.168.1.2 255.255.255.0
Router(config-if)# clock rate 56000
Learn Linux CCNA CEH IPv6 Cyber-Security Online
static routing configuration using serial port in cisco packet tracer
This tutorial is all about how to configure static routing using serial port.This is an example lab showing static routing configuration in cisco packet tracer.Below topology have total 9 network.I have mentioned step wise notes to provide static routing configuration.
You can Also read:
static routing configuration using 3 routers
How to configure loopback interfaces on cisco router
vpn configuration lab using routers in cisco packet tracer
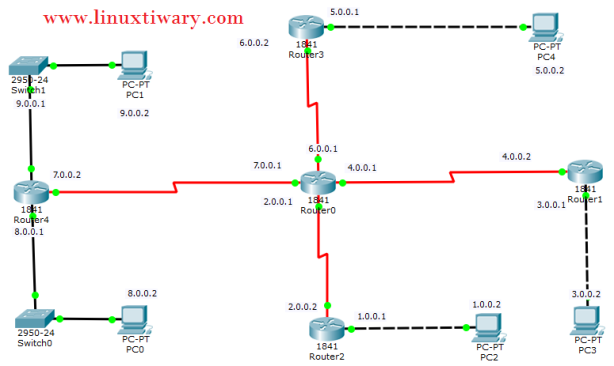
First of all assign ip address on each interface of router as mentioned in topology diagram.Here i assume that you already know how to assign ip address on router.
Static routing Configuration on ROUTER0:
middlerout(config)#ip route 1.0.0.0 255.0.0.0 2.0.0.2 middlerout(config)#ip route 9.0.0.0 255.0.0.0 7.0.0.2 middlerout(config)#ip route 8.0.0.0 255.0.0.0 7.0.0.2 middlerout(config)#ip route 5.0.0.0 255.0.0.0 6.0.0.2 middlerout(config)#ip route 3.0.0.0 255.0.0.0 4.0.0.2
Static routing configuration on ROUTE 1:
1router(config)#ip route 9.0.0.0 255.0.0.0 7.0.0.2 1router(config)#ip route 7.0.0.0 255.0.0.0 4.0.0.1 1router(config)#ip route 8.0.0.0 255.0.0.0 7.0.0.2 1router(config)#ip route 7.0.0.0 255.0.0.0 4.0.0.1 1router(config)#ip route 1.0.0.0 255.0.0.0 2.0.0.2 1router(config)#ip route 2.0.0.0 255.0.0.0 4.0.0.1 1router(config)#ip route 5.0.0.0 255.0.0.0 6.0.0.2 1router(config)#ip route 6.0.0.0 255.0.0.0 4.0.0.1
Static Routing configuration on ROUTER 2:
Router(config)#ip route 9.0.0.0 255.0.0.0 7.0.0.2 Router(config)#ip route 7.0.0.0 255.0.0.0 2.0.0.1 Router(config)#ip route 8.0.0.0 255.0.0.0 7.0.0.2 Router(config)#ip route 7.0.0.0 255.0.0.0 2.0.0.1 Router(config)#ip route 5.0.0.0 255.0.0.0 6.0.0.2 Router(config)#ip route 6.0.0.0 255.0.0.0 2.0.0.1 Router(config)#ip route 3.0.0.0 255.0.0.0 4.0.0.2 Router(config)#ip route 4.0.0.0 255.0.0.0 2.0.0.1 Router(config)#
Static routing configuration on ROUTER 3:
Router(config)#ip route 1.0.0.0 255.0.0.0 2.0.0.2 Router(config)#ip route 2.0.0.0 255.0.0.0 6.0.0.1 Router(config)#ip route 3.0.0.0 255.0.0.0 4.0.0.2 Router(config)#ip route 4.0.0.0 255.0.0.0 6.0.0.1 Router(config)#ip route 8.0.0.0 255.0.0.0 6.0.0.2 Router(config)#ip route 8.0.0.0 255.0.0.0 7.0.0.2 Router(config)#ip routr 7.0.0.0 255.0.0.0 6.0.0.1 Router(config)#ip route 7.0.0.0 255.0.0.0 6.0.0.1 Router(config)#ip route 9.0.0.0 255.0.0.0 7.0.0.2 Router(config)#ip route 7.0.0.0 255.0.0.0 6.0.0.1 Router(config)#
Static routing configuration on ROUTER 4:
4router(config)#ip route 1.0.0.0 255.0.0.0 2.0.0.2 4router(config)#ip route 2.0.0.0 255.0.0.0 7.0.0.1 4router(config)#ip route 5.0.0.0 255.0.0.0 6.0.0.2 4router(config)#ip route 6.0.0.0 255.0.0.0 7.0.0.1 4router(config)#ip route 3.0.0.0 255.0.0.0 4.0.0.2 4router(config)#ip route 4.0.0.0 255.0.0.0 7.0.0.1 Now i am going to check routing table on middle router:
middlerout#show ip route Codes: C - connected, S - static, I - IGRP, R - RIP, M - mobile, B - BGP D - EIGRP, EX - EIGRP external, O - OSPF, IA - OSPF inter area N1 - OSPF NSSA external type 1, N2 - OSPF NSSA external type 2 E1 - OSPF external type 1, E2 - OSPF external type 2, E - EGP i - IS-IS, L1 - IS-IS level-1, L2 - IS-IS level-2, ia - IS-IS inter area * - candidate default, U - per-user static route, o - ODR P - periodic downloaded static route Gateway of last resort is not set S 1.0.0.0/8 [1/0] via 2.0.0.2 C 2.0.0.0/8 is directly connected, Serial0/1/1 S 3.0.0.0/8 [1/0] via 4.0.0.2 C 4.0.0.0/8 is directly connected, Serial0/0/1 S 5.0.0.0/8 [1/0] via 6.0.0.2 C 6.0.0.0/8 is directly connected, Serial0/0/0 C 7.0.0.0/8 is directly connected, Serial0/1/0 S 8.0.0.0/8 [1/0] via 2.0.0.2 [1/0] via 7.0.0.2 S 9.0.0.0/8 [1/0] via 2.0.0.2 [1/0] via 7.0.0.2
Cisco packet tracer соединение роутеров через serial

Всем привет сегодня хочу освежить в памяти как производится начальная настройка cisco через COM-порт. Когда вы получаете новое оборудование, оно как правило имеет заводские настройки, которые врят ли кому подходят, в том числе и Cisco. Единственным способом осуществить первоначальную настройку, хотя бы назначить ip адрес и включить ssh для удаленного доступа, является подключение через COM-порт, в комплекте всегда идет специальный голубой провод.
Схема подключения и оборудование Cisco
И так базовая настройка cisco начинается, вот как выглядит схема подключения COM-портом к нашему сетевому оборудованию.
С одной стороны на сетевом оборудовании есть консольный порт вида мини USB либо формата RJ45.

Вот как выглядят фирменные провода для подключения через console port cisco. Кстати новый оригинальный голубой провод стоит 15 баксов.
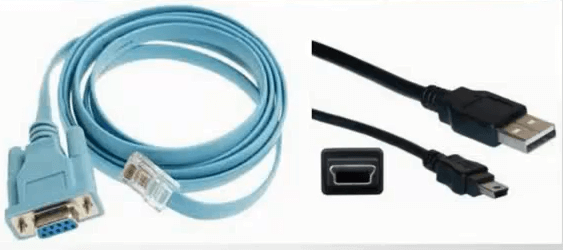
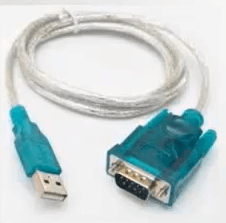
Если у вас например ноутбук или стационарный компьютер не имеют разъема на материнской плате для COM-порт, то есть переходники COM-порт to USB.
Настройки COM-порта
Настройки COM-порта для подключения к Cisco можете посмотреть по данной ссылке, я ранее делал себе заметку из них самое главное это:
Подключаться я буду через терминал в Cisco packet tracer 6.4, но и покажу как это происходит и через всем известную putty.
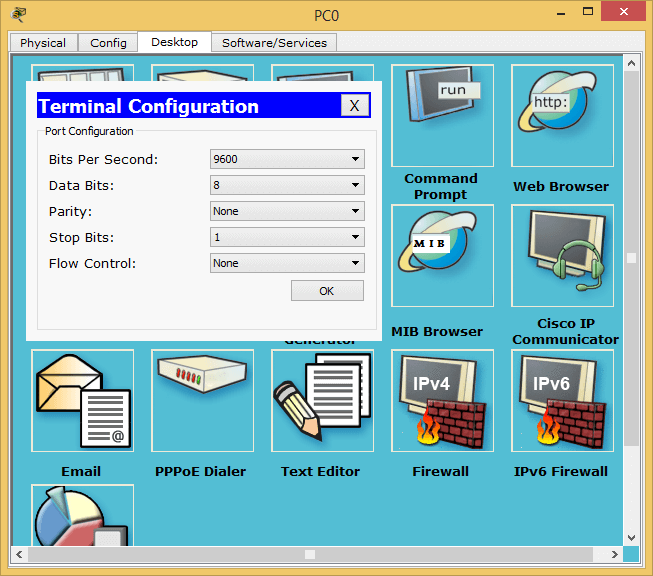
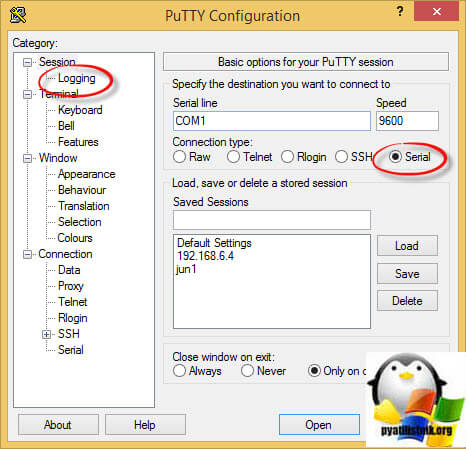
В putty базовая настройка cisco, начинается с вкладки Serial, тут нужно убедиться, что все настройки выставлены как я показывал вам выше.

Далее идем на вкладку Session и выбирем Serial, в поле Serial Line укажите нужный Com port.
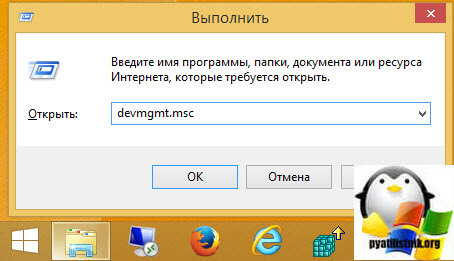
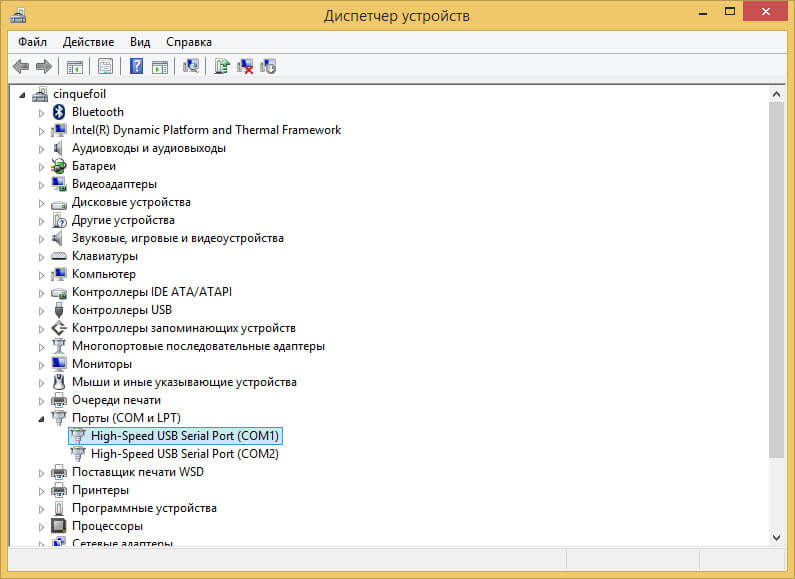
Если не знаете какой у вас Com порт используется, то делаете следующее, нажимаете Win+R и вводите devmgmt.msc, у вас откроется диспетчер устройств.
И в пункте Порты (COM и LPT) смотрим ваши номера.
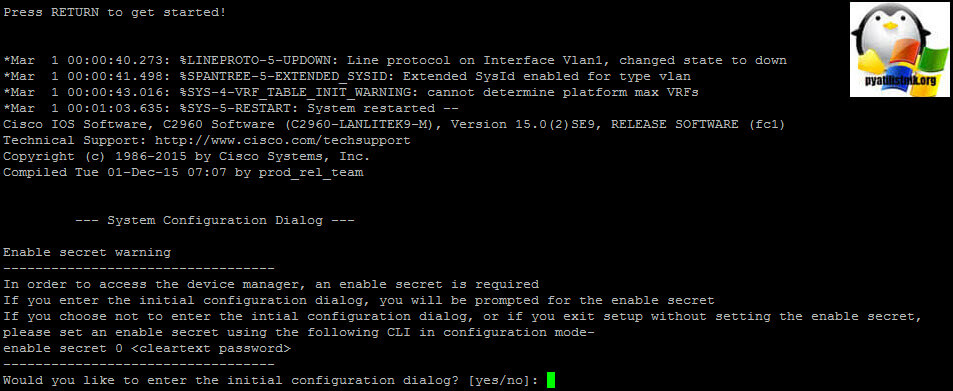
Вы попадаете в терминальную сессию, первым делом нужно удалить стартовый конфиг, делается это просто:

Все теперь ваше устройство не содержит ни каких настроек и при первой загрузке вы получаете стандартный мастер настройки System Configuration Dialog, я если честно всегда говорю нет и привык делать все в ручную, на мой взгляд это нужно уметь делать, если вам вдруг нужно вызвать меню мастера первоначальных настроек, то это делается командой setup.
Команды в терминале Cisco
Настройка cisco осуществляется с помощью списка команд, посмотреть который можно введя ?
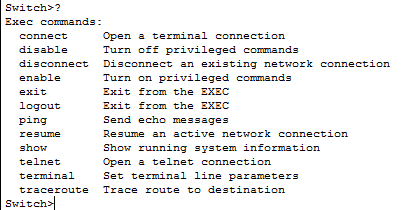
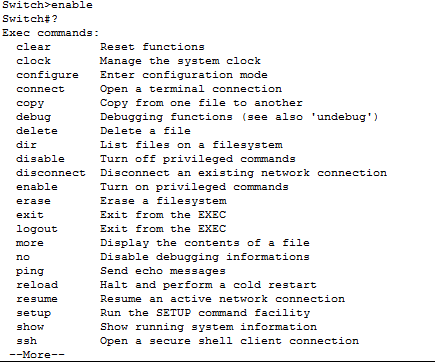
Такое малое количество команд означает,ч то мы находимся в обычном режиме терминала, попасть в привилегированный режим вводим
как видите, список команд существенно увеличился.
Зададим время clock set 13:53:00 28 nov 2016, у вас конечно оно будет своим, более детально как делается настройка времени cisco читайте по ссылке. Зададим dns имя вашему устройству, для этого заходим в режим настройки:
hostname и пишите нужное вам имя
и зададим домен ip domain-name и нужное имя домена
Следующим шагом нужно установить пароль на привилегированный режим в Cisco, а так же создать нового пользователя с возможностью логиниться из локальной базы. Далее настраиваем статический IP адрес и ssh или telnet доступ. После чего можно открывать у себя Putty и спокойно цепляться по удаленке, чтобы продолжить настройку Cisco так как вам это нужно. Надеюсь вы не уснули)))
Популярные Похожие записи:
 Сброс Digi AnywhereUSB на заводские настройки
- Настройка пароля на Digi AnywhereUSB
- Ошибка someone is currently logged into the APC
- Настройка сети в CentOS 8, за минуту
- Подключение ключа 1С через dongleserver ProMAX
- Как перезагрузить Digi AnywhereUSB