- Netexpertise
- Download and Installation
- Install Network Utilities
- Create Bridge and Connect to the Network
- Virtual Cisco Router Configuration File
- Adding the Cisco Router to the Bridge
- Connect to the Router
- Linux on Cisco Routers? Get Ready for AXP!
- Joe
- Adding Cisco Router / Switch IOS Image to GNS3 on Ubuntu
- Cisco router on linux
- Leave a Reply Cancel reply
- Give us a like
- Latest Video
- Recent Posts
- Allaboutlinux.eu Listens
- Recent Comments
- Calendar
- http://www.allaboutlinux.eu/feed
- Make A Donation
Netexpertise
Dynamips and dynagen let you create a virtual Cisco router on a Linux box. It would be even better if that router was reachable from the LAN, wouldn’t it? Going further, that same router could lead us to another couple of virtual routers running in a lab.
Download and Installation
Download dynamips and dynagen from sourceforge.net. Pay attention Dynagen last version 0.11.0 requires Dynamips 0.2.8-RC2.
The 2 programs are provided as rpm packages for Redhat/Fedora.
On other Linux systems such as Debian or Ubuntu, Dynagen is provided as an archive you can extract and from which dynagen can be linked from a bin directory of yours. As for Dynamips, it needs to be taken out from the rpm. You can also download it from netexpertise.eu.
You may get an error while running dynamips:
[root@cisco_host]$ dynamips -h dynamips: error while loading shared libraries: libpcap.so.0.9: cannot open shared object file: No such file or directory [root@cisco_host]$ ln -s /usr/lib/libpcap.so.0.9.8 /usr/lib/libpcap.so.0.9A symbolic link should sort things out.
Install Network Utilities
The 2 following tools are needed:
– brctl from bridge-utils package (on all Linux flavours) – to create a bridge
– tunctl from rpmfind for Redhat/Fedora and uml-utilities for Debian/Ubuntu – to create a tap interface. This isn’t absolutely needed since dynagen can create a tap interface on its own but is definately handy.
Create Bridge and Connect to the Network
Bridge br0 will be made up of the eth1 interface connected to the LAN and tap0 linked to the Cisco router. 192.168.0.100 is the Linux box IP.
[root@cisco_host]$ brctl addbr br0 [root@cisco_host]$ ifconfig br0 up [root@cisco_host]$ ifconfig eth1 0.0.0.0 [root@cisco_host]$ brctl addif br0 eth1 [root@cisco_host]$ ifconfig br0 192.168.0.100 netmask 255.255.255.0 upVirtual Cisco Router Configuration File
Create the following Dynagen configuration file. You will need to copy your own Cisco image on your server as this is proprietary indeed. This is where we map the Cisco f0/0 interface to tap0.
[localhost] workingdir = /tmp [[ 7200 ]] image = /root/c7200-js-mz.124-3.bin ram = 128 idlepc = 0x6082c30c [[ router R1 ]] console = 2001 f0/0 = NIO_tap:tap0I suggest you check dynagen tutorial to find out what’s your your best idlepc value so you do not get your CPU load rise to 100%. We can then launch Dynamips hypervisor and Dynagen to run the virtual router.
[root@cisco_host]$ dynamips -H 7200& [1] 2347 [root@cisco_host]$ Cisco Router Simulation Platform (version 0.2.8-RC2-x86) Copyright (c) 2005-2007 Christophe Fillot. Build date: Apr 20 2008 12:25:53 Hypervisor TCP control server started (port 7200). [root@cisco_host]$ dynagen router.net Reading configuration file. Shutdown in progress. Shutdown completed. Network successfully loaded Dynagen management console for Dynamips and Pemuwrapper 0.11.0 Copyright (c) 2005-2007 Greg Anuzelli, contributions Pavel Skovajsa =>Adding the Cisco Router to the Bridge
tap0 has now been created by Dynagen and can now be brought up and added to the bridge.
[root@cisco_host]$ brctl addif br0 tap0 [root@cisco_host]$ ifconfig tap0 upConnect to the Router
Connect on the router with telnet on port 2001 – as set in the configuration file earlier – and experience the console as if you were on a real Cisco router IOS.
[root@cisco_host]$ telnet localhost 2001 router>enable router#show interface summary *: interface is up IHQ: pkts in input hold queue IQD: pkts dropped from input queue OHQ: pkts in output hold queue OQD: pkts dropped from output queue RXBS: rx rate (bits/sec) RXPS: rx rate (pkts/sec) TXBS: tx rate (bits/sec) TXPS: tx rate (pkts/sec) TRTL: throttle count Interface IHQ IQD OHQ OQD RXBS RXPS TXBS TXPS TRTL ------------------------------------------------------------------------ * FastEthernet0/0 0 0 0 0 0 0 0 0 0 FastEthernet0/1 0 0 0 0 0 0 0 0 0 NOTE:No separate counters are maintained for subinterfaces Hence Details of subinterface are not shown router#conf t Enter configuration commands, one per line. End with CNTL/Z. router(config)#int fa0/0 router(config-if)#ip address 192.168.0.101 255.255.255.0 router(config-if)#no shutdown router(config-if)#end router# router#ping 192.168.0.1 Type escape sequence to abort. Sending 5, 100-byte ICMP Echos to 192.168.0.1, timeout is 2 seconds: . Success rate is 100 percent (5/5), round-trip min/avg/max = 8/11/16 ms router#ping 192.168.0.100 Type escape sequence to abort. Sending 5, 100-byte ICMP Echos to 192.168.0.100, timeout is 2 seconds: . Success rate is 80 percent (4/5), round-trip min/avg/max = 4/20/36 ms192.168.0.1 being the gateway or a device on the LAN.
You can now virtualize as many Cisco routers as you wish, within the limits of your machine’s resources.
Linux on Cisco Routers? Get Ready for AXP!
That’s right, run Linux right on your Cisco router! That’s what Cisco’s new Application eXtension Platform or AXP is doing. Now using a network card like a standard AIM module or network module for your ISR router you can load and run Linux on your router to run your applications and even intergrate them with your router using an IOS API.
Cisco AXP provides an open environment for development and integration of your applications. The card goes into your router, has its own memory, hard drive/flash drive, gigabit ethernet connection and uses a hardened version of Linux customized by Cisco.
Now think about this for a minute just from a selfish networkers point of view. We can now run MRTG, Cacti, SNORT, Nagios, SawMill, phpIP, or any other open source application that runs using PERL, Python, Java, PHP,etc. Plus, Cisco provides an API directly into the IOS to determine link up/down, performance, CLI, adjusting QoS, creating dynamics tunnels, or viewing any other state of the router.
For more information check it out on Cisco’s website:
Introduction to AXP
AXP Data Sheet
Joe
Senior Network Engineer, technology enthusiast, guitar and bass player. Joe Wilson is the creator of RouterFreak.com as well as other niche websites that can be found around on the Internets.
Adding Cisco Router / Switch IOS Image to GNS3 on Ubuntu
After installing the GNS3 program, follow the steps below to add a new Router / Switch IOS image.
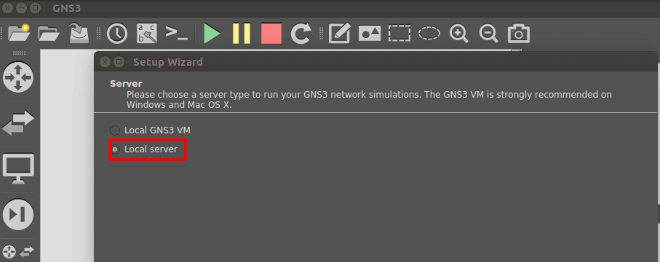
After running GNS3, the first opening of the program is as follows. Select Local Server in the Setup Wizard window. After selecting the Local Server option, click the “Next” button.
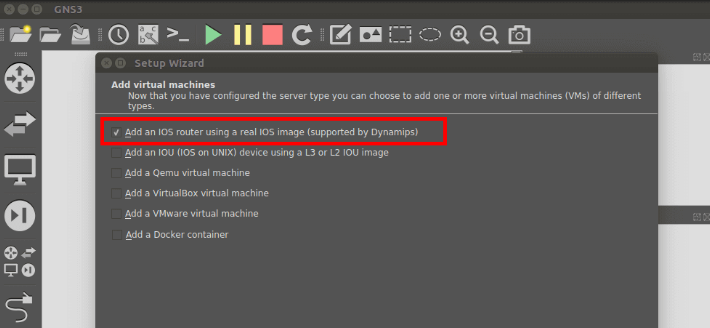
To add a Cisco Router IOS image, select “Add an IOS Router using a real IOS image” from the “Add virtual machines” page.
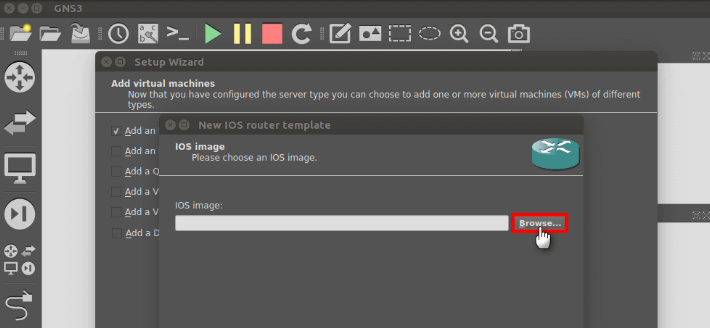
In the IOS images window, click the “Browse” button on the “IOS image” page to add the Router image.
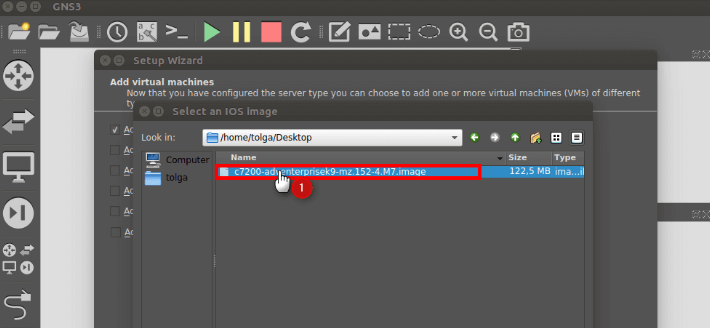
In the “Select an IOS image” window that opens, select an IOS image that you downloaded to your computer and click the “Open” button. You can download the cisco image here.
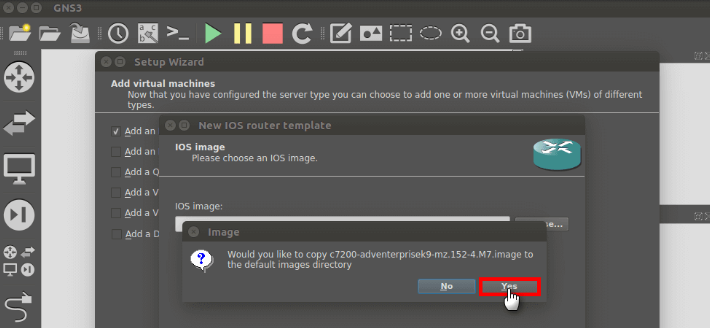
On the “IOS image” page, click the “Yes” button to copy the router IOS image to the default location. After adding the IOS image, click the “Next” button.
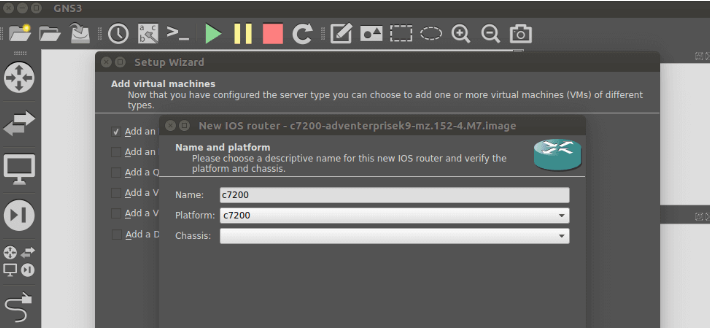
On the “Name and platform” page, select the Cisco Router platform and click the “Next” button.
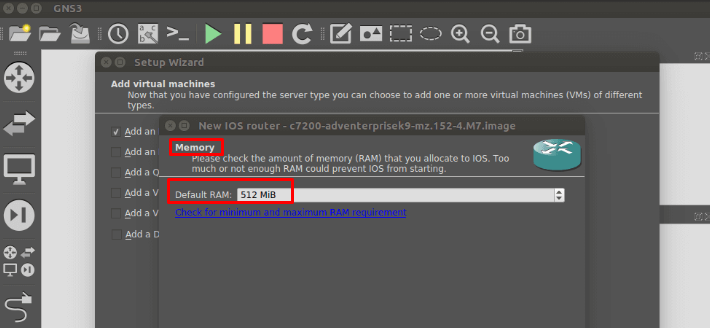
In the “Memory” page, you can configure how much RAM the Cisco Router will use in this window. Continue by clicking the “Next” button to accept the default 512 MB RAM value.
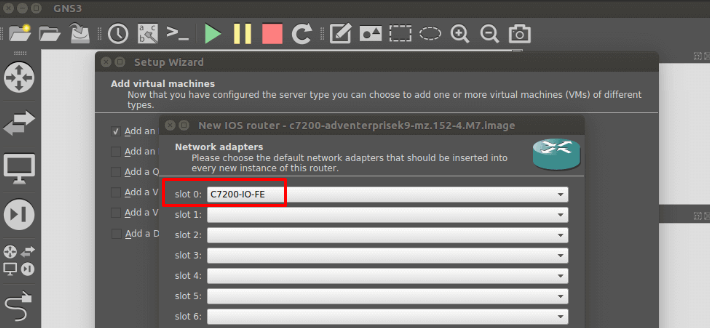
You can add interfaces for the Router on the “Network Adapters” page. Select the “FastEthernet” interface configured by default and click the “Next” button.
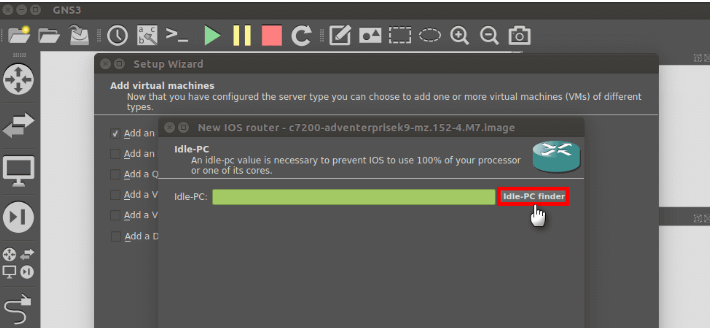
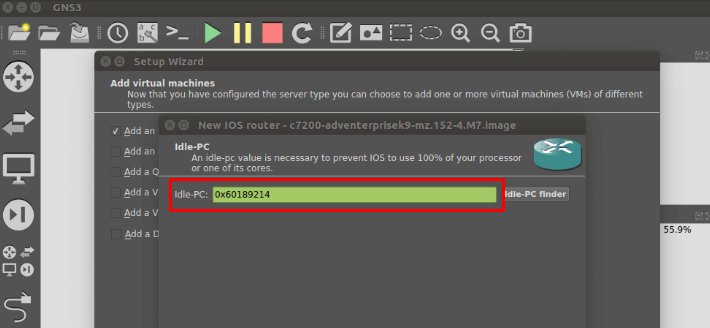
You must adjust the IDLE-PC value so that it does not affect the performance of your computer while the Cisco Router is running. Press the Idle-PC Finder button to adjust the optimum value.
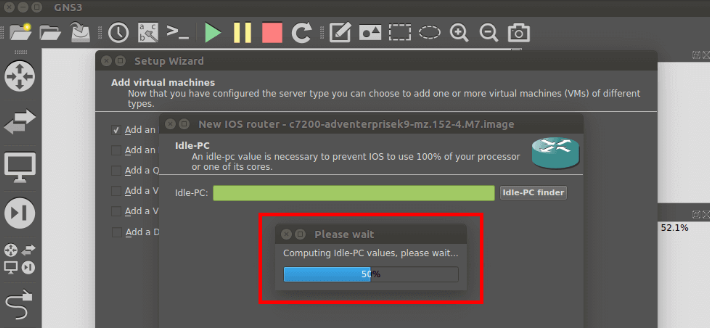
Calculating Idle-PC value for router image.
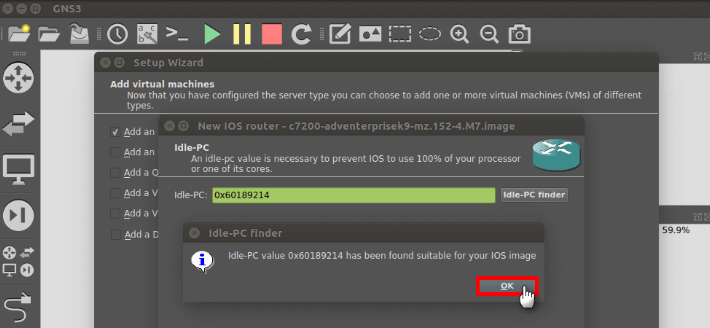
After finding the most suitable Idle-PC value for the router, click the “OK” button.
Click the “Finish” button to continue the IOS addition process.
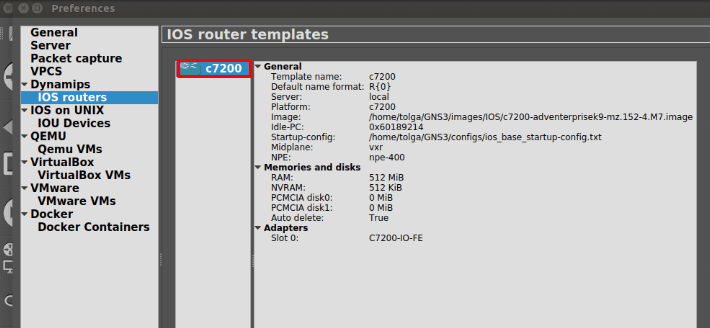
It gives information about the Router image you added in the “IOS Router Templates” window. Just click the “OK” button to close this window.
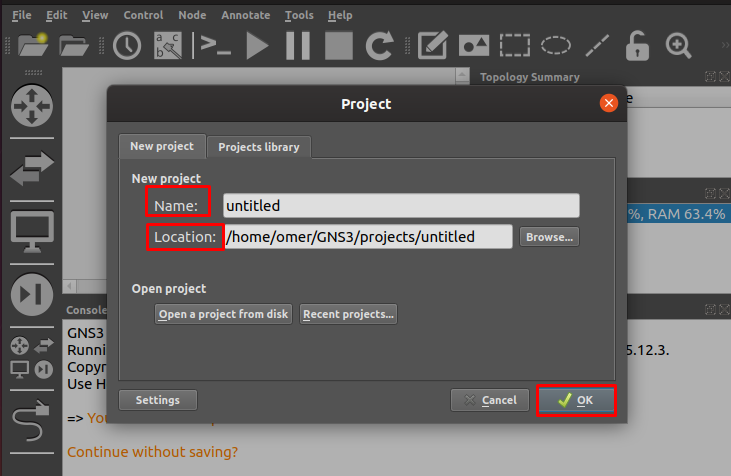
In the new project creation window, after configuring the project name and location, click the “OK” button.
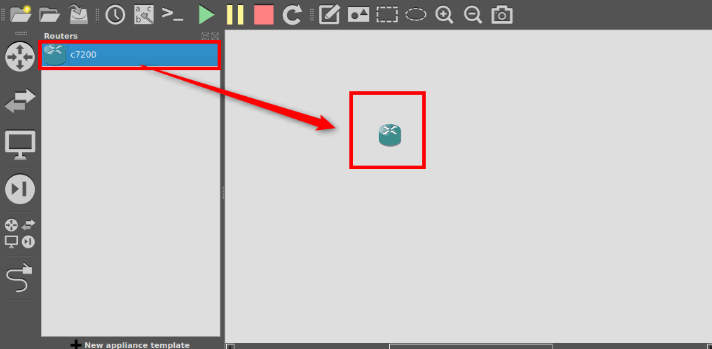
After our Cisco IOS image has been successfully added, drag and drop the c7200 Router from the left section to the workspace.
After running the router, you can see the IOS image version from the image below.
Cisco router on linux
Connect your Cisco Switch / Router on Ubuntu
Requirements for Configure a Cisco device from Console port:
A Host machine with your preferred O.S. In this case I’m using an Ubuntu 12.04 LTS.
A serial port in your computer motherboard or a USB to RS232(Serial) Converter.
A text based terminal emulation (i use minicom in this example)
Its also useful to install a TFTP server on your machine if you want to copy file from or to your Cisco switch / Router. I choose to use the tftpd-hpa
Check for active Serial ports on Linux:
Before we proceed we need to check all the available Serial ports on your machine and write down the port name because we will need it for configuring minicom. Open a terminal and type :
In my case i have a pl2303 USB to Serial Converter and the name of this device is «ttyUSB0″
Leave a Reply Cancel reply
Give us a like
Latest Video
Recent Posts
Allaboutlinux.eu Listens
Recent Comments
Calendar
http://www.allaboutlinux.eu/feed
How it works: There are many CA (Certificate Authorities) around the world that they can generate a certificate for you once you provide the required information and identify that you are the owner of the domain or subdomain where you are planning to use the certificate. Most of them are providing this service for an […]
install Netbeans in Ubuntu. Installing required software. Before we install Netbeans we need to install Apache2 and Php. sudo apt-get update sudo apt-get install apache2 php Now lets install Netbeans sudo apt-get install netbeans Now we need to add the php support for Netbeans. go and download that from the official website https://netbeans.org/downloads/index.html Once the download […]
Install Google Chrome in Ubuntu 17.04 Go to official website of Google Chrome and click on the «Download now» button. Select the «64 bit .deb (For Debian/Ubuntu)», read the agreement and if you agree click on «Accept and Install» to download the installation package. Save the file to the default location ~/Downloads/. the filename should […]
Introduction To Linux Terminal 1.1.The magic of Linux Terminal. The Linux shell exists since Linux invented and it is still one of the most powerful ways for a user to interact with a system. There are thousands of different Linux distributions out there but if you look all of them from the command […]
iSCSI server with OpenSuse. In this tutorial i will try to demonstrate how you can create an iSCSI target and then mount it on another machine. For that i will use the latest available OpenSuse at this time which is the Leap 42.3. I guess that this can be followed by other versions also. […]
Local DNS Server in Ubuntu Debian What is a DNS DNS stands for Domain Name System and its a service that associates domain names with ip addresses. Let me try to explain this a bit more.Since you are reading this article it means that you have typed my domain name (www.allaboutlinux.eu) or you found that […]
Install Ubuntu 15.04 in VMware the easy way Go to official website of Ubuntu and download the dvd http://www.ubuntu.com/download/desktop Then if you don’t have already installed VMware go to the official site and download it: https://my.vmware.com/web/vmware/downloads NOTE. VMware workstation Player is free for home use but not for commercial use. Please check the EULA of VMware for more […]
Install Google Chrome in Linux Debian Go to official website of Google Chrome and click on the «Download now» button. Select the «64 bit .deb (For Debian/Ubuntu)», read the agreement and if you agree click on «Accept and Install» to download the installation package. Save the file to the default location ~/Downloads/. the filename should […]
Install Skype in Linux Debian Skype is a simply way to make voice or video calls or chat with your friends with IM (instant messages). Go to official site of skype (http://www.skype.com/en/) and click on «Download skype». Select Debian from the dropdown menu of distribution selection. Save the file in your Downloads directory. the file […]
install Darktable in Debian 8 There is an easy way to install darktable in Debian by issuing the command «sudo apt-get install Darktable» but this one will install an old version of Darktable. If you need the latest stable one then you need to follow those steps: open a terminal and type: sudo apt-get update […]
Make A Donation
If you like what we do, you can press the button above and contribute in the expenses of this effort that’s called AllAboutLinux.eu! Thank you.


