- How to Migrate Windows 10 from HDD to SSD Using Clonezilla
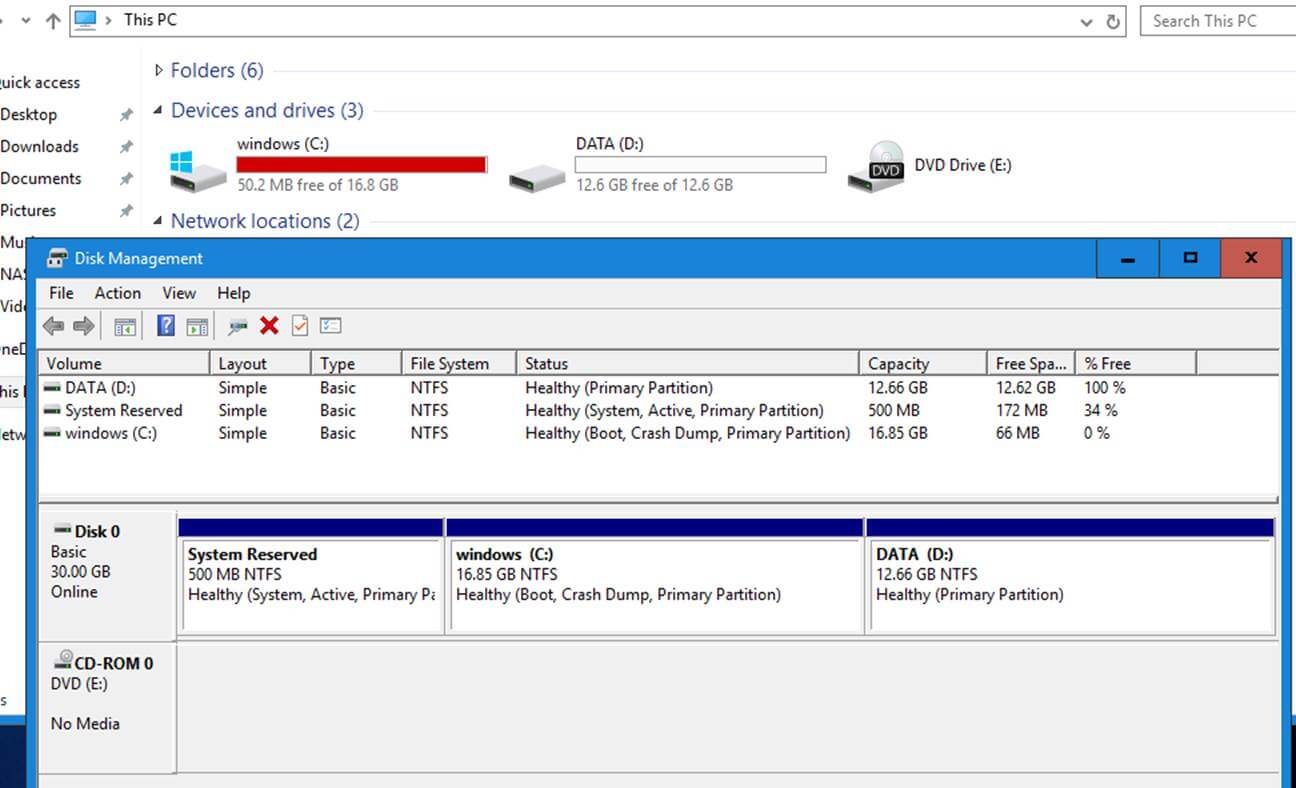
- MBR Partition Layout from Disk Management
- GPT Partition Layout from Disk Management
- Step 1: Shrink C: Partition of Windows System
- Step 2: Clone Disks Using Clonezilla
- Step 3: Resize Windows Partition
- Thread: How I Used Clonezilla to directly clone HDD to smaller SSD
- How I Used Clonezilla to directly clone HDD to smaller SSD
How to Migrate Windows 10 from HDD to SSD Using Clonezilla
This tutorial represents a practical excerpt on how to migrate (also known as cloning) a Windows 10 Operating System from a large HDD with multiple partitions, such as C: , D: , to a smaller SSD using a Linux distribution which includes Clonezilla utility.
Clonezilla utility can run from PartedMagic Linux distribution CD ISO image or directly from Clonezilla Linux distribution CD ISO image.
This guide assumes that both disks (old HDD and SSD) are physically plugged-in into your machine simultaneously and Windows OS is installed on a disk with MBR partition scheme table. Fdisk command line utility should display the disklabel type as DOS.
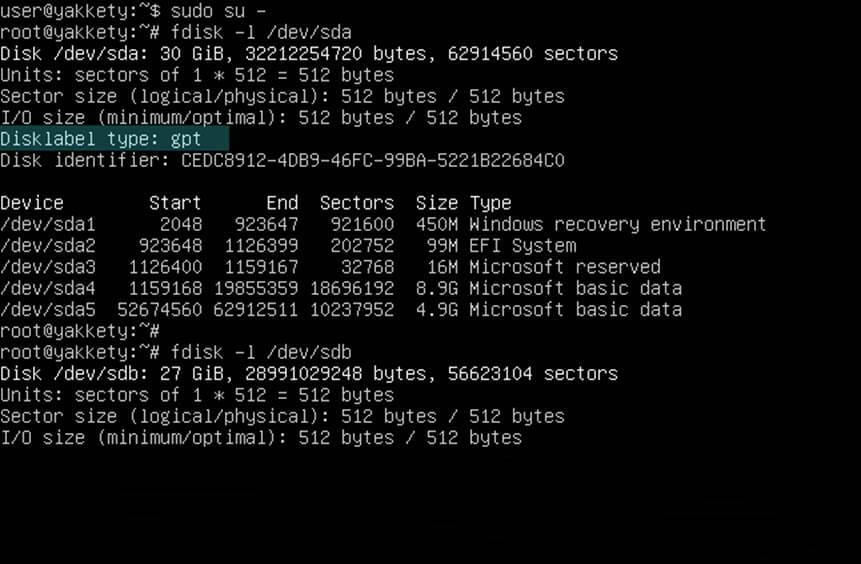
If disk in partitioned in MBR layout from UEFI, you should clone all partitions, such as Windows RE partition, EFI System partition, Microsoft Reserved partition and Microsoft basic data partition which holds the Windows OS partition, typically the C: drive. In this case Fdisk command line utility should report the disklabel type as GPT.
On the below screenshots you can review the initial Windows partitioning scheme in case of a MBR layout style and GPT partition layout performed from UEFI.
MBR Partition Layout from Disk Management
GPT Partition Layout from Disk Management

Step 1: Shrink C: Partition of Windows System
Be aware that in the case your windows C: partition from the HDD is larger than the total size of your SSD you will need reduce its size to fit on the SSD.
The calculations for this step are simple:
System Reserved + Recovery + EFI partition + Windows C: partitions must be smaller or equal than the total size of the SSD reported by a utility such as fdisk.
1. To shrink C: partition from Windows, first open a Command Prompt window and execute the diskmgmt.msc to open Windows Disk Management utility which will be used to Shrink the volume (assuming that windows is installed at the beginning of the disk on the second partition, after the System Reserved partition and has C: letter assigned) in order to reduce its size to minimal.
Feel free to use other partitioning tools for this step, such as Gparted run from a live Linux ISO, to reduce C: drive size to minimal.
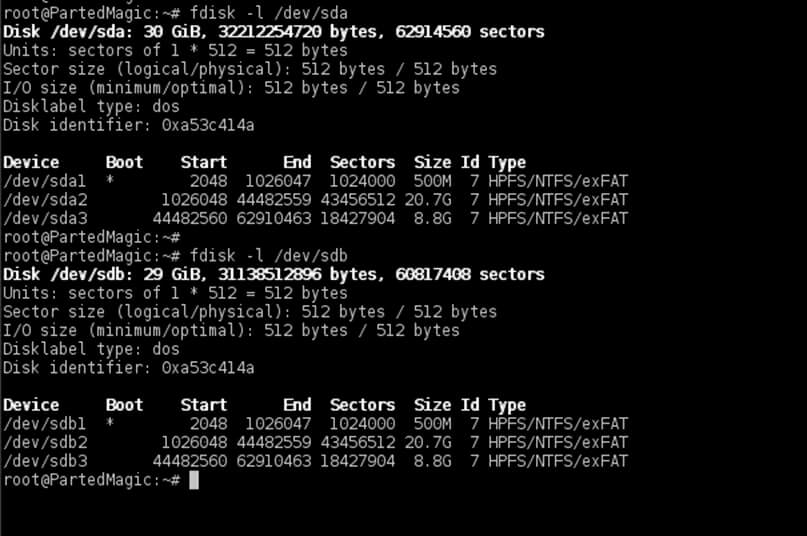
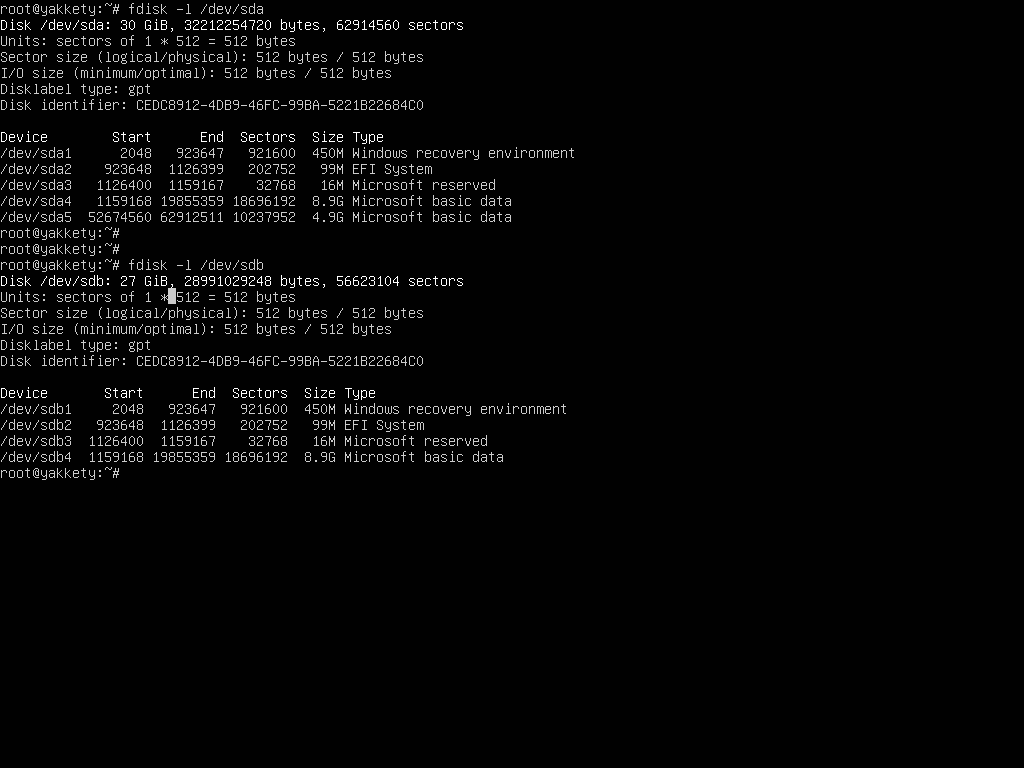
2. After you’ve reduced the size of C: partition, plug the SSD drive to your machine motherboard and reboot the machine into Clonezilla utility (use Clonezilla ISO image or Parted Magic ISO), enter to Bash shell interface and check both disks partition table and size using the below commands.
# fdisk -l /dev/sda # fdisk -l /dev/sdb
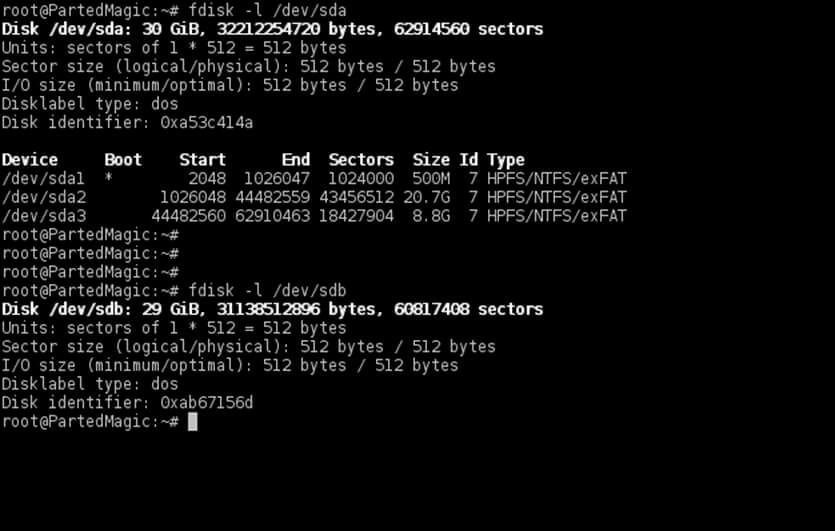
Be aware that your drives names would be sda for the first disk, sdb for the second and so on. Choose the disk with maximum attention so you won’t end-up cloning the wrong device and destroy all data.
To match the correct disk source (HDD in this case) and disk destination target (SSD) use the size and the partition table reported by fdisk command. Fdisk output will show that the SSD should be smaller in size than your HDD disk and should have no partition table created by default.
In case of a GPT disk, the HDD partition table should look as illustrated on the below screenshot.
$ su - # fdisk -l /dev/sda # fdisk -l /dev/sdb
Step 2: Clone Disks Using Clonezilla
3. Next , clone only the MBR (stage one bootloader + partition table) from the HDD to the SSD target disk using one of the below commands (assuming that sda represents the drive where Windows OS is installed and sdb the SSD disk).
# dd if=/dev/sda of=/dev/sdb bs=512 count=1 or # sfdisk -d /dev/sda | sfdisk -f /dev/sdb

In case of a GPT partition style you should clone the first 2048 bytes:
# dd if=/dev/sda of=/dev/sdb bs=2048 count=1
Or use sgdisk utility. Be aware that if you copy partition table from sda to sdb you should inverse the order of disks when using sgdisk.
After cloning the MBR/GPT, run fdisk command again with the -l flag to verify if the partition table matches on both disks.
# fdisk -l /dev/sda # fdisk -l /dev/sdb
4. By now both drives should have the exact partition table. On the target disk now delete all the partitions that follow after the Windows partition in order to start with a clean partition table with the entries necessaries only for system reserved and windows.
You won’t clone data from D: (or other partitions that follow Windows) from the old drive. You’re basically cloning only the first two partitions from the old HDD. Later you will use this unallocated space left behind to extend the C: partition by incorporating all the unused space from SSD.
Use fdisk utility as described below to delete partitions. First run the command against your SSD target drive ( /dev/sdb this case), print partition table with p key, press d key to start delete partitions and choose the last partition number from the prompt (in this case the third partition) as illustrated in the below screenshots.
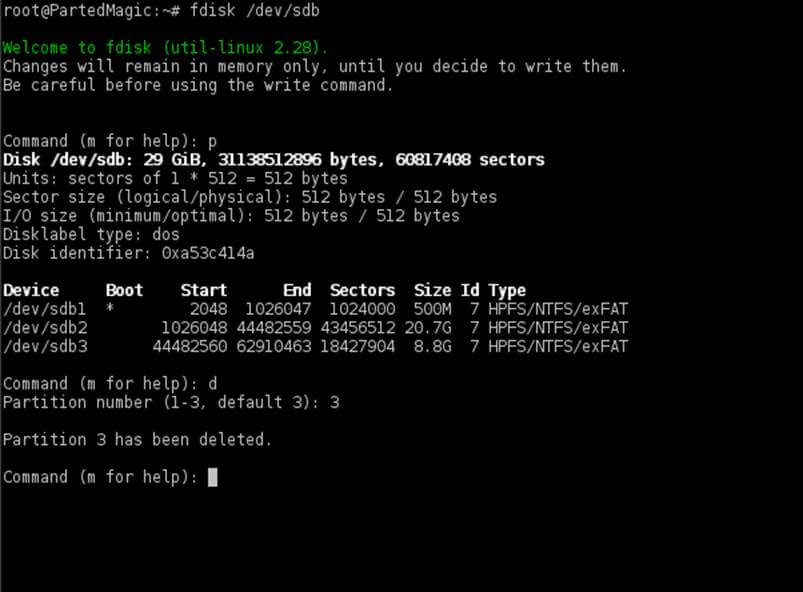
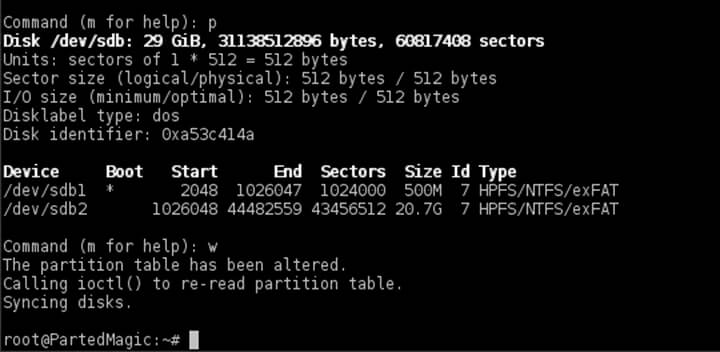
In case your drive has more than one partition following after the Windows partition, make sure you delete all of them. After you’ve finished removing all unneeded partitions, press p key again to print partition table and if, by now, only the two required Windows partitions are listed, you are safe to hit on w key in order to apply all changes.
The same procedure for deleting last partitions applies for GPT disks also, with the mention that you should use cgdisk utility which is intuitive to work with in manipulation a disk layout.
Don’t worry about destroying backed-up partition table at the end of the GPT disk, cgdisk will make the appropriate changes on both partition tables and will save the new disk layout table at the end of the disk automatically.
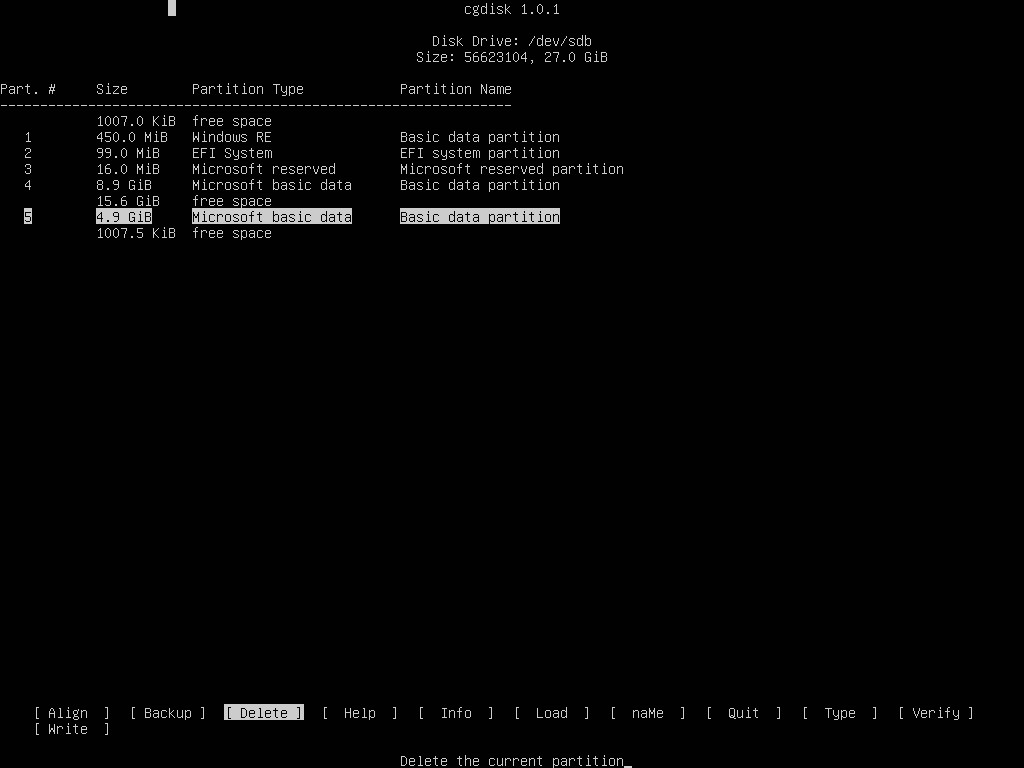
And the final GPT disk report with the last 4,9 GB partition deleted.
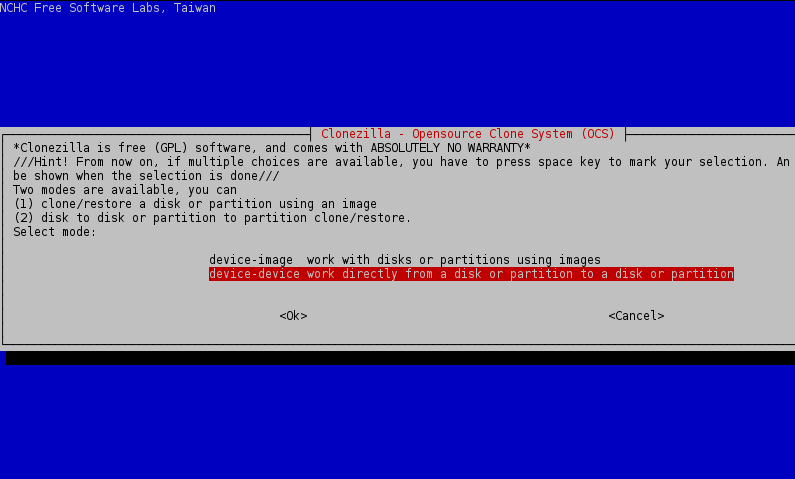
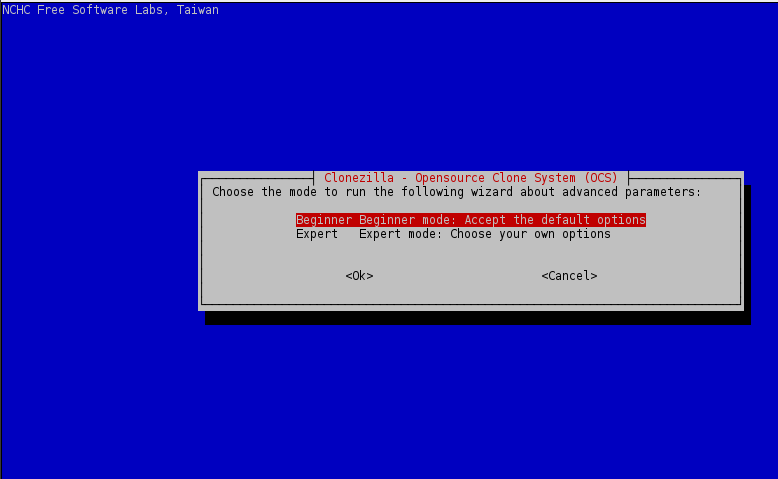
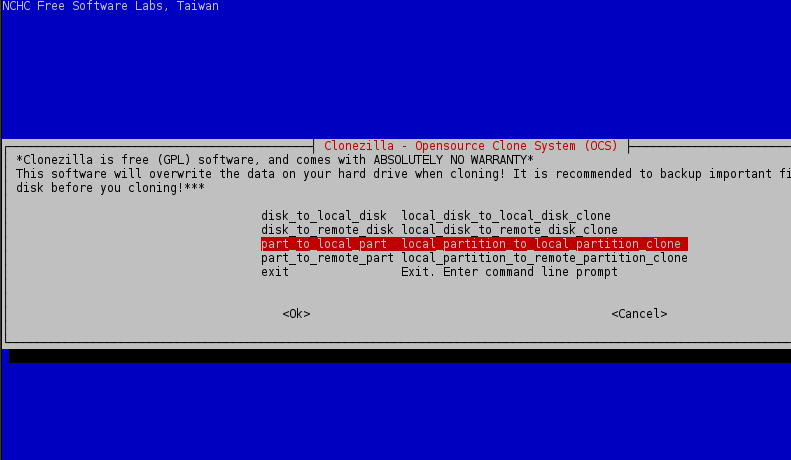
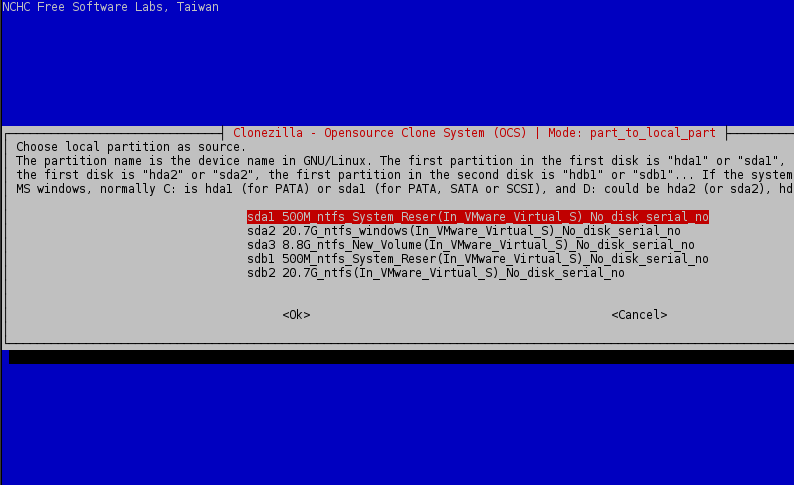
5. Now, if everything is in place, start Clonezilla utility, select device-device mode, run from beginner wizard and select part-to-local_part cloning option.
Use the below screenshots for guide.
6. Choose the first local partition from the list ( sda1 – System Reserved ) as source and press Enter key to continue.
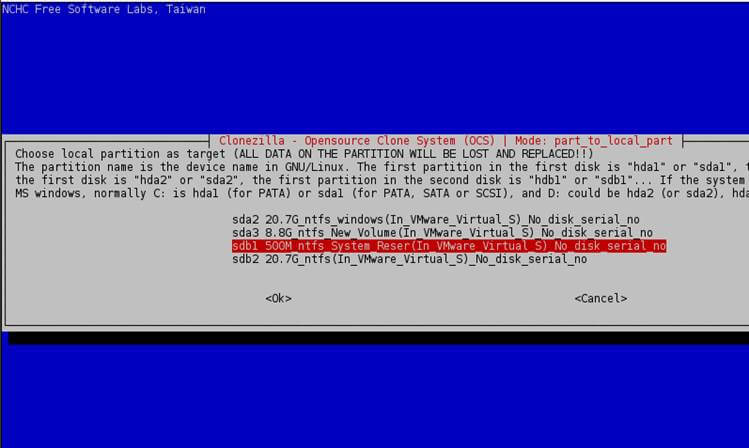
7. Next, choose the local target partition, which will be the first partition from the second disk, ( /dev/sdb1 ) and press Enter key to continue.
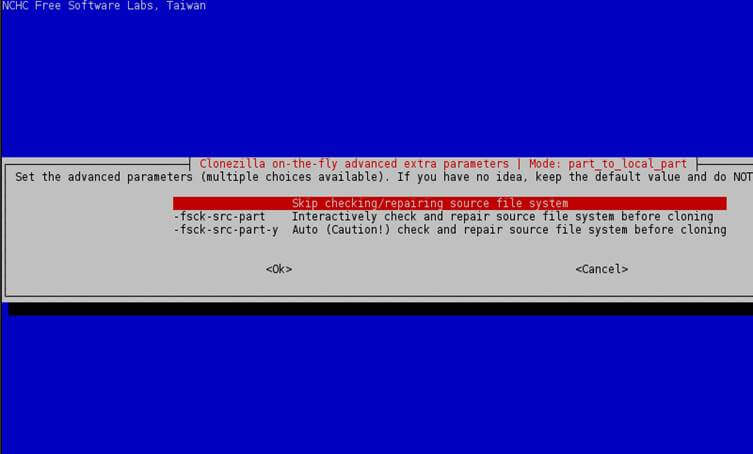
8. On the next screen choose to Skip check/repair file system and press Enter key again to continue.
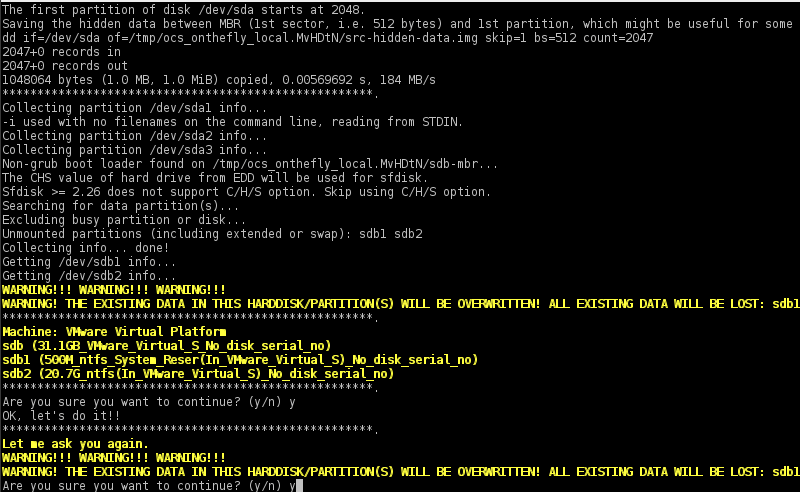
9. Finally, press Enter key again to Continue and answer with yes (y) twice to accept the warnings and start the cloning process.
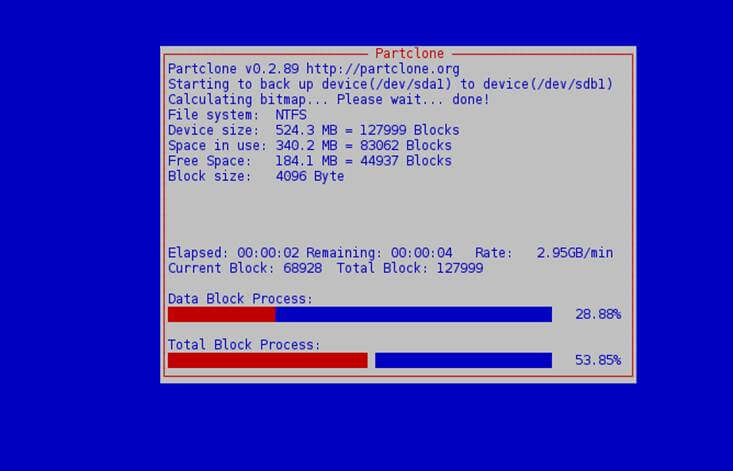
10. After the cloning process of the first partition finishes select to enter command line prompt, run clonezilla and repeat the same steps for next partitions (source sda2 – target sdb2, etc).

11. After all windows partitions are cloned, reboot the system and physically unplug the HDD drive or, better, tamper BIOS settings in order to set SSD as primary boot drive instead of old HDD.
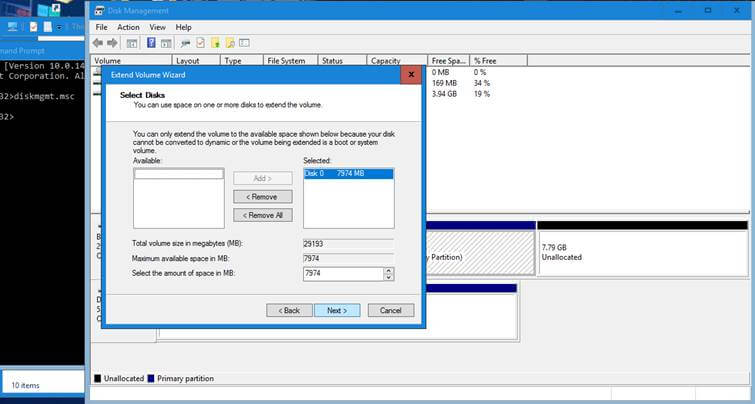
Step 3: Resize Windows Partition
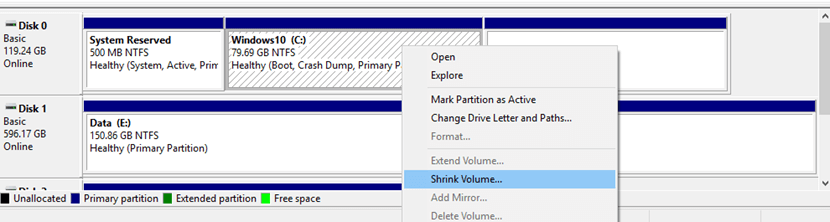
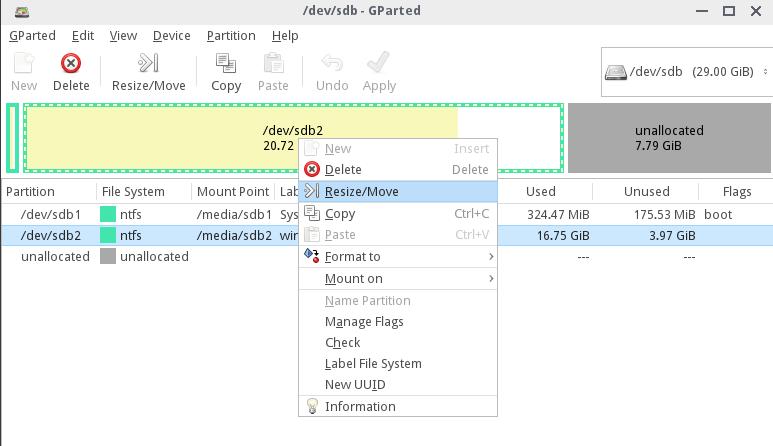
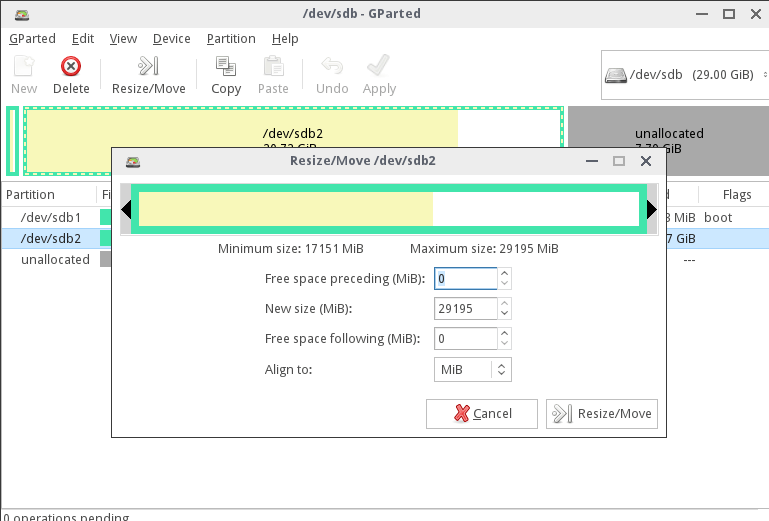
12. You can run Gparted utility to check partitions sanity and extend windows partition from Linux or you can just boot into Windows and use Disk Management utility to do this job. The below screenshots illustrate how to use both utilities.
Extend Partition using Gparted Live CD
Extend Partition using Windows Disk Management utility directly from Windows.
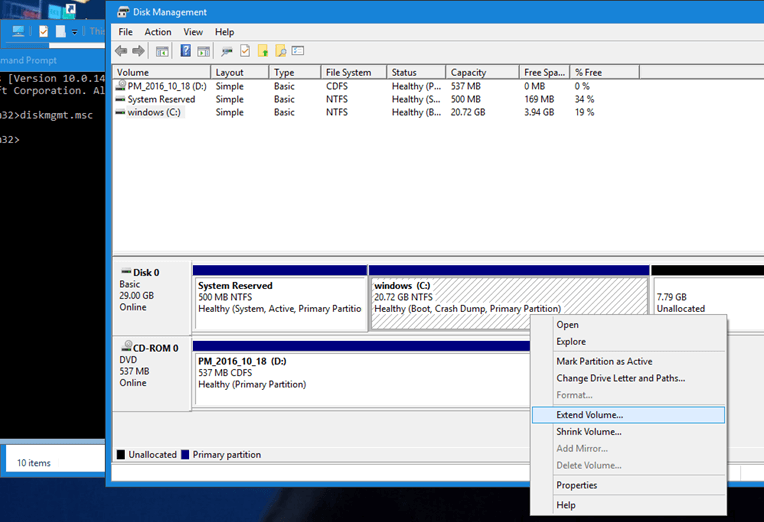
That’s all! The C: partition is now expanded to the maximum size of your SSD and Windows can now run at its maximum speed on a brand new SSD. The old HDD has all data intact.
Connect the hard-disk again in order to use it in case you’ve physically removed it from the motherboard. You can delete system reserved partition and windows partition from the old HDD and create a new partition instead of these two. The other old partitions ( D: , E: etc) will remain intact.
Conclusion
With Clonezilla you can also choose to image the partitions and save them to an external HDD or a network location. In this case you must also backup HDD MBR/GPT with one of the following commands and save the MBR image to the same directory where your clonezilla images are kept.
# dd if=/dev/sda of=/path/to/MBR.img bs=512 count=1 or # sfdisk -d /dev/sda > =/path/to/sda.MBR.txt
# dd if=/dev/sda of=/path/to/GPT.img bs=2048 count=1 or # sgdisk --backup=/path/to/sda.MBR.txt /dev/sda
For a future restoration of your Windows system from a network location, first restore the MBR sector from the saved imaged above using one of the below commands, then proceed with restoring each clonezilla partition image one by one.
MBR image restore from file:
# dd if=/path/to/MBR.img of=/dev/sda bs=512 count=1 or # sfdisk /dev/sda < =/path/to/sda.MBR.txt
GPT image restore from file:
# dd if=/path/to/GPT.img of=/dev/sda bs=2048 count=1 # sgdisk - -load-backup=/path/to/sda.MBR.txt /dev/sda
This method has been used multiple times on BIOS motherboards and on UEFI machines with Windows installed from Legacy Mode (CSM) or directly from UEFI without any error or data loss.
Thread: How I Used Clonezilla to directly clone HDD to smaller SSD
 First Cup of Ubuntu
 ![]()
 How I Used Clonezilla to directly clone HDD to smaller SSD
I searched around the internet and these forums and I didn't quite find what I wanted to achieve. If this is ill relevant then just delete the post It is my first post and wanted to contribute my experience which might help someone else.
I had a 500GB hard in my laptop, I decided to buy a SSD which was 480GB. Not much smaller at all but this meant Clonezilla would not directly copy to the small SSD. I didn't want to reinstall etc.
I read around on the internet that you could use Clonezilla in image mode but I didn't want to do that for several reasons. One was that I needed another external HDD to store the images. The other was that I wasn't sure if it would copy the partition MAP correctly as I use GPT.
What I decided to do was burn a live CD of Parted Magic (awesome CD). From this CD I could run many Utilities such as GParted and Clonezilla from the one disc (saves time).
My partitions were as follows (around about): GPT Boot = 1MB, Root = 60GB, Unallocated = 40GB, Home = 380GB and SWAP = 10GB.
Using GParted I reduced the size of the Root partition to 20GB as I was using only 6GB (used to windows where applications were huge ). This increased the unallocated space 80GB (this was far another OS that I deleted).
Then I put the new SSD into a USB caddy, used GParted to create the same size 1mb boot partition (needed for GPT disks), created the same size root partition and similar size home partition. The partitions were just created to the same size, no mounting etc.
Then started Clonezilla and selected the device to device option. Then selected the part to local part option. This means that I can directly copy one partition to the same newly created one on the SSD. Pick the local source partition to clone, then select the target partition on the SSD.
I picked the 1mb boot as source and the 1mb partition on the SSD as target. Then I confirmed the settings etc and let Clonezilla do it's thing, I then done the same for the root.
I went to GParted and checked they were the same as the HDD (amount of storage used etc). Then I selected the 1mb partition on the SSD and set it's flag to bios_grub (required for a GPT disc).
I rebooted with the SSD attached in the caddy to see if it booted from the SSD. It DID I was expecting it to ask for the /home partition but it mounted the home on the internal HDD while using the root on the external SSD. Then I went back to parted magic and done the same for the home partition.
Hope this helps some people!