- Clonezilla
- uEFI boot mode (GPT)
- Legacy boot mode (MBR)
- MS Windows Method A: Manual
- MS Windows Method B: Rufus USB Creator
- MS Windows Method C: Unetbootin
- Windows Method D: LinuxLive USB Creator
- USB setup with GNU/Linux
- uEFI boot mode (GPT)
- Legacy boot mode (MBR)
- GNU/Linux Method A: Manual
- GNU/Linux Method B: Unetbootin
- USB setup with MacOS
- MacOS Method: balenaEtcher
- Создание резервной копии с помощью Clonezilla
- Создание резервной копии с помощью Clonezilla
- Lazy Geek -:)
- Part-1: Creation of Hard drive image using Clonezilla
Clonezilla
Depends on the boot mode for the machine you want to boot with the USB flash drive, choose one of the following methods to setup Clonezilla Live on your USB flash drive using MS Windows:
uEFI boot mode (GPT)
- Download the amd64 (x86-64) version of Clonezilla Live zip file.
- If you already have a partition of at least 500 MB in size on your USB flash drive formatted with a FAT (not NTFS) file system then skip to the next step (3).
Otherwise create at least a 500 MB partition on your USB flash drive and format it with a FAT16/FAT32 (not NTFS) file system. - Use unzip tool, e.g., 7-zip, to extract all the contents of the zip file to the FAT16/FAT32 partition on your USB flash drive. Make sure you have extracted all the directories and files, including the «.disk» dir and the files under it. Keep the directory architecture, for example, file «GPL» should be in the USB flash drive’s top directory (e.g. G:\GPL).
- That’s all. You can boot this USB flash drive on a uEFI boot mode machine.
Legacy boot mode (MBR)
Choose one of the following methods to setup Clonezilla Live for legacy boot mode on your USB flash drive using MS Windows:
NOTE: If you use FAT file system in one of the above methods, the installed USB flash drive should be able to boot both on uEFI and legacy boot modes.
MS Windows Method A: Manual
WARNING! DO NOT RUN makeboot.bat from your local hard drive!
Doing so could cause your MS windows not to boot.
- Download the Clonezilla Live zip file.
- If you already have a partition of at least 500 MB in size on your USB flash drive formatted with a FAT or NTFS file system then skip to the next step (3).
Otherwise create at least a 500 MB partition on your USB flash drive and format it with a FAT16/FAT32 or NTFS file system. - Extract all the contents of the zip file to the FAT16/FAT32 or NTFS partition on your USB flash drive. Keep the directory architecture, for example, file «GPL» should be in the USB flash drive’s top directory (e.g. G:\GPL).
- Browse to your USB flash drive and as an administrator , (On the USB flash key, create a shortcut to the makeboot.bat file. Then right-clic on the shortcut, Properties, Advanced and check «Run as administrator».), click the makeboot.bat in the dir utils\win32\ (for 32-bit Windows) or makeboot64.bat in the dir utils\win64\ (for 64-bit Windows). WARNING! Makeboot.bat must be run from your USB flash drive.
If you are an experienced user, open a command prompt as Administrator, navigate to the root of the USB flash key and enter \utils\win32\makeboot or \utils\win64\makeboot, depending on the flavor of Windows you are running. - Follow the on-screen instructions.
(PS: The above description is modified from: http://www.pendrivelinux.com/2007/01/02/all-in-one-usb-dsl. Thanks to PDLA from http://pendrivelinux.com)
MS Windows Method B: Rufus USB Creator
- If you already have Rufus installed on your computer then skip to the next step (2).
Otherwise download and install Rufus on your MS Windows computer. - Download the Clonezilla Live iso file.
- From MS Windows, run the Rufus program and follow the instructions in the GUI to install Clonezilla Live on your USB flash drive.
MS Windows Method C: Unetbootin
- If you already have Unetbootin installed on your computer then skip to the next step (2).
Otherwise download and install Unetbootin on your MS Windows computer. - Download the Clonezilla Live iso file.
- From MS Windows, run the Unetbootin program and follow the instructions in the GUI to install Clonezilla Live on your USB flash drive.
NOTE: The boot menu created by Unetbootin is not exactly the same as the boot menu created in method A. Therefore it is recommended to use method A.
Windows Method D: LinuxLive USB Creator
- If you already have LinuxLive USB Creator installed on your computer then skip to the next step (2).
Otherwise download and install LinuxLive USB Creator on your MS Windows computer. - Download the Clonezilla Live iso file.
- From Windows, install then run the LinuxLive USB Creator program and follow the instructions in the GUI to install Clonezilla Live on your USB flash drive.
USB setup with GNU/Linux
Depends on the boot mode for the machine you want to boot with the USB flash drive, choose one of the following methods to setup Clonezilla Live on your USB flash drive using GNU/Linux:
uEFI boot mode (GPT)
- Download the amd64 (x86-64) version of Clonezilla Live zip file.
- If you already have a partition of at least 500 MB in size on your USB flash drive formatted with a FAT (not NTFS) file system then skip to the next step (3).
Otherwise create at least a 500 MB partition on your USB flash drive and format it with a FAT16/FAT32 (not NTFS) file system. - Mount the FAT16/FAT32 file system of your USB flash drive, e.g., assuming the FAT16/FAT32 file system of your USB flash drive is /dev/sdg1,
If you have no pmount, you can run «sudo apt install pmount» to install it. Then unzip the clonezilla live amd64 zip file to the FAT16/FAT32 partition on your USB flash drive, e.g.,
# unzip clonezilla-live-2.7.3-21-amd64.zip -d /media/disk/
Legacy boot mode (MBR)
Choose one of the following methods to setup Clonezilla Live on your USB flash drive using GNU/Linux:
NOTE: If you use FAT file system in one of the above methods, the installed USB flash drive should be able to boot both on uEFI and legacy boot modes.
GNU/Linux Method A: Manual
WARNING! Confirm you have the correct path name before executing commands!
Failure to do so could cause loss of data or your GNU/Linux not to boot.
/dev/sdd is a device path name
/dev/sdd1 is a partition path name
- Download the Clonezilla Live zip file.
- If you already have a FAT or NTFS partition on your USB flash drive then skip to the next step (3).
Otherwise prepare at least a 500 MB partition formatted with either a FAT16/FAT32 or NTFS file system.
If the USB flash drive or USB hard drive does not have any partition, you can use a partitioning tool (e.g. gparted, parted, fdisk, cfdisk or sfdisk) to create a partition with a size of 500 MB or more.
Here we assume your USB flash drive or USB hard drive is /dev/sdd ( You have to comfirm your device name, since it’s _NOT_ always /dev/sdd ) on your GNU/Linux, so the partition table is like:
# fdisk -l /dev/sdd Disk /dev/sdd: 12.8 GB, 12884901888 bytes 15 heads, 63 sectors/track, 26630 cylinders Units = cylinders of 945 * 512 = 483840 bytes Disk identifier: 0x000c2aa7 Device Boot Start End Blocks Id System /dev/sdd1 * 1 26630 12582643+ b W95 FAT32
Then format the partition as FAT with a command such as «mkfs.vfat -F 32 /dev/sdd1»
WARNING! Executing the mkfs.vfat command on the wrong partition or device could cause your GNU/Linux not to boot. Be sure to confirm the command before you run it.
# mkfs.vfat -F 32 /dev/sdd1 mkfs.vfat 2.11 (12 Mar 2005)
TIP: If your USB flash drive or USB hard drive is not able to boot, check the following:
- Ensure that your USB flash drive contains at least one FAT or NTFS partition.
- Ensure that the partition is marked as «bootable» in the partition table.
- Ensure that the partition starts on a cylinder boundary.
For the first partition this is usually sector 63.
GNU/Linux Method B: Unetbootin
- If you already have Unetbootin installed on your computer then skip to step 2.
Otherwise install Unetbootin on your GNU/Linux computer. - Download the Clonezilla Live iso file.
- From GNU/Linux, run the Unetbootin program and follow the instructions in the GUI to install Clonezilla Live on your USB flash drive.
NOTE: The boot menu created by Unetbootin is not exactly the same as the boot menu created in method A. Therefore it is recommended to use method A.
USB setup with MacOS
The following method can be used to setup Clonezilla Live on your USB flash drive using MacOS:
MacOS Method: balenaEtcher
- Download the Clonezilla Live iso file.
- Insert a USB flash drive on the Mac machine.
- Erase it using the standard Mac Disk Utility (exFAT works fine).
- Download balenaEtcher for MacOS, then follow its document to burn the image to the USB flash drive.
- Eject the USB drive. Thanks to Hans Palm for providing this info.
Создание резервной копии с помощью Clonezilla

В данной статье показано как создать резервную копию (образ) жесткого диска с помощью функционального дистрибутива на основе linux — Clonezilla. Скачать iso образ можно c официального сайта CloneZilla
Записать его на флеш-накопитель можно с помощью утилиты UNetbootin.
Создание резервной копии с помощью Clonezilla
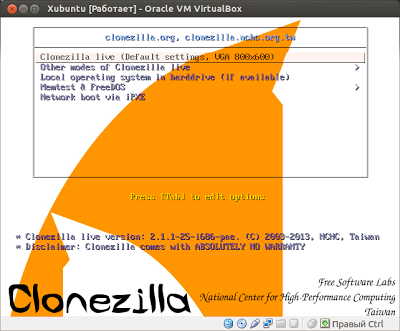
Создав загрузочный флеш-накопитель с Clonezilla, загружаемся с него (нажатие f+12 при загрузке или выставление приоритета загрузки в Bios).
Перед нами откроется следующее окно:
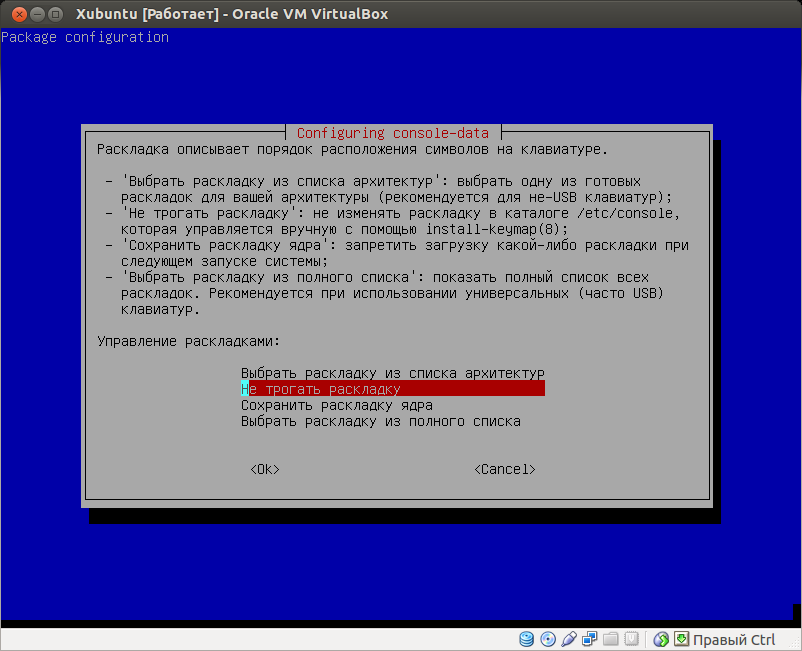
Выбираем русский язык, затем Затем выбираем «Не трогать раскладку»:

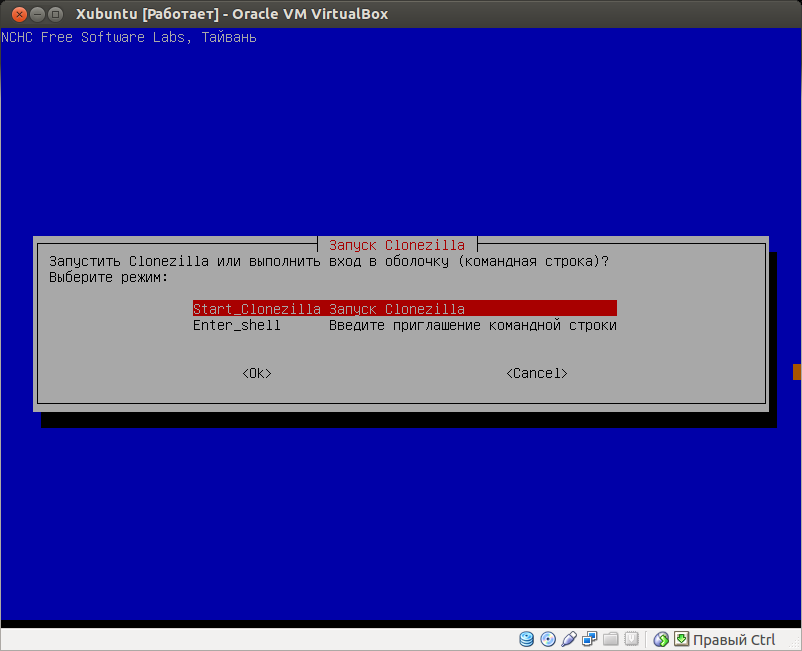
В появившемся окошке выбираем «Запустить Clonezilla»:
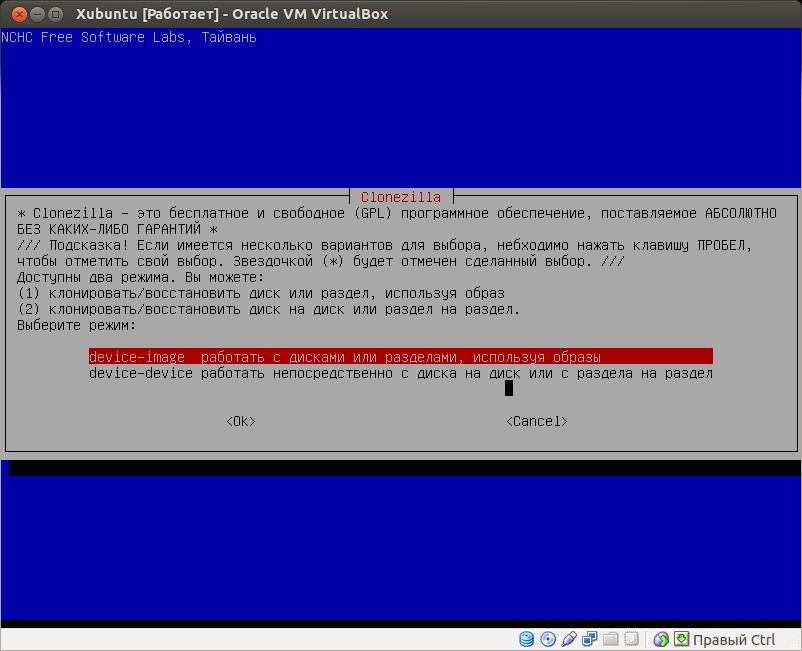
Затем выбираем device-image, для работы с дисками и разделами:
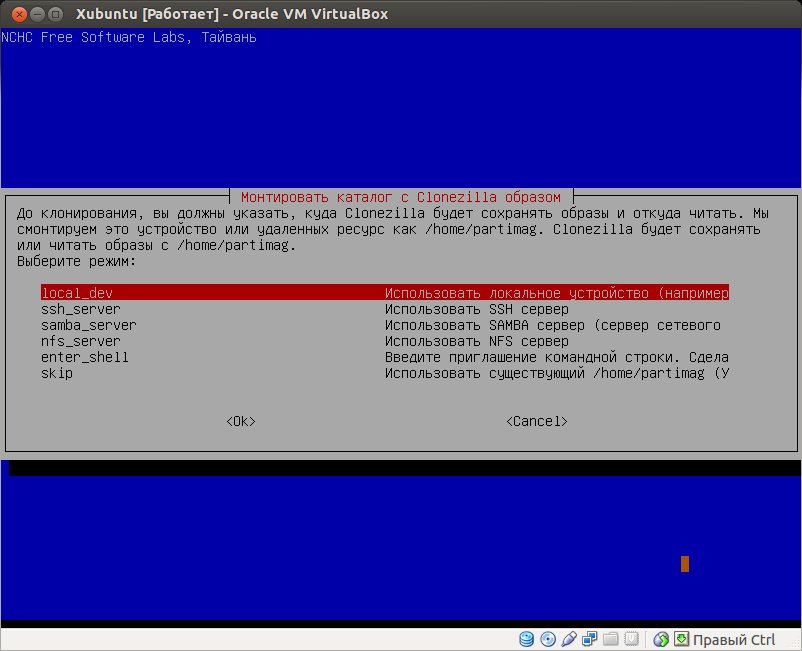
Затем выбираем local-dev, так как будем сохранять на флешку.
Стоит выбирать этот пункт также, если хотите сохранить на внешний или локальный жесткий диск:
Далее выбираем жесткий диск или другой съёмный носитель, на который сохраним резервную копию, в данном случае используется флеш накопитель:
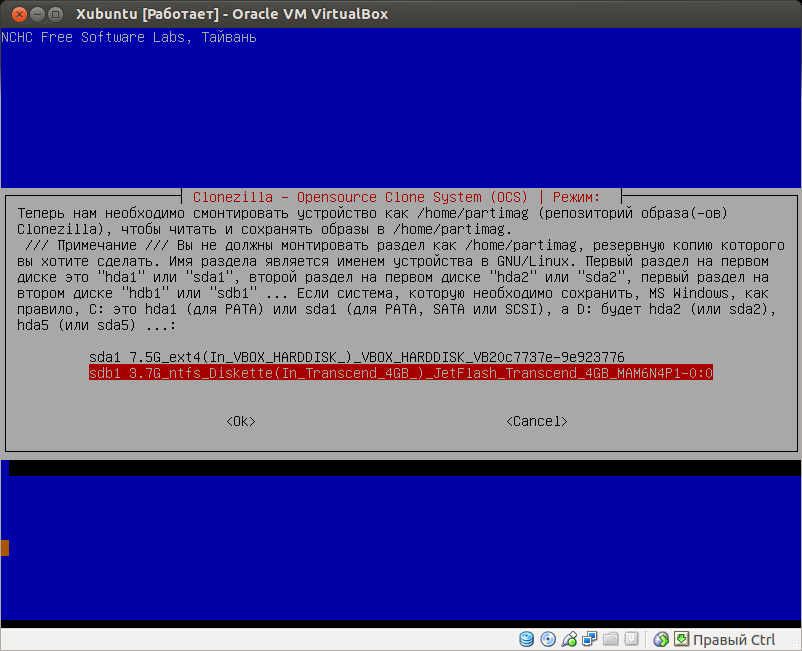
Выбираем каталог на носителе, в котором будем сохранять снимаемый образ:

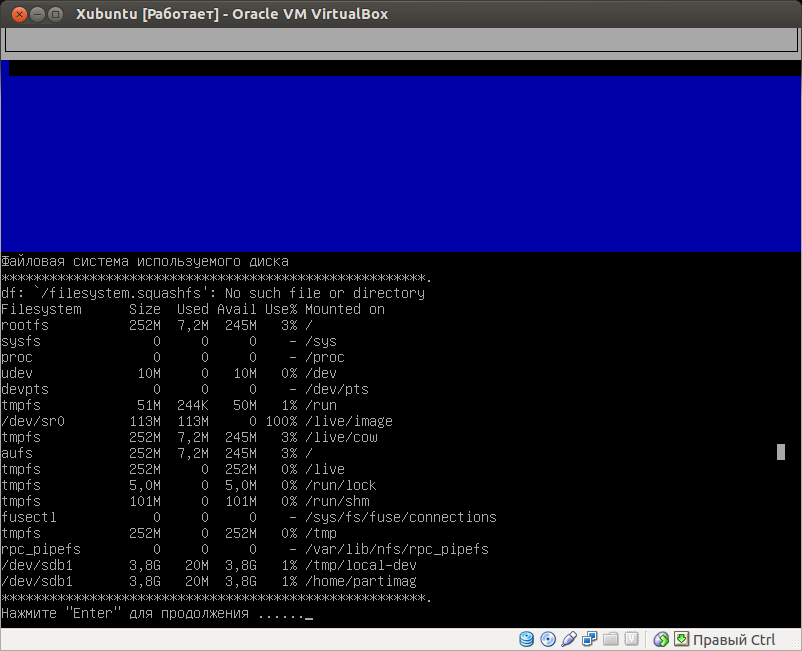
Затем пойдет проверка. Когда она закончится, просто нажмите «enter»:
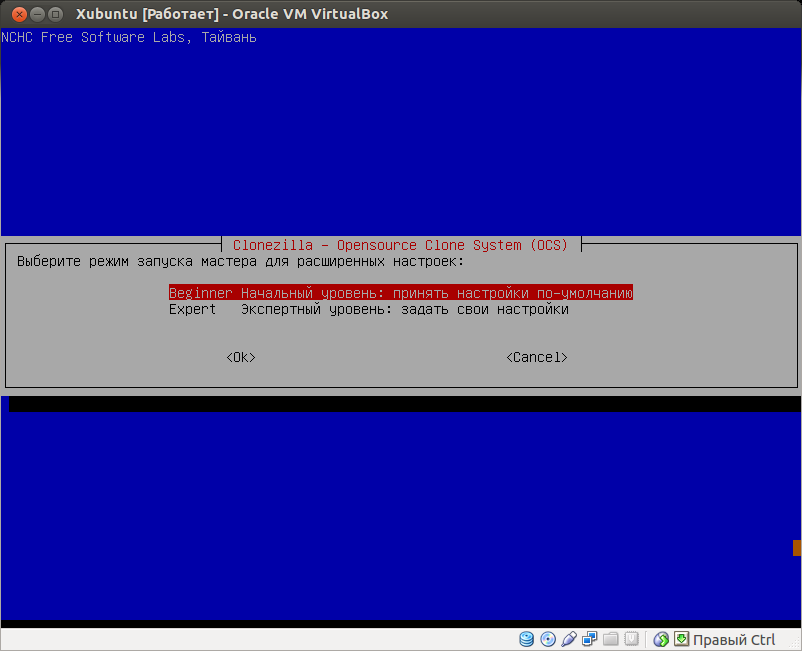
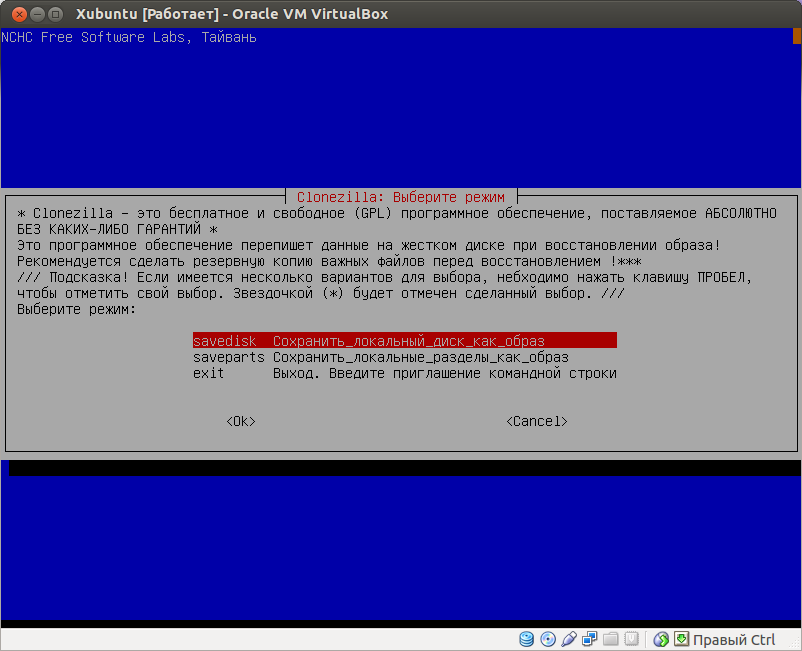
Теперь откроется «Выбор режима настроек», выбираем режим «Beginner» (новичка):
Выбираем режим сохранения образа, где:
savedisk — сохранить диск полностью,
saveparts — сохранить отдельные разделы
(в нашем случае выбран savedisk, так как делаем полную копию диска):
Ввод имени образа и для хорошей ориентации указываем дату создания:

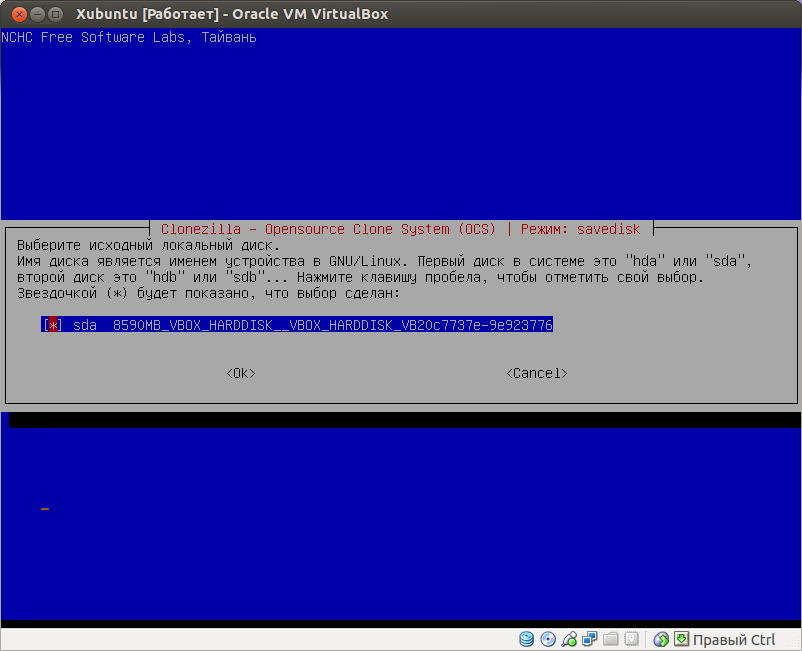
Далее выбираем диск, образ которого собираемся сделать:
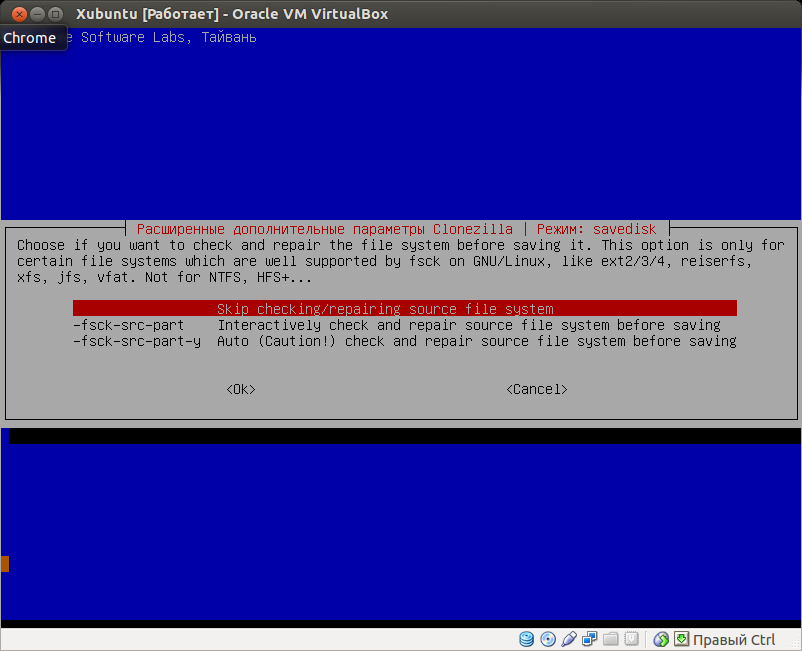
Отметка будем ли проверять диск перед созданием образа:
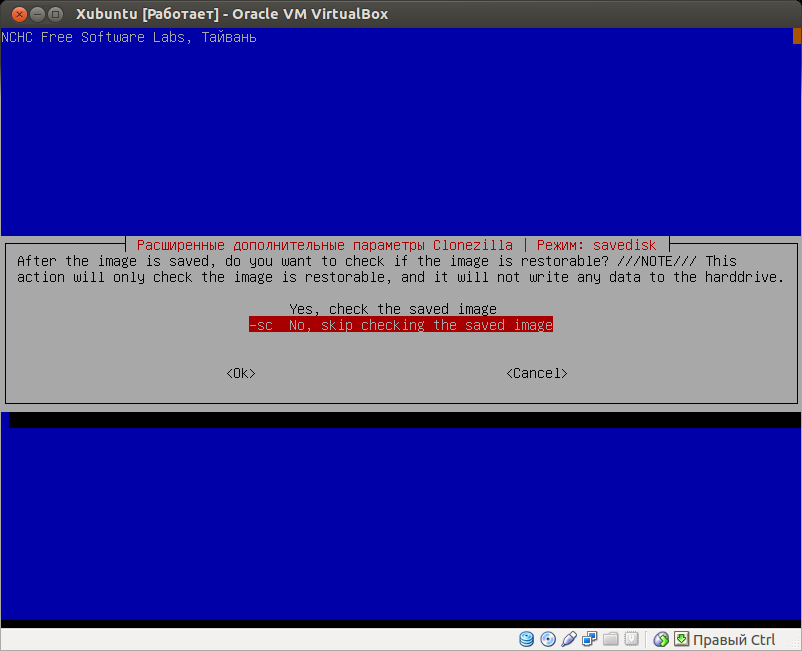
Отметка будем ли проверять образ после завершения процесса клонирования:
Далее отвечаем на пару вопросов, нажатием «y» и «Enter»:
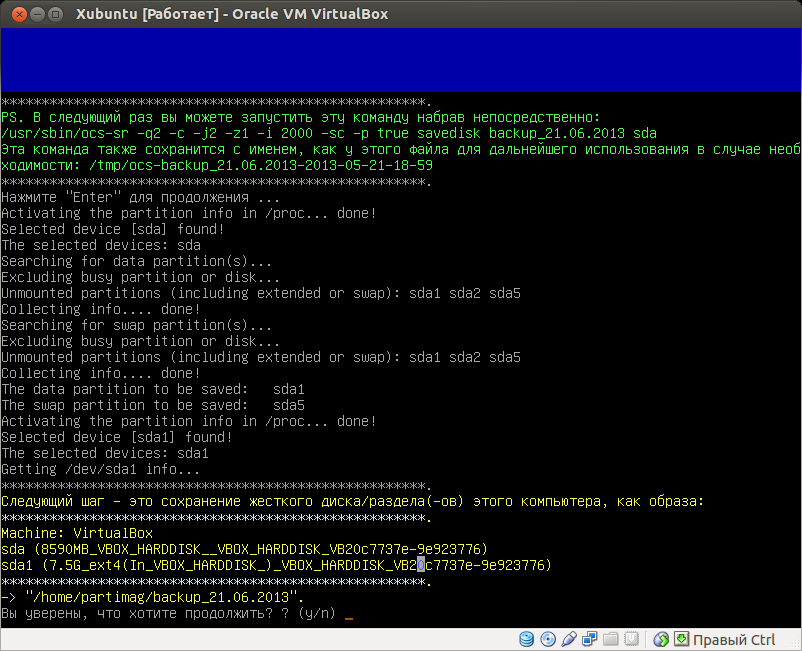
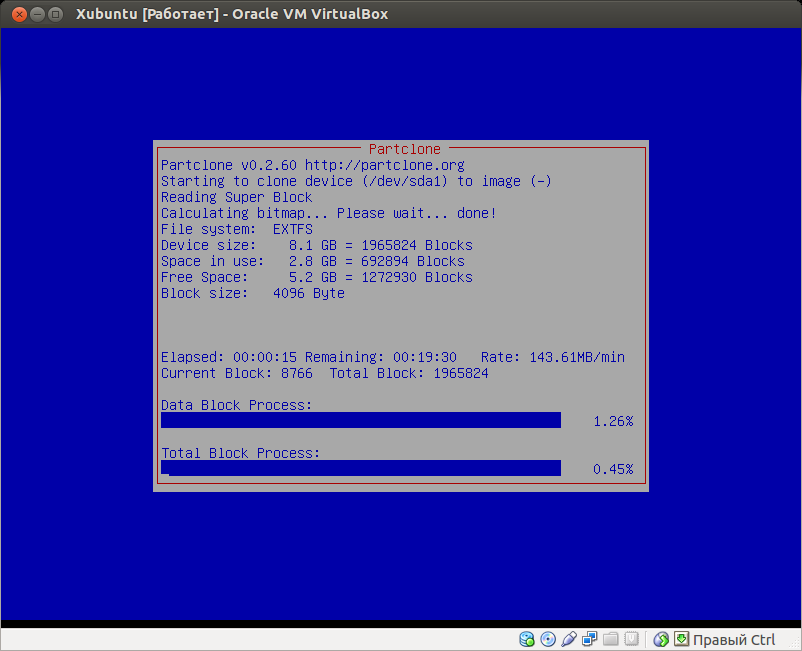
Собственно сам процесс создания образа диска:
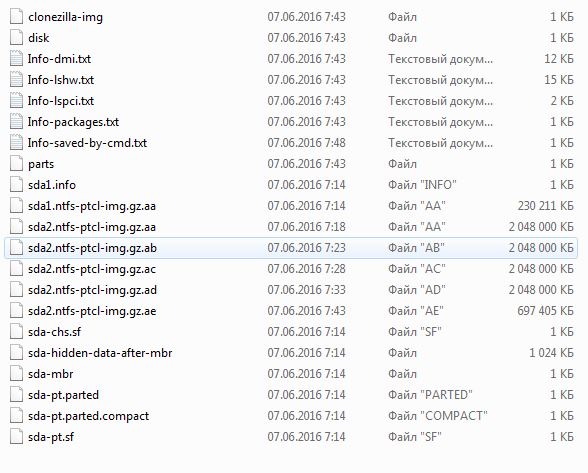
После завершения процесса клонирования, в папке указанной в процессе настройки, будет список файлов, данную резервную копию вы можете восстановить на любом необходимом (но совместимом) оборудовании.
В следующей статье будет подробно показано, как восстановить образ диска сделанного при помощи Clonezilla.
Lazy Geek -:)
Part-1: Creation of Hard drive image using Clonezilla

The scenario is really simple, in which I want to backup my Ubuntu server using the “ CloneZilla Live ” and also want to store it on another server which has an ip address of 192.168.179.141. If you want to learn more about CloneZilla, please visit this link.
Let’s start the tutorial by inserting the CloneZilla Live CD into the server that you want to backup and boot from it.
1) At first, CloneZilla Live comes up with this screen just press ENTER :

2) Next, select your desired language:

3) If you are using US keymap, just select the default option “ Don’t touch keymap ” and press ENTER :

4) Select “ Start Clonezilla ” and press ENTER :

5) Select “ device-image ” and press ENTER :

6) Here we’ll select that where we want to store the hard drive image. In my case, I have selected SSH server :

7) Here, it will ask the network setting (I have selected dhcp ):

8) Then it will ask the SSH server address (In my case, it is 192.168.179.141):

9) Next ssh port (default is 22):

10) User account on SSH Server that is allowed to write/read on the server:

11) Specify the directory on SSH Server, where CloneZilla image will be saved(In my case, it is /home/arbab/clonezilla ):

13)and then enter your SSH password:

14) Next screen will confirm the successfully mount. Press “ Enter “:

15) Choose “ Beginner ” then hit Enter :

16) Select “ savedisk ” because, we want to create an image of the full hard drive:

17) Input the name that you want to give to your image (default is just fine for me):

18) Choose the hard drive for which you want to create an image:

19) Select an option, if you want to check & repair the file system before saving (I am going with default option, which is skip):

20) Select this option, if you want to check the saved image is restorable:

21) Hit Enter :

22) Then press “ y ” and Hit Enter to start the image creation process:

After this, image creation process will start (please be patient, this may take some time):

23) After the successful image creation, press ENTER :

24) Select your desired option to Poweroff/Reboot etc the CloneZilla Live system:

Login to SSH Server and verify the disk image:

Please Remember me in your prayers!