- Chapter 8. Cloning virtual machines
- 8.1. How cloning virtual machines works
- 8.2. Creating virtual machine templates
- 8.2.1. Creating a virtual machine template using virt-sysprep
- 8.2.2. Creating a virtual machine template manually
- 8.3. Cloning a virtual machine using the command-line interface
- 8.4. Cloning a virtual machine using the web console
- How to Clone Virtual Machine in VirtualBox
- Types of Cloning in VirtualBox
- Cloning a VirtualBox Virtual Machine
Chapter 8. Cloning virtual machines
To quickly create a new virtual machine (VM) with a specific set of properties, you can clone an existing VM.
Cloning creates a new VM that uses its own disk image for storage, but most of the clone’s configuration and stored data is identical to the source VM. This makes it possible to prepare multiple VMs optimized for a certain task without the need to optimize each VM individually.
8.1. How cloning virtual machines works
Cloning a virtual machine (VM) copies the XML configuration of the source VM and its disk images, and makes adjustments to the configurations to ensure the uniqueness of the new VM. This includes changing the name of the VM and ensuring it uses the disk image clones. Nevertheless, the data stored on the clone’s virtual disks is identical to the source VM.
This process is faster than creating a new VM and installing it with a guest operating system, and can be used to rapidly generate VMs with a specific configuration and content.
If you are planning to create multiple clones of a VM, first create a VM template that does not contain:
- Unique settings, such as persistent network MAC configuration, which can prevent the clones from working correctly.
- Sensitive data, such as SSH keys and password files.
Additional resources
8.2. Creating virtual machine templates
To create multiple virtual machine (VM) clones that work correctly, you can remove information and configurations that are unique to a source VM, such as SSH keys or persistent network MAC configuration. This creates a VM template , which you can use to easily and safely create VM clones.
You can create VM templates using the virt-sysprep utility or you can create them manually based on your requirements.
8.2.1. Creating a virtual machine template using virt-sysprep
To create a cloning template from an existing virtual machine (VM), you can use the virt-sysprep utility. This removes certain configurations that might cause the clone to work incorrectly, such as specific network settings or system registration metadata. As a result, virt-sysprep makes creating clones of the VM more efficient, and ensures that the clones work more reliably.
Prerequisites
- The libguestfs-tools-c package, which contains the virt-sysprep utility, is installed on your host:
# yum install libguestfs-tools-c # ls -la /var/lib/libvirt/images -rw-------. 1 root root 9665380352 Jul 23 14:50 a-really-important-vm.qcow2 -rw-------. 1 root root 8591507456 Jul 26 2017 an-actual-vm-that-i-use.qcow2 -rw-------. 1 root root 8591507456 Jul 26 2017 totally-not-a-fake-vm.qcow2 -rw-------. 1 root root 10739318784 Sep 20 17:57 another-vm-example.qcow2 - Ensure you are logged in as the owner of the VM’s disk image:
# whoami root # cp /var/lib/libvirt/images/a-really-important-vm.qcow2 /var/lib/libvirt/images/a-really-important-vm-original.qcow2 # virt-sysprep -a /var/lib/libvirt/images/a-really-important-vm.qcow2 [ 0.0] Examining the guest . [ 7.3] Performing "abrt-data" . [ 7.3] Performing "backup-files" . [ 9.6] Performing "bash-history" . [ 9.6] Performing "blkid-tab" . [. ] Verification
- To confirm that the process was successful, compare the modified disk image to the original one. The following example shows a successful creation of a template:
# virt-diff -a /var/lib/libvirt/images/a-really-important-vm-orig.qcow2 -A /var/lib/libvirt/images/a-really-important-vm.qcow2 - - 0644 1001 /etc/group- - - 0000 797 /etc/gshadow- = - 0444 33 /etc/machine-id [. ] - - 0600 409 /home/username/.bash_history - d 0700 6 /home/username/.ssh - - 0600 868 /root/.bash_history [. ] Additional resources
8.2.2. Creating a virtual machine template manually
To create a template from an existing virtual machine (VM), you can manually reset or unconfigure a guest VM to prepare it for cloning.
Prerequisites
- Ensure that you know the location of the disk image for the source VM and are the owner of the VM’s disk image file. Note that disk images for VMs created in the system connection of libvirt are by default located in the /var/lib/libvirt/images directory and owned by the root user:
# ls -la /var/lib/libvirt/images -rw-------. 1 root root 9665380352 Jul 23 14:50 a-really-important-vm.qcow2 -rw-------. 1 root root 8591507456 Jul 26 2017 an-actual-vm-that-i-use.qcow2 -rw-------. 1 root root 8591507456 Jul 26 2017 totally-not-a-fake-vm.qcow2 -rw-------. 1 root root 10739318784 Sep 20 17:57 another-vm-example.qcow2 - Configure the VM for cloning:
- Install any software needed on the clone.
- Configure any non-unique settings for the operating system.
- Configure any non-unique application settings.
# rm -f /etc/udev/rules.d/70-persistent-net.rules DEVICE=eth[x] BOOTPROTO=none ONBOOT=yes #NETWORK=10.0.1.0 or non-desired settings, such as UUID.* DEVICE=eth[x] BOOTPROTO=dhcp ONBOOT=yes - /etc/sysconfig/networking/devices/ifcfg-eth[x]
- /etc/sysconfig/networking/profiles/default/ifcfg-eth[x]
If you had used NetworkManager or any special settings with the VM, ensure that any additional unique information is removed from the ifcfg scripts.
# rm /etc/sysconfig/rhn/systemid # subscription-manager unsubscribe --all # subscription-manager unregister # subscription-manager clean # subscription-manager clean The original RHSM profile remains in the Portal along with your ID code. Use the following command to reactivate your RHSM registration on the VM after it is cloned:
#subscription-manager register --consumerid=71rd64fx-6216-4409-bf3a-e4b7c7bd8ac9 # rm -rf /etc/ssh/ssh_host_example # rm /etc/lvm/devices/system.devices # rm ~/.config/gnome-initial-setup-done The wizard that runs on the next boot depends on the configurations that have been removed from the VM. In addition, on the first boot of the clone, it is recommended that you change the hostname.
8.3. Cloning a virtual machine using the command-line interface
To quickly create a new virtual machine (VM) with a specific set of properties, for example for testing purposes, you can clone an existing VM. To do so using the CLI, follow the instructions below.
Prerequisites
- The source VM is shut down.
- Ensure that there is sufficient disk space to store the cloned disk images.
- Optional: When creating multiple VM clones, remove unique data and settings from the source VM to ensure the cloned VMs work properly. For instructions, see Creating virtual machine templates.
- Use the virt-clone utility with options that are appropriate for your environment and use case. Sample use cases
- The following command clones a local VM named doppelganger and creates the doppelganger-clone VM. It also creates the doppelganger-clone.qcow2 disk image in the same location as the disk image of the original VM, and with the same data:
# virt-clone --original doppelganger --auto-clone Allocating 'doppelganger-clone.qcow2' | 50.0 GB 00:05:37 Clone 'doppelganger-clone' created successfully. # virt-clone --original geminus1 --name geminus2 --file /var/lib/libvirt/images/disk1.qcow2 --file /var/lib/libvirt/images/disk2.qcow2 Allocating 'disk1-clone.qcow2' | 78.0 GB 00:05:37 Allocating 'disk2-clone.qcow2' | 80.0 GB 00:05:37 Clone 'geminus2' created successfully. # virsh migrate --offline --persistent geminus2 qemu+ssh://root@10.0.0.1/system root@10.0.0.1's password: # scp /var/lib/libvirt/images/disk1-clone.qcow2 root@10.0.0.1/user@remote_host.com://var/lib/libvirt/images/ # scp /var/lib/libvirt/images/disk2-clone.qcow2 root@10.0.0.1/user@remote_host.com://var/lib/libvirt/images/
Verification
To verify the VM has been successfully cloned and is working correctly:
# virsh list --all Id Name State --------------------------------------- - doppelganger shut off - doppelganger-clone shut off # virsh start doppelganger-clone Domain 'doppelganger-clone' started Additional resources
8.4. Cloning a virtual machine using the web console
To quickly create new virtual machines (VMs) with a specific set of properties, you can clone a VM that you had previously configured. The following instructions explain how to do so using the web console.
Cloning a VM also clones the disks associated with that VM.
Prerequisites
- In the Virtual Machines interface of the web console, click the Menu button ⋮ of the VM that you want to clone. A drop down menu appears with controls for various VM operations.
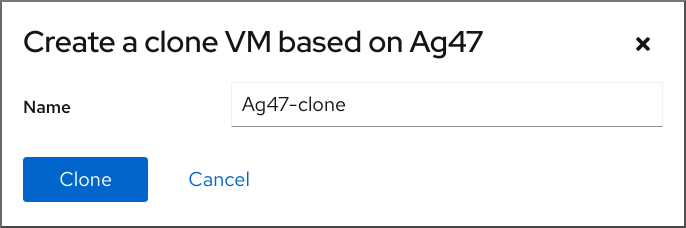
- Click Clone . The Create a clone VM dialog appears.
Verification
How to Clone Virtual Machine in VirtualBox
Installing a fresh operating system on VirtualBox is easy and can be done in a short time. After that, there are so many steps like installing packages, hardening the OS, updating drivers, configuring development environments, etc.. have to be done.
This is ok if you have just one virtual machine to work with. What if you need to repeat the same procedure for 5, 10, or 15 more virtual machines? Do you think it is easy to set up everything manually for all the virtual machines? It is a time-consuming task, right? This is where the cloning process comes into play.
Cloning is a process where your disk images from one machine will be copied to spin up a new Guest VM.
Types of Cloning in VirtualBox
There are two types of cloning in VirtualBox.
- Full Clone – In this mode, your existing disk image will be copied to a new location and a clone will be created. Your new disk will not be dependent on the source disk from where it is cloned from.
- Linked Clone – In this mode, a differential image is created and the parent disk will be your source image disk. If you remove the parent disk then cloned machine will not work.
Note: The time of cloning a virtual machine relies on the size and the number of connected disk images.
Cloning a VirtualBox Virtual Machine
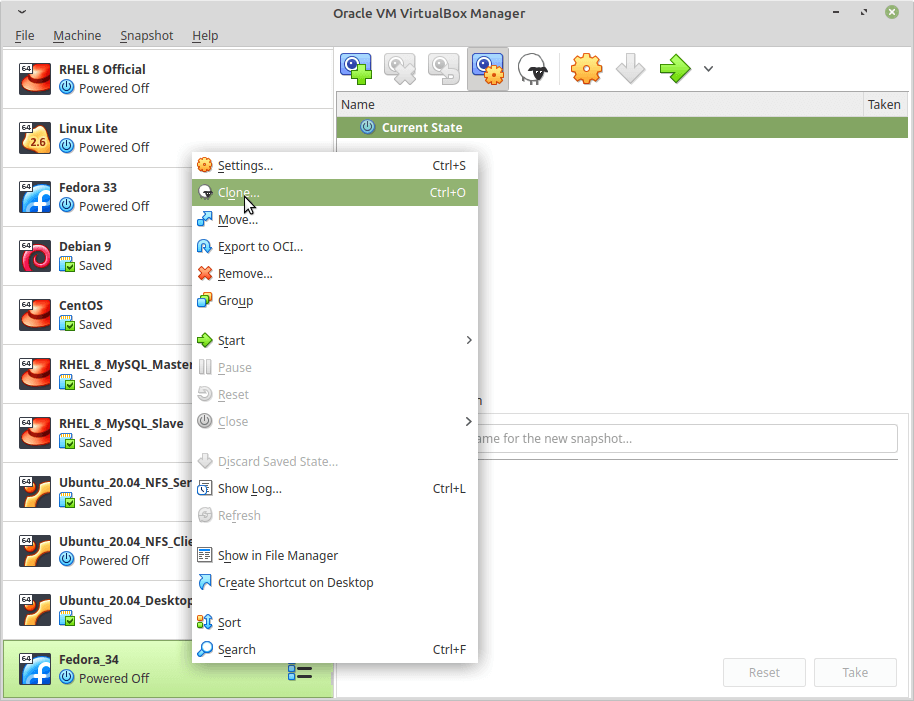
Creating a clone is a very simple process. Open VirtualBox Manager, choose the virtual machine to be cloned and right-click on the VM, and choose option clone. The cloning option will be disabled if VM is in a running state so make sure VM is turned off.
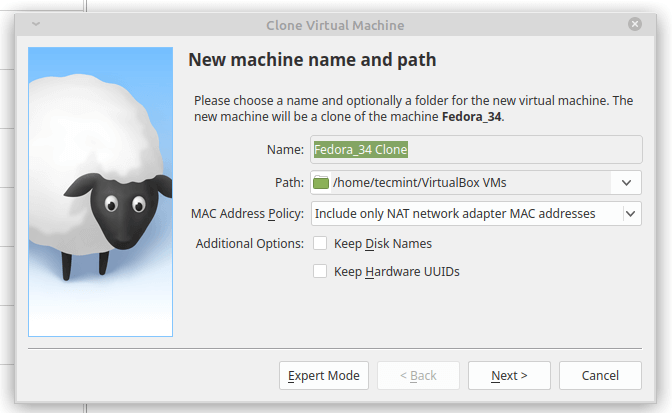
Once you initiate the clone, click on ‘Expert Mode‘ and there are few parameters we have to configure. Initially, we will do a full clone.
- Name: Name of your VM.
- Path: Storage location for your VM.
- Clone type: Full Clone.
- Snapshots: There are two snapshot options that specify whether to take a snapshot of the current machine state or everything. I don’t have any snapshot configured so I am choosing “Current Machine State“.
- MAC Address Policy: when cloning you have the option to stick with the same MAC address or create a new one for your network interface. It is advisable to create a new one.
- Keep Disk Names, Hardware UUIDs: This will retain the same Disk name and hardware UUID during cloning.

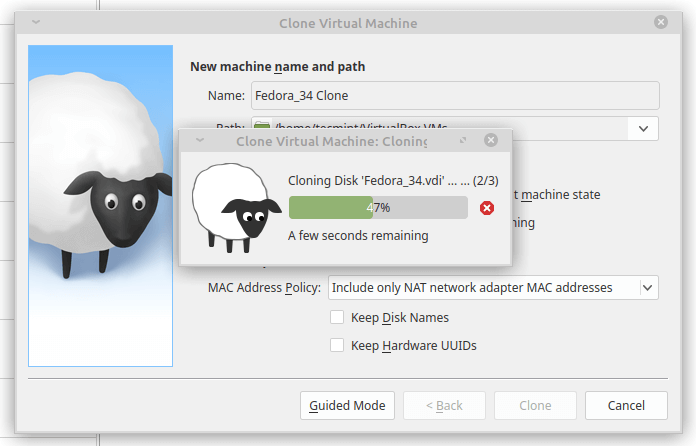
Once you have filled all the necessary parameters and press clone you will see cloning will be started.
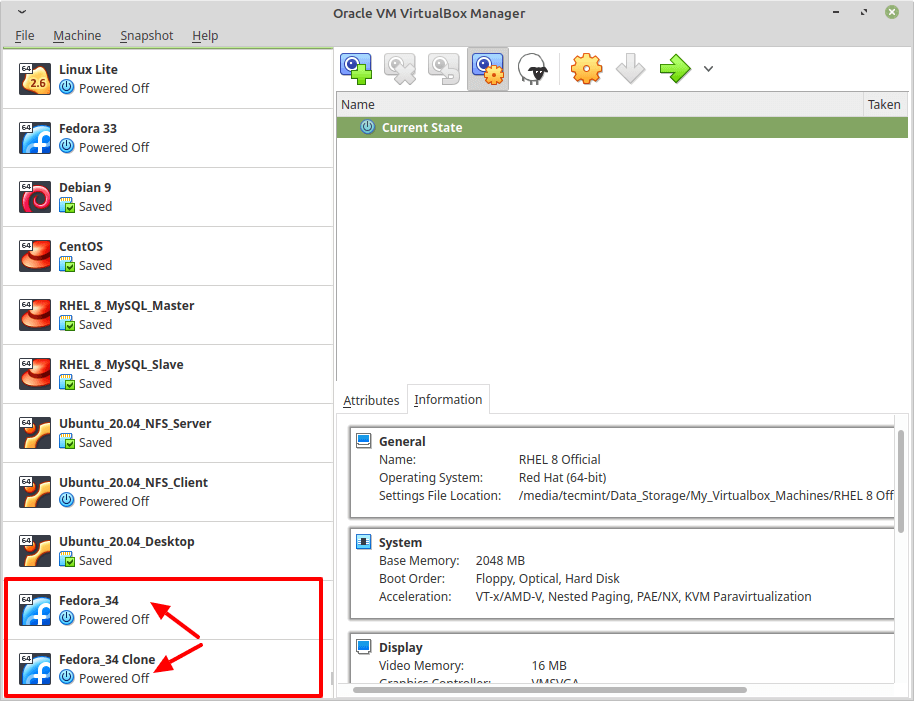
Once the cloning is completed your cloned image will be automatically displayed in the Virtualbox Manager.
In the next article, we will take a look at Importing and Exporting virtual machines in VirtualBox.