- cloudflared (DoH)
- Configuring DNS -Over- HTTPS 
- Installing cloudflared 
- AMD64 architecture (most devices)
- armhf architecture (32-bit Raspberry Pi)
- arm64 architecture (64-bit Raspberry Pi)
- cloudflared archive page
- Configuring cloudflared to run on startup
- If you configured cloudflared via service install 
- Automating Cloudflared Updates
- Uninstalling cloudflared 
- If installed the manual way
- If installed with cloudflare service install 
- aessing / install-Cloudflared.sh
- DNS-Over-HTTPS on Pi-hole (cloudflared setup on Ubuntu)
cloudflared (DoH)
DNS -Over- HTTPS is a protocol for performing DNS lookups via the same protocol you use to browse the web securely: HTTPS .
With standard DNS , requests are sent in plain-text, with no method to detect tampering or misbehavior. This means that not only can a malicious actor look at all the DNS requests you are making (and therefore what websites you are visiting), they can also tamper with the response and redirect your device to resources in their control (such as a fake login page for internet banking).
DNS -Over- HTTPS prevents this by using standard HTTPS requests to retrieve DNS information. This means that the connection from the device to the DNS server is secure and can not easily be snooped, monitored, tampered with or blocked. It is worth noting, however, that the upstream DNS -Over- HTTPS provider will still have this ability.
Configuring DNS -Over- HTTPS 
Along with releasing their DNS service 1.1.1.1, Cloudflare implemented DNS -Over- HTTPS proxy functionality into one of their tools: cloudflared .
In the following sections, we will be covering how to install and configure this tool on Pi-hole .
The cloudflared binary will work with other DoH providers (for example, you could use https://8.8.8.8/dns-query for Google’s DNS -Over- HTTPS service).
Installing cloudflared 
The installation is fairly straightforward, however, be aware of what architecture you are installing on ( amd64 or arm ).
AMD64 architecture (most devices)
Download the installer package, then use apt-get to install the package along with any dependencies. Proceed to run the binary with the -v flag to check it is all working:
# For Debian/Ubuntu wget https://github.com/cloudflare/cloudflared/releases/latest/download/cloudflared-linux-amd64.deb sudo apt-get install ./cloudflared-linux-amd64.deb cloudflared -v # For CentOS/RHEL/Fedora wget https://github.com/cloudflare/cloudflared/releases/latest/download/cloudflared-linux-x86_64.rpm sudo yum install ./cloudflared-linux-x86_64.rpm cloudflared -v armhf architecture (32-bit Raspberry Pi)
Here we are downloading the precompiled binary and copying it to the /usr/local/bin/ directory to allow execution by the cloudflared user. Proceed to run the binary with the -v flag to check it is all working:
wget https://github.com/cloudflare/cloudflared/releases/latest/download/cloudflared-linux-arm sudo mv -f ./cloudflared-linux-arm /usr/local/bin/cloudflared sudo chmod +x /usr/local/bin/cloudflared cloudflared -v Users have reported that the current version of cloudflared produces a segmentation fault error on Raspberry Pi Zero W, Model 1B and 2B. Currently, there is no known workaround.
arm64 architecture (64-bit Raspberry Pi)
wget https://github.com/cloudflare/cloudflared/releases/latest/download/cloudflared-linux-arm64 sudo mv -f ./cloudflared-linux-arm64 /usr/local/bin/cloudflared sudo chmod +x /usr/local/bin/cloudflared cloudflared -v cloudflared archive page
Configuring cloudflared to run on startup
Create a cloudflared user to run the daemon:
sudo useradd -s /usr/sbin/nologin -r -M cloudflared Proceed to create a configuration file for cloudflared :
sudo nano /etc/default/cloudflared Edit configuration file by copying the following in to /etc/default/cloudflared . This file contains the command-line options that get passed to cloudflared on startup:
# Commandline args for cloudflared, using Cloudflare DNS CLOUDFLARED_OPTS=--port 5053 --upstream https://1.1.1.1/dns-query --upstream https://1.0.0.1/dns-query Update the permissions for the configuration file and cloudflared binary to allow access for the cloudflared user:
sudo chown cloudflared:cloudflared /etc/default/cloudflared sudo chown cloudflared:cloudflared /usr/local/bin/cloudflared Then create the systemd script by copying the following into /etc/systemd/system/cloudflared.service . This will control the running of the service and allow it to run on startup:
sudo nano /etc/systemd/system/cloudflared.service [Unit] Description=cloudflared DNS over HTTPS proxy After=syslog.target network-online.target [Service] Type=simple User=cloudflared EnvironmentFile=/etc/default/cloudflared ExecStart=/usr/local/bin/cloudflared proxy-dns $CLOUDFLARED_OPTS Restart=on-failure RestartSec=10 KillMode=process [Install] WantedBy=multi-user.target Enable the systemd service to run on startup, then start the service and check its status:
sudo systemctl enable cloudflared sudo systemctl start cloudflared sudo systemctl status cloudflared Now test that it is working! Run the following dig command, a response should be returned similar to the one below:
pi@raspberrypi:~ $ dig @127.0.0.1 -p 5053 google.com ; > DiG 9.11.5-P4-5.1-Raspbian > @127.0.0.1 -p 5053 google.com ; (1 server found) ;; global options: +cmd ;; Got answer: ;; ->>HEADER Configuring Pi-hole
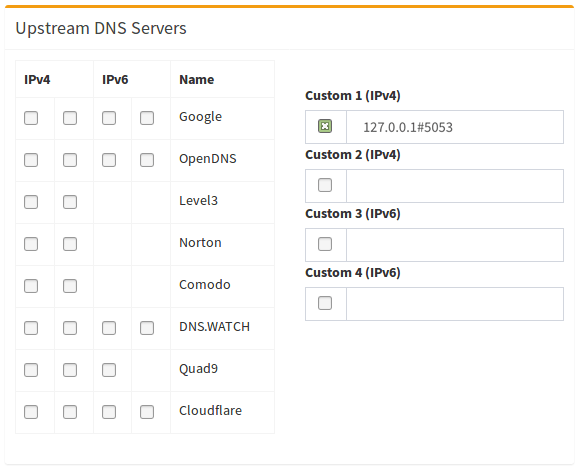
Finally, configure Pi-hole to use the local cloudflared service as the upstream DNS server by specifying 127.0.0.1#5053 as the Custom DNS ( IPv4 ):

(don't forget to hit Return or click on Save )
Updating cloudflared 
The cloudflared tool will not receive updates through the package manager. However, you should keep the program update to date. You can either do this manually, or via a cron script.
The procedure for updating depends on how you configured the cloudflared binary.
If you configured cloudflared with your own service files
If you configured cloudflared manually (by writing a systemd unit yourself), to update the binary you'll simply redownload the binary from the same link, and repeat the install procedure.
wget https://github.com/cloudflare/cloudflared/releases/latest/download/cloudflared-linux-arm sudo systemctl stop cloudflared sudo mv -f ./cloudflared-linux-arm /usr/local/bin/cloudflared sudo chmod +x /usr/local/bin/cloudflared sudo systemctl start cloudflared cloudflared -v sudo systemctl status cloudflared
If you configured cloudflared via service install 
If you configured cloudflared using their service install command, then you can use the built in update command.
sudo cloudflared update sudo systemctl restart cloudflared
Automating Cloudflared Updates
If you want to have the system update cloudflared automatically, simply place the update commands for your configuration method in the file /etc/cron.weekly/cloudflared-updater , and adjust permissions:
sudo chmod +x /etc/cron.weekly/cloudflared-updater sudo chown root:root /etc/cron.weekly/cloudflared-updater
Make sure to add shebang #!/bin/bash in the beginning of /etc/cron.weekly/cloudflared-updater . Otherwise, the command would not executed.
The system will now attempt to update the cloudflared binary automatically, once per week.
Uninstalling cloudflared 
If installed the manual way
sudo systemctl stop cloudflared sudo systemctl disable cloudflared sudo systemctl daemon-reload sudo deluser cloudflared sudo rm /etc/default/cloudflared sudo rm /etc/systemd/system/cloudflared.service sudo rm /usr/local/bin/cloudflared
If installed with cloudflare service install 
sudo cloudflared service uninstall sudo systemctl daemon-reload
After the above, don't forget to change the DNS back to something else in Pi-hole's DNS settings!
aessing / install-Cloudflared.sh
This file contains bidirectional Unicode text that may be interpreted or compiled differently than what appears below. To review, open the file in an editor that reveals hidden Unicode characters. Learn more about bidirectional Unicode characters
#! /bin/bash # ============================================================================= # Install Cloudlflare daemon (cloudflared) on Linux (Ubuntu) - DNS-over-HTTPS # https://developers.cloudflare.com/1.1.1.1/dns-over-https/cloudflared-proxy/ # https://developers.cloudflare.com/argo-tunnel/downloads # ----------------------------------------------------------------------------- # Developer. Andre Essing (https://www.andre-essing.de/) # (https://github.com/aessing) # (https://twitter.com/aessing) # (https://www.linkedin.com/in/aessing/) # ----------------------------------------------------------------------------- # THIS CODE AND INFORMATION ARE PROVIDED "AS IS" WITHOUT WARRANTY OF ANY KIND, # EITHER EXPRESSED OR IMPLIED, INCLUDING BUT NOT LIMITED TO THE IMPLIED # WARRANTIES OF MERCHANTABILITY AND/OR FITNESS FOR A PARTICULAR PURPOSE. # ============================================================================= # Download wget https://bin.equinox.io/c/VdrWdbjqyF/cloudflared-stable-linux-amd64.deb sudo chown _apt:root cloudflared-stable-linux-amd64.deb sudo chmod 700 cloudflared-stable-linux-amd64.deb # Create a user sudo useradd -r -M -s /usr/sbin/nologin -c " Cloudflared user " -U cloudflared sudo passwd -l cloudflared sudo chage -E 0 cloudflared # Install sudo apt-get install ./cloudflared-stable-linux-amd64.deb sudo chown cloudflared:cloudflared /usr/local/bin/cloudflared sudo chmod 750 /usr/local/bin/cloudflared # Configure cloudflared echo " CLOUDFLARED_OPTS=--address 127.0.0.1 --port 5353 --upstream https://1.1.1.2/dns-query --upstream https://1.0.0.2/dns-query " | sudo tee /etc/default/cloudflared sudo chown cloudflared:cloudflared /etc/default/cloudflared sudo chmod 640 /etc/default/cloudflared sudo chmod 755 /usr/local/bin # Create startup script echo ' [Unit] Description=cloudflared DNS over HTTPS proxy After=syslog.target network-online.target [Service] Type=simple User=cloudflared EnvironmentFile=/etc/default/cloudflared ExecStart=/usr/local/bin/cloudflared proxy-dns $CLOUDFLARED_OPTS Restart=on-failure RestartSec=10 KillMode=process [Install] WantedBy=multi-user.target ' | sudo tee /lib/systemd/system/cloudflared.service sudo chmod 644 /lib/systemd/system/cloudflared.service sudo chown root:root /lib/systemd/system/cloudflared.service # Create update script echo ' #!/bin/bash /usr/local/bin/cloudflared update sudo systemctl restart cloudflared ' | sudo tee /etc/cron.daily/cloudflared-updater sudo chmod 755 /etc/cron.daily/cloudflared-updater sudo chown root:root /etc/cron.daily/cloudflared-updater # Enable cloudflared and start sudo systemctl enable cloudflared sudo systemctl start cloudflared sudo systemctl status cloudflared # Clean the kitchen sudo rm -r cloudflared-stable-linux-amd64.deb
DNS-Over-HTTPS on Pi-hole (cloudflared setup on Ubuntu)
I’ve been running Pi-hole with DNS-Over-HTTPS using Cloudflare’s DoH client (cloudflared) for some time now; I followed the guide posted here on the official Pi-hole documentation site. When updating the cloudflared recently, I noticed it displayed some errors when the service tried to start up. After digging around, I found that cloudflared now has an option to install itself as a service whereas the guide I used includes steps for creating the service manually. Thus, I believe this is a simpler way to setup cloudflared as your DNS-Over-HTTPS client for Pi-hole.
Download the cloudflared daemon and install it:
Create a folder and config file for the cloudflared daemon:
Use the following command to instruct cloudflared to install itself as service:
Start the new cloudflared service and check the status:
You should get output similar to the following if successful:
Loaded : loaded ( / etc / systemd / system / cloudflared . service ; enabled ; vendor preset : enabled )
└─ 1479 / usr / local / bin / cloudflared -- config / etc / cloudflared / config . yml -- origincert / etc / cloudflared / cert . pem -- no - autoupdate
Sep 02 03 : 50 : 20 sandbox cloudflared [ 1479 ] : time = "2019-09-02T03:50:20Z" level = info msg = "Version 2019.8.4"
Sep 02 03 : 50 : 20 sandbox cloudflared [ 1479 ] : time = "2019-09-02T03:50:20Z" level = info msg = "GOOS: linux, GOVersion: go1.12.7, GoArch: amd64"
Sep 02 03 : 50 : 20 sandbox cloudflared [ 1479 ] : time = "2019-09-02T03:50:20Z" level = info msg = Flags config = / etc / cloudflared / config . yml no - autoupdate = true origincert = / et
Sep 02 03 : 50 : 20 sandbox cloudflared [ 1479 ] : time = "2019-09-02T03:50:20Z" level = info msg = "Adding DNS upstream" url = "https://1.1.1.1/dns-query"
Sep 02 03 : 50 : 20 sandbox cloudflared [ 1479 ] : time = "2019-09-02T03:50:20Z" level = info msg = "Adding DNS upstream" url = "https://1.0.0.1/dns-query"
Sep 02 03 : 50 : 20 sandbox cloudflared [ 1479 ] : time = "2019-09-02T03:50:20Z" level = info msg = "Starting DNS over HTTPS proxy server" addr = "dns://localhost:5053"
Sep 02 03 : 50 : 20 sandbox cloudflared [ 1479 ] : time = "2019-09-02T03:50:20Z" level = info msg = "Starting metrics server" addr = "127.0.0.1:39507"
Now just configure Pi-hole to use cloudflared as the DNS resolver: