- 13 Practical Examples of Using the Gzip Command in Linux
- gzip Command Syntax
- 1. Create a Gzip File in Linux
- 2. Create Gzip and Keep Original File
- 3. View Contents of a .gz File
- 4. View Info of a .gz File
- 5. Overwrite Gzip File Without Confirmation
- 6. Compress Multiple Files with Gzip
- 7. Gzip All Files in a Directory
- 8. Decompress a Gzip File in Linux
- 9. Compress Tar File to Gzip
- 10. Speeding Up gzip Compression
- 11. Speeding Up Gzip Compression Ratio
- 12. Set Gzip Compression Level
- 13. Change Gzip File Extension Suffix
- Команда Gzip в Linux
- Синтаксис команды gzip
- Сжатие файлов с помощью gzip
- Сохраните исходный файл
- Подробный вывод
- Сжать несколько файлов
- Сжать все файлы в каталоге
- Измените уровень сжатия
- Стандартный ввод
- Распаковка файлов с помощью gzip
- Сохраните сжатый файл
- Распаковать несколько файлов
- Распаковать все файлы в каталоге
- Список содержимого сжатого файла
- Выводы
13 Practical Examples of Using the Gzip Command in Linux
Compression is a very commonly performed operation by users to save disk space as well as reduce time and bandwidth while transferring large amounts of data over the network using gzip utility.
gzip stands for the GNU zip and it is a very popular compression and decompression utility. One of the primary reasons for its popularity is its high compression ratio and speed, which means the compressed data remains the same after decompressing.
The gzip command uses a deflate algorithm which is a lossless data compression that creates smaller file size to make file transfer much faster, as compared to other compression tools.
In this guide, we are going to discuss gzip command usage with examples in Linux.
gzip Command Syntax
Just like any other Linux command, the gzip command’s syntax is divided into two parts OPTIONS and FILES.
In the above syntax, the OPTIONS are used to alter the behavior of the command whereas the FILES represent the input files.
1. Create a Gzip File in Linux
One of the very common uses of the gzip command is to compress a large file. It is very common to see that, large ISO files or tar bundles are compressed to save disk space.
To compress a single file, we just need to pass the file name to the gzip command. To understand this, let’s use the following command to compress the ISO file:
Now, let’s use the ls command to verify that the file has been compressed:

In the above output, we can see the new compressed file with the name alma-linux.iso.gz. We can also observe that, by default, the gzip command adds a .gz extension to a compressed file.
2. Create Gzip and Keep Original File
In the previous example, we saw how easy it is to compress a file. However, if we observe carefully then we can notice that the gzip command deletes the original file after compressing it.
However, sometimes we want to keep the original file as well. In such cases, we can use the -k option as shown.
$ gzip -k alma-linux.iso $ ls -l

In the above output, we can see that the original file is intact even after the compression.
3. View Contents of a .gz File
To view the contents of a compressed .gz file, use the zcat command – which allows you to view the compressed file contents without uncompressing.
To understand this, first, create a simple text file using the redirection operator:
$ echo "zcat example from tecmint.com" > demo $ gzip demo $ ls -l $ zcat demo
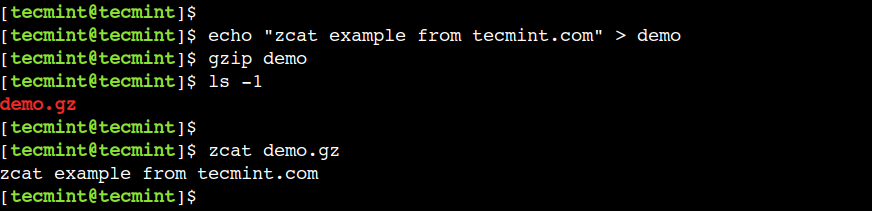
In the above output, we can see that the zcat displays the contents of the compressed file without uncompressing it.
4. View Info of a .gz File
Sometimes, we want to display more details about the compressed file. In such a case, we can use the -l option to list the following fields:
- compressed size – it represents the size of the compressed file in bytes.
- uncompressed size – it represents the size of the uncompressed file in bytes.
- ratio – it represents the compression ratio.
- uncompressed_name – it represents the name of the uncompressed file.
To understand this, let’s execute the following command:

5. Overwrite Gzip File Without Confirmation
By default, the gzip command works in an interactive way if the compressed file with the same name already exists. To understand this default behaviour, let’s execute the same command from the previous example:

Here, we can see that the gzip command waits for the user input. Now, we can use the ‘y’ to overwrite the file or ‘n’ to abort the operation.
This interactive operation is safe and avoids overwriting files by mistake. However, this is not suitable every time. For example, if we are executing the gzip command from the script then the script will wait infinitely for the user input. In such cases, we can use the -f option which overwrites the files forcefully.
Now, let’s execute the same command with the -f option:

Here, we can see that now the gzip command works in a non-interactive way.
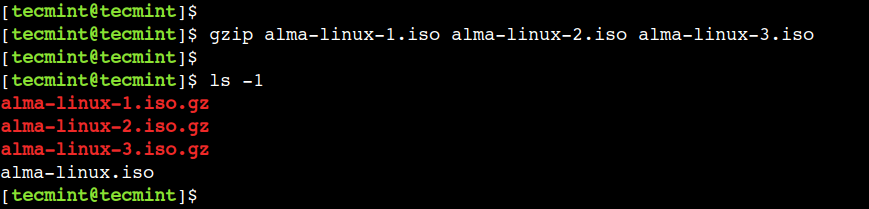
6. Compress Multiple Files with Gzip
So far we saw how to compress a single file. In a similar way, we can use the gzip command to compress multiple files at once.
So, first, let’s create multiple copies of the file using the following cp command:
$ cp alma-linux.iso alma-linux-1.iso $ cp alma-linux.iso alma-linux-2.iso $ cp alma-linux.iso alma-linux-3.iso
Next, let’s compress the three files using the below command:
$ gzip alma-linux-1.iso alma-linux-2.iso alma-linux-3.iso $ ls -l
7. Gzip All Files in a Directory
In the previous example, we saw how to compress multiple files. In a similar way, we can also compress all the files from a directory.
To understand this, first let us create a new directory and add a few files into it:
$ mkdir dir-1 $ touch dir-1/file-1.txt dir-1/file-2.txt dir-1/file-3.txt
Now, let’s use the -r option to compress all the files from the dir-1 directory:

In the above example, the -r option traverses the directory in a recursive fashion.
8. Decompress a Gzip File in Linux
The gzip command allows us to decompress the file using the -d option as shown.
$ gzip -d alma-linux.iso.gz $ ls -l

9. Compress Tar File to Gzip
In the previous two examples, we saw how to compress multiple files using a single command. However, we can also observe that the gzip command doesn’t compress these files into a single file. In such cases, first, we can create a tar bundle and then compress it using the gzip command.
So, first, let’s create a tar bundle with multiple files in it:
$ tar cvf sample.tar alma-linux-1.iso alma-linux-2.iso

Now, let us compress this tar bundle using the following command:

10. Speeding Up gzip Compression
So far, we used very small files to demonstrate the usage of the gzip command. However, in real scenarios, the data that needs to be compressed can be really large.
In such cases, we can use the —fast option to reduce the compression time.
It is important to note that, the —fast option gives preference to the compression speed over the ratio.
11. Speeding Up Gzip Compression Ratio
In a similar way, we can use the —best option to improve the compression ratio. To understand this, let’s execute the below command:
Here, we should note that the —best option gives preference to the compression ratio over the speed.
12. Set Gzip Compression Level
We can use an integer argument with the gzip command to regulate the speed of the compression. The valid value for the range is between 1 to 9. The value 1 represents the fasted compression whereas the value 9 represents the slowest compression.
For example, the following command uses the 2 as an argument to improve the compression speed:
It is important to note that, the default compression level in gzip is -6. It prefers high compression at the expense of speed.
13. Change Gzip File Extension Suffix
By default, the gzip command uses the .gz suffix after compressing the file. However, we can override this default behavior using the —suffix option.
For example, we can use the below command to use gnuzip as a suffix:
$ gzip --suffix .gnuzip alma-linux.iso $ ls -l

In the above example, we can see the compressed file has a .gnuzip extension.
Conclusion
In this practical guide, we discussed some of the common examples of the gzip command in Linux to compress and decompress files faster.
Do you know of any other best example of the gzip command in Linux? Let us know your views in the comments below.
Команда Gzip в Linux
Gzip — один из самых популярных алгоритмов сжатия, который позволяет уменьшить размер файла и сохранить исходный режим файла, право собственности и временную метку.
Gzip также относится к .gz файлов .gz и утилите gzip которая используется для сжатия и распаковки файлов.
В этом руководстве мы покажем вам, как использовать команду gzip .
Синтаксис команды gzip
Общий синтаксис команды gzip следующий:
Gzip сжимает только отдельные файлы и создает сжатый файл для каждого заданного файла. По соглашению, имя файла, сжатого с помощью Gzip, должно заканчиваться на .gz или .z .
Если вы хотите сжать несколько файлов или каталогов в один файл, сначала вам нужно создать архив Tar, а затем сжать файл .tar с помощью Gzip. Файл с .tar.gz или .tgz представляет собой архив Tar, сжатый с помощью Gzip.
Gzip чаще всего используется для сжатия текстовых файлов, архивов Tar и веб-страниц. Не используйте Gzip для сжатия изображений, аудио, документов PDF и других двоичных файлов, поскольку они уже сжаты.
gzip может сжимать только обычные файлы. Символьные ссылки игнорируются.
Сжатие файлов с помощью gzip
Чтобы сжать отдельный файл, вызовите команду gzip за которой следует имя файла:
gzip создаст файл filename.gz и удалит исходный файл.
По умолчанию gzip сохраняет в сжатом файле метку времени, режим, владельца и имя исходного файла.
Сохраните исходный файл
Если вы хотите сохранить исходный (исходный) файл, используйте параметр -k :
Другой вариант сохранить исходный файл — использовать параметр -c который сообщает gzip о необходимости записи в стандартный вывод и перенаправления вывода в файл:
gzip -c filename > filename.gzПодробный вывод
Используйте параметр -v если вы хотите увидеть процентное сокращение и имена обрабатываемых файлов:
filename: 7.5% -- replaced with filename.gz Сжать несколько файлов
Вы также можете передать несколько файлов в качестве аргументов команде. Например, чтобы сжать файлы с именами file1 , file2 , file3 , вы должны выполнить следующую команду:
Приведенная выше команда создаст три сжатых файла: file1.gz , file2.gz , file3.gz .
Сжать все файлы в каталоге
Чтобы сжать все файлы в данном каталоге, используйте параметр -r :
gzip будет рекурсивно проходить по всей структуре каталогов и сжимать все файлы в каталоге и его подкаталогах.
Измените уровень сжатия
gzip позволяет указать диапазон уровней сжатия от 1 до 9. -1 или —fast означает самую высокую скорость сжатия с минимальной степенью сжатия, -9 или —best указывает на самую —best скорость сжатия с максимальной степенью сжатия. Уровень сжатия по умолчанию -6 .
Например, чтобы получить максимальное сжатие, вы должны запустить:
Сжатие — это задача, интенсивно использующая процессор, и чем выше уровень сжатия, тем больше времени занимает процесс.
Стандартный ввод
Чтобы создать файл .gz из стандартного .gz , перенаправьте вывод команды в gzip . Например, чтобы создать резервную копию базы данных MySQL в формате Gzip, вы должны выполнить:
mysqldump database_name | gzip -c > database_name.sql.gzВывод команды mysqldump будет вводиться для gzip .
Распаковка файлов с помощью gzip
Чтобы распаковать файл .gz , используйте параметр -d :
Другая команда, которую вы можете использовать для распаковки Gzip-файла, — это gunzip . Эта команда в основном является псевдонимом для gzip -d :
Возможно, вам будет проще запомнить gunzip чем gzip -d .
Сохраните сжатый файл
Как и при сжатии файла, параметр -k сообщает gzip нужно сохранить входной файл, в данном случае это сжатый файл:
Распаковать несколько файлов
Чтобы распаковать сразу несколько файлов, передайте имена файлов в gzip качестве аргументов:
gzip -d file1.gz file2.gz file3.gzРаспаковать все файлы в каталоге
При использовании с параметрами -d и -r gzip рекурсивно распаковывает все файлы в указанном каталоге:
Список содержимого сжатого файла
При использовании с параметром -l gzip показывает статистику по данным сжатым файлам:
Вывод будет включать имя несжатого файла, сжатый и несжатый размер и степень сжатия:
compressed uncompressed ratio uncompressed_name 130 107 7.5% filename Чтобы получить дополнительную информацию, добавьте параметр -v :
method crc date time compressed uncompressed ratio uncompressed_name defla a9b9e776 Sep 3 21:20 130 107 7.5% filename Выводы
С помощью Gzip вы можете уменьшить размер данного файла. Команда gzip позволяет сжимать и распаковывать файлы.
Для получения дополнительной информации о команде gzip обратитесь к странице документации Gnu gzip .
Если у вас есть вопросы, оставьте комментарий ниже.