- Linux Mint Forums
- How to: Compile the latest kernels (Classic Mint & LMDE)
- How to: Compile the latest kernels (Classic Mint & LMDE)
- Re: How to—compile the latest kernel(s) the Mint/Ubuntu way
- Re: How to—compile the latest kernel(s) the Mint/Ubuntu way
- Re: How to—compile the latest kernel(s) the Mint/Ubuntu way
- Re: How to—compile the latest kernel(s) the Mint/Ubuntu way
- How to Install g++ on Linux Mint 21
- Installing g++ on Linux Mint 21
- Compiling a C++ code using g++ on Linux Mint 21
- Conclusion
- About the author
- Aaliyan Javaid
- How to Install GCC compiler on Linux Mint 20
- Installing GCC compiler on Linux Mint 20
- Getting started with GCC compiler on Linux Mint
- Conclusion
- About the author
- Kamran Sattar Awaisi
Linux Mint Forums
How to: Compile the latest kernels (Classic Mint & LMDE)
Forum rules
Don’t add support questions to tutorials please; start your own topic in the appropriate sub-forum instead. Before you post please read forum rules
Acid_1 Level 5
Posts: 796 Joined: Thu Nov 01, 2007 11:12 pm Location: Saskatchewan, Canada
How to: Compile the latest kernels (Classic Mint & LMDE)
Post by Acid_1 » Tue Apr 16, 2013 3:55 pm
How to compile your own kernel.
I’ve personally tested it on:
Linux Mint 14, Cinnamon
Linux Mint Debian Edition, Cinnamon
I made a video of it, so you can see what a proper build should look like. http://www.youtube.com/watch?v=_uWjGagIQcs
The first thing we need to do is install what is needed to compile the kernel. These are the essentials:
sudo apt-get install build-essential kernel-package libncurses5-dev fakeroot wget bzip2The next line you can omit if you are comfortable with using the terminal for all your kernel options. Otherwise, if you want a GUI with point and click for your options, install the QT4 base.
sudo apt-get install qt4-designer qt4-dev-tools qt4-doc qt4-linguist-tools qt4-qmakeexport CONCURRENCY_LEVEL=2 export CHOST="x86_64-pc-Linux-gnu" export CFLAGS="-march=native -O2 -pipe" export CXXFLAGS="$CFLAGS" If you’re running a 32bit pc, use the «x86-pc-Linux-gnu» option instead. Then we need to make a directory to contain all our building:
mkdir kernel-build cd kernel-build Now we need a kernel to build. You have a few options with the kernels, but I like to get mine from kernel.org. You can pick the Mainline, Stable, or Linux-next. The differences are:
- The most recent kernel, released by Torvalds, with latest features, not necessarily stable
- The latest stable kernel, with updates that are only bug fixes, no new features
- Not actually a version number. Hundreds of devs add to this tree daily, and there is no record of previous days kernels of this tree. It can change drastically over 24 hours, and is not recommended for production or home use
wget https://www.kernel.org/pub/linux/kernel/v3.x/linux-3.8.7.tar.xz tar -Jxf linux-3.8.7.tar.xz cd linux-3.8.7Next we want to copy our old kernel configs to the new kernel, reducing the work we need to do for selecting options for the kernel. You can answer these to the best of your ability or you can simply press enter (return) to use the default options.
cp /boot/config-`uname -r` ./.config make oldconfigFinally, we will compile the kernel and install it like any other .deb file for Mint/Ubuntu. For custom name on this kernel, I would put -mint-14-x86-64-15-04-13, so the following code would look like this:
fakeroot make-kpkg --initrd --append-to-version=-customname kernel_image kernel_headersThe —append-to-version option lets you identify the kernel as your own unique kernel. Now all you do is wait a couple hours for it to compile your kernel. It will automatically be turned into a .deb for easy installation. Then simply install it with:
cd .. sudo dpkg -i linux-image-*.deb linux-headers-*.deb sudo update-grubfor the terminal to finish the name for you.
Now you have your own custom kernel, congratulations. Feel free to remove the folder holding all the source code, as it’s likely over 10Gb now. Keep the .debs if you have the space (they’re about 55Mb combined), and have fun.
For nvidia driver users who blacklisted nouveau, you have one more step, due to a recently introduced change with nvidia drivers. Reboot into the new kernel via recovery mode. As root, run:
update-initramfs -k 'uname -r'And reboot into your new kernel normally. Congratulations, you’re finished!
Lethe wrote: What you can also do is starting with a generic kernel (i.e. the standard Mint/Debian kernel) is to plug in all your devices (USB stick, USB printer etc.) so that the modules get loaded, then run in your unpacked ‘linux kernel’ directory:
What this will do it automatically tune your config to only use the modules required on your system, and turn all the other off. A lot quicker than trying to do it manually.
Re: How to—compile the latest kernel(s) the Mint/Ubuntu way
Post by CptCrunch » Wed May 29, 2013 7:19 pm
fakeroot make-kpkg —initrd —append-to-version=-mint-14-x86 _ 64-15-04-13 kernel_image kernel_headers
fakeroot make-kpkg —initrd —append-to-version=-mint-14-x86 — 64-15-04-13 kernel_image kernel_headers
Re: How to—compile the latest kernel(s) the Mint/Ubuntu way
Post by Lethe » Tue Jun 11, 2013 5:28 am
What you can also do is starting with a generic kernel (i.e. the standard Mint/Debian kernel) is to plug in all your devices (USB stick, USB printer etc.) so that the modules get loaded, then run in your unpacked ‘linux kernel’ directory:
What this will do it automatically tune your config to only use the modules required on your system, and turn all the other off. A lot quicker than trying to do it manually.
catweazel Level 19
Posts: 9763 Joined: Fri Oct 12, 2012 9:44 pm Location: Australian Antarctic Territory
Re: How to—compile the latest kernel(s) the Mint/Ubuntu way
Post by catweazel » Tue Jun 11, 2013 5:34 am
export CONCURRENCY_LEVEL=2 export CHOST="x86_64-pc-Linux-gnu" export CFLAGS="-march=native -O2 -pipe" export CONCURRENCY_LEVEL=2That the number of jobs and is the same as make’s -j option. This can be set much higher on machines with more than one core. I use 16.
export CHOST="x86_64-pc-Linux-gnu"That tells the compiler to build a dumbed down kernel and isn’t optimal for high-end machines. It’s the stock ubuntu setting. «i686-pc-linux-gnu» is more appropriate for later cpus, eg core2, i5, i7.
export CFLAGS="-march=native -O2 -pipe" That too is suboptimal for later processors. march can be set to «corei7 -O2 -pipe», for example.
CHOST and CFLAGS can also be set using make menuconfig.
«There is, ultimately, only one truth — cogito, ergo sum — everything else is an assumption.» — Me, my swansong.
Acid_1 Level 5
Posts: 796 Joined: Thu Nov 01, 2007 11:12 pm Location: Saskatchewan, Canada
Re: How to—compile the latest kernel(s) the Mint/Ubuntu way
Post by Acid_1 » Mon Jul 01, 2013 4:35 pm
catweazel wrote: 1) That the number of jobs and is the same as make’s -j option. This can be set much higher on machines with more than one core. I use 16.
export CHOST="x86_64-pc-Linux-gnu"2) That tells the compiler to build a dumbed down kernel and isn’t optimal for high-end machines. It’s the stock ubuntu setting. «i686-pc-linux-gnu» is more appropriate for later cpus, eg core2, i5, i7.
export CFLAGS="-march=native -O2 -pipe" 3) That too is suboptimal for later processors. march can be set to «corei7 -O2 -pipe», for example.
4) CHOST and CFLAGS can also be set using make menuconfig.
1) I was unaware of this, but thanks and I will try it next time.
2/3) That’s beyond the scope of this tutorial. It’s simply for those who want to have a more recent kernel on their distro. I don’t have the know-how to list this in the tutorial for others, let alone all the possible architectures that are out there, and simply don’t have the time, or even the will, to look that up. If the user wants these optimisations, they are more than welcome to use Google for different CFLAGS options.
4) Perhaps, but why wait until later when setting a variable, when you could just as easily forget.
Lethe wrote: What you can also do is starting with a generic kernel (i.e. the standard Mint/Debian kernel) is to plug in all your devices (USB stick, USB printer etc.) so that the modules get loaded, then run in your unpacked ‘linux kernel’ directory:
What this will do it automatically tune your config to only use the modules required on your system, and turn all the other off. A lot quicker than trying to do it manually.
I do like this feature, and I wasn’t aware of it (Thanks Nick!). However, I don’t know if I’d even want to use it. What if I buy more hardware? I have to recompile it in order to have features from it work, or even the hardware’s base function? What if I switch out a drive, or a mobo, or some RAM? Will I still be able to boot without a LiveCD handy or internet?
Not all these are applicable to me necessarily, but just some shortcomings I see if I were to use it myself, for others, or even some people using this guide. However, I will keep that in mind. TY.
fakeroot make-kpkg —initrd —append-to-version=-mint-14-x86 _ 64-15-04-13 kernel_image kernel_headers
fakeroot make-kpkg —initrd —append-to-version=-mint-14-x86 — 64-15-04-13 kernel_image kernel_headers
How to Install g++ on Linux Mint 21
![]()
Computers generally interpret the instructions in machine language that consist of zeros and ones and if you want to learn programming then you must be aware that to translate the instruction into machine language compilers are used. Likewise, g++ is a compiler that can compile both C and C++ language and is most used by the Linux users. So, if you want to install g++ on Linux Mint 21 and want to learn how to compile a C++ code using it then give this guide a thorough read.
Installing g++ on Linux Mint 21
To install g++ on Linux Mint, follow the steps listed below:
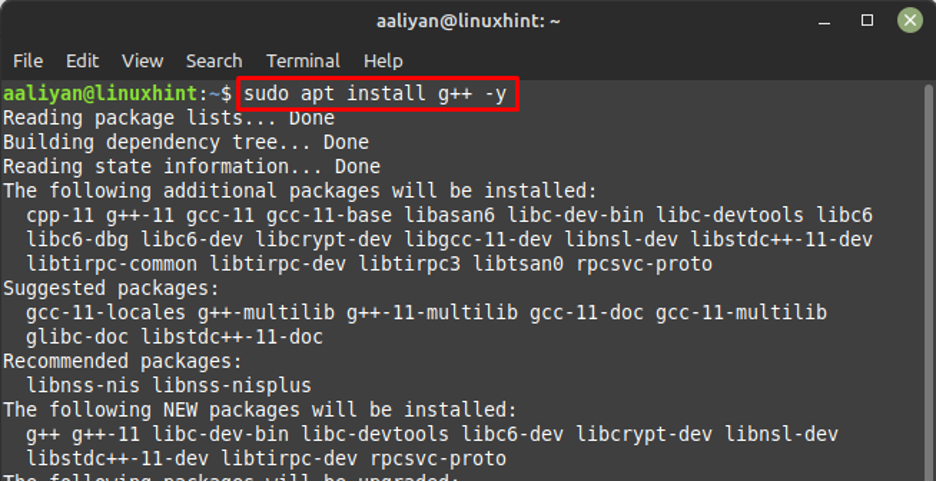
Step 1: Update the package list of the default package manager as it is recommended before installing any application on Linux:

Step 2: Next, install g++ with the help of below command:
Step 3: Now to see if this editor is installed correctly check its version:

Compiling a C++ code using g++ on Linux Mint 21
There are few easy steps that one needs to follow to learn how to write and compile C++ code using g++ in Linux Mint 21:
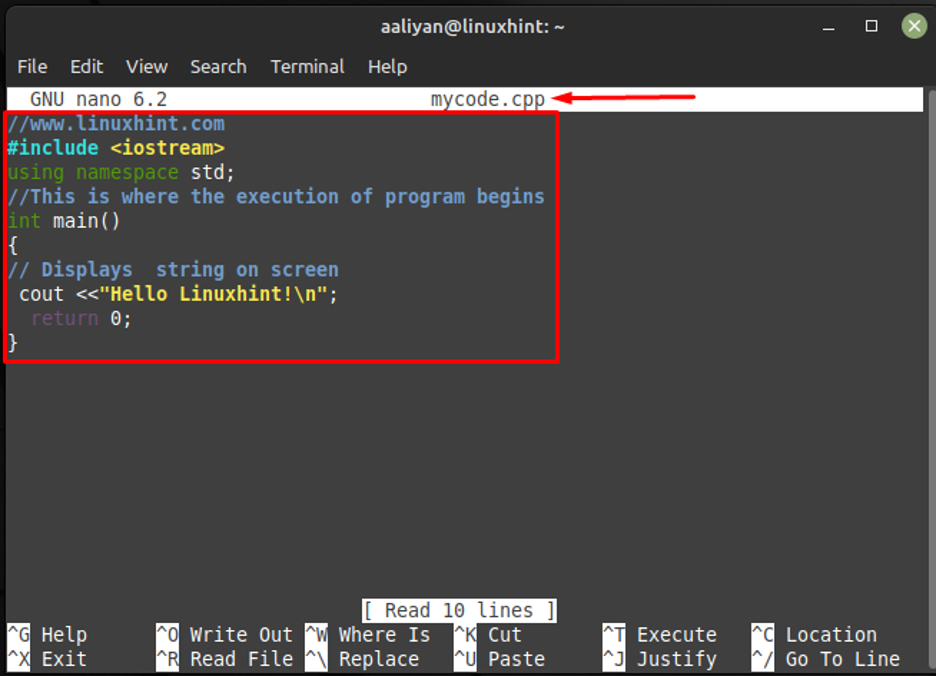
Step 1: Create .cpp file with your desired name:

Step 2: Next write the C++ code in the created file, below is the simple code that I have written in the .cpp file:
// Here execution of code begins
int main ( )
{
// displays string on screen
cout
Note: Ensure that you are in the same directory where the created file is present.
Step 3: Now just the save and close the file by pressing ctrl+x and compile the file using:

Step 4: Next, run the compiled C++ file using:

So, this is how one can write and compile C++ code using the g++ compiler in Linux Mint 21.
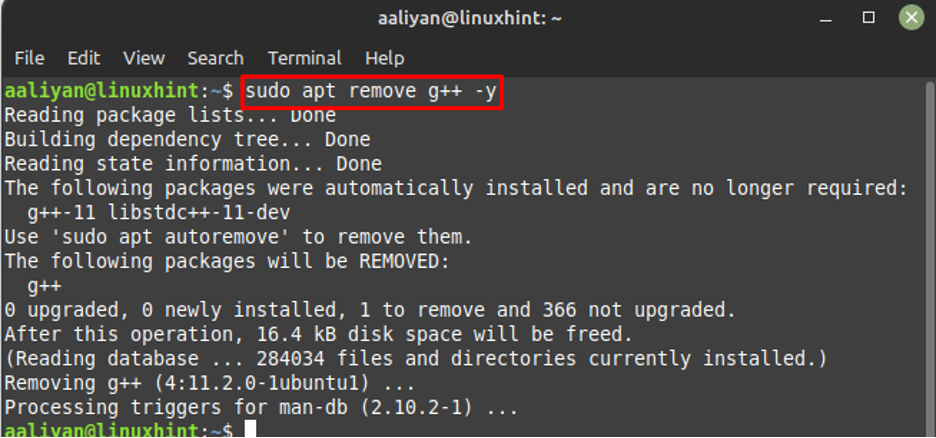
To remove the g++ compiler from Linux Mint 21 use:
Conclusion
The primary purpose of a compiler is to convert the programming language into machine language so that machines can understand the instructions given to them. There are a variety of compilers available that support different programming languages, the g++ is mainly used to compile C and C++ language. To install g++ on Linux Mint 21 one can use its default package manager; the detailed installation process is mentioned in this guide.
About the author
Aaliyan Javaid
I am an electrical engineer and a technical blogger. My keen interest in embedded systems has led me to write and share my knowledge about them.
How to Install GCC compiler on Linux Mint 20
![]()
The GNU compiler collection, which is the abbreviation for GCC, contains multiple compilers for various languages like C, C++, Go, etc. Using GCC, you can easily compile your programs on Linux Mint. Many open-source projects, including Linux Kernel, are compiled using the GCC compiler.
The build-essential package contains the GCC compiler, debugger, and many additional development tools. By installing the build-essential package, we can use GCC compiler on Linux Mint.
Installing GCC compiler on Linux Mint 20
The build-essential package is included in the Linux Mint base repository. open the terminal and update the apt package listing by typing:

Now, install the build-essential package with the command:
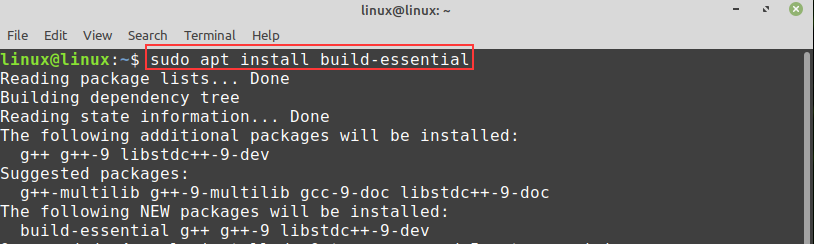
To continue installing the build-essential package, type ‘y’ on the command line.

Once the build-essentials package is installed, verify the GCC compiler installation with the command:

Getting started with GCC compiler on Linux Mint
Let’s compile our first C++ program with GCC compiler. Open your text editor and create a hello.cpp file:
printf ( «Hello from LinuxHint \n » ) ;
To compile this C++ program with GCC compiler, write on your terminal

My “hello.cpp” file is compiled successfully, and a new executable file, “a.out,” is created.
Let’s execute the ‘a.out’ file:

You can see that the message is printed on the terminal.
Conclusion
GCC compiler is used to compile the programming files on Linux. This post describes the installation of the GCC compiler on Linux Mint 20.
About the author
Kamran Sattar Awaisi
I am a software engineer and a research scholar. I like to write article and make tutorial on various IT topics including Python, Cloud Computing, Fog Computing and Deep Learning. I love to use Linux based operating systems.