- Configure a Linux CMake project in Visual Studio
- Add a Linux configuration
- Choose a Linux target
- Target Windows Subsystem for Linux
- IntelliSense
- Locale setting
- More settings
- Configure a Linux MSBuild C++ project in Visual Studio
- General settings
- Remote settings
- Copy sources (remote systems only)
- Build events
- IntelliSense for headers on remote systems
- Linux target locale
- Running Linux programs on Windows
- Feedback
Configure a Linux CMake project in Visual Studio
Linux support is available in Visual Studio 2017 and later. To see the documentation for these versions, set the Version drop-down located above the table of contents to Visual Studio 2017 or Visual Studio 2019.
This topic describes how to add a Linux configuration to a CMake project that targets either a remote Linux system or Windows Subsystem for Linux (WSL). It continues the series that began with Create a Linux CMake project in Visual Studio. If you’re using MSBuild, instead, see Configure a Linux MSBuild Project in Visual Studio
Add a Linux configuration
A configuration can be used to target different platforms (Windows, WSL, a remote system) with the same source code. A configuration is also used to set your compilers, pass environment variables, and customize how CMake is invoked. The CMakeSettings.json file specifies some or all of the properties listed in Customize CMake settings, plus other properties that control the build settings on the remote Linux machine.
To change the default CMake settings in Visual Studio 2017, choose CMake > Change CMake Settings > CMakeLists.txt from the main menu. Or, right-click CMakeLists.txt in Solution Explorer and choose Change CMake Settings. Visual Studio then creates a new CMakeSettings.json file in your root project folder. To make changes, open the file and modify it directly. For more information, see Customize CMake settings.
The default configuration for Linux-Debug in Visual Studio 2017 (and Visual Studio 2019 version 16.0) looks like this:
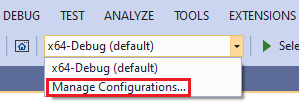
< "configurations": [ < "name": "Linux-Debug", "generator": "Unix Makefiles", "remoteMachineName": "$", "configurationType": "Debug", "remoteCMakeListsRoot": "/var/tmp/src/$/$", "cmakeExecutable": "/usr/local/bin/cmake", "buildRoot": "$\\CMakeBuilds\\$\\build\\$", "installRoot": "$\\CMakeBuilds\\$\\install\\$", "remoteBuildRoot": "/var/tmp/build/$/build/$", "remoteInstallRoot": "/var/tmp/build/$/install/$", "remoteCopySources": true, "remoteCopySourcesOutputVerbosity": "Normal", "remoteCopySourcesConcurrentCopies": "10", "remoteCopySourcesMethod": "rsync", "remoteCopySourcesExclusionList": [ ".vs", ".git" ], "rsyncCommandArgs": "-t --delete --delete-excluded", "remoteCopyBuildOutput": false, "cmakeCommandArgs": "", "buildCommandArgs": "", "ctestCommandArgs": "", "inheritEnvironments": [ "linux_x64" ] > ] > To change the default CMake settings in Visual Studio 2019 or later, from the main toolbar, open the Configuration dropdown and choose Manage Configurations.
This command opens the CMake Settings Editor, which you can use to edit the CMakeSettings.json file in your root project folder. You can also open the file with the JSON editor by clicking the Edit JSON button in the upper-right of the CMake Settings dialog. For more information, see Customize CMake Settings.
The default Linux-Debug configuration in Visual Studio 2019 version 16.1, and later, looks like this:
< "configurations": [ < "name": "Linux-GCC-Debug", "generator": "Ninja", "configurationType": "Debug", "cmakeExecutable": "cmake", "remoteCopySourcesExclusionList": [ ".vs", ".git", "out" ], "cmakeCommandArgs": "", "buildCommandArgs": "", "ctestCommandArgs": "", "inheritEnvironments": [ "linux_x64" ], "remoteMachineName": "$", "remoteCMakeListsRoot": "$HOME/.vs/$/$/src", "remoteBuildRoot": "$HOME/.vs/$/$/out/build/$", "remoteInstallRoot": "$HOME/.vs/$/$/out/install/$", "remoteCopySources": true, "rsyncCommandArgs": "-t --delete --delete-excluded", "remoteCopyBuildOutput": false, "remoteCopySourcesMethod": "rsync", "variables": [] > ] > In Visual Studio 2019 version 16.6 or later, Ninja is the default generator for configurations targeting a remote system or WSL, as opposed to Unix Makefiles. For more information, see this post on the C++ Team Blog.
For more information about these settings, see CMakeSettings.json reference.
- If you’re targeting a remote system, Visual Studio chooses the first remote system in the list under Tools >Options >Cross Platform >Connection Manager by default for remote targets.
- If no remote connections are found, you’re prompted to create one. For more information, see Connect to your remote Linux computer.
Choose a Linux target
When you open a CMake project folder, Visual Studio parses the CMakeLists.txt file, and specifies a Windows target of x86-Debug. To target a remote Linux system, you’ll change the project settings based on your Linux compiler. For example, if you’re using GCC on Linux and compiling with debug info, choose: Linux-GCC-Debug or Linux-GCC-Release.
If you specify a remote Linux target, your source is copied to the remote system.
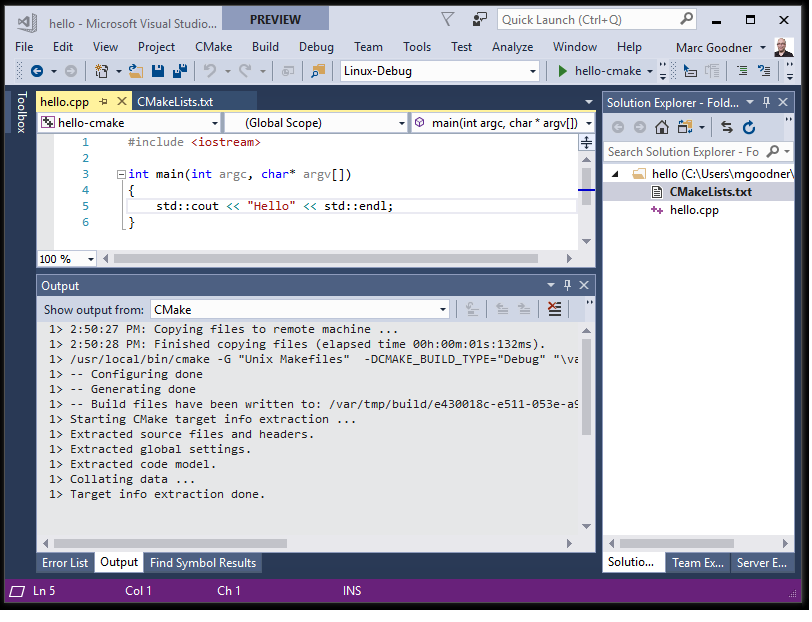
After you select a target, CMake runs automatically on the Linux system to generate the CMake cache for your project:
Target Windows Subsystem for Linux
If you’re targeting Windows Subsystem for Linux (WSL), you don’t need to add a remote connection.
To target WSL, select Manage Configurations in the configuration dropdown in the main toolbar:
The CMakeSettings.json window appears.
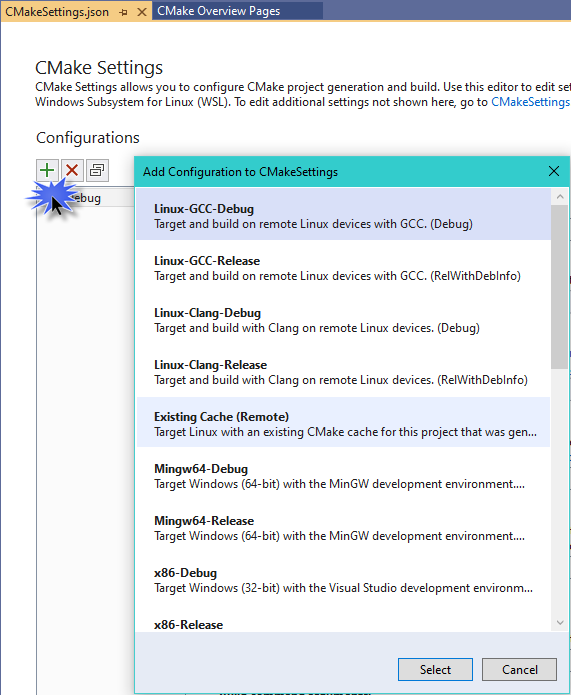
Press Add Configuration (the green ‘+’ button) and then choose Linux-GCC-Debug or Linux-GCC-Release if using GCC. Use the Clang variants if you’re using the Clang/LLVM toolset. Press Select and then Ctrl+S to save the configuration.
Visual Studio 2019 version 16.1 When you target WSL, Visual Studio doesn’t need to copy source files and maintain two synchronous copies of your build tree because the compiler on Linux has direct access to your source files in the mounted Windows file system.
IntelliSense
Accurate C++ IntelliSense requires access to the C++ headers referenced by your C++ source files. Visual Studio automatically uses the headers referenced by a CMake project from Linux to Windows to provide a full-fidelity IntelliSense experience. For more information, see IntelliSense for remote headers.
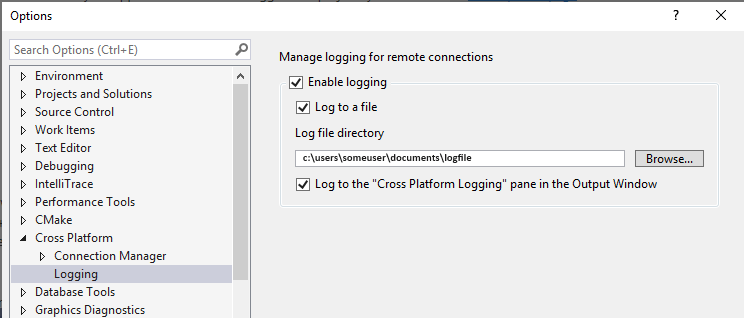
Locale setting
Visual Studio language settings aren’t propagated to Linux targets because Visual Studio doesn’t manage or configure installed packages. Messages shown in the Output window, such as build errors, are shown using the language and locale of the Linux target. You’ll need to configure your Linux targets for the desired locale.
More settings
Use the following settings to run commands on the Linux system before and after building, and before CMake generation. The values can be any command that is valid on the remote system. The output is piped back to Visual Studio.
Configure a Linux MSBuild C++ project in Visual Studio
Linux support is available in Visual Studio 2017 and later.
This topic describes how to configure a MSBuild-based Linux project as described in Create a Linux MSBuild C++ project in Visual Studio. For Linux CMake projects, see Configure a Linux CMake project.
You can configure a Linux project to target a physical Linux machine, a virtual machine, or the Windows Subsystem for Linux (WSL).
Visual Studio 2019 version 16.1 and later:
- When you target WSL, you can avoid the copy operations needed to build and get IntelliSense that are required when you target a remote Linux system.
- You can specify separate Linux targets for building and debugging.
General settings
To view configuration options, select the Project > Properties menu, or right-click on the project in Solution Explorer and select Properties from the context menu. The General settings appear.
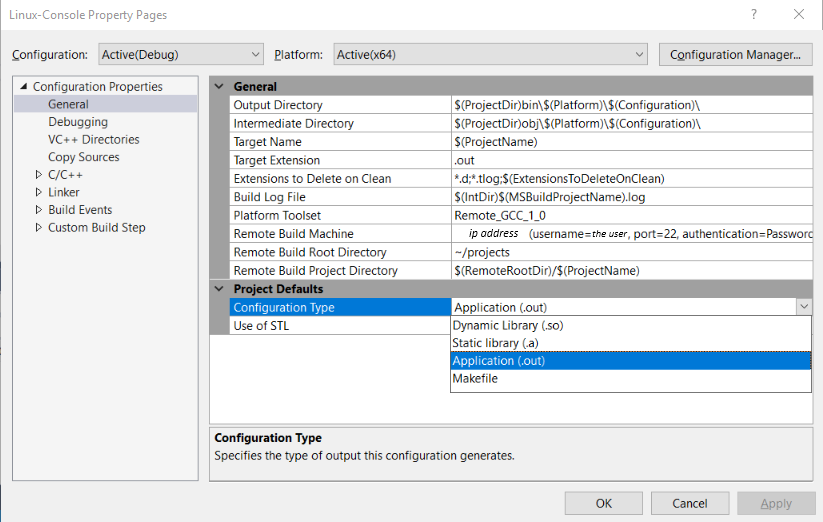
By default, an executable (.out) is built. To build a static or dynamic library, or to use an existing Makefile, use the Configuration Type setting.
If you’re building for Windows Subsystem for Linux (WSL), WSL Version 1 is limited to 64 parallel compilation processes. This is governed by the Max Parallel Compilation Jobs setting in Configuration properties > C/C++ > General.
Regardless of the WSL version you are using, if you intend to use more than 64 parallel compilation processes, we recommend that you build with Ninja—which generally will be faster and more reliable. To build with Ninja, use the Enable Incremental Build setting in Configuration properties > General.
For more information about the settings in the property pages, see Linux Project Property Page Reference.
Remote settings
To change settings related to the remote Linux computer, configure the remote settings that appear under General.
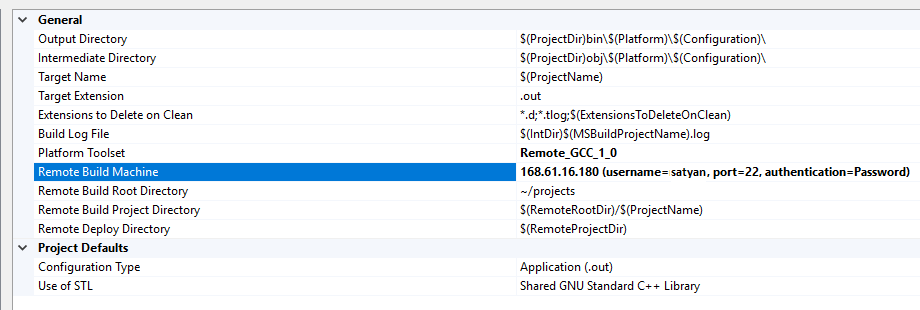
- To specify a remote target Linux computer, use the Remote Build Machine entry. This will allow you to select one of the connections created previously. To create a new entry, see the Connecting to Your Remote Linux Computer section.
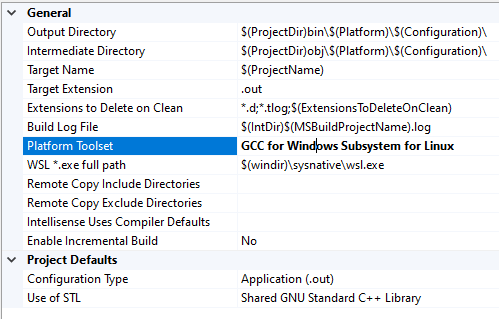
Visual Studio 2019 version 16.7 and later: To target Windows Subsystem for Linux (WSL), set the Platform Toolset drop-down to GCC for Windows Subsystem for Linux. The other remote options will disappear and the path to the default WSL shell will appear in their place: If you have side-by-side WSL installations, you can specify a different path here. For more information about managing multiple distros, see Manage and configure Windows Subsystem for Linux. You can specify a different target for debugging on the Configuration Properties > Debugging page.
To change the default C and C++ compilers, or the Linker and Archiver used to build the project, use the appropriate entries in the C/C++ > General section and the Linker > General section. You can specify a certain version of GCC or Clang, for example. For more information, see C/C++ Properties (Linux C++) and Linker Properties (Linux C++).
Copy sources (remote systems only)
This section doesn’t apply when targeting WSL.
When building on remote systems, the source files on your development PC are copied to the Linux computer and compiled there. By default, all sources in the Visual Studio project are copied to the locations set in the settings above. However, additional sources can also be added to the list, or copying sources can be turned off entirely, which is the default for a Makefile project.
- Sources to copy determines which sources are copied to the remote computer. By default, the @(SourcesToCopyRemotely) defaults to all source code files in the project, but doesn’t include any asset/resource files, such as images.
- Copy sources can be turned on and off to enable and disable the copying of source files to the remote computer.
- Additional sources to copy allows you to add additional source files, which will be copied to the remote system. You can specify a semi-colon delimited list, or you can use the := syntax to specify a local and remote name to use:
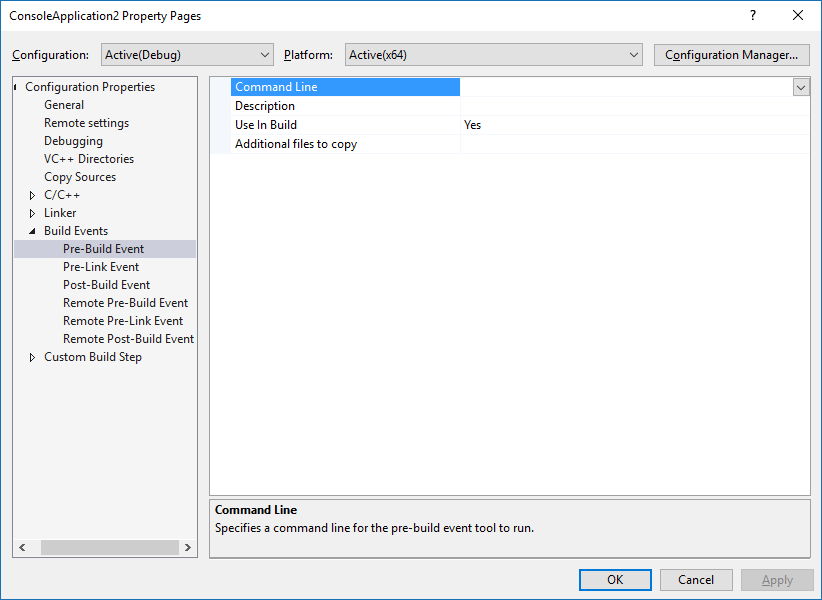
Build events
Since all compilation is happening on a remote computer (or WSL), several additional Build Events have been added to the Build Events section in Project Properties. These are Remote Pre-Build Event, Remote Pre-Link Event, and Remote Post-Build Event, and will occur on the remote computer before or after the individual steps in the process.
IntelliSense for headers on remote systems
When you add a new connection in Connection Manager, Visual Studio automatically detects the include directories for the compiler on the remote system. Visual Studio then zips up and copies those files to a directory on your local Windows machine. After that, whenever you use that connection in a Visual Studio or CMake project, the headers in those directories are used to provide IntelliSense.
In Visual Studio 2019 version 16.5 and later, the remote header copy has been optimized. Headers are now copied on-demand when opening a Linux project or configuring CMake for a Linux target. The copy occurs in the background on a per-project basis, based on the project’s specified compilers. For more information, see Improvements to Accuracy and Performance of Linux IntelliSense.
This functionality depends on the Linux machine having zip installed. You can install zip by using this apt-get command:
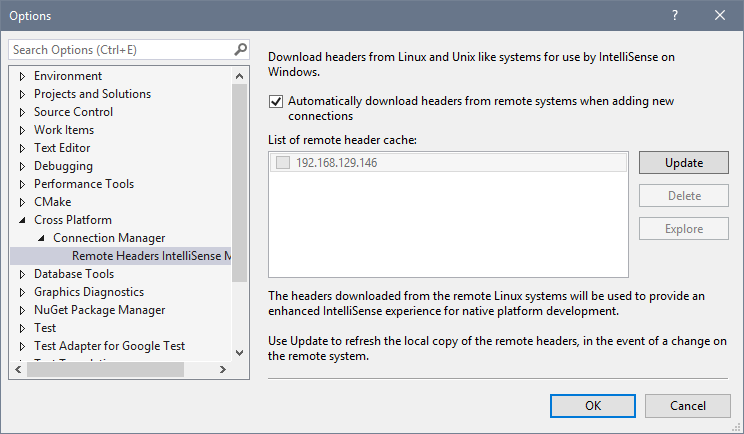
To manage your header cache, navigate to Tools > Options, Cross Platform > Connection Manager > Remote Headers IntelliSense Manager. To update the header cache after making changes on your Linux machine, select the remote connection and then select Update. Select Delete to remove the headers without deleting the connection itself. Select Explore to open the local directory in File Explorer. Treat this folder as read-only. To download headers for an existing connection that was created before Visual Studio 2017 version 15.3, select the connection and then select Download.
Linux target locale
Visual Studio language settings aren’t propagated to Linux targets because Visual Studio doesn’t manage or configure installed packages. Messages shown in the Output window, such as build errors, are shown using the language and locale of the Linux target. You’ll need to configure your Linux targets for the desired locale.
Running Linux programs on Windows
To run a Linux program on Windows, you have these options:
- Run the program as-is on the Windows Subsystem for Linux (WSL). In WSL your program executes directly on the machine hardware, not in a virtual machine. WSL also enables direct filesystem calls between Windows and Linux systems, removing the need for SSL transport. WSL is designed as a command-line environment and is not recommended for graphics-intensive applications. For more information, see Windows Subsystem for Linux Documentation.
- Run the program as-is in a Linux virtual machine or Docker container, either on your local machine or on Azure. For more information, see Virtual Machines and Docker on Azure.
- Compile the program using gcc or clang in the MinGW or MinGW-w64 environments, which provide a translation layer from Linux to Windows system calls.
- Compile and run the program using gcc or clang in the Cygwin environment, which provides a more complete Linux environment on Windows compared to MinGW or MinGW-w64.
- Manually port your code from Linux and compile for Windows using Microsoft C++ (MSVC). This involves refactoring platform-independent code into separate libraries, and then re-writing the Linux-specific code to use Windows-specific code (for example, Win32 or DirectX APIs). For applications that require high performance graphics, this is probably the best option.
Feedback
Submit and view feedback for