- How to use the Linux BIND command to install and configure DNS
- How DNS works
- Great Linux resources
- Where does DNS get IP addresses?
- Forward and reverse lookups
- Install and configure DNS
- Configure the /etc/named.conf file
- Define the forward and reverse zones
- Create forward and reverse zone files
- Add the nameserver IP to /etc/resolv.conf
- Start/restart and enable the named service
- Verify the DNS name resolution
- Query with nslookup
- Query with dig
- Wrap up
- Как установить и настроить DNS-сервер BIND на CentOS или Rocky Linux
- Подготовка сервера
- Установка и запуск BIND
- Базовая настройка DNS-сервера
- Описание глобальных опций
- Пример глобальных настроек
- Зоны bind
- Решение проблем с помощью log-файлов
- Лог запросов
- Читайте также
How to use the Linux BIND command to install and configure DNS
The Domain Name System helps you get where you want to be on the internet. Make sure you know what it is and how to set up, configure, and test it.

The Domain Name System (DNS) is used to resolve (translate) hostnames to internet protocol (IP) addresses and vice versa. A DNS server, also known as a nameserver, maps IP addresses to hostnames or domain names.
In this article, you will learn the basics of DNS, from how DNS gets the IP address and hostname, to the concepts of forward and reverse lookup zones. It will also show you how to install and configure DNS, define and edit zone files, and verify whether the DNS can resolve to the correct address with the help of commands. If you are new to DNS, this article will help you play with it on your system using basic configurations.
How DNS works
When a client requests information from a nameserver, it usually connects to port 53, and then the nameserver resolves the name requested.

Great Linux resources
Where does DNS get IP addresses?
You might wonder how DNS gets the IP of the corresponding hostname or domain name. How does DNS search among different IP addresses and associate your domain name correctly? Who stores those mappings between domain names and IP addresses?
The DNS workflow illustrates how communication happens within DNS and how it resolves the addresses.
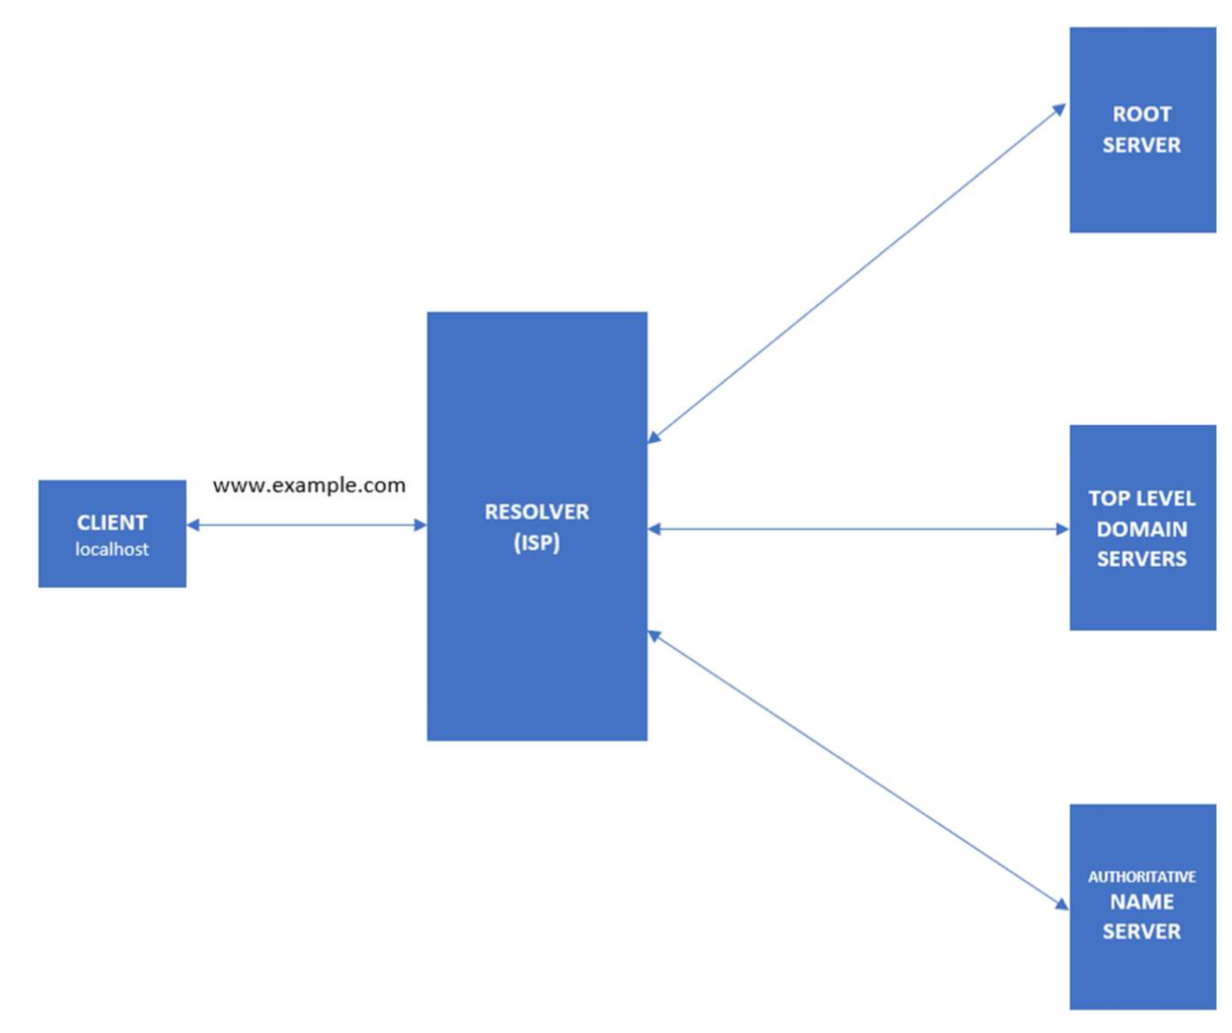
- When the client searches for the domain www.example.com , the request will initially go to the internet service provider’s (ISP) resolver. It will respond to the user’s request to resolve a domain name.
- If the IP address is not found on the resolver, the request is forwarded to a root DNS server and later to the top-level domain (TLD) servers.
- TLD servers store information for top-level domains, such as .com or .net.
- Requests are forwarded to the nameservers, which know detailed information about domains and IP addresses.
- Nameservers respond to the ISP’s resolver, and then the resolver responds to the client with the requested IP.
- When the resolver doesn’t know the IP, it stores the IP and its domain in a cache to service future queries.
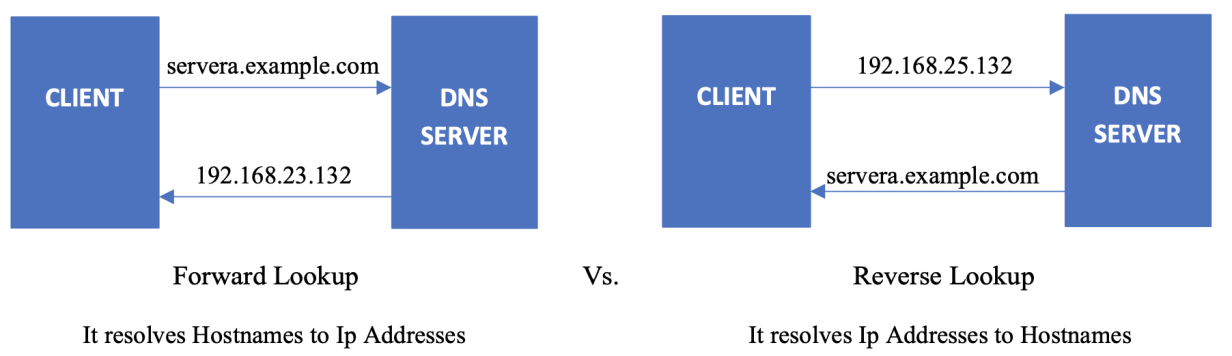
Forward and reverse lookups
The forward lookup zone uses the domain name to search for IP addresses, whereas the reverse lookup zone uses IP addresses to search for the domain name.
Install and configure DNS
BIND is a nameserver service responsible for performing domain-name-to-IP conversion on Linux-based DNS servers.
[root@servera ~] # yum install bindThe BIND package provides the named service. It reads the configuration from the /etc/named and /etc/named.conf files. Once this package is installed, you can start configuring DNS.
Configure the /etc/named.conf file
First, add or edit the two values in the options field. One is the DNS server address, and the other is the allow-query to any.
[root@servera ~] # vim /etc/named.conf listen-on port 53 < 127.0.0.1; 192.168.25.132; >; allow-query < localhost; any; >;Here are the values from the above file:
- 192.168.25.132 – DNS server address
- any – matches every IP address
Define the forward and reverse zones
Define the forward and reverse zones in the /etc/named.conf or /etc/named.rfc1912.zones (you can define zones in either of those files). In this example, I am appending zone definition details to the /etc/named.rfc1912.zones file.
[root@servera ~] # vim /etc/named.rfc1912.zones zone "example.com" IN < type master; file "example.forward.zone"; allow-update < none; >; >; zone "25.168.192.in-addr.arpa" IN < type master; file "example.reverse.zone"; allow-update < none; >; >; Create forward and reverse zone files
You also need to create forward and reverse zone files in the /var/named directory.
Note: By default, the named.conf file includes the /var/named directory for checking zone files. Sample zone files named.localhost and named.loopback are created during the installation of the BIND package.
[root@servera ~] # vim /var/named/example.forward.zone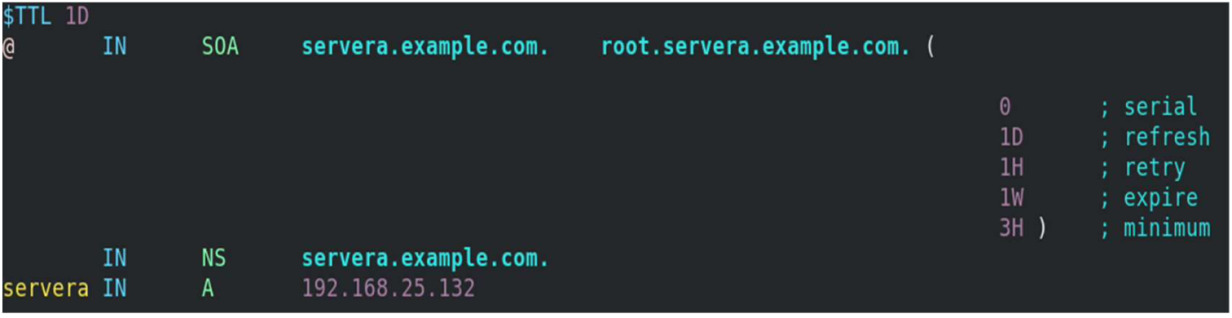
[root@servera ~] # vim /var/named/example.reverse.zone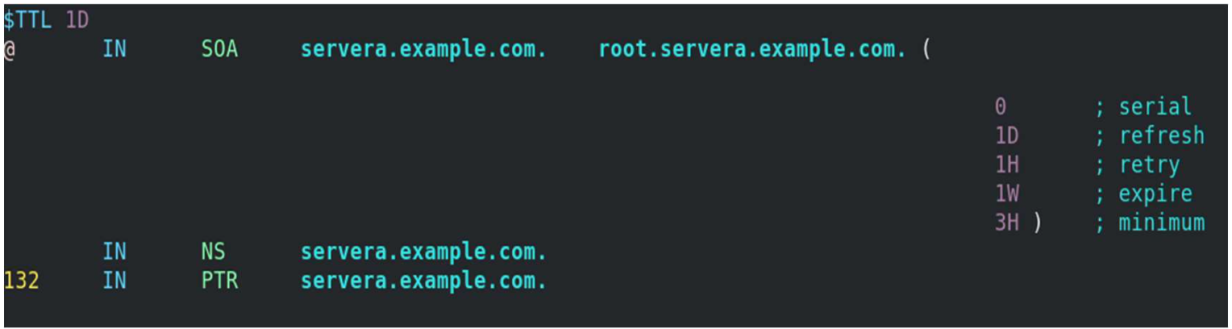
Add the nameserver IP to /etc/resolv.conf
First, you must disable DNS processing by NetworkManager because it dynamically updates the /etc/resolv.conf file with DNS settings from its active connection profiles. To disable this and allow manual editing of /etc/resolv.conf , you must create a file (For example, 90-dns-none.conf ), as root in the /etc/NetworkManager/conf.d/ directory that contains the following:
Save the file and reload (restart) NetworkManager.
# systemctl reload NetworkManagerAfter you reload NetworkManager, it won’t update /etc/resolv.conf . Now, you can manually add the nameserver’s IP address to the /etc/resolv.conf file.
[root@servera ~] # vim /etc/resolv.conf # Generated by NetworkManager search localdomain example.com nameserver 192.168.25.132[ Be prepared in case something goes wrong. Read An introduction to DNS troubleshooting. ]
Start/restart and enable the named service
If the named service is not running or is disabled, then start and enable it. If it is already active (running) and you made all these configurations, you need to restart the service to make changes.
[root@servera ~] # systemctl status named.service [root@servera ~] # systemctl start named.service [root@servera ~] # systemctl enable named.service [root@servera ~] # systemctl restart named.service Verify the DNS name resolution
You have installed the BIND package, configured named files, created lookup zones, and restarted the service to make configurations take effect. Now use the nslookup and dig commands to check whether DNS is working properly and verify whether you are getting the intended results.
- nslookup is a program to query internet domain name servers.
- dig is a tool for interrogating DNS servers. It performs DNS lookups and displays the answers that are returned from the nameserver.
Query with nslookup
[root@servera ~] # nslookup servera.example.com Server: 192.168.25.132 Address: 192.168.25.132#53 Name: servera.example.com Address: 192.168.25.132 [root@servera ~] # nslookup 192.168.25.132 132.25.168.192.in-addr.arpa name = servera.example.com.Query with dig
Here is a forward lookup, where DNS responds with 192.168.11.132 as an IP for servera.example.com:
[root@servera ~] # dig servera.example.com . output truncated. ;; ANSWER SECTION: servera.example.com. 86400 IN A 192.168.25.132 ;; AUTHORITY SECTION: example.com. 86400 IN NS servera.example.com. . output truncated. This example displays a reverse lookup, where the DNS server responds with servera.example.com as the domain name for 192.168.25.132:
[root@servera ~] # dig -x 192.168.25.132 . output truncated. ;; ANSWER SECTION: 132.25.168.192.in-addr.arpa. 86400 IN PTR servera.example.com. ;; AUTHORITY SECTION: 25.168.192.in-addr.arpa. 86400 IN NS servera.example.com. ;; ADDITIONAL SECTION: servera.example.com. 86400 IN A 192.168.25.132 . output truncated. [ Network getting out of control? Check out Network automation for everyone, a free book from Red Hat. ]
Wrap up
In this article, you learned what DNS is and how it works. Also, you now know what forward and reverse lookup zones are and how they work. You also learned how to install the BIND package, which is responsible for setting up DNS on the system and configuring the named files and lookup zones. Finally, you learned two commands, nslookup and dig , to interrogate DNS resolutions.
Как установить и настроить DNS-сервер BIND на CentOS или Rocky Linux

Обновлено: 18.02.2023 Опубликовано: 14.10.2016
Используемые термины: DNS, BIND, Linux, CentOS, Rocky Linux. Мы рассмотрим небольшой обзор по установке DNS-сервера bind на системы типа RPM (Rocky Linux, CentOS, Oracle Linux и так далее).
Подготовка сервера
Установка и запуск BIND
Базовая настройка DNS-сервера
* где 192.168.166.155 — IP-адрес нашего NS-сервера, на котором он будет принимать запросы; allow-query разрешает выполнять запросы всем, но из соображений безопасности можно ограничить доступ для конкретной сети, например, вместо any написать 192.168.166.0/24. Для применения настроек выполните команду:
Для начала проверим работу сервиса с локального компьютера. Для этого установим nslookup и выполним команду:
Для проверки работоспособности сервера с другого компьютера сети (например, на Windows) выполняем команду:

* данной командой мы пытаемся узнать IP-адреса сайта dmosk.ru через сервер 192.168.166.155. Должно получиться, примерно, следующее:
Описание глобальных опций
Перечисленные ниже параметры являются глобальными по отношению к DNS и всем настроенным зонам. Они задаются в конфигурационном файле named.conf, директиве options <>.
| Опции | Описания |
|---|---|
| directory | Указывает рабочий каталог сервера bind. Если не указан, /var/named |
| forwarders | Перечисляет серверы, на которые будет переведен запрос, в случае, если наш сервер не сможет его обработать (нет соответствующей зоны.) |
| forward | Переопределяет способ обработки запроса. Принимает два значения — ONLY или FIRST. Первое указывает на то, что сервер не будет пытаться искать совпадения среди локальных зон. Второе — сервер сначала будет перенаправлять запрос и если он не будет успешно обработан, искать соответствия во внутренней базе. |
| listen-on | На каких интерфейсах будет слушать bind |
| allow-transfer | Указание на список серверов на которые будут разрешены зонные передачи (репликация на вторичные NS) |
| allow-query | Список узлов, с которых разрешено обращаться к серверу. Если не задана, разрешено всем. |
| allow-notify | Перечисленным серверам разрешает отправку уведомлений об изменениях в настройках зоны. |
| allow-recursion | Задает список хостов, для которых разрешены рекурсивные запросы, остальным — будут разрешены итеративные. Если не задана, для всех рекурсивно. |
Пример глобальных настроек
Зоны bind
- Первичная, она же master, она же локальная. База, которая пополняется и редактируется на текущем сервере. Подробнее как настроить первичную зону bind.
- Вторичная или slave. База копирует настройки с первичной зоны на другом сервере. Подробнее как настроить вторичную зону bind.
- Заглушка или stub. Хранит у себя только записи NS, по которым все запросы переводятся на соответствующие NS-серверы.
- Кэширующая или hint. Не хранит на сетбе никаких записей — только результаты уже обработанных запросов для ускорения ответов на повторные обращения.
Решение проблем с помощью log-файлов
По умолчанию, сервер Bind под CentOS хранит логи в файле /var/named/data/named.run.
Для его непрерывного просмотра вводим следующую команду:
tail -f /var/named/data/named.run
Степень детализации логов можно настроить в конфигурационном файле:
logging channel default_debug file «data/named.run»;
severity dynamic;
>;
>;
* где file — путь к log-файлу; severity — уровень чувствительности к возникающим событиям. Возможны следующие варианты для severity:
- critical — критические ошибки.
- error — ошибки и выше (critical).
- warning — предупреждения и выше. Предупреждения не говорят о наличии проблем в работе сервиса, однако это такие событтия, которые могут привести с ошибкам, поэтому не стоит их игнорировать.
- notice — уведомления и выше.
- info — информация.
- debug — отладка (подробный лог).
- dynamic — тот же debug.
Напротив, чтобы отключить ведение лога, в конфигурационном файле должна быть настройка:
После изменения конфигурационного файла перезапускаем сервис:
Лог запросов
Если мы хотим также видеть в логе все запросы, которые приходят на bind, в командной строке вводим:
Для отключения еще раз повторяем команду:
Читайте также
Дополнительная информация по bind: