- How to Set Up Local Yum Repositories on CentOS 7
- Set Up and Configure Yum Repositories on CentOS
- Step 1: Configure Network Access
- Step 2: Create Yum Local Repository
- Step 3: Create a Directory to Store the Repositories
- Step 4: Synchronize HTTP Repositories
- Step 5: Create the New Repository
- Step 6: Setup Local Yum Repository on Client System
- Step 7: Test the Configuration
- How to configure YUM repository in Linux/Centos/Redhat | YUM in Linux/Centos/Redhat
- Как добавить репозиторий CentOS 7
- Как добавить репозиторий в CentOS вручную
- Настройка репозиториев CentOS
- Как удалить репозиторий CentOS
- Выводы
How to Set Up Local Yum Repositories on CentOS 7
In Linux, a repository is a central database of software. Linux distributions have a central repository for system and commonly-used software.
Often administrators may have a need for a specialized software package, or to manage network bandwidth. For these reasons, they need to set up a new custom local repository.
Yum is a local repository for RPM package files. These packages compress available software for Linux distributions. With the repository, you can download, install and hold packages on a local disk or remotely.
This tutorial walks you through setting up a local Yum repository on CentOS 7.
- Access to a user account with root or sudo privileges
- Access to a terminal window/command-line (Menu > Applications > Utilities > Terminal)
- The YUM (Yellowdog Updater Modified) package manager, installed by default
Set Up and Configure Yum Repositories on CentOS
Step 1: Configure Network Access
Firstly, hosting a yum repository requires you to configure the system for network access.
Yum typically delivers files over either FTP or HTTP. However, you cannot configure for both, so take a moment to decide which method you would like to use.
If you already have the system configured as a web server with Apache or an FTP server with vsftpd, skip to Step 2.
To use HTTP, install the Apache web services package with the command:
If you are using FTP instead, install the vsftpd software package with:
This is an example of an output with the latest version already installed:

Note: Instead of Apache, you can also use Nginx as a web server. Before doing so, make sure you open the correct ports on your firewall (Port 80 for HTTP, Port 21 for FTP).
Step 2: Create Yum Local Repository
One helpful tool is the createrepo software package. This software bundles several .rpm files together into a repomd repository. Install the software by entering the following:
sudo yum install createrepoNext, install yum-utils to give your system a better toolbox for managing repositories. Install yum-utils by entering the following:
sudo yum install yum-utilsThis is an example of a possible output:

Step 3: Create a Directory to Store the Repositories
Then, create a directory for an HTTP repository using:
sudo mkdir –p /var/www/html/repos/
Alternaticreate an FTP directory by typing the following:
Step 4: Synchronize HTTP Repositories
Download a local copy of the official CentOS repositories to your server. This allows systems on the same network to install updates more efficiently.
To download the repositories, use the commands:
sudo reposync -g -l -d -m --repoid=base --newest-only --download-metadata --download_path=/var/www/html/repos/sudo reposync -g -l -d -m --repoid=centosplus --newest-only --download-metadata --download_path=/var/www/html/repos/sudo reposync -g -l -d -m --repoid=extras --newest-only --download-metadata --download_path=/var/www/html/repos/sudo reposync -g -l -d -m --repoid=updates --newest-only --download-metadata --download_path=/var/www/html/repos/The system should reach out and download copies of the official repositories.
In the previous commands, the options are as follows:
- –g – lets you remove or uninstall packages on CentOS that fail a GPG check
- –l – yum plugin support
- –d – lets you delete local packages that no longer exist in the repository
- –m – lets you download comps.xml files, useful for bundling groups of packages by function
- ––repoid – specify repository ID
- ––newest-only – only download the latest package version, helps manage the size of the repository
- ––download-metadata – download non-default metadata
- ––download-path – specifies the location to save the packages
If you’re using FTP, substitute your FTP directory in the commands above. You can also use your installation CD as a source for repositories.
First, mount the cd, then copy the files into your FTP directory with the following:
cp /media/packages/* /var/ftp/reposStep 5: Create the New Repository
We’ll use the createrepo utility to create a repository.
To create the repository for HTTP use the command:
sudo createrepo /var/www/htmlThe terminal will display the following information:

Similarly, create a repository for FTP, enter the following:
Step 6: Setup Local Yum Repository on Client System
Now set up a local Yum Repository on a clients machine.
1. First, switch to the client system and login as a user with root or sudo privileges.
2. Next, you’ll need to prevent yum from downloading from the wrong location. To do this, move the default yum repository files with the following command:
This command stores the files in the /tmp/ directory. You can substitute any other location you’d like.
3. Create and edit a new config file:
sudo nano /etc/yum.repos.d/remote.repoThe system should open a new file in a text editor.
4. In the new file, enter the command (replacing the IP address with the IP address of your server):
[remote] name=RHEL Apache baseurl=http://192.168.1.10 enabled=1 gpgcheck=05. Finally, save the file and exit.
If you’re configuring for FTP, use the following instead (replacing the IP address with the IP address of your server):
[remote] name=RHEL FTP baseurl=ftp://192.168.1.10 enabled=1 gpgcheck=0Step 7: Test the Configuration
While still on the client system, run a command to install a package with the yum package manager:
The system should accordingly reach out to your server and install the software.
After following these steps, you now know how to set up a local YUM repository on CentOS 7.
In addition to downloading the default repositories (or copying them from the CD), you can also copy any other software packages into your storage folder. This provides a simple and central location that users can access and install software.
How to configure YUM repository in Linux/Centos/Redhat | YUM in Linux/Centos/Redhat
![]()
I. Make directory /dvd by using following command. This is the mount point for /dev/hdc (this my DVD rom connected at secondary master).
I I. Mount using following command
I I I. Need to copy all rpm’s from CD or DVD to /var/ftp
IV. For creating repodata we need to download createrepo rpm. Following command to download from terminal. Or use browser to download click HERE . To get the latest release click Here.
#rpm –UVH createrepo-0.4.10-1.el5.rf.noarch.rpm
# rpm –Uvh http://packages.sw.be/createrepo/createrepo- 0.4.6-1.el5.rf.noarch.rpm
V. Once installed use the following command to create the repodata files
VI. Once above done. Move *.repo files from the
#mv /etc/yum.repos.d/* /root/Desktop
Centos 5: The reason to move is if you don’t have Internet connection when you installing package with yum, which try to resolve the base centos repository file which is located in /etc/yum.repos.d/Centos-xxxx.repo. So it will not install rpm from local repository Above movement helped to install rpm from local repository. If you have Internet connection move it back to original and install rpm with yum.
VII. Edit the /etc/yum.conf file put the following lines at the end.
baseurl=ftp://youripaddress —-> for Centos 5
VIII. Clean up previous caching by following command. This is important when you are changing repo files or rpm on your repository.
IX. Install rpm with the following command.
Как добавить репозиторий CentOS 7
В операционных системах семейства Linux основное программное обеспечение хранится в репозиториях. Но далеко не всегда все нужные программы есть в официальных источниках, а поскольку свой репозиторий может создать каждый, то очень скоро появились сторонние ресурсы, в которых можно найти новые версии программ или даже таких, которых пока нет в официальных хранилищах.
В Ubuntu для таких целей используются PPA-репозитории, в CentOS такой технологии нет, но зато есть достаточно простой способ установки сторонних ресурсов через пакетный менеджер. В этой статье мы рассмотрим, как добавить репозиторий CentOS 7.
Как добавить репозиторий в CentOS вручную
Все файлы репозиториев в системе CentOS или Red Hat хранятся в каталоге /etc/yum.repos.d/, вы можете посмотреть их список с помощью такой команды:
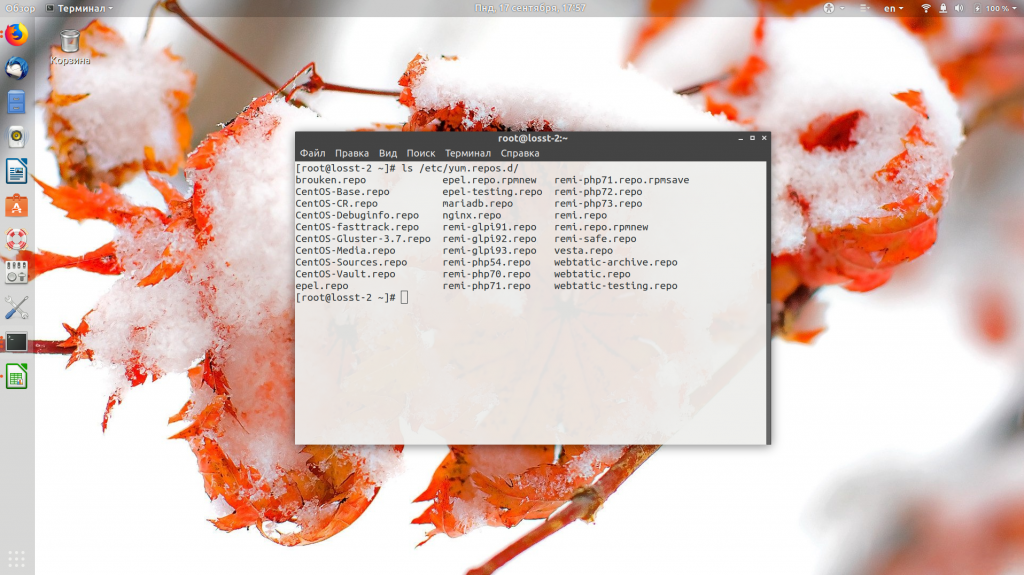
Для каждого репозитория обычно создаётся отдельный файл, но в одном файле могут находиться несколько репозиториев, которые связаны между собой. Синтаксис файла такой:
[название_репозитория]
name = описание_репозитория
mirrorlist = ссылка_на_список зеркал
baseurl = ссылка_на_зеркало с пакетами
enabled = 1
gpgcheck = 1
gpgkey = файл_ключа_подписи
А теперь разберём подробнее, что за что отвечает:
- Название репозитория будет выводиться при обновлении списка пакетов через YUM, а также может использоваться для управления настройками репозитория через yum-config-manager, о котором мы поговорим ниже.
- Атрибутиы mirrorlist и baseurl взаимозаменяемы, если используется один из них, то другой не нужен. Например, мы можем сразу указать ссылку на архив пакетов с помощью baseurl или указать URL, по которому можно скачать список таких ссылок. Конечно, второе предпочтительнее.
- Параметр enabled позволяет включить или отключить репозиторий.
- Параметр gpgcheck включает проверку цифровой подписи пакетов, а gpgkey — указывает адрес ключа, с которым надо сверять подпись. Эти параметры не обязательны.
Таким образом, чтобы подключить репозитории CentOS, необходимо просто добавить в эту папку файл настроек репозитория.
Например, вы хотите установить пакеты из репозитория, которые доступны по URL: http://vault.centos.org/centos/7.4.1708/extras/x86_64/Packages/. Тогда конфигурация репозитория будет выглядеть вот так:
[extras741708]
name=Extras packages for CentOS 7.4.1708 for x86_64
baseurl=http://vault.centos.org/centos/7.4.1708/extras/x86_64/
enabled=1

Если вы хотите использовать для репозитория проверку подписи по GPG-ключу, то надо передать URL, по которому этот ключ можно получить с помощью параметра gpgkey.
Но обычно вам не придётся этого всего делать. Большинство популярных репозиториев уже позаботились обо всём этом и создали свой rpm-пакет, который устанавливает все нужные им настройки и ключи. Обычно эти пакеты и саму команду для их установки можно найти на официальном сайте репозитория. Установка репозитория CentOS 7 NUX выполняется такой командой:
yum install -y http://li.nux.ro/download/nux/dextop/el7/x86_64/nux-dextop-release-0-1.el7.nux.noarch.rpm
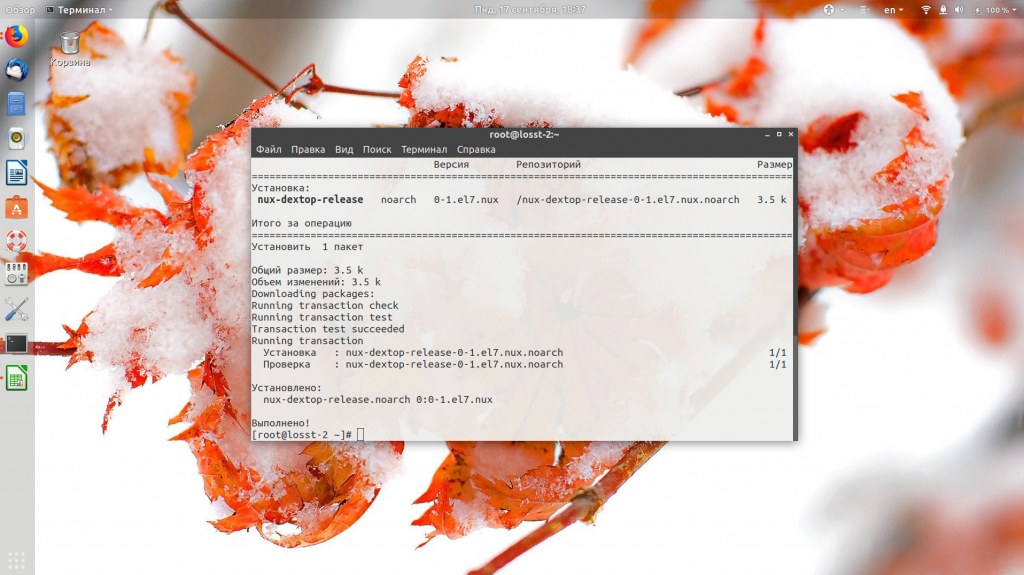
Утилита yum скачает и установит все необходимые конфигурационные файлы. И при следующем обращении к YUM будет загружен список пакетов этого репозитория.
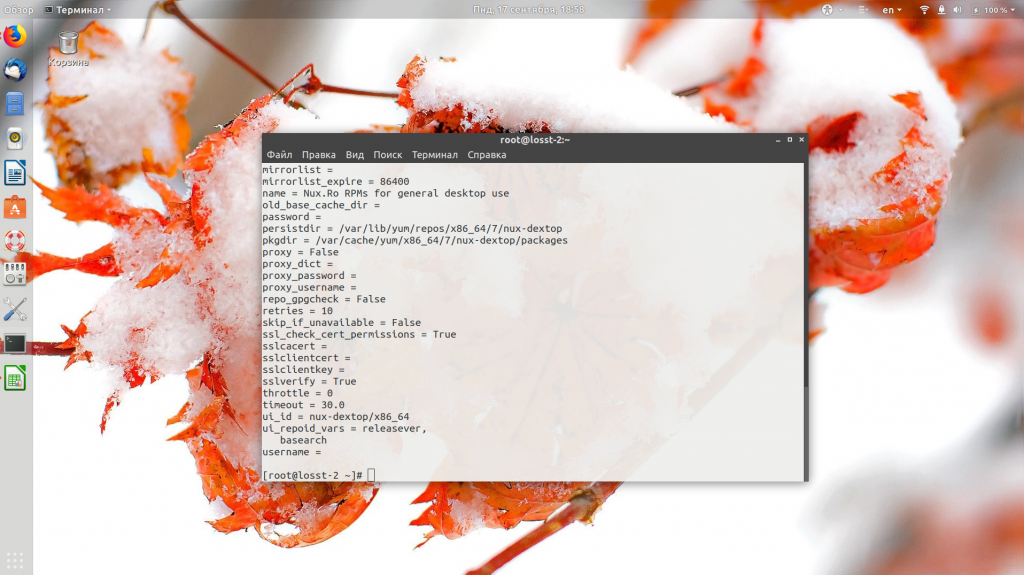
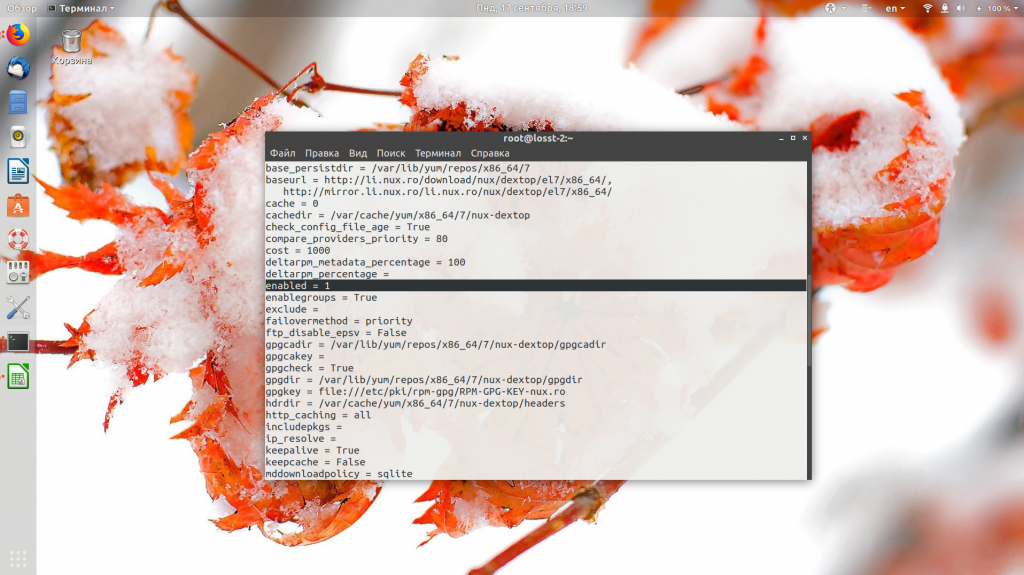
Дальше вы можете устанавливать из него пакеты. Также можно проверить конфигурацию репозитория:
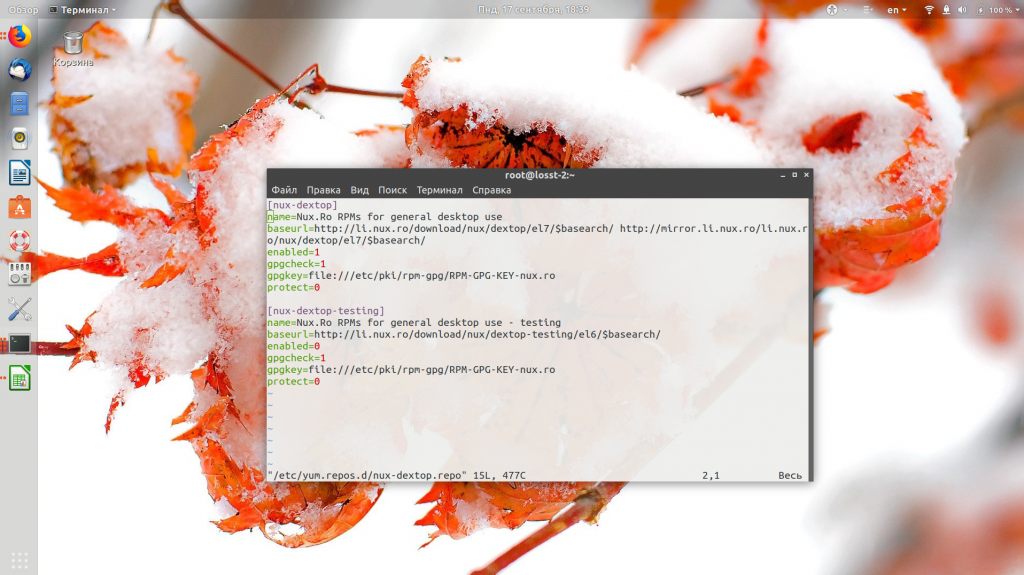
Как видите, здесь есть два репозитория: nux-desktop и nux-desktop-testing. Первый включён по умолчанию, а второй отключён. Вы можете включить его, поставив в параметре enabled значение 1.
Настройка репозиториев CentOS
В Red Hat есть утилита subscribtion-manager, которая позволяет управлять подключёнными репозиториями, устанавливать их и менять конфигурации. Она проприетарная, поэтому из CentOS вырезана. Но настройка репозитория CentOS 7 необязательно должна выполняться вручную. Существует специальная утилита — yum-config-manager, правда, она не поставляется вместе с системой и её надо установить:
Утилита имеет несколько опций, но мы будем использовать только некоторые из них:
- —add-repo — добавить репозиторий;
- —enable — активировать репозиторий;
- —disable — отключить репозиторий;
- —setopt — установить значение параметра репозитория;
Опции —add-repo надо передать адрес файла .repo с описанием репозитория, поэтому она используется очень редко, а вот для включения или отключения репозиториев утилиту использовать очень удобно. Например, отключаем репозиторий nux-dextop:
yum-config-manager —disable nux-dextop
yum-config-manager —enable nux-dextop
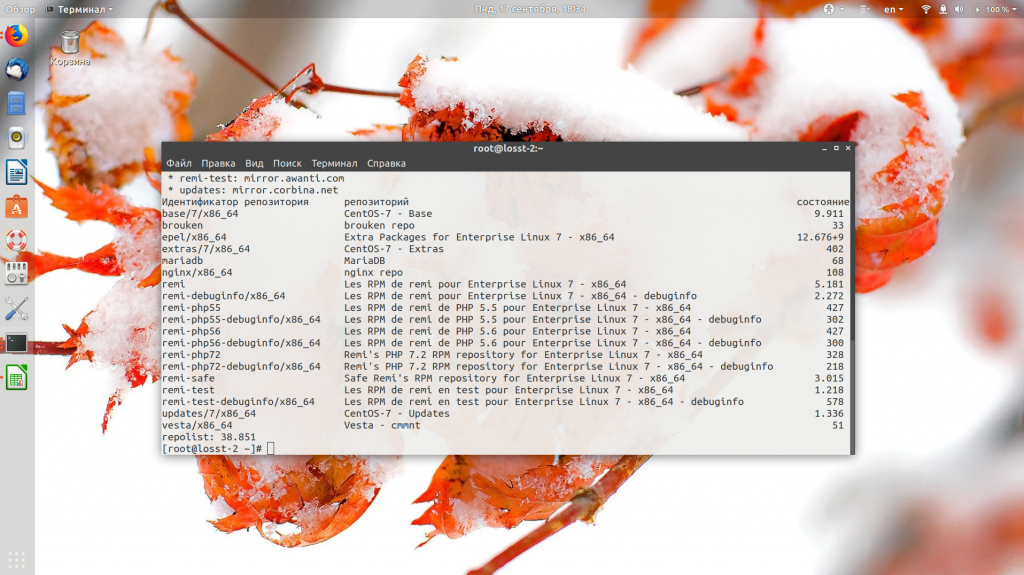
Если всё прошло так, как надо, то утилита выведет новую конфигурацию, если же ничего не выведено, значит такой пакет не найден. Проверьте, правильно ли вы вводите название репозитория с помощью команды:
Как удалить репозиторий CentOS
Чтобы удалить репозиторий CentOS из системы, достаточно удалить его файл из папки /etc/yum.repos.d или удалить пакет, которым вы его устанавливали. Например, удаляем репозиторий nux-dextop:
yum remove nux-dextop-release

Если репозиторий устанавливался через пакет, то такой метод удаления предпочтительнее, так как система удалит всё, что было установлено. Если же мы добавляли репозиторий вручную, достаточно удалить файл с его настройками:
Теперь этого репозитория больше нет в системе.
Выводы
В этой статье мы рассмотрели, как выполняется подключение репозитория CentOS 7. Как видите, это не сложнее, чем в Ubuntu. Преимущество Ubuntu только в том, что у неё есть централизованная база таких репозиториев и поиск по ней. А для CentOS репозитории надо искать в интернете.
Обнаружили ошибку в тексте? Сообщите мне об этом. Выделите текст с ошибкой и нажмите Ctrl+Enter.