- How to Set Up OpenLDAP Server on Ubuntu 22.04/20.04
- What is OpenLDAP
- Step 1: Install OpenLDAP Server on Ubuntu 22.04/20.04
- Step 2: Basic Post-Installation Configuration
- Step 3: Configuring the LDAP Clients
- Step 4: Testing OpenLDAP Server
- Step 5: Installing phpLDAPadmin
- If you use Apache
- If you use Nginx
- Step 6: Configuring phpLDAPadmin
- Step 7: Accessing phpLDAPadmin Web Interface
- Install and Configure Linux LDAP
- Step 1: Set Hostname and IP for the Ubuntu Server
- Step 2: Install the OpenLDAP Server to the Ubuntu 22.04 System
- Step 3: Confirm If the Installation Is Successful
- Step 4: Add a Base DN for all the Users and Groups
- Step 5: Configure the LDAP Server by Adding User Accounts and Groups
- Step 6: Configure the LDAP Database
- Conclusion
- About the author
- Kennedy Brian
How to Set Up OpenLDAP Server on Ubuntu 22.04/20.04
In this tutorial, we are going to take a look at installing and Configuring OpenLDAP server on Ubuntu 22.04/20.04 LTS. We will also install the phpLDAPadmin web-based management tool.
What is OpenLDAP
OpenLDAP is an open-source and fast directory server that provides network clients with directory services. Client applications connect to OpenLDAP server using the Lightweight Directory Access Protocol (LDAP) to access organizational information stored on that server. Given the appropriate access, clients can search the directory, modify and manipulate records in the directory. OpenLDAP is efficient in both reading and modifying data in the directory.
OpenLDAP servers are most commonly used to provide centralized management of user accounts. For example, you can create an account in OpenLDAP and if it is connected with a mail server, FTP server, Samba server, or any other server, you can use the account to log in to these servers without creating a new account for each server.
Step 1: Install OpenLDAP Server on Ubuntu 22.04/20.04
Run the following command to install OpenLDAP server and the client command-line utilities from Ubuntu 22.04/20.04 package repository. slapd stands for the Stand-Alone LDAP Daemon.
sudo apt install slapd ldap-utils
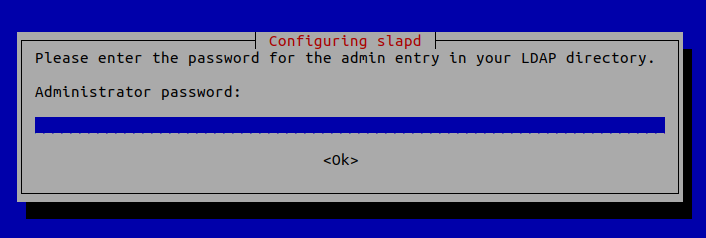
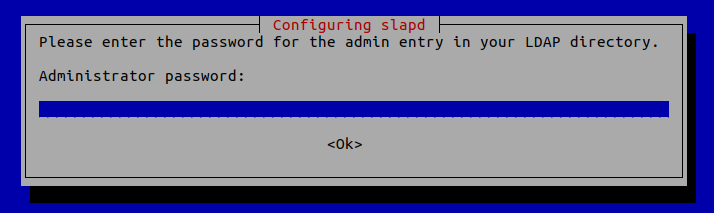
You will be asked to set a password for the admin entry in the LDAP directory.
Once it’s done, slapd will be automatically started. You can check out its status with:
Be default, it runs as the openldap user as is defined in /etc/default/slapd file.
Step 2: Basic Post-Installation Configuration
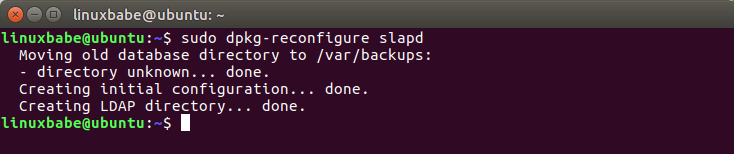
The installation process installs the package without any configurations. To have our OpenLDAP server running properly, we need to do some basic post-installation configuration. Run the following command to start the configuration wizard.
sudo dpkg-reconfigure slapd
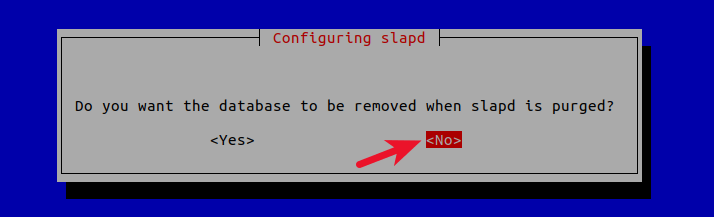
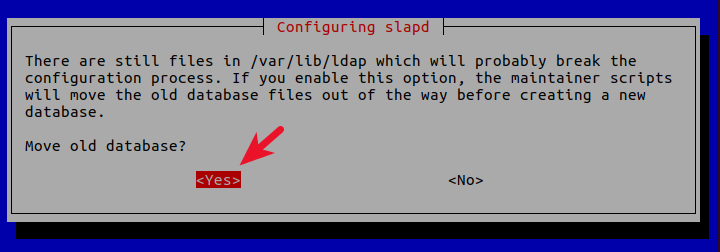
You will need to answer a series of questions. Answer these questions as follows:
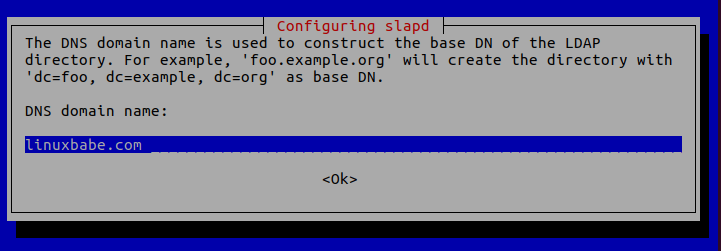
- DNS domain name: Enter your domain name like linuxbabe.com . You will need to set a correct A record for your domain name. You can also use a subdomain like directory.linuxbabe.com . This information is used to create the base DN (distinguished name) of the LDAP directory.
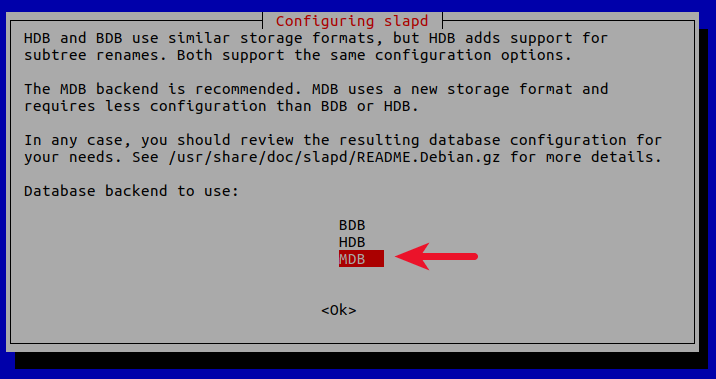
- Database backend to use: MDB.
- BDB (Berkeley Database) is slow and cumbersome. It is deprecated and support will be dropped in future OpenLDAP releases.
- HDB (Hierarchical Database) is a variant of the BDB backend and will also be deprecated.
- MDB reads are 5-20x faster than BDB. Writes are 2-5x faster. And it consumes 1/4 as much RAM as BDB. So we choose MDB as the database backend.
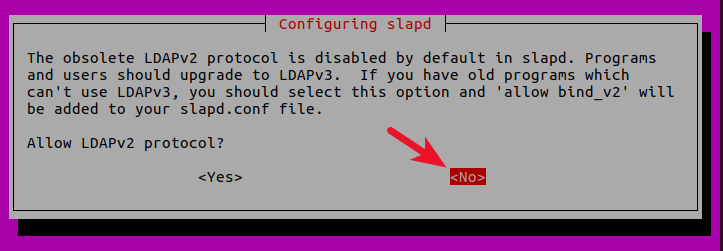
- Allow LDAPv2 protocol? No. The latest version of LDAP is LDAP v.3, developed in 1997. LDAPv2 is obsolete.
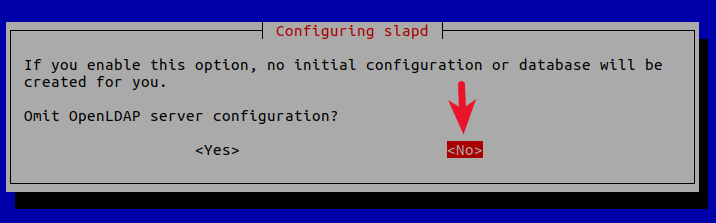
Now the process will reconfigure the OpenLDAP service according to your answers. Your OpenLDAP server is now ready to use.
Step 3: Configuring the LDAP Clients
/etc/ldap/ldap.conf is the configuration file for all OpenLDAP clients. Open this file.
sudo nano /etc/ldap/ldap.conf
We need to specify two parameters: the base DN and the URI of our OpenLDAP server. Copy and paste the following text at the end of the file. Replace your-domain and com as appropriate.
BASE dc=your-domain,dc=com URI ldap://localhost
The first line defines the base DN. It tells the client programs where to start their search in the directory. If you used a subdomain when configuring OpenLDAP server, then you need to add the subdomain here like so
BASE dc=subdomain,dc=your-domain,dc=com
The second line defines the URI of our OpenLDAP server. Since the LDAP server and client are on the same machine, we should set the URI to ldap://localhost .
Step 4: Testing OpenLDAP Server
Now that OpenLDAP server is running and client configuration is done, run the following command to make test connections to the server.
# extended LDIF # # LDAPv3 # base (default) with scope subtree # filter: (objectclass=*) # requesting: ALL # # linuxbabe.com dn: dc=linuxbabe,dc=com objectClass: top objectClass: dcObject objectClass: organization o: LinuxBabe # admin, linuxbabe.com dn: cn=admin,dc=linuxbabe,dc=com objectClass: simpleSecurityObject objectClass: organizationalRole cn: admin description: LDAP administrator # search result search: 2 result: 0 Success # numResponses: 3 # numEntries: 2 Result: 0 Success indicates that OpenLDAP server is working. If you get the following line, then it’s not working.
Step 5: Installing phpLDAPadmin
phpLDAPadmin is a web-based program for managing OpenLDAP server. The command-line utilities can be used to manage our OpenLDAP server, but for those who want an easy-to-use interface, you can install phpLDAPadmin.
Run the following command to install phpLDAPadmin from Ubuntu package repository.
sudo apt install phpldapadmin
If your Ubuntu server doesn’t have a web server running, then the above command will install the Apache web server as a dependency. If there’s already a web server such as Nginx, then Apache won’t be installed.
If you use Apache
The installation will put a configuration file phpldapadmin.conf under /etc/apache2/conf-enabled/ directory. Once the installation is done, you can access phpLDAPadmin web interface at
your-domain.com/phpldapadmin
To enable HTTPS, you can obtain and install a free TLS certificate issued from Let’s Encrypt.
If you use Nginx
Nginx users will need to manually create a server block file for phpLDAPadmin.
sudo nano /etc/nginx/conf.d/phpldapadmin.conf
Copy the following text and paste it to the file. Replace ldap.your-domain.com with your preferred domain name.
server < listen 80; server_name ldap.your-domain.com; root /usr/share/phpldapadmin/htdocs; index index.php index.html index.htm; error_log /var/log/nginx/phpldapadmin.error; access_log /var/log/nginx/phpldapadmin.access; location ~ \.php$ < fastcgi_pass unix:/run/php/php7.4-fpm.sock; fastcgi_index index.php; fastcgi_param SCRIPT_FILENAME $document_root/$fastcgi_script_name; include fastcgi_params; >> Save and close the file. Then text Nginx configurations.
If the test is successful, reload Nginx for the changes to take effect.
sudo systemctl reload nginx
Now you can access phpLDAPadmin web interface at ldap.your-domain.com . To enable HTTPS, you can obtain and install a free TLS certificate issued from Let’s Encrypt.
Step 6: Configuring phpLDAPadmin
We need to do some configurations just like we did with the command-line client. The phpLDAPadmin configuration file is at /etc/phpldapadmin/config.php .
sudo nano /etc/phpldapadmin/config.php
Since OpenLDAP and phpLDAPadmin are running on the same machine, so we will configure phpLDAPadmin to connect to localhost on the default LDAP port 389 without SSL/TLS encryption.
Line 293 specifies that phpLDAPadmin will connect to localhost.
$servers->setValue('server','host','127.0.0.1'); Line 296 is commented out by default, which means the standard port 389 will be used.
// $servers->setValue('server','port',389); Line 335 is commented out by default, which means TLS encryption is not enabled.
// $servers->setValue('server','tls',false); $servers->setValue('server','base',array('dc=example,dc=com')); $servers->setValue('server','base',array()); This will let phpLDAPadmin automatically detect the base DN of your OpenLDAP server. Next, you can disable anonymous login. Go to line 453.
// $servers->setValue('login','anon_bind',true); By default, anonymous login is enabled. To disable it, you need to remove the comment character (the two slashes) and change true to false.
$servers->setValue('login','anon_bind',false); You will probably want to disable template warnings because these warnings are annoying and unimportant. Go to line 161.
// $config->custom->appearance['hide_template_warning'] = false;
Remove the comment character and change false to true.
$config->custom->appearance['hide_template_warning'] = true;
Step 7: Accessing phpLDAPadmin Web Interface
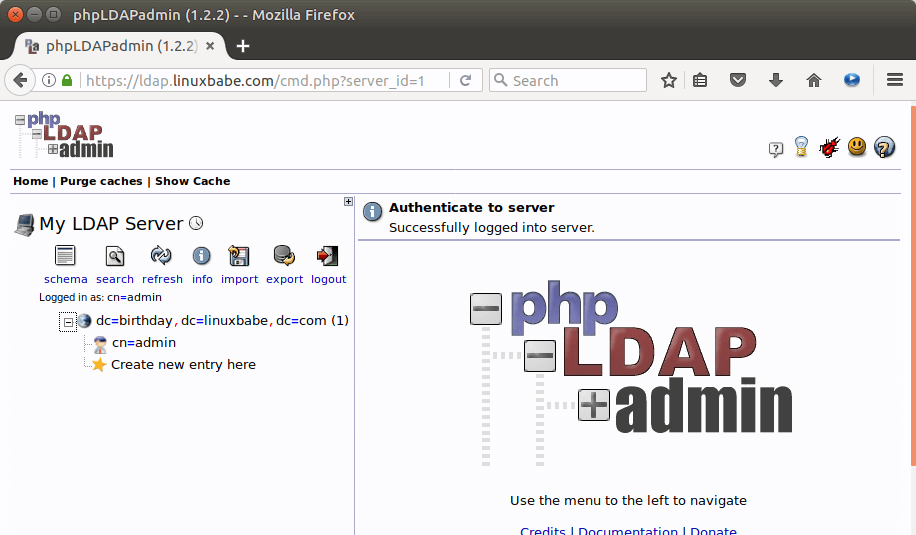
We can now test out the phpLDAPadmin tool with our web browser. When phpLDAPadmin first loads, it looks something like this.

To log into our OpenLDAP server, click on the login link. You will see the login dialog box. The default login DN is cn=admin,dc=example,dc=com . You may need to change dc=example . In my case, I need to change the login DN to cn=admin,dc=linuxbabe,dc=com .
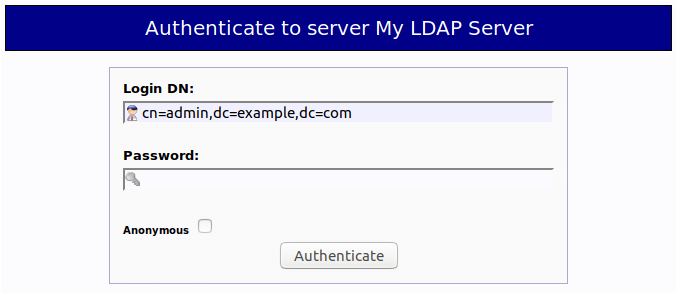
The password is the admin password you set during the configuration of OpenLDAP server. Once you log into phpLDAPadmin, you can manage this directory server.
That’s it! I hope this tutorial helped you install and configure both OpenLDAP server and phpLDAPadmin on Ubuntu 22.04/20.04. In the next tutorial, we will see how to configure Ubuntu to authenticate user logins with OpenLDAP.
Install and Configure Linux LDAP
![]()
LDAP, or Lightweight Directory Access Protocol, is an open-vendor protocol for accessing directory information such as X.500 service containers. It is useable in Linux and other OS environments.
This write-up describes how to set up the LDAP directory on a Linux server. It will provide a step-by-step tutorial on installing, configuring, and testing the OpenLDAP server on Linux systems. It is an open-source implementation of LDAP.
This guide will use Ubuntu 22.04|20.04|18.04 LTS as our operating software.
Step 1: Set Hostname and IP for the Ubuntu Server
So, set a hostname for your system before beginning the installation process. This command should help:

As the host, you should proceed to add your IP address to the /etc/hosts file as shown below:
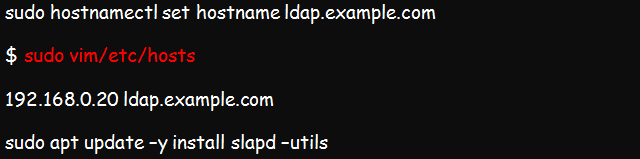
At this point, you can replace example.com with your valid hostname. For example, I may choose to use kenhint.com instead.
Step 2: Install the OpenLDAP Server to the Ubuntu 22.04 System
The actual installation begins at this point. And you will need to begin by installing LDAP alongside some of its management utilities and packages. This command will help you accomplish the installation on Ubuntu 22.04:

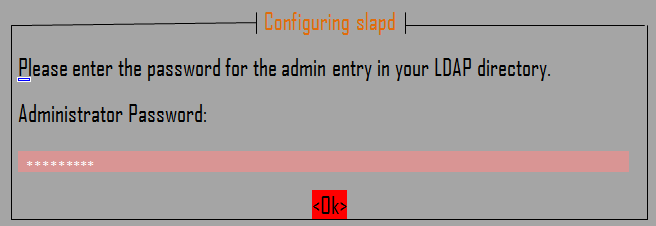
As part of the installation, you will see a prompt to set your LDAP administrator password. Enter your preferred password in the provided space and press to continue. This will be the interface on your screen:
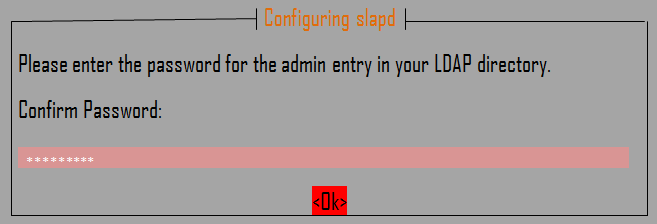
The following interface will prompt you to enter the password. Key in your password again and press OK.
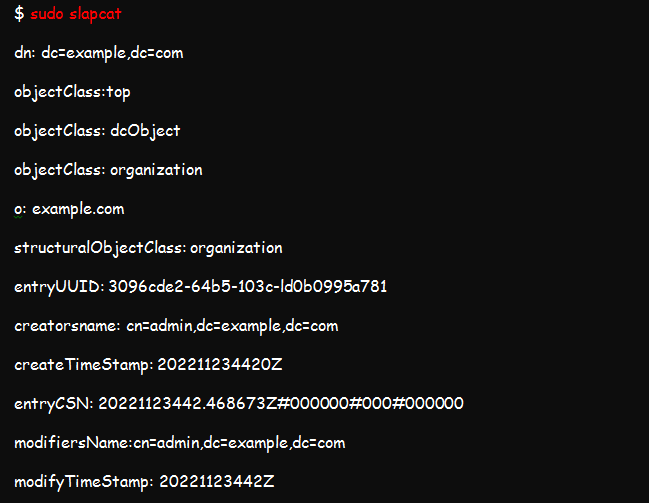
Step 3: Confirm If the Installation Is Successful
You can use the slapcat command to review the contents and packages in your installation. Expect an outcome similar to the ones in the screenshot below:

The result of the above command should read as shown in this illustration;
Step 4: Add a Base DN for all the Users and Groups
You can add a base DN for each user or group by creating a basedn.ldif file with the following contents:
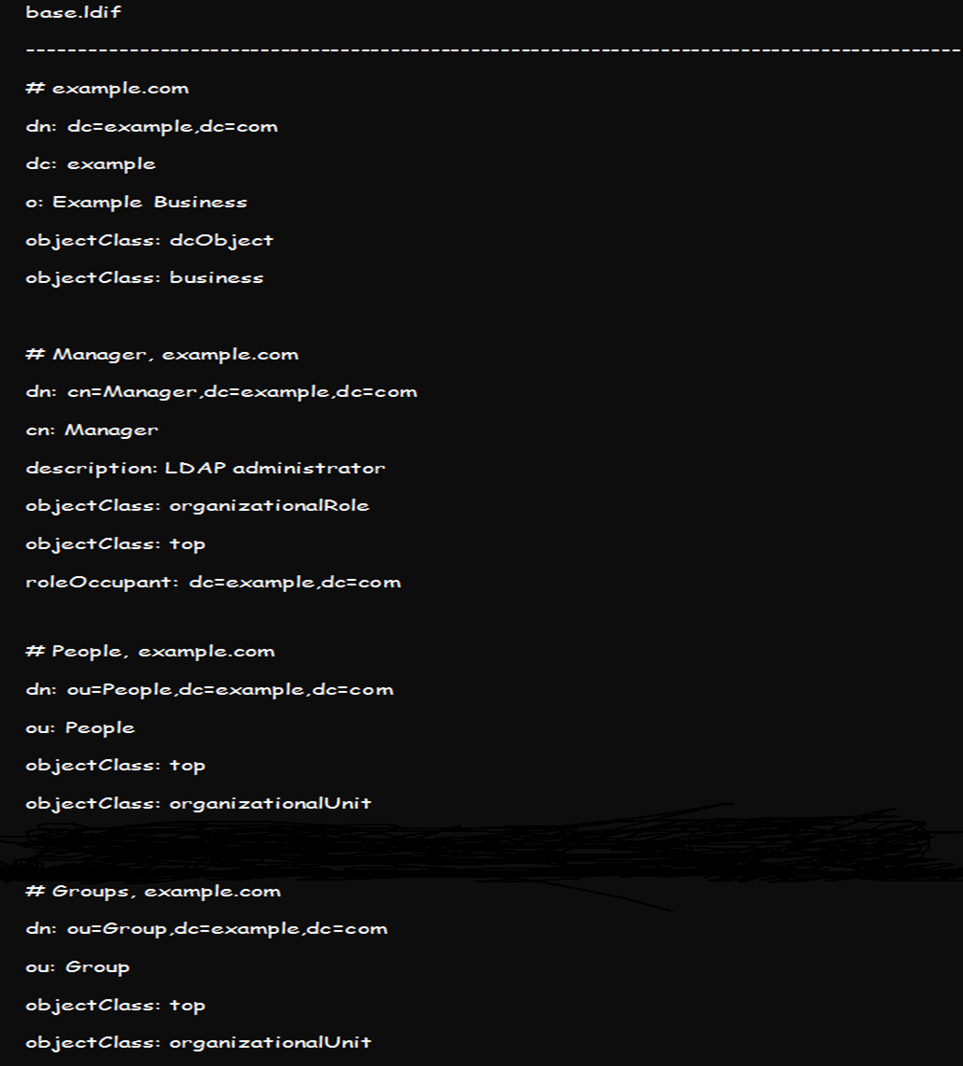
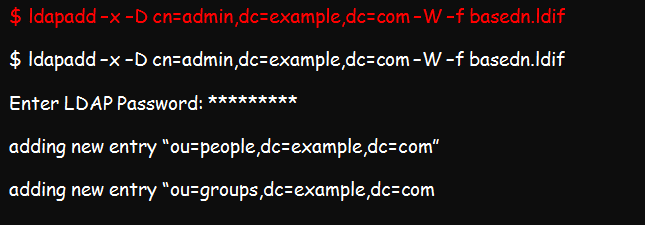
Create a similar base DN for groups using the above format and replace the example and com in the file with your correct domain credentials and add the base file by running this command:
Step 5: Configure the LDAP Server by Adding User Accounts and Groups
Firstly, it is not recommended to edit the LDAP configuration files manually. So, for better results, it is advisable to add your edits into the configuration file and either use ldapmodify or ldapadd commands to load them into the directory.
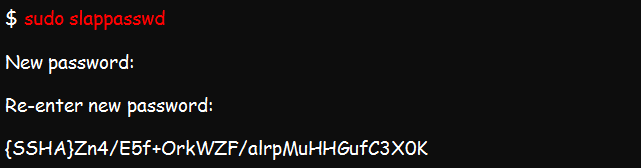
You can create an OpenLDAP user account and assign a password to the account with the slappasswd command.
Proceed to create a ldif file which you will use for adding users.
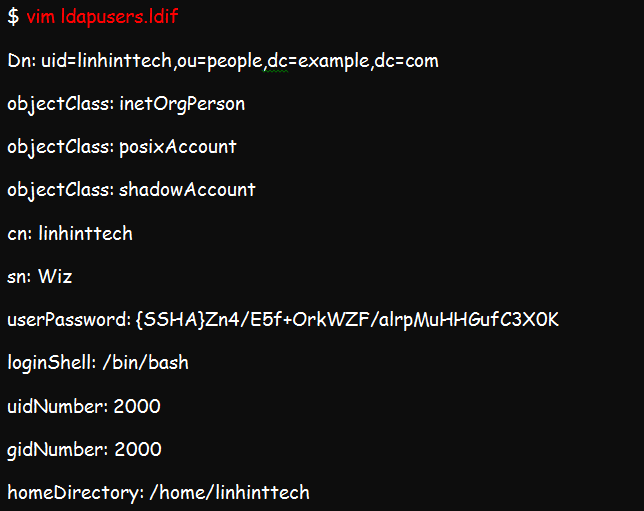
We already talked about how you can replace example and com with the right domain credentials. Now, replace Zn4/E5f+Ork7WZF/alrpMuHHGufC3x0k with your password, cn and sn with the correct username values, and linhinttechs with the username you expect to add.
Once you are done editing, you are free to add the account by running this command:

You can do the same to create a group account by first creating the ldif file. This file is what you will use for adding entries into the directory.
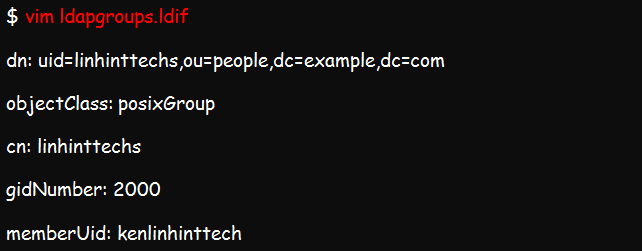
Now, add the group by running this command:

Step 6: Configure the LDAP Database
Configuring the LDAP database starts with copying the sample database of slapd file into the corresponding /var/lib/ldap directory. You can then set the recommended permissions as in the screenshot below:

Import common LDAP protocol schemas from /etc/openldap/schema directory into the database. This example should help:

Add your domain to the database and create the ldapdomain.ldif, which will help you modify the credentials in the database. Create the file using the below command:

Add the following required information and replace the relevant sections as earlier advised and add the outcome into the database using the following command:

Conclusion
OpenLDAP is an open-vendor implementation of the LDAP protocol in Linux environments. The article demonstrates how to install and set up the OpenLDAP server and database for centralized authentication in Ubuntu.
About the author
Kennedy Brian
Brian is a computer scientist with a bias for software development, programming, and technical content development. He has been in the profession since 2015. He reads novels, jogs, or plays table tennis whenever not on gadgets. He is an expert in Python, SQL, Java, and data and network security.