- Connect to Wi-Fi From Terminal on Debian 11/10 with WPA Supplicant
- Step 1: Find The Name of Your Wireless Interface And Wireless Network
- Step 2: Connect to Wi-Fi Network With WPA_Supplicant
- Connecting to Hidden Wireless Network
- Step 3: Auto-Connect At System Boot Time
- How to Obtain a Static IP Address
- Multiple Wi-Fi Networks
- Wi-Fi Security
- Wrapping Up
- Configuring Wi-Fi on Debian 10
- Method of Configuring Wi-Fi on Debian 10:
- Conclusion:
- About the author
- Karim Buzdar
Connect to Wi-Fi From Terminal on Debian 11/10 with WPA Supplicant
This tutorial is going to show you how to connect to Wi-Fi network from the command line on Debian 11/10 server and desktop using wpa_supplicant, which is an implementation of the supplicant component for the WPA protocol. A supplicant in wireless LAN is client software installed on end-user’s computer that needs to be authenticated in order to join a network.
Please note that you will need to install the wpa_supplicant software before connecting to Wi-Fi, so you need to connect to Wired Ethernet first, which is done for just one time. If you don’t like this method, please don’t be mad at me. Maybe someday Debian will ship wpa_supplicant out of the box.
Step 1: Find The Name of Your Wireless Interface And Wireless Network
Run iwconfig command to find the name of your wireless interface.
wlan0 is a common name for a wireless network interface on Linux systems. On systemd-based Linux distros, you might have a wireless interface named wlp4s0 .
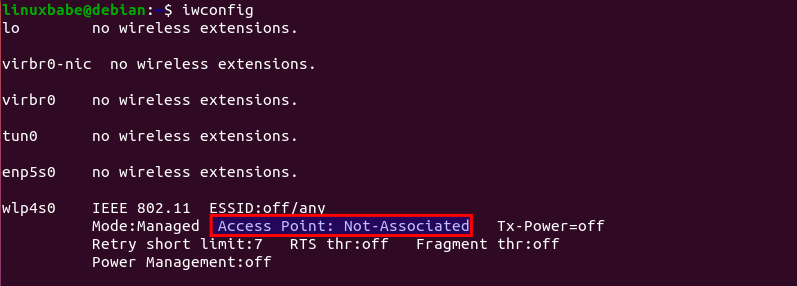
As you can see, the wireless interface isn’t associated with any access point right now. Then run the following command to bring up the wireless interface.
sudo ip link set dev wlp4s0 up If you encounter the following error,
RTNETLINK answers: Operation not possible due to RF-kill
you need to unblock Wi-Fi with the following command.
Next, find your wireless network name by scanning nearby networks with the command below. Replace wlp4s0 with your own wireless interface name. ESSID is the network name identifier.
sudo iwlist wlp4s0 scan | grep ESSID 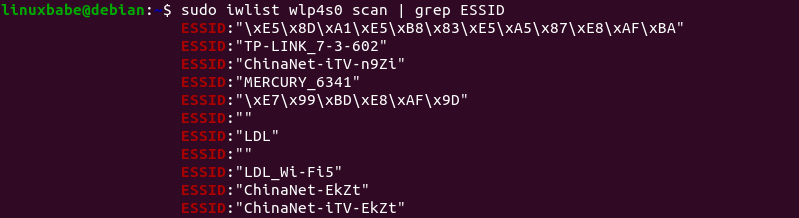
Step 2: Connect to Wi-Fi Network With WPA_Supplicant
Now install wpa_supplicant on Debian 11/10 from the default software repository.
sudo apt install wpasupplicant
We need to create a file named wpa_supplicant.conf using the wpa_passphrase utility. wpa_supplicant.conf is the configuration file describing all networks that the user wants the computer to connect to. Run the following command to create this file. Replace ESSID (network name) and Wi-Fi passphrase with your own.
wpa_passphrase your-ESSID your-wifi-passphrase | sudo tee -a /etc/wpa_supplicant/wpa_supplicant.conf

If your ESSID contains whitespace such as ( linuxbabe WiFi ), you need to wrap the ESSID with double-quotes ( «linuxbabe WiFi» ) in the above command.
The output of wpa_passphrase command will be piped to tee , and then written to the /etc/wpa_supplicant/wpa_supplicant.conf file. Now use the following command to connect your wireless card to the wireless access point.
sudo wpa_supplicant -c /etc/wpa_supplicant/wpa_supplicant.conf -i wlp4s0 The following output indicates your wireless card is successfully connected to an access point.
Successfully initialized wpa_supplicant wlp4s0: SME: Trying to authenticate with c5:4a:21:53:ac:eb (SSID='CMCC-11802' freq=2437 MHz) wlp4s0: Trying to associate with c5:4a:21:53:ac:eb (SSID='CMCC-11802' freq=2437 MHz) wlp4s0: Associated with c5:4a:21:53:ac:eb wlp4s0: CTRL-EVENT-SUBNET-STATUS-UPDATE status=0 wlp4s0: WPA: Key negotiation completed with c5:4a:21:53:ac:eb [PTK=CCMP GTK=CCMP] wlp4s0: CTRL-EVENT-CONNECTED - Connection to c5:4a:21:53:ac:eb completed [id=0 id_str=]
Note that if you are using Debian desktop edition, then you need to stop Network Manager with the following command, otherwise it will cause a connection problem when using wpa_supplicant.
sudo systemctl stop NetworkManager
And disable NetworkManager auto-start at boot time by executing the following command.
sudo systemctl disable NetworkManager-wait-online NetworkManager-dispatcher NetworkManager
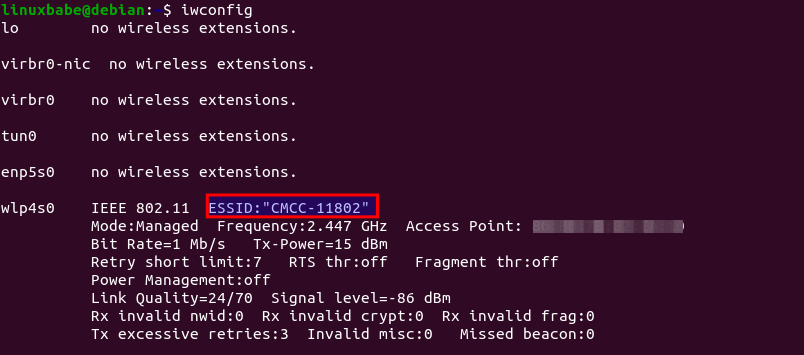
By default, wpa_supplicant runs in the foreground. If the connection is completed, then open up another terminal window and run
You can see that the wireless interface is now associated with an access point.
You can press CTRL+C to stop the current wpa_supplicant process and run it in the background by adding the -B flag.
sudo wpa_supplicant -B -c /etc/wpa_supplicant.conf -i wlp4s0
Although we’re authenticated and connected to a wireless network, we don’t have an IP address yet. To obtain a private IP address from DHCP server, use the following command:
Now your wireless interface has a private IP address, which can be shown with:

Now you can access the Internet. To release the private IP address, run
Connecting to Hidden Wireless Network
If your wireless router doesn’t broadcast ESSID, then you need to add the following line in /etc/wpa_supplicant/wpa_supplicant.conf file.
Step 3: Auto-Connect At System Boot Time
To automatically connect to wireless network at boot time, we need to edit the wpa_supplicant.service file. It’s a good idea to copy the file from /lib/systemd/system/ directory to /etc/systemd/system/ directory, then edit the file content, because we don’t want a newer version of wpa_supplicant to override our modifications.
sudo cp /lib/systemd/system/wpa_supplicant.service /etc/systemd/system/wpa_supplicant.service
Edit the file with a command-line text editor, such as Nano.
sudo nano /etc/systemd/system/wpa_supplicant.service
ExecStart=/sbin/wpa_supplicant -u -s -O /run/wpa_supplicant
Change it to the following. Here we added the configuration file and the wireless interface name to the ExecStart command.
ExecStart=/sbin/wpa_supplicant -u -s -c /etc/wpa_supplicant/wpa_supplicant.conf -i wlp4s0 It’s recommended to always try to restart wpa_supplicant when failure is detected. Add the following right below the ExecStart line.
Save and close the file. (To save a file in Nano text editor, press Ctrl+O , then press Enter to confirm. To exit, press Ctrl+X .) Then reload systemd.
sudo systemctl daemon-reload
Enable wpa_supplicant service to start at boot time.
sudo systemctl enable wpa_supplicant.service
We also need to start dhclient at boot time to obtain a private IP address from DHCP server. This can be achieved by creating a systemd service unit for dhclient .
sudo nano /etc/systemd/system/dhclient.service
Put the following text into the file.
[Unit] Description= DHCP Client Before=network.target After=wpa_supplicant.service [Service] Type=forking ExecStart=/sbin/dhclient wlp4s0 -v ExecStop=/sbin/dhclient wlp4s0 -r Restart=always [Install] WantedBy=multi-user.target
Save and close the file. Then enable this service.
sudo systemctl enable dhclient.service
How to Obtain a Static IP Address
If you want to obtain a static IP address, then you need to disable dhclient.service .
sudo systemctl disable dhclient.service
Create a network config file.
sudo nano /etc/systemd/network/static.network
[Match] Name=wlp4s0 [Network] Address=192.168.1.8/24 Gateway=192.168.1.1
Save and close the file. Then create a .link file for the wireless interface.
sudo nano /etc/systemd/network/10-wifi.link
Add the following lines in this file. You need to use your own MAC address and wireless interface name. This is to prevent the system from changing the wireless interface name.
[Match] MACAddress=a8:4b:05:2b:e8:54 [Link] NamePolicy= Name=wlp4s0
Save and close the file. Then disable the networking.service and enable systemd-networkd.service , which will take care of networking.
sudo systemctl disable networking sudo systemctl enable systemd-networkd
You can now restart systemd-networkd to see if your configuration works.
sudo systemctl restart systemd-networkd
Another way to obtain a static IP address is by logging into your router’s management interface and assigning a static IP to the MAC address of your wireless card, if your router supports this feature.
Recommended Reading:
Multiple Wi-Fi Networks
The /etc/wpa_supplicant.conf configuration file can include multiple Wi-Fi networks. wpa_supplicant automatically selects the best network based on the order of network blocks in the configuration file, network security level, and signal strength.
To add a second Wi-Fi network, run:
wpa_passphrase your-ESSID your-wifi-passphrase | sudo tee -a /etc/wpa_supplicant/wpa_supplicant.conf Note that you need to use the -a option with the tee command, which will append, instead of deleting the original content, the new Wifi-network to the file.
Wi-Fi Security
Do not use WPA2 TKIP or WPA2 TKIP+AES as the encryption method in your Wi-Fi router. TKIP is not considered secure anymore. You can use WPA2-AES as the encryption method.
Wrapping Up
I hope this tutorial helped you connect Debian 11/10 to Wi-Fi network from the command line with WPA Supplicant. As always, if you found this post useful, then subscribe to our free newsletter to get more tips and tricks 🙂
Configuring Wi-Fi on Debian 10
![]()
Before the advent of Wi-Fi, people used to have wired connections for accessing the Internet. However, these types of connections had some major concerns associated with them. A very common issue was that if the wire gets damaged or broken accidentally, you will immediately lose your Internet access. Therefore, wired connections were considered as highly unreliable. Wi-Fi networks resolved this issue to a great extent.
Moreover, they also provided us with the ability to connect multiple devices to the Internet with the help of a single access point, whereas, in the case of a wired network, we needed separate wires for each device. Therefore, most of the people these days prefer to use Wi-Fi networks. In this article, we will explain to you the method of configuring Wi-Fi on Debian 10.
Method of Configuring Wi-Fi on Debian 10:
For configuring Wi-Fi on Debian 10, you will need to perform the following steps:
1.Click on the Activities tab located on your desktop and then type terminal in the search bar that appears. Click on the search result to launch the terminal. The newly opened terminal window is shown in the image below:

2. Now you need to check the general status of the Network Manager. For doing that, type the following command in your terminal and then press the Enter key:
This command, along with its output, is shown in the following image:

3. After doing this, you need to see all the current connections. For doing that, type the following command in your terminal and then press the Enter key:
This command, along with its output, is shown in the image below:

4. The point to be noted over here is that Wi-Fi can only be configured on those devices that are recognized by your Network Manager. To ensure that, you will need to check your device status. For doing that, you need to type the following command in your terminal and then press the Enter key:
This command, along with its output, is shown in the following image:

5. After ensuring that your device is recognized by the Network Manager, you need to look for all the available Wi-Fi networks. For doing that, type the following command in your terminal and then press the Enter key:
As soon as this command executes successfully, you will be able to see a list of all the available Wi-Fi networks along with their SSIDs. This command is also shown in the image below:

6. From the list of the available Wi-Fi networks, you need to choose the network to which you want to connect. Now type the following command in your terminal and then press the Enter key:
Here, replace SSID_OF_CHOSEN_NETWORK with the SSID of your desired network. In this example, I wanted to connect to the Wi-Fi network with the SSID “……”. Therefore, I have replaced SSID_OF_CHOSEN_NETWORK with “……”. This command is also shown in the following image:

7. If this command is executed successfully, you will receive a “Connection Successfully Added” message as shown in the image below:

8. Now you will need to set up a password for this newly added Wi-Fi network. For doing that, type the following command in your terminal and then press the Enter key:
Here, replace PASSWORD with a password of your choice that you want to set up for your newly added Wi-Fi network. In this example, I wanted to set my password as “1234”. Therefore, I have replaced the PASSWORD with “1234”. If this command is executed successfully, you will always be asked to enter this password while connecting to the newly added Wi-Fi network. This command is shown in the following image:

9. Finally, you will need to enable this Wi-Fi connection. For doing that, you need to type the following command in your terminal and then press the Enter key:
Running this command will render you all set for using the newly configured Wi-Fi network. This command is also shown in the image below:

Conclusion:
By following the method described in this article, you can easily configure and use Wi-Fi on Debian 10. Along with this, you can also figure out multiple other things by the steps described in this article. For example, you can check the status of your Network Manager; you can check the status of your device; you can check the list of all the available Wi-Fi networks, etc. In short, this method is really helpful and convenient to follow.
About the author
Karim Buzdar
Karim Buzdar holds a degree in telecommunication engineering and holds several sysadmin certifications. As an IT engineer and technical author, he writes for various web sites. He blogs at LinuxWays.