- Connect two android phones with wi-fi (without laptop or access point) and send file
- 4 Answers 4
- Как управлять Android смартфоном по Wi-Fi?
- Сопряжение по Wi-Fi двух смартфонов
- Управление вторым смартфоном
- How to Connect Android via Wi-Fi?
- Part 1. How to Connect Android via Wi-Fi on Coolmuster Android Assistant
- Part 2. How to Connect Android via Wi-Fi on Coolmuster Mobile Transfer
- Part 3. How to Connect Android via Wi-Fi on Coolmuster Android Eraser
- Part 4. How to Connect Android with Wi-Fi on Coolmuster Android Backup Manager
- Part 5. Contact Us for Further Assistant
Connect two android phones with wi-fi (without laptop or access point) and send file
Is it possible to connect two android phones by wi-fi, without using a bluetooth/GSM/CDMA/IR? Also, there is no any laptop or wi-fi access points or wi-fi routers. I think, that it is possible to create some SSID on both phones, do a static configure of IP addresses. Will android connect to another’s android wi-fi? If they will be connected, how can I send a file from one phone to second? Is there a ftp-client and server? or Can I ssh to other phone? Or telnel/netcat? Maybe http ?
4 Answers 4
This is called ad hoc network and has been asked before:
Short answer: ad hoc is not yet supported on Android so this would not work.
You can use Bluetooth to connect two Android phones in a p2p fashion.
Direct device-to-device connection over Wifi is supported under API 14 in Android 4.0 ICS in package android.net.wifi.p2p. You can test devices capability via FEATURE_WIFI_DIRECT.
Thanks! Can you comment the second part of Q — about how to send file after the ad-hoc is configured?
Bluetooth is too slow and short. Ad hoc is not supported in gui, but I can do it by hand (with editing config files on j-b-ed phone)
Of course jailbreaked Android phone is basically a linux device so it can do many things. But you can not write an app that does this. And it probably needs root access too.
@PeterKnego after connecting to the adhoc network created on my laptop is it possible to send data to a udp server running on the laptop? just asking for the guidlines.
This is actually possible with SDK V 14. As the documents state:
- Create a broadcast receiver for Wi-Fi Direct Intents
- Set up permissions
- Set up the receiver in onCreate()
- Set up an intent filter
- Register the receiver in onResume()
I’ve included some of the key code constructs below to make this happen. But read the documentation for more information.
Here’s a sample Broadcast Receiver
public class WiFiDirectBroadcastReceiver extends BroadcastReceiver < private WifiP2pManager manager; private Channel channel; private MyWiFiActivity activity; public WiFiDirectBroadcastReceiver(WifiP2pManager manager, Channel channel, MyWifiActivity activity) < super(); this.manager = manager; this.channel = channel; this.activity = activity; >@Override public void onReceive(Context context, Intent intent) < String action = intent.getAction(); if (WifiP2pManager.WIFI_P2P_STATE_CHANGED_ACTION.equals(action)) < int state = intent.getIntExtra(WifiP2pManager.EXTRA_WIFI_STATE, -1); if (state == WifiP2pManager.WIFI_P2P_STATE_ENABLED) < // Wifi Direct is enabled >else < // Wi-Fi Direct is not enabled >> else if (WifiP2pManager.WIFI_P2P_PEERS_CHANGED_ACTION.equals(action)) < // Call WifiP2pManager.requestPeers() to get a list of current peers >else if (WifiP2pManager.WIFI_P2P_CONNECTION_CHANGED_ACTION.equals(action)) < // Respond to new connection or disconnections >else if (WifiP2pManager.WIFI_P2P_THIS_DEVICE_CHANGED_ACTION.equals(action)) < // Respond to this device's wifi state changing >> > Как управлять Android смартфоном по Wi-Fi?
Как управлять телефоном с другого устройства Android по Wi-Fi? Я расскажу про пульт управления, команды ADB, удаление и установку системных приложений. Все инструкции даны для Android 11/12/13, поскольку там есть отладка по Wi-Fi.
Сопряжение по Wi-Fi двух смартфонов
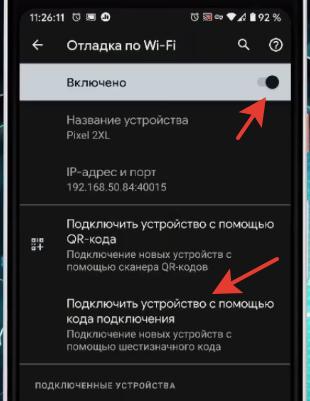
Шаг 1. На смартфоне, к которому будем подключаться, включите “Отладку по Wi-Fi” (смотрите меню для Разработчиков).
Шаг 2. Выбираем опцию “Подключить устройство с помощью кода подключения”.
Шаг 3. На главном смартфоне (с которого будем управлять) ставим приложение “ADB Shell – Debug Toolbox” и запускаем.
Далее выбираем “Сопряжение” и указываем код, IP-адрес и номер порта (эти данные смотрим на втором телефоне).
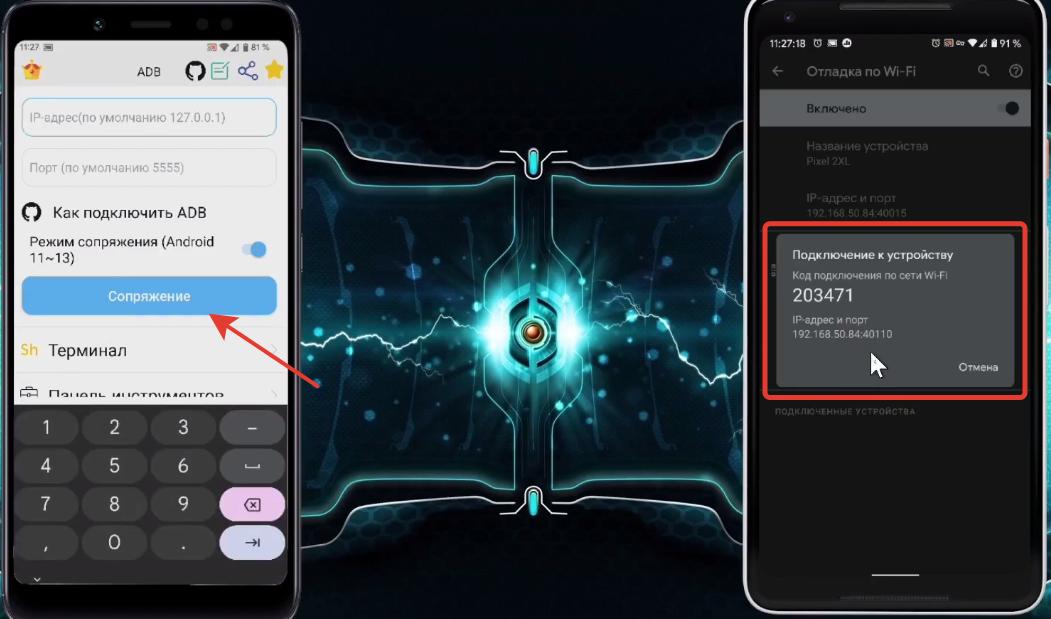
В поле “Enter pairing code” вводим код подключения. Сопряжение завершено.
Не забываем, что для сопряжения оба устройства должны быть подключены к одной сети (к одному роутеру). А при каждом новом подключении может быть разный IP-адрес и номер порта.
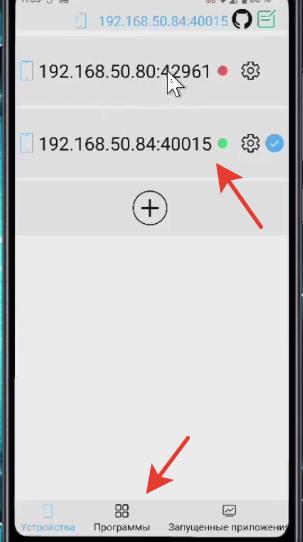
Шаг 4. В командной строке приложения ADB вводим adb devices и смотрим, какие устройства подключены.
Отключаем оно устройство (сам смартфон, с которого будем управлять), чтобы не было путаницы: adb disconnect 192.168.50.80:42961.
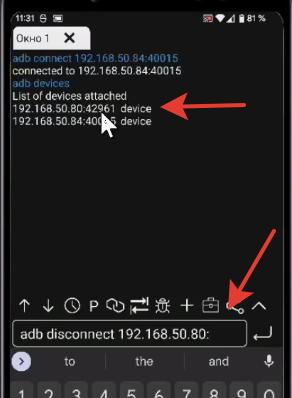
В итоге у нас остался сопряженным только второй смартфон, которым мы и будем управлять.
Шаг 5. И далее через терминал вы сможете, например, удалять системные приложения. Используйте команду: pm uninstall -k –user 0 имя пакета.
Управление вторым смартфоном
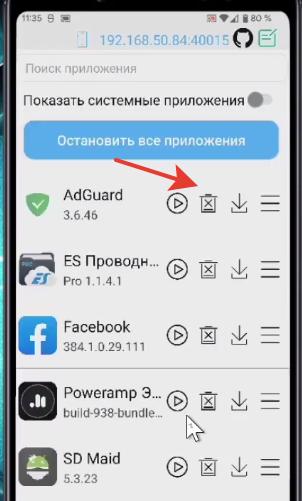
Шаг 1. Давайте посмотрим, какие приложения установлены на втором смартфоне. В приложении ADB выбираем пункт “Панель инструментов” и наш сопряженный смартфон.
Далее переходим на вкладку “Программы”. Здесь можно запустить, остановить, удалить ТОЛЬКО сторонние приложения! Для удаления системных приложений (предустановленных) используем Терминал (командную строку) и команду – pm uninstall -k –user 0 имя пакета.
Вкладка “Запущенные приложения”. Можно остановить, запустить или удалить приложение.
Вкладка “Скриншот” – можно сделать скриншот экрана второго смартфона.
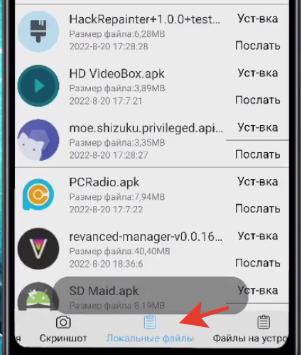
Вкладка “Локальные файлы” – доступ к папкам и файлам, их удаление. Отсюда можно перекидывать приложения со второго смартфона на главный, с которому мы и управляем.
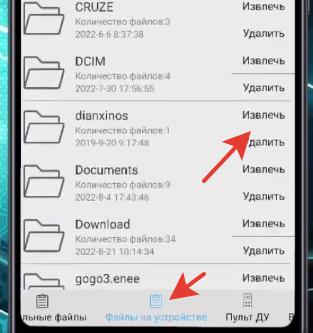
Вкладка “Файлы на устройстве”– доступ ко всем файлам на втором смартфоне. Их можно архивировать, устанавливать APK-файлы, удалять.
Вкладка “Пульт ДУ” – позволит управлять по Wi-Fi вторым устройством.
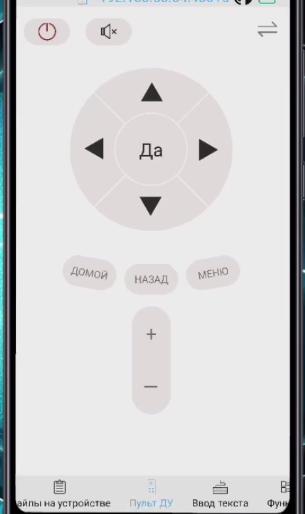
Работает навигация по устройству, громкость, меню.
Вкладка “Функции“. Здесь команды управления устройством – перезагрузка, включение/выключение, меню recovery, передача мобильных данных (вкл/откл), включить и отключить экран.

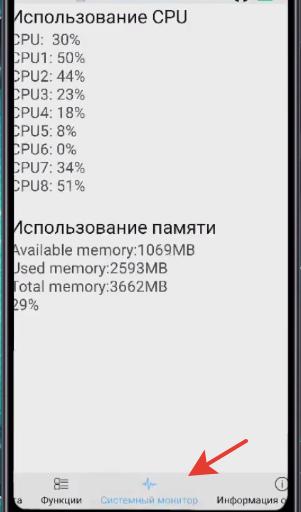
Вкладка “Системный монитор” – показывает использование оперативной памяти и мощности процессора.
Вот так можно управлять вторым устройством на Android через Wi-Fi.
How to Connect Android via Wi-Fi?
To have your Android device recognized by Coolmuster products, except for connecting with USB cable, you can connect Android with Wi-Fi, too. This tutorial is for all Android users who has Samsung, Huawei, HTC, LG, Sony, ZTE, OPPO, Motorola and etc., let’s keep reading to learn more details. (Note: Currently, Wi-Fi connection only supports Coolmuster Android Assistant, Coolmuster Mobile Transfer, Coolmuster Android Eraser and Coolmuster Android Backup Manager.)
Part 1. How to Connect Android via Wi-Fi on Coolmuster Android Assistant
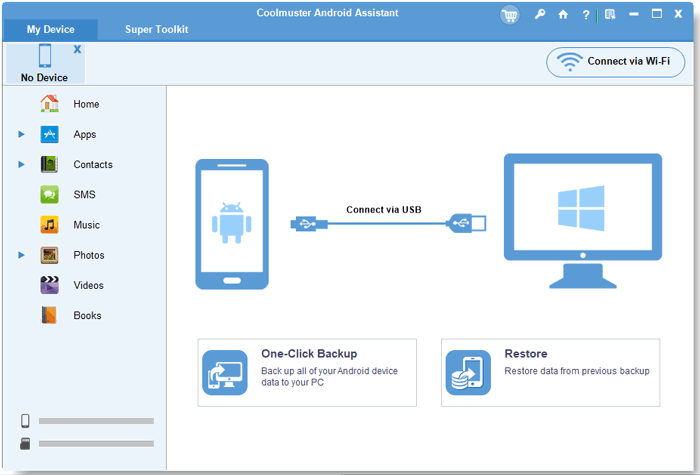
Step 1. Download and install the latest version of Coolmuster Android Assistant on your computer.
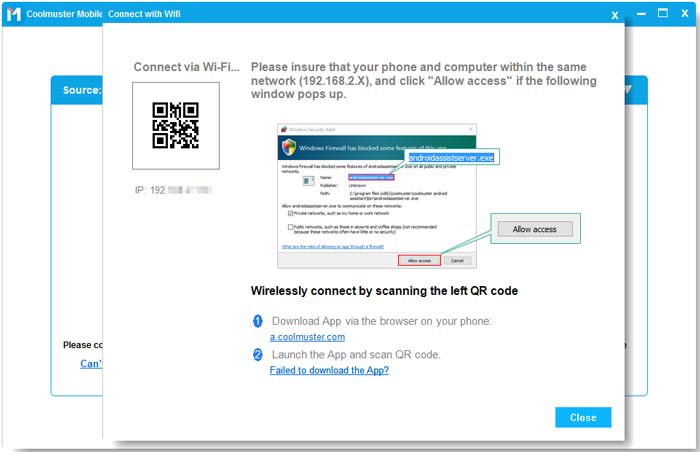
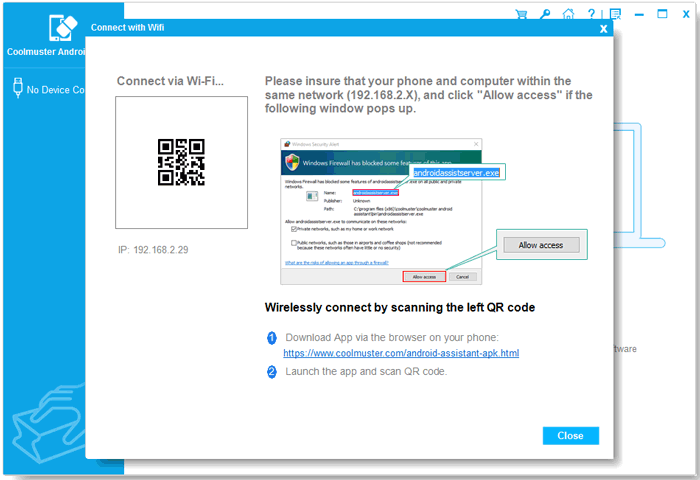
Step 2. Launch the program and click «Connect via WIFI» option at the top-right corner.
On the pop-up window, you will get the guide to connect your Android with Wi-Fi as below.
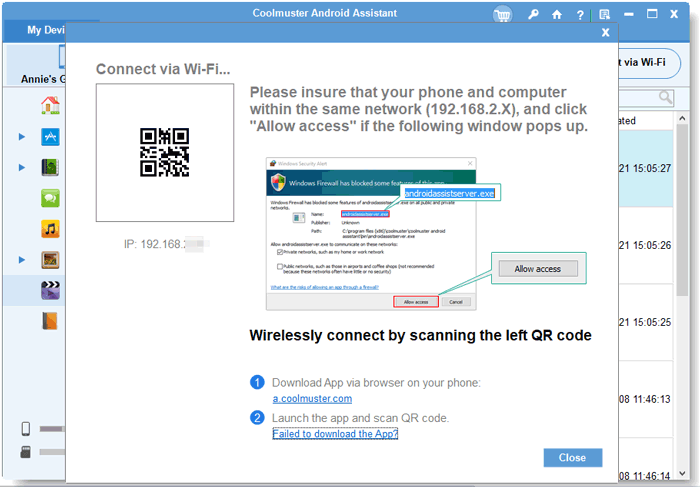
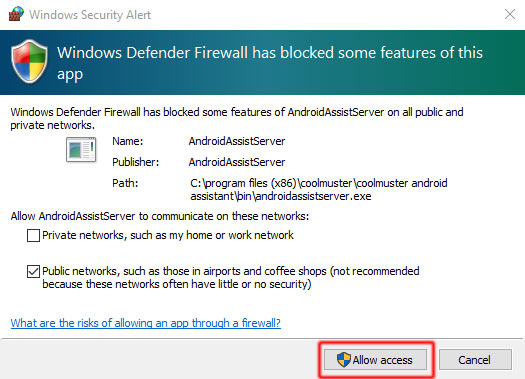
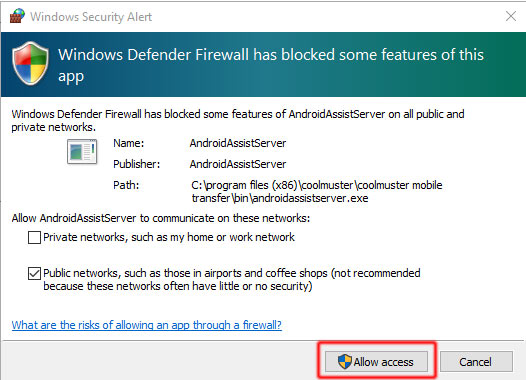
Step 3. If the following window pops up on your computer, please click «Allow Access» option to continue.
Note: The following pop-up window only shows in Windows PC, and Mac will not appear.
Step 4. Here, please make sure your Android device and computer are within the same network (eg.: 192.168.2.X). Then download and install the latest Coolmuster Android Assistant (Android Version) on your Android device by visiting https://www.coolmuster.com/android-assistant-apk.html via browser. (See detailed steps >>)
Note: Please make sure your Android device has enough storage space to install the Coolmuster Android Assistant (Android Version).

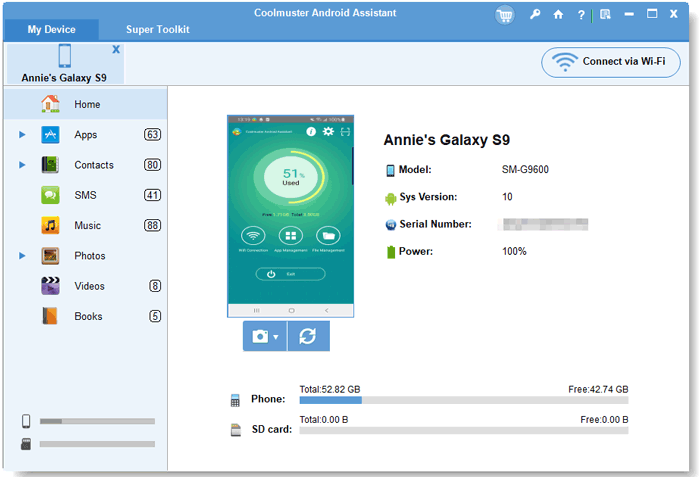
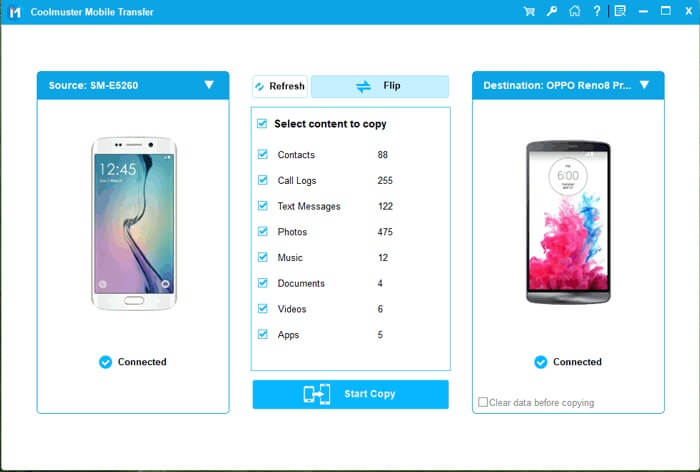
Step 5. Launch the Coolmuster Android Assistant (Android Version) on your Android device, and scan the QR code on the program with the Coolmuster Android Assistant (Android Version) on your Android device. When your Android device has been detected successfully by the program, you might see the main interface as follows.
Part 2. How to Connect Android via Wi-Fi on Coolmuster Mobile Transfer
Step 1. Download and install the latest version of Coolmuster Mobile Transfer on your computer.
Note: If your Coolmuster Mobile Transfer is not the latest version, please update it to the latest one.
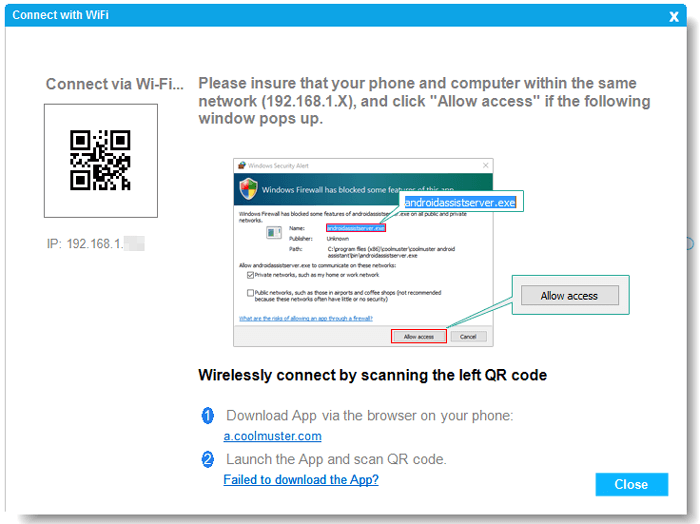
Step 2. Launch the program on your computer and click «Can’t recognize the device?» option on the main interface.
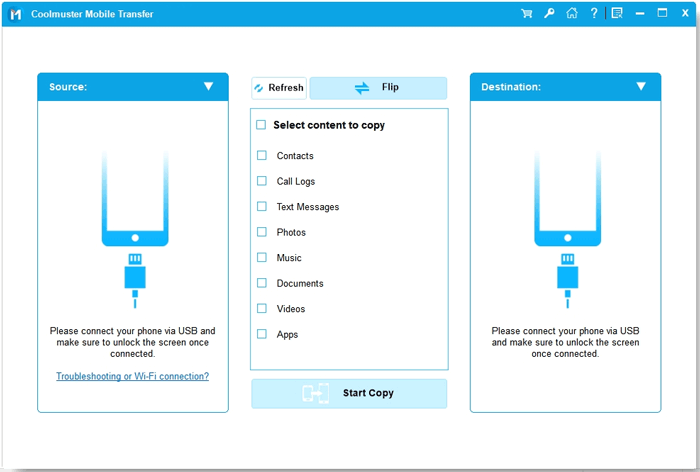
Then click «Connect via Wi-Fi» options on the pop-up window.
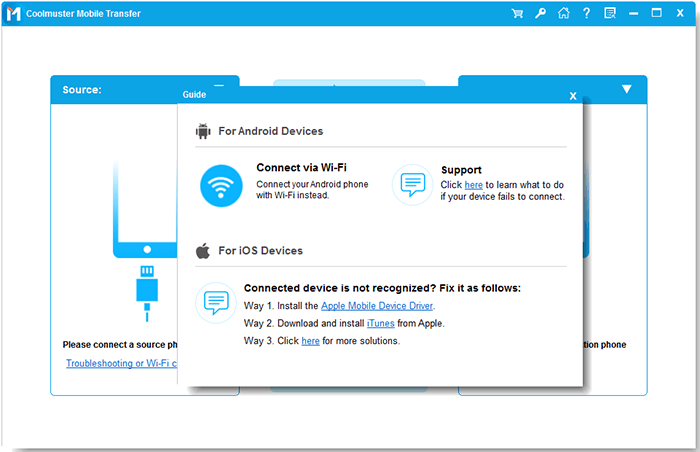
Then you might get another pop-up window as below, which guides you how to connect Android device with Wi-Fi.
Step 3. If the following window pops up, please click «Allow Access» option to continue.
Step 4. Please make sure your Android device and computer are within the same network (eg.: 192.168.2.X). Then download and install Coolmuster Android Assistant (Android Version) on your Android device by visiting https://www.coolmuster.com/android-assistant-apk.html via browser. (See detailed steps >>)
Step 5. Launch the Coolmuster Android Assistant (Android Version) on your Android device, and scan the QR code on the program with the Coolmuster Android Assistant (Android Version) on your Android device. When the Android device is recognized successfully by the program, you might see the main interface as below.
Part 3. How to Connect Android via Wi-Fi on Coolmuster Android Eraser
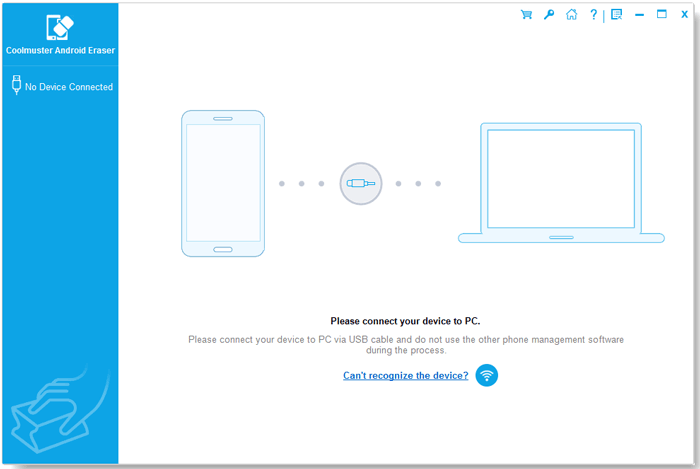
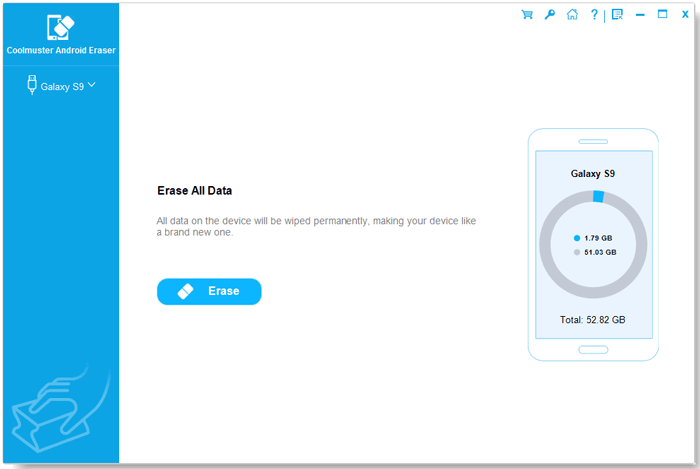
Step 1. Download and install the newest version of Coolmuster Android Eraser on your computer.
Step 2. Run the program on your computer and click the Wi-Fi icon besides «Can’t recognize the device?» option on the main interface.
Then you will get the pop-up window as below to show you how to connect Android phone via Wi-Fi.
Step 3. If you see the following window pops up, please choose «Allow Access» to move on.
Step 4. Please be sure both of the Android phone and computer are within the same network (eg.: 192.168.2.X). Then download and install Coolmuster Android Assistant (Android Version) on your Android device by visiting https://www.coolmuster.com/android-assistant-apk.html via browser. (See detailed steps >>)
Step 5. Open the Coolmuster Android Assistant (Android Version) on your Android phone, and scan the QR code on the program with the Coolmuster Android Assistant (Android Version) on your device. Thus your Android phone will be recognized successfully by the program soon and show the main interface as below.
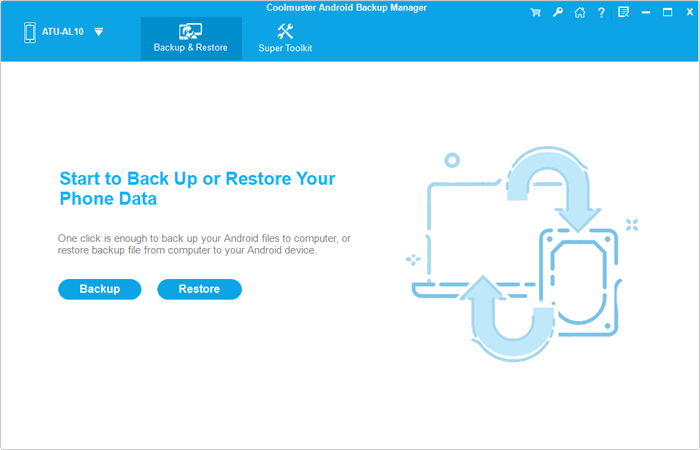
Part 4. How to Connect Android with Wi-Fi on Coolmuster Android Backup Manager
Step 1. Download and install the latest version of Coolmuster Android Backup Manager on your computer.
Step 2. Launch the software and click the Wi-Fi icon below.
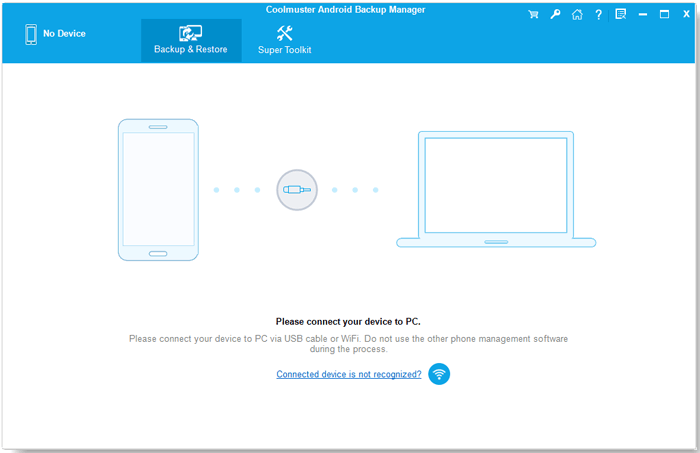
Then a pop-up window as follows will show you how to connect your Android phone with Wi-Fi.
Notes: For Windows PC, if the following window shows up, please click «Allow Access» option to continue.
Step 3. As reminded, please ensure both of your Android phone and computer are within the same network (eg.: 192.168.2.X). Now please visit https://www.coolmuster.com/android-assistant-apk.html via your phone browser to download and install the latest Coolmuster Android Assistant (Android Version) on your Android device. (See detailed steps >>)
Note: Although Coolmuster Android Assistant (Android Version) takes only a little storage space on your device, please make sure there is enough space for it.
Step 4. Please scan the QR code showed on the program using the Coolmuster Android Assistant (Android Version) on your Android device. Once your Android phone has been recognized successfully by the software, the main interface will appear as follows and you can start to manage your phone.
Part 5. Contact Us for Further Assistant
If you need more help, please don’t hesitate to contact us via email at support@coolmuster.com with your following information:
(1) What’s your computer’s operating system?
(2) What’s your Android device’s brand, model, and OS version?
(3) Send us some screenshots of Coolmuster products to show the problems.
* Tip: To take a screenshot on Windows PC, you might press «Print Screen SysRq» key on your keyboard, then click «Start» > «All Programs» > «Accessories» > «Paint«, press «Ctrl» + «V» to paste the screenshot, then save the picture and send it to us.

For more problems about Coolmuster products on use, installation and connection, please go to the related FAQ page to find solutions: