- How to bridge WiFi and Ethernet adapters to share internet on Windows 11 or 10
- How to share internet using wifi adapter to Ethernet cable
- MikroTik — Настройка LAN портов 3-5 и Wi-Fi
- Объединяем LAN порты 3-5 в свитч
- Создаем интерфейс Bridge-local и объединяем в нем LAN порты и Wi-Fi
- Настройка Wi-Fi
- Can you be connected to WiFi and Ethernet at the same time?
- How to allow your computer to use both WiFi and Ethernet at the same time?
- Will using WiFi and Ethernet at the same time increase the speed?
- Load balancing WiFi and Ethernet
- * Network Manager by Sortbyte (Windows OS)
- * MultiPath TCP (Linux)
- Two separate networks
How to bridge WiFi and Ethernet adapters to share internet on Windows 11 or 10
Everybody is not using a router in their home to connect internet. Nowadays, when the Wifi adapter is almost in every laptop and PC (via Wireless adapter card); the users mostly ad hoc smartphone’s hotspots to share and use the internet. Another reason why the users started using Wifi over the ethernet connection; because nobody wants to run long Ethernet cables in their homes. That’s why Wifi adapters and WiFi hotspots are more popular nowadays. So, in such circumstances, if someone wants to share a computer’s WiFi Internet connection with other Ethernet devices, how will he do that?
You might be thinking, why would we do this? Just imagine you don’t have a router with a LAN ethernet port to connect some old devices. Since there are certain devices in home and offices that still do not offer WiFi connectivity option like smart TVs (old), media players, NAS devices, and more… Such kind of devices needs a wired Ethernet connection to connect to the Internet.
So, if you think without a router, how do you share the internet from a laptop or PC then here is the answer…
We don’t need any Virtual router to share an internet connection in Windows 7, 8, or 10. Just bridge Wifi to ethernet in Windows 10 or whatever Windows version you are on and that’s it. Not only Wifi adapter to Ethernet but also one can use this method for Ethernet adapter to Ethernet adapter too.
How to share internet using wifi adapter to Ethernet cable
Although there are a few software available online those let us create virtual routers on Windows to share the internet from PC to PC via ethernet. But actually, we don’t need them. Just follow the below steps… We are using Windows 10 here but the steps are the same for Windows 8 and Windows 7 too.
- Go to the search bar of Windows 10 or 7.
- Search for Control Panel.
- Click on the Control Panel to open it.
- Select the Network and Internet option.
- You will see View network status and task under Network and Sharing Center, click on that.
- From the left side panel, click on Change adapter settings.
- Now press the Shift button and without releasing it, click on the Wifi adapter and then on the Ethernet adapter for which you want to share the network connection.
- Right-click on any of the adapters and select the Bridge connection option.
Above tutorial steps in detail:
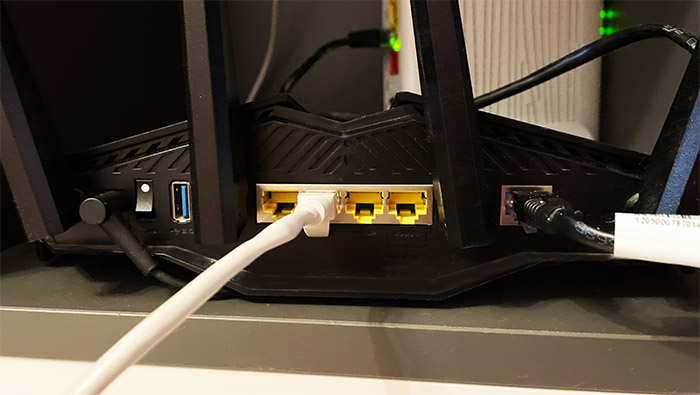
Step 1: As I said in the above-mentioned steps that first you need to connect the ethernet cable to the computer or laptop from where your want to share the wireless network internet connection. For example, I want to share Wi-Fi internet from my PC to a NAS device that doesn’t have a WLAN card. Then, search and open the control panel on Windows 10 or Windows 7. When it appears just click on that.
MikroTik — Настройка LAN портов 3-5 и Wi-Fi
LAN порты 3-5 будут объединены с Wi-Fi интерфейсом в единую локальную сеть, к которой будут подключаться компьютеры.
Объединяем LAN порты 3-5 в свитч
- Откройте меню Interface;
- Сделайте двойной щелчок мыши по интерфейсу ether4;
- В списке Master Port выберите ether3 (главный порт нашего свитча);
- Нажмите кнопку ОК.
Повторите тоже самое для интерфейса ether5.
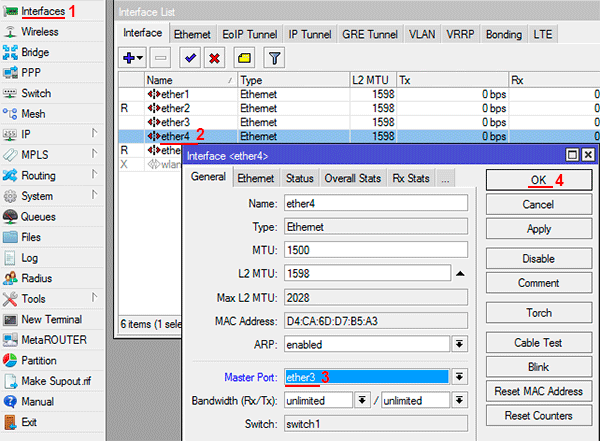
Напротив портов ether4 и ether5 появится буква S (Slave — ведомый).

Создаем интерфейс Bridge-local и объединяем в нем LAN порты и Wi-Fi
Чтобы LAN порты 3-5 объединить с Wi-Fi в одну сеть, нужно создать bridge интерфейс, и добавить в него мастер порт свитча ether3 и Wi-Fi интерфейс wlan1.
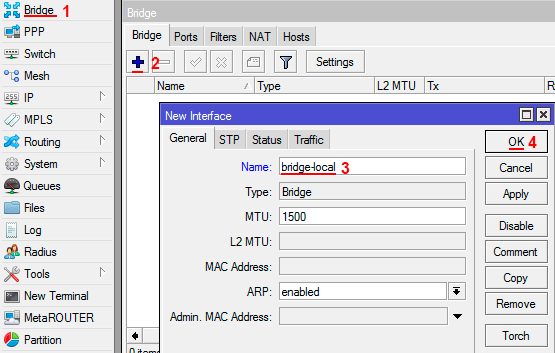
Создаем интерфейс bridge-local:
- Откройте меню Bridge;
- Нажмите кнопку Add (синий крестик);
- В поле Name пропишите имя интерфейса bridge-local;
- Нажмите кнопку OK.
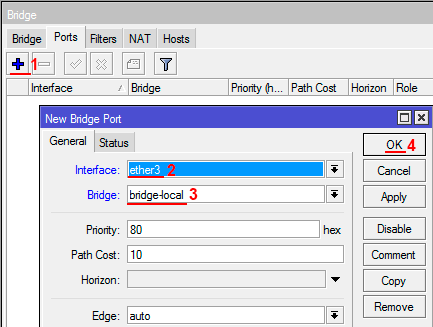
Добавляем главный порт свитча ether3 в bridge-local:
- Перейдите на вкладку Ports и нажмите кнопку Add (синий крестик);
- В списке Interface выберите главный ethernet порт свитча ether3;
- В списке Bridge выберите интерфейс bridge-local;
- Нажмите кнопку OK.
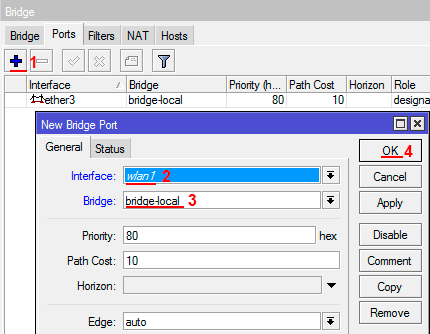
Добавляем Wi-Fi интерфейс в bridge-local:
- На вкладке Ports нажмите кнопку Add (синий крестик);
- В списке Interface выберите беспроводной интерфейс wlan1;
- В списке Bridge выберите интерфейс bridge-local;
- Нажмите кнопку OK.
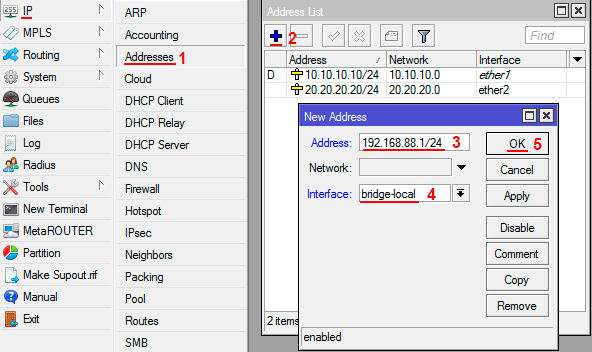
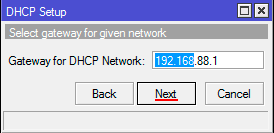
Назначаем IP-адрес интерфейсу bridge-local:
- Откройте меню IP —Addresses;
- Нажмите кнопку Add (синий крестик);
- В поле Address введите IP-адрес и маску локальной сети 192.168.88.1/24;
- В списке Interface выберите интерфейс локальной сети bridge-local;
- Нажмите кнопку OK.
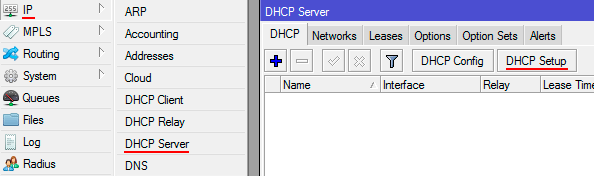
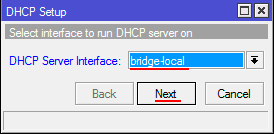
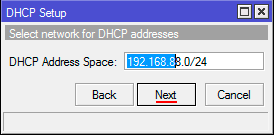
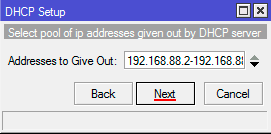
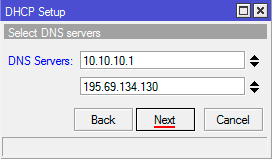
Настраиваем DHCP сервер локальной сети.
Чтобы компьютеры, подключенные к роутеру, получали сетевые настройки автоматически, настроим DHCP сервер:


Настройка Wi-Fi
- Откройте меню Wireless;
- Нажмите левой кнопкой мыши на интерфейсе wlan1 и нажмите кнопку Enable (синяя галочка).

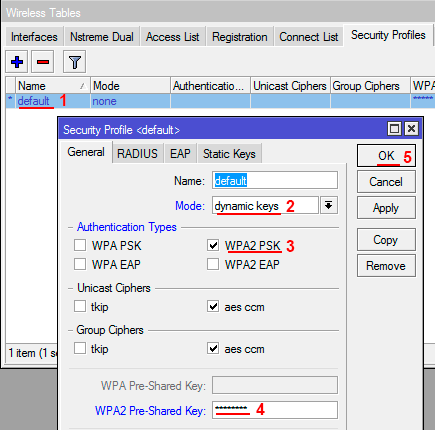
Создаем пароль для подключения к точке доступа MikroTik:
- Откройте вкладку Security Profiles и сделайте двойной щелчок левой кнопкой мыши по default;
- В появившемся окне в списке Mode выберите dynamic keys;
- Поставьте галочку напротив регистрации по протоколу WPA2 PSK;
- В поле WPA2 Pre-Shared Key введите пароль для подключения к Wi-Fi точке;
- Нажмите кнопку OK.
Настраиваем параметры Wi-Fi точки MikroTik:
- Откройте вкладку Interfaces и сделайте двойной щелчок левой кнопкой мыши на Wi-Fi интерфейсе wlan1, чтобы зайти в его настройки;
- Перейдите на вкладку Wireless;
- В списке Mode выберите режим работы ap bridge;
- В списке Band выберите 2GHz-B/G/N (в каких стандартах будет работать Wi-Fi точка);
- В списке Channel Width укажите ширину канала 20/40Mhz HT Above, чтобы беспроводные устройства смогли подключиться на максимальной скорости с шириной канала 40 МГц;
- В списке Frequency укажите, на какой частоте будет работать Wi-Fi;
- В поле SSID укажите имя Wi-Fi сети;
- Нажмите кнопку OK.
Can you be connected to WiFi and Ethernet at the same time?
It is very much possible to be connected to both WiFi and Ethernet at the same time, but this type of configuration can only be achieved if the client device (a computer, a smartphone, a smart bulb) has installed more than one network adapters. This narrows down the list to only a few types of devices, the most common being the Desktop PC, where you can install as many network adapters as your motherboard allows.
You can also use a laptop with an additional USB network adapter. But the question is why would you want to use both WiFi and Ethernet at the same time? I am very much aware that some users believe that this approach could increase the bandwidth, while others needs this type of setup for very specific applications.
It can be load balancing, fallback or you could have two separate networks (one online, the other offline or limited for IoT devices) that you want to check at the same time from one computer. And I know that Windows OS has a hands-off approach to this type of setup, where it prioritizes Ethernet over WiFi, forcing you to use one connection at a time. This can be easily changed from the settings menu, so let’s explore some of these options, the risks and some of the applications that can benefit from a PC being connected to both WiFi and Ethernet at the same time.
How to allow your computer to use both WiFi and Ethernet at the same time?
- 1. Go to Network and Internet.
- 2. Click on Network and Sharing Center.
- 3. Click on Change Adapter Settings.
- 4. Right click the active Ethernet Adapter and select Properties.
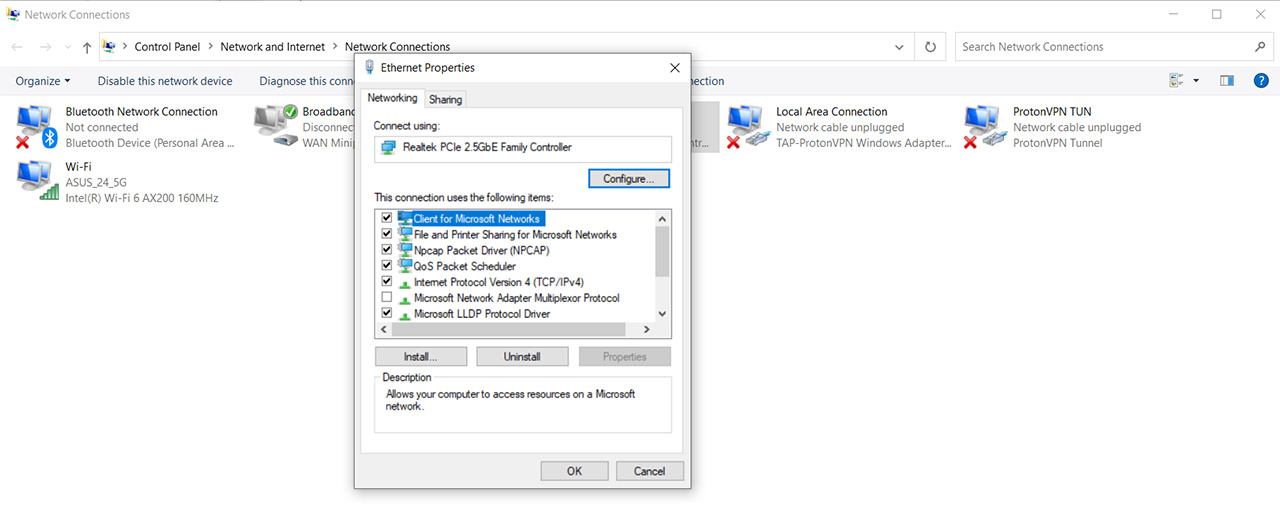
- 5. Choose Configure and click on Advanced.
- 6. Scroll down to Priority & VLAN and, from the Value section (on the right) select Priority & VLAN Disabled.
- 7. Click OK.

At this point, Windows OS should allow you to use both the WiFi and the Ethernet connection at the same time.
Important: Make sure to have two separate network adapters in your computer, otherwise, it’s not possible to connect to WiFi and via Ethernet to your networks with one adapter. If it’s a pre-built PC, you can open it and check the motherboard, while with a laptop, you’ll most likely have to add the secondary adapter yourself, connecting it to a USB port.
Will using WiFi and Ethernet at the same time increase the speed?
It depends on the gateway (router, in our case). If the computer (client device) is connected to the same source (router) via both WiFi and Ethernet, you’re still using the same bandwidth. So no, there won’t be any speed improvement of any sort. But, considering that each connection will have its own IP, you can rely on load balancing or link fallback.
Load balancing WiFi and Ethernet
I will still be sticking with Windows OS since this is what the vast majority of you are currently using. And the idea behind load balancing is that you can split the connections between two separate network adapters. So, if you’re streaming a movie, that’s a connection, while if you’re checking a YouTube video as the same time, that’s another connection.
And one connection can be served by the LAN (Ethernet), while the other can use WiFi. Obviously, the load balancing technique will always prioritize the least crowded connection, so don’t be surprised that the vast majority of your connections will be via WiFi. But that’s only the case if you’re connected directly to the router at 1Gbps.
If you have to rely on powerline adapters or if the router is limited to Fast Ethernet LAN ports (it happens), then the cabled connection can be at disadvantage. So can you actually do it natively, from Windows OS? No, you need to rely on third-party software.
* Network Manager by Sortbyte (Windows OS)
This is a free tool that you can download immediately on your PC and after running it, you’ll be able to see both the WiFi and the Ethernet live traffic. If there’s a single type of connection, then you need to run the steps in the first section to allow both WiFi and Ethernet at the same time. Click on Control Panel and a new window will appear to show even more data about both connections.
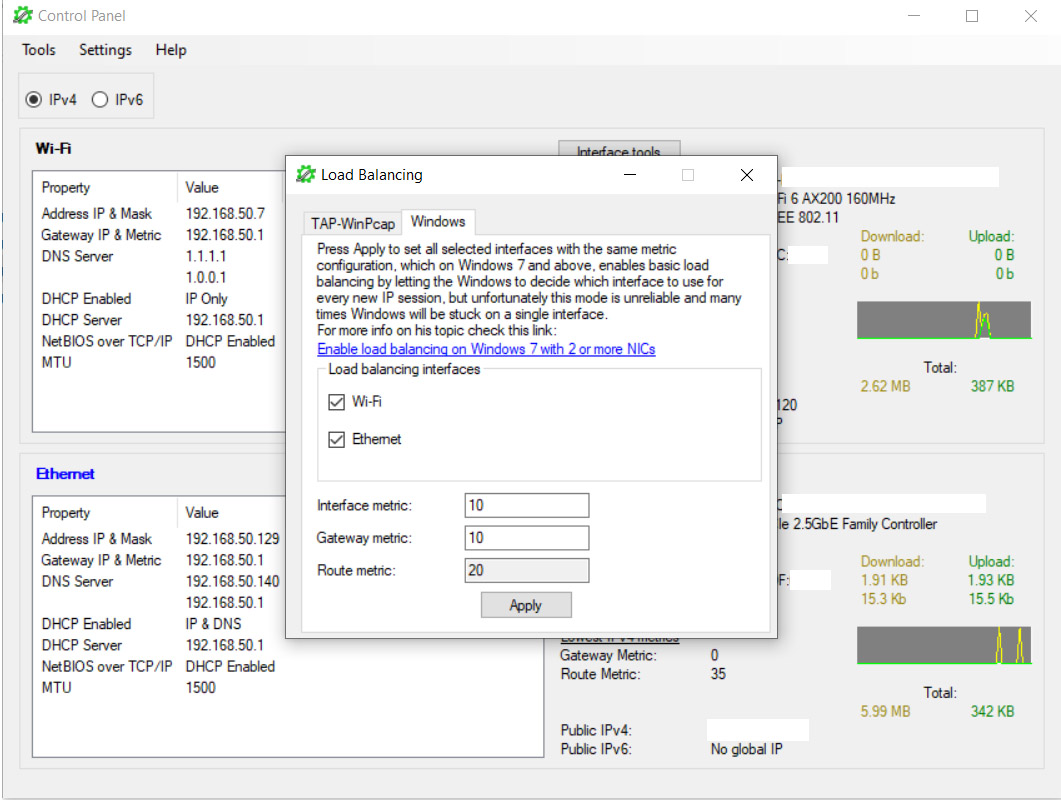
Then, click on Tools > Load Balancing. Here, you should see both WiFi and Ethernet at the same time, and you’ll need to set the metric for the Interface, Gateway and Route. The idea is to have the same metric for both connections, so that Windows OS will pick the least crowded one for the job. Obviously, Windows OS is not very stable, so expect things to go wrong.
* MultiPath TCP (Linux)
In case you want to do the same thing on Linux, the MultiPath TCP will allow the use of multiple simultaneous interfaces. And it works in such a manner that it appears as a regular TCP interface to some apps. Why I’m mentioning that is because even if you use WiFi and Ethernet at the same time, most apps will still connect to a single interface, usually the fastest. So, this software aims at fixing that – I wish Windows OS had a similar tool available.
Two separate networks
A very common practice is to have two routers inside your home, one for the IoT, smart devices (which may or may not have access to the Internet) and the other for the private use. This means that the user may want to connect to both routers at the same time to check on the two networks.
And, of course, while the idea differs a bit since you do get two separate routers and not a single one, the concept is still the same. You can connect your computer to one router via WiFi and the other via Ethernet cable, while also keeping them separate, thus removing some of the risks that the IoT devices can bring to your private network.
Mark is a graduate in Computer Science, having gathered valuable experience over the years working in IT as a programmer. Mark is also the main tech writer for MBReviews.com, covering not only his passion, the networking devices, but also other cool electronic gadgets that you may find useful for your every day life.