- Setting up a wireless network in Windows
- Get the right equipment
- Setting up the modem and Internet connection
- Positioning the wireless router
- Securing your wireless network
- Connect a PC to your wireless network
- Connect to a Wi-Fi network in Windows
- Как включить беспроводную связь на ноутбуке: пошаговая инструкция
- Диагностика
- С помощью кнопок
- Включение через центр управления
- Windows 8 и 10
- Проверить драйвер
- Проверка функции WLAN
- Установка драйверов
- Что делать на компьютере?
Setting up a wireless network in Windows
A wireless network at home lets you get online from more places in your house. This article describes the basic steps for setting up a wireless network and starting to use it.
Get the right equipment
Before you can set up your wireless network, here’s what you’ll need:
Broadband Internet connection and modem. A broadband Internet connection is a high-speed Internet connection. Digital Subscriber Line (DSL) and cable are two of the most common broadband connections. You can get a broadband connection by contacting an Internet service provider (ISP). Typically, ISPs that provide DSL are telephone companies and ISPs that provide cable are cable TV companies. ISPs frequently offer broadband modems. Some ISPs also offer combination modem/wireless routers. You can also find these at computer or electronics stores, and online.
Wireless router. A router sends info between your network and the Internet. With a wireless router, you can connect PCs to your network using radio signals instead of wires. There are several different kinds of wireless network technologies, which include 802.11a, 802.11b, 802.11g, 802.11n, 802.11ac, and 802.11ax.
Wireless network adapter. A wireless network adapter is a device that connects your PC to a wireless network. To connect your portable or desktop PC to your wireless network, the PC must have a wireless network adapter. Most laptops and tablets—and some desktop PCs—come with a wireless network adapter already installed.
To check whether your PC has a wireless network adapter:
- Select Start , type device manager in the search box, and then select Device Manager.
- Expand Network adapters.
- Look for a network adapter that might have wireless in the name.
Setting up the modem and Internet connection
After you have all the equipment, you’ll need to set up your modem and Internet connection. If your modem wasn’t set up for you by your Internet service provider (ISP), follow the instructions that came with your modem to connect it to your PC and the Internet. If you’re using Digital Subscriber Line (DSL), connect your modem to a phone jack. If you’re using cable, connect your modem to a cable jack.
Positioning the wireless router
Put your wireless router somewhere where it will receive the strongest signal with the least amount of interference. For better results, follow these tips:
Place your wireless router in a central location. Place the router as close to the center of your home as possible to increase the strength of the wireless signal throughout your home.
Position the wireless router off the floor and away from walls and metal objects, such as metal file cabinets. The fewer physical obstructions between your PC and the router’s signal, the more likely that you’ll be using the router’s full signal strength.
Reduce interference. Some networking equipment uses a 2.4 gigahertz (GHz) radio frequency. This is the same frequency as most microwaves and many cordless phones. If you turn on the microwave or get a call on a cordless phone, your wireless signal might be temporarily interrupted. You can avoid most of these issues by using a cordless phone with a higher frequency, such as 5.8 GHz.
Securing your wireless network
Security is always important; with a wireless network, it’s even more important because your network’s signal could be broadcast outside your home. If you don’t help secure your network, people with PCs nearby could access info stored on your network PCs and use your Internet connection.
To help make your network more secure:
Change the default user name and password. This helps protect your router. Most router manufacturers have a default user name and password on the router and a default network name (also known as the SSID). Someone could use this info to access your router without you knowing it. To help avoid that, change the default user name and password for your router. See the documentation for your device for instructions.
Set up a security key (password) for your network. Wireless networks have a network security key to help protect them from unauthorized access. We recommend using Wi-Fi Protected Access 3 (WPA3) security if your router and PC support it. See the documentation for your router for more detailed info, including what type of security is supported and how to set it up.
Some routers support Wi-Fi Protected Setup (WPS). If your router supports WPS and it’s connected to the network, follow these steps to set up a network security key:
- Do one of the following, depending on which version of Windows is running on your PC:
- In Windows 7 or Windows 8.1, select Start, start typing Network and Sharing Center, and then choose it in the list.
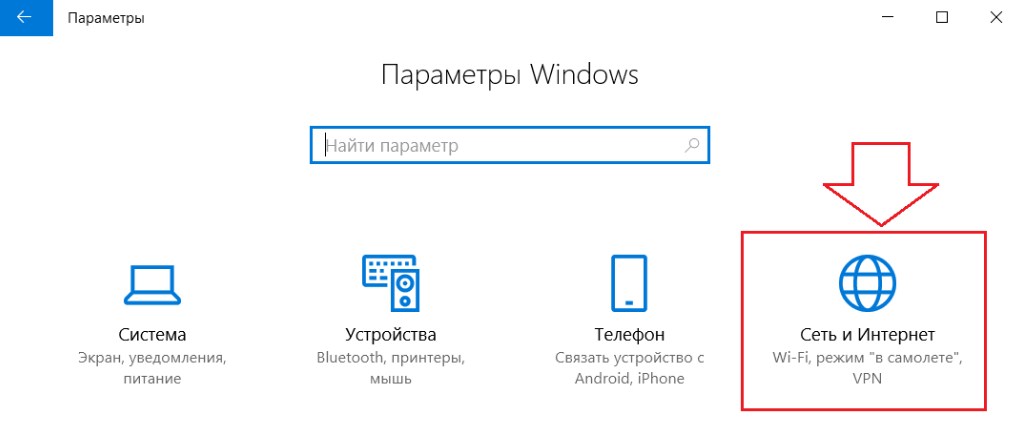
- In Windows 10, select Start , then select Settings >Network & Internet >Status >Network and Sharing Center.
- In Windows 11, select Start, type control panel, then select Control Panel >Network and Internet >Network and Sharing Center.
- Select Set up a new connection or network.
- Select Set up a new network, then choose Next.
The wizard will walk you through creating a network name and a security key. If your router supports it, the wizard will default to Wi‑Fi Protected Access (WPA2 or WPA3) security. We recommend that you use WPA3 if you can, because it offers better security than WPA2, WPA, or Wired Equivalent Privacy (WEP) security. With WPA3, WPA2 or WPA you can also use a passphrase, so you don’t have to remember a cryptic sequence of letters and numbers.
Write down your security key and keep it in a safe place. You can also save your security key on a USB flash drive by following the instructions in the wizard. (Saving your security key to a USB flash drive is available in Windows 8 and Windows 7, but not in Windows 10 or Windows 11.)
Use a firewall. A firewall is hardware or software that can help protect your PC from unauthorized users or malicious software (malware). Running a firewall on each PC on your network can help control the spread of malicious software on your network, and help protect your PCs when you’re accessing the Internet. Windows Firewall is included with this version of Windows.
Connect a PC to your wireless network
- Select the Network or Wifi icon in the notification area.
- In the list of networks, choose the network that you want to connect to, and then select Connect.
- Type the security key (often called the password).
- Follow additional instructions if there are any.
If you have problems with your Wi-Fi network when using Windows 10, see Fix Wi-Fi problems in Windows for advanced troubleshooting info.
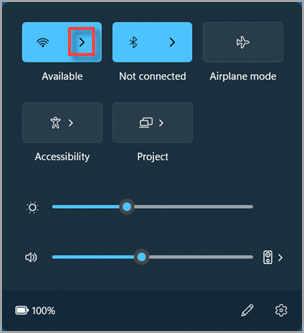
- Select the Network icon in the notification area, then select the > icon next to the Wi-Fi quick setting to see a list of available networks.
- Choose the network that you want to connect to, and then select Connect.
- Type the security key (often called the password).
- Follow additional instructions if there are any.
If you have problems with your Wi-Fi network when using Windows 11, see Fix Wi-Fi problems in Windows for advanced troubleshooting info.
Connect to a Wi-Fi network in Windows
Whether you’re at home, work, or out and about, chances are you’ll find a Wi-Fi network that you can connect to for internet access.
- Select the Network, Sound, or Battery icons ( ) on the far right side of the taskbar to open quick settings.
The Disconnected icon appears when you’re not connected.

On the Wi-Fi quick setting, select Manage Wi-Fi connections .
Whether you’re at home, work, or out and about, chances are you’ll find a Wi-Fi network that you can connect to for internet access.
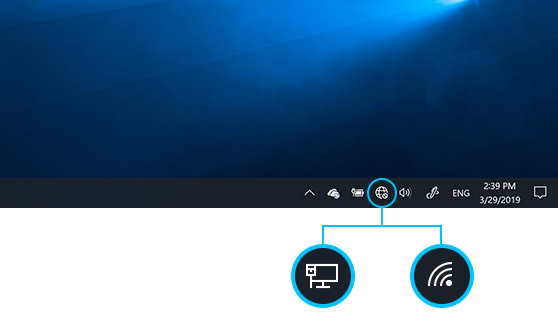
- Select the Network icon on the taskbar. The icon that appears depends on your current connection state. If you don’t see one of the network icons (or a similar one) shown in the following image, select the Up arrow to see if it appears there.
- Choose the Wi-Fi network you want, then select Connect.
- Type the network password, and then select Next.
- Choose Yes or No, depending on the type of network you’re connecting to and if you want your PC to be discoverable by other PCs and devices on the network.
Как включить беспроводную связь на ноутбуке: пошаговая инструкция
![]()
Как ни странно, но именно эта проблема частенько возникает у пользователей новых моделей ноутов. После недолгого использования по каким-то непонятным причинам Wi-Fi отключается. Но сделано это для уменьшения электропотребления аккумулятора. Сегодня я расскажу, как быстро включить беспроводную сеть или вай-фай адаптер на ноутбуках HP, Lenovo, Acer и т.д.
Диагностика
Для быстрого устранения проблемы просто найдите в правом нижнем углу ваше подключение по сети. И не важно какая у вас операционная система: Windows 7, 8, 10 или XP. Найдите значок волны и правой кнопкой нажмите по ней. После этого выберите диагностику.

Операционная система Windows сама должна найти проблему и программно решить её. После этого вы должны увидеть фразу, что адаптер был отключен, и операционная система вновь его активировала.
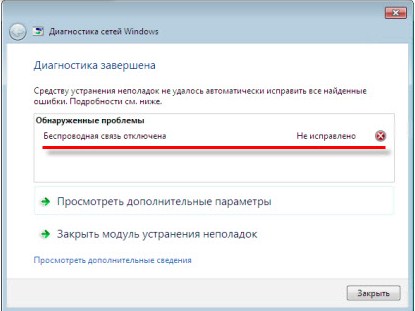
Но иногда можно наблюдать вот такое сообщение: «Беспроводная связь отключена – Не исправлено (С красным крестиком)». Но пугаться не стоит, просто система сама не смогла включить передатчик на ноуте, и мы сделаем это вручную.
С помощью кнопок
На 50% ноутбуках можно найти отдельную кнопку или переключатель, который включает и выключает вай-фай сеть. Для начала я бы посмотрел на дополнительные кнопки рядом с основной клавиатурой. Вам нужно найти кнопку на которой будет изображена антенна или компьютер с отходящими от них волнами.

Если такой кнопки нет, то можно поискать её сбоку ноутбука. Иногда компании, выпускающие ноутбуки, ставят кнопки включения там. Но как я и писал ранее, не на всех ноутбуках есть такая кнопочка. Но включить можно другим способом, для этого надо найти подобный значок на основной клавиатуре в ряду F клавиш.
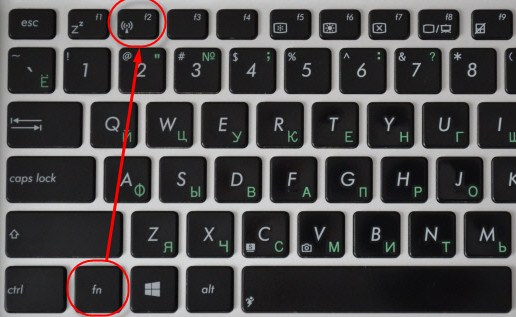
Для активации надо нажать одновременно на вспомогательную клавишу «Fn» и эту клавишу. На моём ноутбуке это сочетание «Fn+F2», но иногда используют клавиши F3, F5, F9, F12.
| Ноутбук | Fn + |
|---|---|
| Samsung | F9 или F12 |
| Asus | F2 |
| Lenovo | F5 |
| Acer | F3 |
| MSI | F10 |
| HP | F12 |
Если по нажатию ничего не произошло, то это значит, что у вас на машине не установлены драйвера, которые отвечают за эти кнопки, поэтому включать будем по-другому.
Включение через центр управления
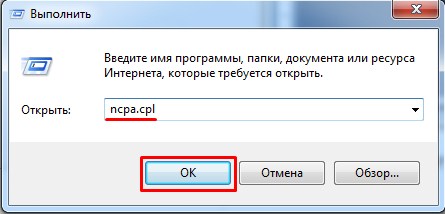
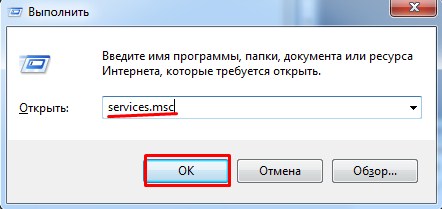
- После этого вы увидите вот такое окошко. Надо в поле ввести команду ncpa.cpl и нажать ниже на кнопку «ОК».
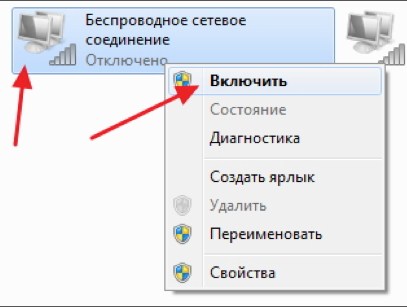
- Найдите беспроводное соединение со значком лесенки, нажмите по нему правой кнопкой и выберите «Включить».
Windows 8 и 10
Если у вас восьмёрка или десятка, то возможно у вас включен режим «В самолете». Тогда вы никак не сможете включить Wi-Fi, пока он работает.
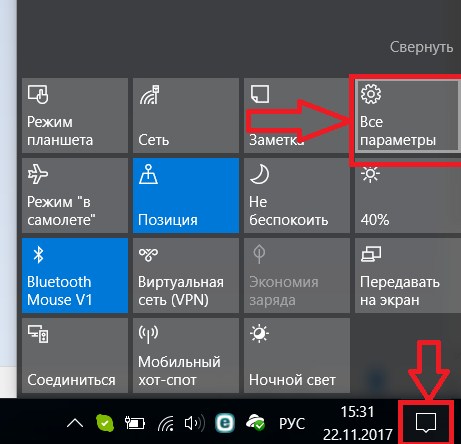
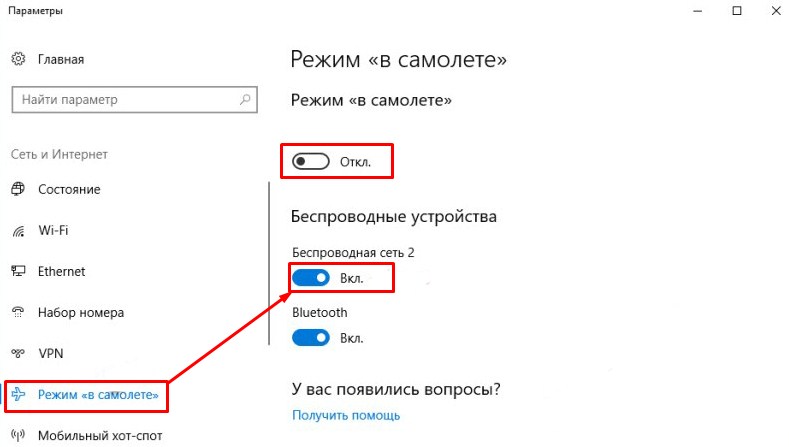
- Нажмите на самолётик и отключите режим. Также вы можете передвинуть нижние бегунки в режим «Вкл». Тогда, даже если у вас будет включен режим «В самолете», беспроводная сеть и Bluetooth не будут отключаться.
Проверить драйвер
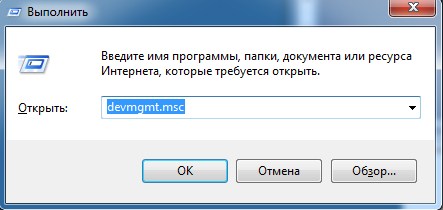
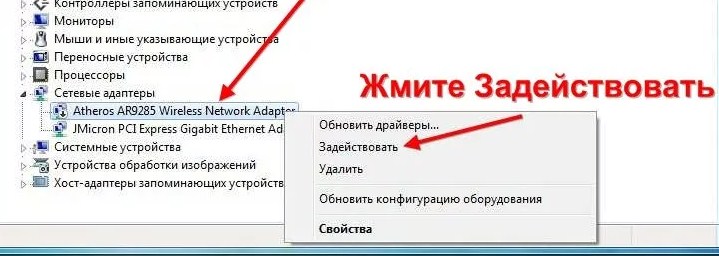
- Перейдите в раздел «Сетевые устройства». Теперь внимательно посмотрите – есть ли значок со стрелочкой вниз? Если он есть, то нажмите по нему правой кнопкой и далее выберите «Задействовать».
Проверка функции WLAN
Сразу скажу, что данная функция автоматически управляет всеми сетевыми устройствами, и она по идее должна быть включена. Но иногда при установке некоторых программ или при вреде от вирусов настройка может слетать.
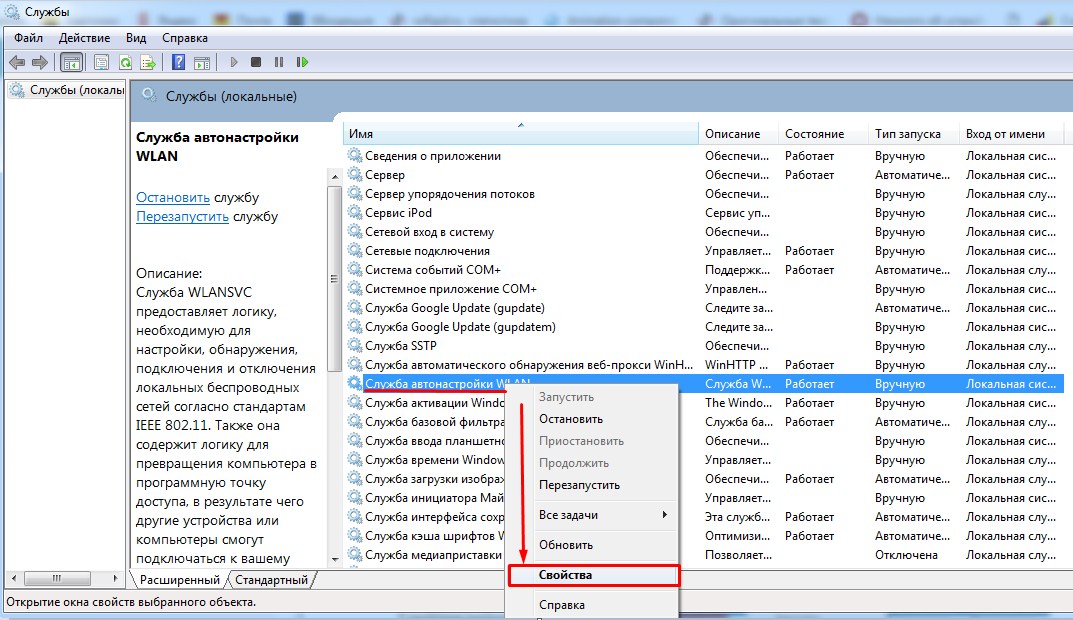
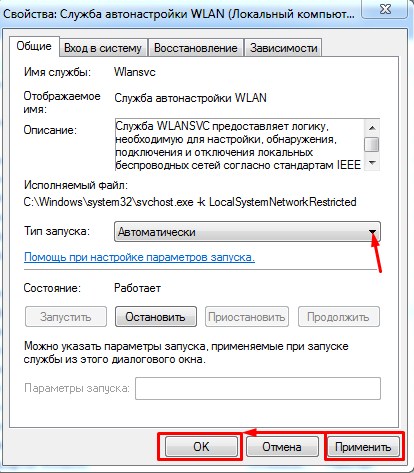
- Список будет размещать данные в алфавитном порядке. Так что просто листайте в самый низ до раздела «Служба автонастройки WLAN». После этого выбираем свойства этого раздела.
Установка драйверов
На вашем месте я бы переустановил драйвера для вашего Wi-Fi адаптера. Их стоит скачивать с официального сайта компании вашего ноутбука.
- Для этого подключите по проводу ноутбук к вашему роутеру в любой свободный LAN порт. Или можете найти, где ещё можно воспользоваться интернетом.

- После этого открываем любой поисковик и вводим название компании. У меня ноутбук фирмы Acer, поэтому я ввожу именно его.
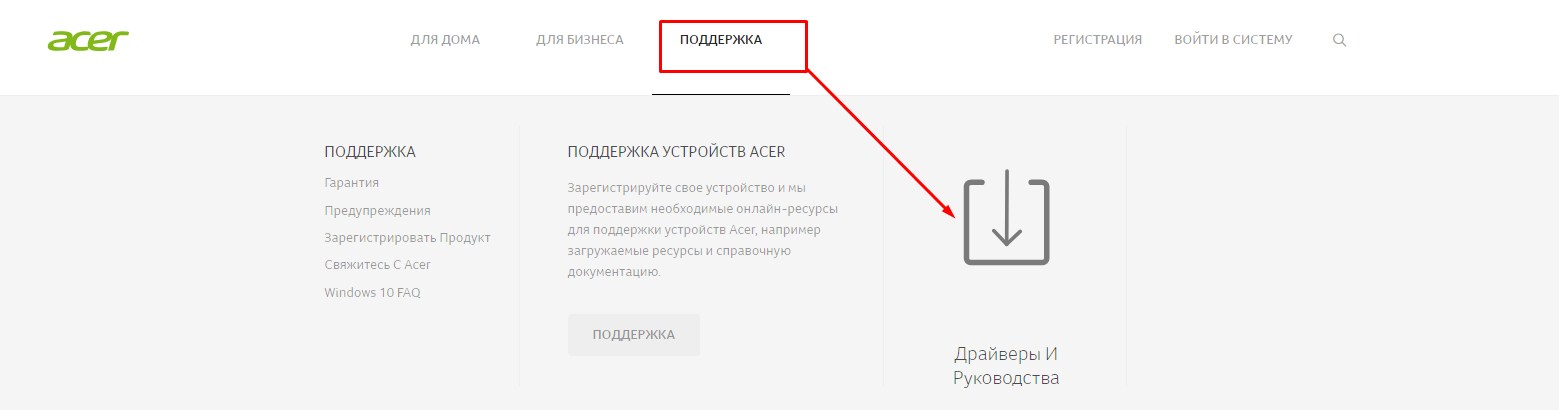
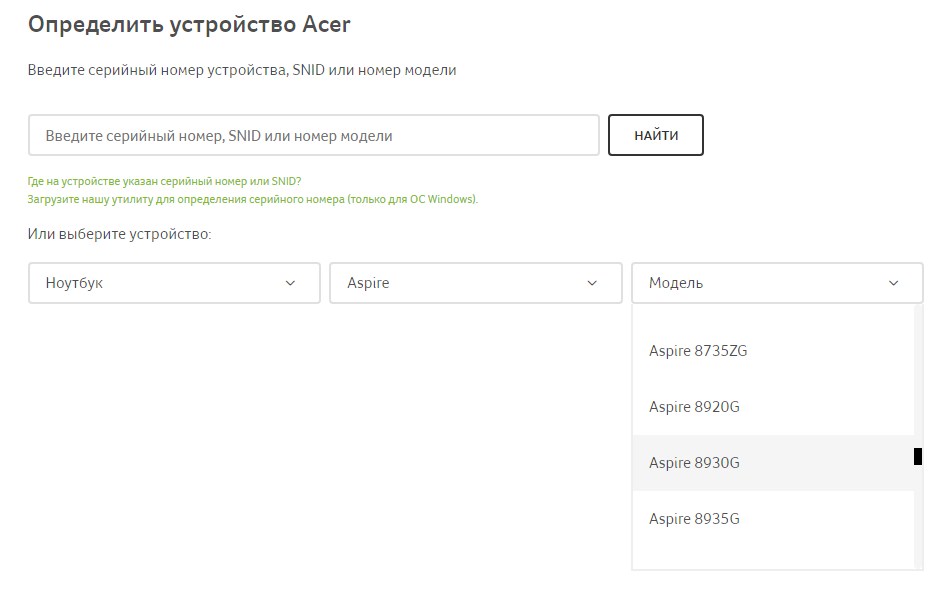
- Выбираем свой продукт. Выбираем версию операционной системы и после этого скачиваем драйвера на ваш беспроводной адаптер.
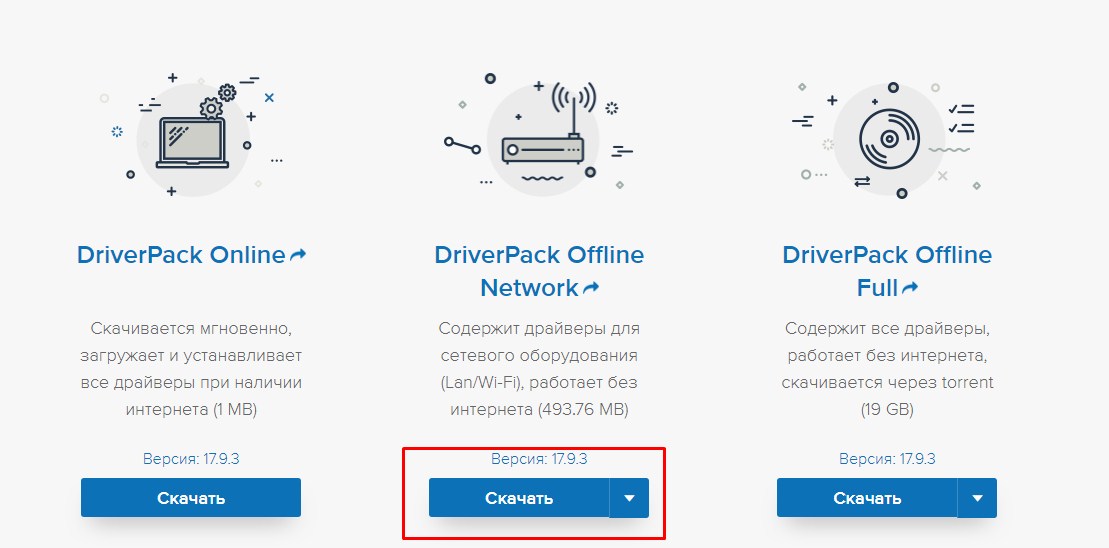
Если вы не нашли на сайте нужных дров или просто запутались, то можно скачать целый пак с сайта – https://drp.su/ru/foradmin . Нужно скачивать «DriverPack Offline Network». После установки драйвера не забудьте перезагрузить аппарат.
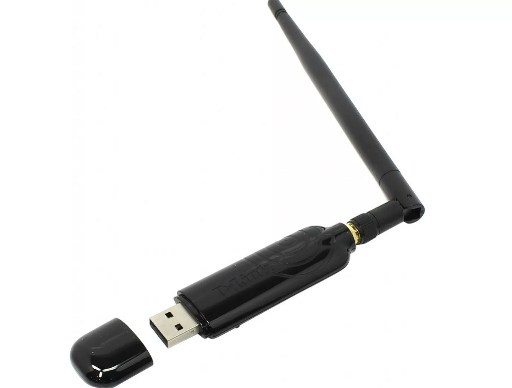
Что делать на компьютере?
К сожалению, но производители обычных стационарных персональных компьютеров не устанавливают встроенный модуль беспроводной сети. Но его можно купить отдельно. Выглядит он как обычная флэшка. Иногда в неё также устанавливают антенну для улучшения связи. Стоят такие внешние модули от 800 до 1800 рублей в любом компьютерном магазине. Драйвера быстро устанавливаются в автономном режиме при первом подключении к интернету.