- Connect smtp in linux
- Introduction
- SMTP From Command Line — Some Important Commands
- Step 1: Checking SMTP Connection Using Telnet
- Step 2: Checking The SMTP Connection From Command Line Using Ncat Or Nc
- Step 3: Checking SMTP Connection Over TLS Using Openssl
- Grade My Email Check your spam now?
- Connect smtp in linux
- Introduction
- Prerequisites
- Its time to now open terminal
- How to install sSMTP to send mails from your Linux command line (CLI)
- Step 1
- Step 2
- Step 3
- Case 1: Send Mail Directly From The Command Line
- Case 2: Send Mail From A Shell Script
- Error 1
- Conclusion
- Grade My Email Check your spam now?
Connect smtp in linux

Vikram Sahu 🦉
Published on 2019-08-19· Updated on 2022-08-16
The author voluntarily contributed this tutorial as a part of Pepipost Write to Contribute program.
Introduction
SMTP connection errors could be resolved in numerous ways but command line detects the error from the root quite easily. In this conundrum, Telnet is widely used to test SMTP connection breaks. Testing an email server with Telnet client is where we would focus, going forward with our solution. In this article we would be solving one of the most widely searched issues and a potential SMTP connection pain point for the developers. To check if SMTP is working from the command line (Linux), is one critical aspect to be considered while setting up an email server.
The most common way of checking SMTP from Command Line is using telnet, openssl or ncat (nc) command. It is also the most prominent way to test SMTP Relay. Let’s see how it works.
Note: these commands are Linux specific, so won’t work in other environments.
SMTP From Command Line — Some Important Commands
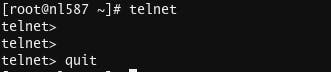
1. Telnet: Used to communicate with another host using the telnet protocol. If the hostname is not provided it enters into command mode.
Note: If telnet is not available, copy and paste the command
2. ncat or nc: It’s a general purpose CLI tool used for port scanning, security tool, and monitoring tool.
Note: If ncat or nc is not available, copy and paste the below command
sudo yum install nmap-ncat -y
3. openssl: It’s a general purpose library that provides an open-source implementation of SSL and TLS protocol.
Note: If openssl is not installed, copy and paste the below command:
Step 1: Checking SMTP Connection Using Telnet
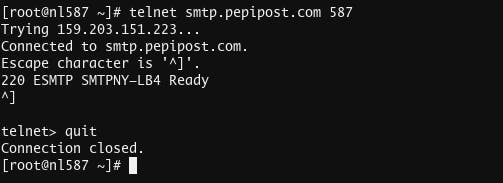
Telnet to your host, you want to check connection. Smtp servers usually communicate over smtp ports 25, 2525,587. Telnet SMTP test is one the best ways to figure out your SMTP connection state.
Syntax : telnet [your hostname ] [port no]
telnet smtp.pepipost.com 25 [2525 | 587 ]
In order to quit telnet ctrl + ] and quit
Output: If it’s getting connected properly
You can even try sending email using telnet.
Output: If the connection is refused.
Step 2: Checking The SMTP Connection From Command Line Using Ncat Or Nc
Because ncat or nc has various functionality from the list of functionality we will just check the connection using the following command.
nc -v -u smtp.example.com 587
If it is successfully connected
[[email protected] auth]# ncat -v -u smtp.pepipost.com 587 Ncat: Version 7.50 ( https://nmap.org/ncat ) Ncat: Connected to 138.197.56.58:587.
If there is a problem connecting the host
[[email protected] auth]# ncat -v -u smtp.example.com 587 Ncat: Version 7.50 ( https://nmap.org/ncat ) Ncat: Could not resolve hostname "smtp.example.com": Name or service not known. QUITTING.
All of the above steps are used to check the SMTP connection from command line to a particular port of the host. The next step is used to communicate through a secure tunnel using TLS. TLS security is of paramount importance when it comes to email deliverability. Read our detailed blog on TLS Security (Highly Recommended).
Step 3: Checking SMTP Connection Over TLS Using Openssl
In order to set up a TLS encrypted connection to an SMTP server, you need openssl command.
openssl s_client -connect smtp.pepipost.com:587 -starttls smtp
Once you hit the above command,you see a lot of verbose.
Above all, when a connection is successfully established, then you will notice a 250 DSN.
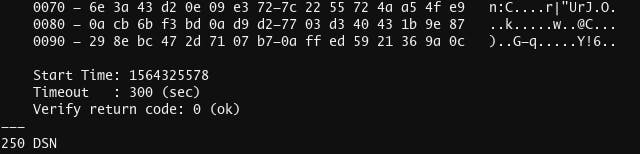
Consequently, once you got 250 DSN you can start now your SMTP transaction now by using below command
EHLO i am here 250-smtpbny-lb2.pepipost.com 250-PIPELINING 250-SIZE 50000000 250-VRFY 250-ETRN 250-AUTH PLAIN LOGIN 250-AUTH=PLAIN LOGIN 250-ENHANCEDSTATUSCODES 250-8BITMIME 250 DSN
this will give you supported verbose.
It will not respond if your SMTP server is not active.
These are some of the popular methods to check whether the SMTP connection is active on your machine. In case you have installed the SMTP correctly, but still getting an error while sending emails, then please refer this doc for more information.
Grade My Email
Check your spam now?
Netcorecloud’s toolkit is the solution to all your email problems.
Connect smtp in linux

Vishal Chauhan
Published on 2019-09-20· Updated on 2020-07-17
The author voluntarily contributed this tutorial as a part of Pepipost Write to Contribute program.
Introduction
Notifications are getting more important these days to stay updated among various online activities. Moreover, these notifications can be emails, SMS or push. This tutorial is going to demonstrate you the simplest way of sending notifications, over one of the most popular channels that is email. You are going to learn the process of sending emails from the terminal or a shell script from a Linux operating system, using some of the popular CLI tools.
This tutorial is going to help you in sending critical server-level emails like Cron reports, script logs, customer registrations, receipt, bank statement over email. There are many ways to send emails from the server, but let’s explore the tool that’s easy to install and easy to code.
With simple libraries and little configurations, you can have a CLI tool in your Linux OS that you can use to send mails from the terminal.
Prerequisites
- Linux operating system
- SMTP Configurations (SMTP server details and authentication credentials)
- Your favourite editor (Optional)
- Configure Gmail SMTP/ready with any other custom SMTP server details. In this tutorial, you are going to use Gmail SMTP to send emails, so make sure that;
undefinedundefined
Google SMTP server configurations would look something like this:
- SMTP Server/Hostname: smtp.gmail.com
- SMTP Username: [Your Gmail Address]
- SMTP password: [Your Gmail Password]
- SMTP Port: 587
- TLS/SSL: Required
Its time to now open terminal
There are various tools and libraries which you can install to send emails from the terminal. Few of the popular libraries are:
In this tutorial, you’re going to learn the steps on how to install and use sSMTP to send mails from your Linux command line. Click here, in case you want to learn how to install and use Mailx to send mails from your Linux command line.
How to install sSMTP to send mails from your Linux command line (CLI)
Step 1
Use the below command to install ssmtp:
sudo apt-get install ssmtp
Optional:
CentOS users can use the below command to install ssmtp:
In CentOS, you may see an error during installation as «package ssmtp is not available», in such a case below command, is going to be helpful to fix the issue:
sudo yum --enablerepo=extras install epel-release
Step 2
Once ssmtp installed successfully, you need to make the below global configurations which required for sending mail.
Open the following file in your favourite editor:
sudo vim /etc/ssmtp/ssmtp.conf
Edit the above file with the below details:
mailhub=smtp.gmail.com:587 useSTARTTLS=YES AuthUser=username-here AuthPass=password-here TLS_CA_File=/etc/pki/tls/certs/ca-bundle.crt
The above configuration is going to be used to send email using your Gmail SMTP. In case you want to use some other third-party SMTP, then mention the hostname of the same. e.g. if you want to use Pepipost SMTP, then instead of smtp.gmail.com, you need to mention smtp.pepipost.com in the mailhub parameter. mailhub is used for SMTP server address which consists of two part host:port
Now you are all set to sending mails from the command line (CLI).
Step 3
There are multiple ways to use ssmtp command to send emails.
Case 1: Send Mail Directly From The Command Line
For this, copy-paste the below command, and you’re ready to send email from your command line:
-vvv is the verbosity to see the logs while sending the mail
Case 2: Send Mail From A Shell Script
You can use the same ssmtp to send mail from a shell script too. For that, open your preferred editor and create a shell script file with name saymail.shand copy-paste the below code:
#!/bin/sh SUBJECT="Test Subject" TO /cdn-cgi/l/email-protection" data-cfemail="8fecfdeef5f6cff6e0ffe2eee6e3a1ece0e2">[email protected]" MESSAGE="Hey There! This is a test mail" echo $MESSAGE | sudo ssmtp -vvv $TO
Make sure you have set the right permission access to your script file. If not, here is the command to set the permission:
Now, the code is ready to be executed. Just run the shell script using the below command:
Hope now you’re able to send mails using the shell script too.
Below are few errors/exceptions which you may encounter while sending the mail using ssmtp:
Error 1
In case while sending the email, if might get the below error as output:
ssmtp: Authorization failed (535 5.7.8 https://support.google.com/mail/?p=BadCredentials u65smyez14952a76922r5pfui.104 — gsmtp)
Solution: In such a case, try doing following as solution:
- Enable «Allow less secure app» in your google accounts settings, as explained in the above prerequisites section.
- The provided login credentials can be invalid. Make sure you have the correct credentials.
Once the issue is fixed, re-run the shell script and the success output will be something like this;
[] EHLO kali [] STARTTLS [] EHLO kali [] AUTH LOGIN [] dmlzaGFsY2hhasd2dWhhbjIyMTJAZ21haWwuY29t [] MAIL FROM:[email protected]> [] RCPT TO:[email protected]> [] DATA [] Received: by kali (sSMTP sendmail emulation); Thu, 19 Sep 2019 21:45:14 +0530 [->] From: "root" [email protected]> [->] Date: Thu, 19 Sep 2019 21:45:14 +0530 [->] Hey There! This is a test mail [->] [->] . [] QUIT [Conclusion
Hope the steps explained above were useful and you were able to successfully send mail using linux command line (CLI). Feel free to contribute, in case you encountered some issue which is not listed as a part of this tutorials.
Use below comments section to ask/share any feedback.Grade My Email
Check your spam now?Netcorecloud's toolkit is the solution to all your email problems.