How to connect to L2TP over IPSec VPN?
I’m having trouble connecting to my company’s VPN on Ubuntu 15.04. It uses L2TP over IPsec, and I have a username, password and shared secret. How do I connect?
Seems there is no easy way anymore to establish a L2tp VPN connection since OpenSwan has been deprecated and removed in Ubuntu 14.10. Need it myself, found no working solution after months of sporadic research.
@Powel Szubert, can’t understant the last step. I don’t know witch IP i have to use for create this route. could you help me? please.
6 Answers 6
Update: A PPA exists now for network-manager-l2tp :
sudo add-apt-repository ppa:nm-l2tp/network-manager-l2tp sudo apt-get update sudo apt-get install network-manager-l2tp To install the network manager l2tp that supports L2TP for Ubuntu 16.04
Another solution is to use network-manager-l2tp. You can get it from https://github.com/nm-l2tp/network-manager-l2tp.
Works for me too in 16.04! I had to apt install strongswan-plugin-openssl for «VPN service failed to start» in Network Manager which was caused by ENCRYPTION_ALGORITHM 3DES_CBC (key size 0) not supported! in syslog.
There’s now a PPA, which simplifies the installation. One note: I did have to stop the system xl2tpd service with sudo service xl2tpd stop before I could connect to my VPN — otherwise xl2tpd would ignore the IPsec tunnel and try connecting directly over L2TP.
You will also need a GUI: apt install network-manager-l2tp-gnome . See askubuntu.com/questions/934350/connect-to-l2tp-over-ipsec
This also worked for me on 16.04 LTS, and as @JulienCarsique mentioned, also had to run apt install network-manager-l2tp-gnome along with network-manager-l2tp (this should be the accepted answer IMO)
The first comment is probably the answer for most of us, except, maybe, some real experts:
«Seems there is no easy way anymore to establish a L2tp VPN connection since OpenSwan has been deprecated and removed in Ubuntu 14.10. Need it myself, found no working solution after months of sporadic research. – derFunk May 21 at 18:11»
No solution seems to be planned, see https://wiki.strongswan.org/issues/254. Another needed functionality removed from Ubuntu.
I have proposed a solution below that should be very easy for a novice user. It doesn’t involve patching the package. There are ways to do it but it’s not as trivial as using the built-in functionality.
Patch NM-L2TP package with script
#!/bin/bash CUR_PATH=$(dirname $(readlink -f $0)) TMP_PATH=/tmp/nm-l2tp mkdir $ cd $ wget https://launchpad.net/~seriy-pr/+archive/ubuntu/network-manager-l2tp/+build/6512073/+files/network-manager-l2tp_0.9.8.5-0utopic1_amd64.deb ar vx network-manager-l2tp_0.9.8.5-0utopic1_amd64.deb mkdir new tar -xpvf data.tar.xz -C ./new mv ./new/usr/lib/pppd/2.4.5 ./new/usr/lib/pppd/2.4.6 sed -i 's/2.4.5/2.4.6/g' ./new/usr/lib/NetworkManager/nm-l2tp-service sed -i 's/2.4.5/2.4.6/g' ./new/usr/lib/pppd/2.4.6/nm-l2tp-pppd-plugin.so mkdir new/DEBIAN tar -xpvf control.tar.gz -C ./new/DEBIAN sed -i 's/, ppp (/network-manager-l2tp_0.9.8.5-0vivid1_amd64.deb rm -rf $
Then download and install an appropriate Openswan package from the http://www.ubuntuupdates.org/pm/openswan and run the following commands
sudo apt-get update sudo dpkg -i network-manager-l2tp_0.9.8.5-0vivid1_amd64.deb sudo service xl2tpd stop sudo update-rc.d xl2tpd disable Then just go to the Network manager, choose VPN connections and create l2tp. You need only set up a username, password and the IPSec PSK in the IPSec additional settings.
Another workaround, tested on 15.10, should work on 15.04 also. Requires manual editing of conffiles and manual establishing connection.
- leave original strongswan from ubuntu repo
- remove xl2tpd package (U can try with xl2tpd but on my computer xl2tpd crashed with segfault on every start)
- install openl2tpd from: ftp://ftp.openl2tp.org/releases/openl2tp-1.8/debian-squeeze/openl2tp_1.8-1_amd64.deb
- edit /etc/ipsec.conf:
config setup strictcrlpolicy=yes conn %default ikelifetime=30m keylife=15m rekeymargin=3m keyingtries=1 mobike=no dpdaction=restart dpddelay=30 dpdtimeout=120 conn MYSERVER left=192.168.101.157 leftprotoport=17/1701 right=77.78.79.80 # public IP of VPN gw rightprotoport=17/1701 authby=secret type=transport keyexchange=ikev1 auto=route
ppp profile modify profile_name=default \ auth_eap=no auth_mschapv1=no auth_mschapv2=no tunnel create tunnel_name=MYSERVER \ dest_ipaddr=77.78.79.80 \ hello_timeout=10 \ retry_timeout=10 \ max_retries=60 \ persist=yes session create session_name=MeOnMYSERVER \ tunnel_name=MYSERVER \ interface_name=ppp1 \ user_name=MyLogin \ user_password=MyPassword
- restart and test ipsec: ipsec restart ipsec status
- output should be like this: Routed Connections: MYSERVER: ROUTED, TRANSPORT MYSERVER: 192.168.101.157/32[udp/l2f] === 77.78.79.80/32[udp/l2f] Security Associations (0 up, 0 connecting): none
- connect sudo service openl2tpd restart sudo route add -net gw
Note that for the accepted answer, the correct installation command for Ubuntu 18 is
sudo apt install network-manager-l2tp network-manager-l2tp-gnome Since Ubuntu now ships with Gnome.
There is a workaround to get l2tp-ipsec on 15.04 but its not very elegant.
I uninstalled strongswan and installed an old openswan trusty .deb package.
I then found .deb files of the old l2tp-ipsec-vpn and l2tp-ipsec-vpn-daemon from trusty by Werner Jaeger.
I installed those, and after I restarted, I was able to connect. However, this took quite a bit of time to get working properly and required installing deprecated packages.
I think that’s all I did but if you try this and get another error there may be another package I installed I don’t remember.
UPDATE: I had to do this again so I figured I would share the steps. Install the old client: https://launchpad.net/l2tp-ipsec-vpn
Again this is a workaround if you need it in pinch and currently works. That being said, this really needs to be apart of the OS.
sudo apt-get install gksu libgksu2-0 libctemplate2 libengine-pkcs11-openssl libp11-2 xl2tpd Next download the old binaries and install with dpkg:
wget http://mirrors.kernel.org/ubuntu/pool/universe/o/openswan/openswan_2.6.38-1_amd64.deb sudo dpkg -i openswan_2.6.38-1_amd64.deb wget http://mirrors.kernel.org/ubuntu/pool/universe/l/l2tp-ipsec-vpn/l2tp-ipsec-vpn_1.0.9-1_amd64.deb wget http://mirrors.kernel.org/ubuntu/pool/universe/l/l2tp-ipsec-vpn-daemon/l2tp-ipsec-vpn-daemon_0.9.9-1_amd64.deb sudo dpkg -i l2tp-ipsec-vpn_1.0.9-1_amd64.deb sudo dpkg -i l2tp-ipsec-vpn-daemon_0.9.9-1_amd64.deb Open the client. Add a connection and configure as needed. Once you try to connect it may take awhile but be patient.
How to Setup an L2TP/IPsec VPN Client on Linux
L2TP (which stands for Layer 2 Tunneling Protocol) is a tunneling protocol designed to support virtual private networks (VPN connections) over the internet. It is implemented in most if not all modern operating systems including Linux and VPN-capable devices.
The L2TP does not provide any authentication or encryption mechanisms directly to traffic that passes through it, it is usually implemented with the IPsec authentication suite (L2TP/IPsec) to provide encryption within the L2TP tunnel.
In this article, we will show how to set up an L2TP/IPSec VPN connection in Ubuntu and its derivatives and Fedora Linux.
This guide assumes that the L2TP/IPsec VPN server has been set up and that you have received the following VPN connection details from your organization’s or company’s system administrator.
Gateway IP address or hostname Username and Password Pre-shared Key (Secret)
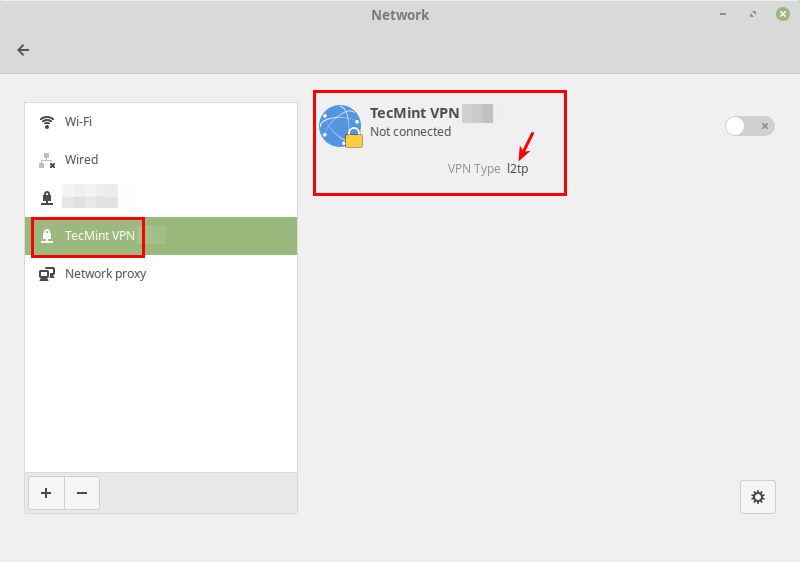
How to Setup L2TP VPN Connection in Linux
To add an L2TP/IPsec option to the NetworkManager, you need to install the NetworkManager-l2tp VPN plugin which supports NetworkManager 1.8 and later. It provides support for L2TP and L2TP/IPsec.
To install the L2TP module on Ubuntu and Ubuntu-based Linux distributions, use the following PPA.
$ sudo add-apt-repository ppa:nm-l2tp/network-manager-l2tp $ sudo apt-get update $ sudo apt-get install network-manager-l2tp network-manager-l2tp-gnome
On RHEL/CentOS and Fedora Linux, use the following dnf command to install L2TP module.
# dnf install xl2tpd # dnf install NetworkManager-l2tp # dnf install NetworkManager-l2tp-gnome OR # yum install xl2tpd # yum install NetworkManager-l2tp # yum install NetworkManager-l2tp-gnome
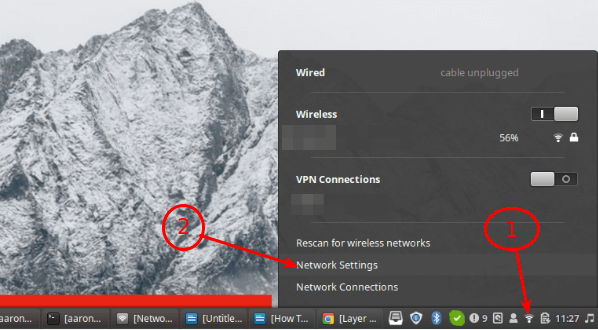
Once the package installation is complete, click on your Network Manager icon, then go to Network Settings.
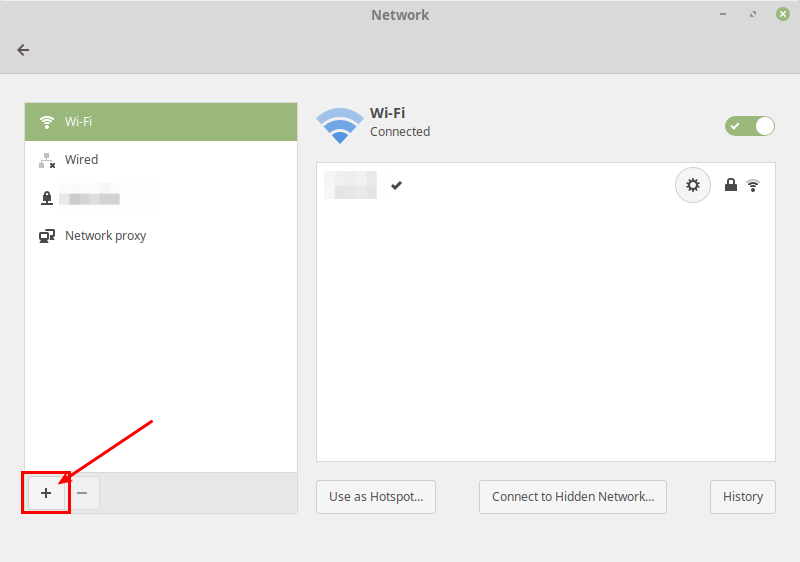
Next, add a new VPN connection by clicking on the (+) sign.
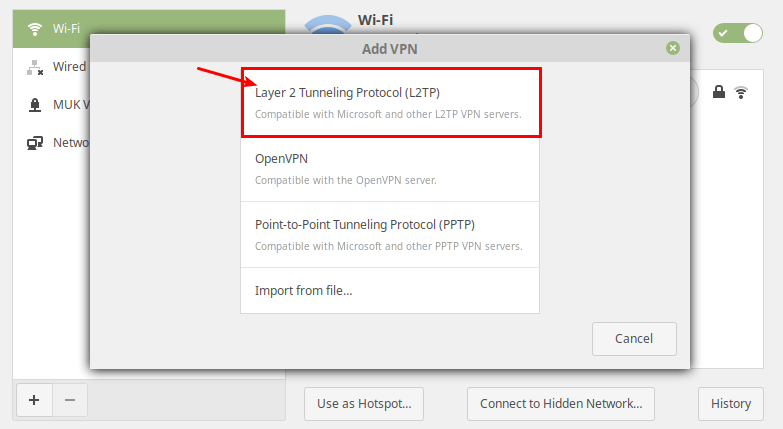
Then select Layer 2 Tunneling Protocol (L2TP) option from the pop-up window.
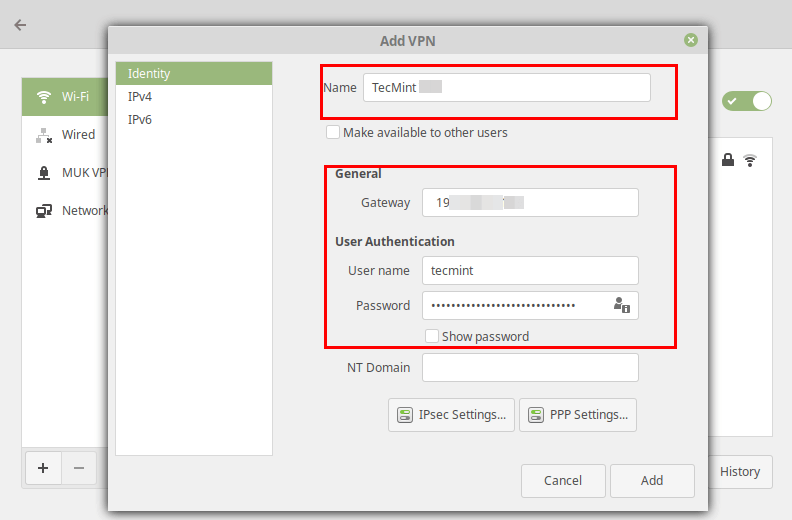
Next, enter the VPN connection details (gateway IP address or hostname, username and password) you received from the system administrator, in the following window.
Next, click IPsec Settings to enter the pre-shared key for the connection. Then enable IPsec tunnel to L2TP host, enter (or copy and paste the) the Pre-shared key and click Ok.

After that, click Add. Now your new VPN connection should be added.
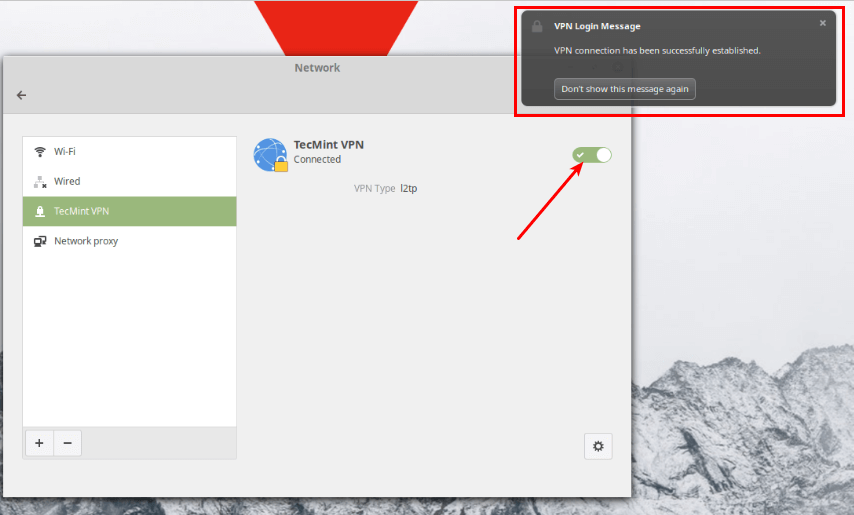
Next, turn on the VPN connection to start using it. If the connection details are correct, the connection should be established successfully.
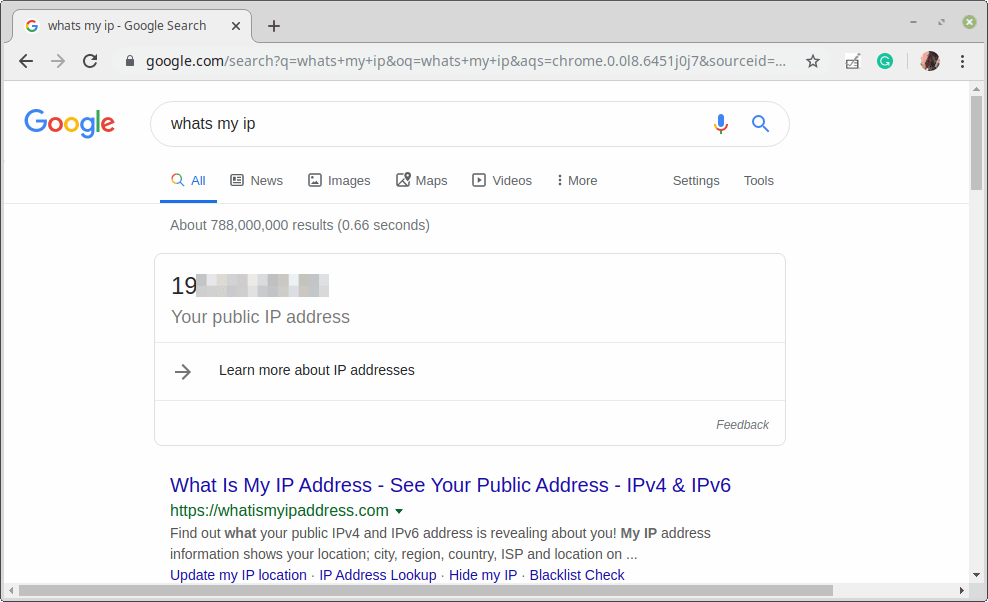
Last but not least, test if the VPN is working fine. You can check your computer’s public IP address to confirm this from a web browser: it should now point to the IP of the gateway.
That’s the end of this article. If you have any queries or thoughts to share, reach us via the feedback form below.