- How to get internet from wifi and share to LAN device
- 5 Answers 5
- How to Share LAN Internet via WiFi Hotspot Without a Router
- Make Hotspot
- Share the connection
- Share Wired Lan network over wifi without a router.
- Bridge WiFi to Ethernet in Windows 10
- Is it Possible to Bridge the Internet from WiFi to Ethernet?
- How to Bridge WiFi to Ethernet in Windows 10
- How to Remove a WiFi to Ethernet Bridge Connection
- Closing Words
How to get internet from wifi and share to LAN device
In my apartment, I can only connect to the internet via apartment’s Wifi hotspot. But I have a multiple devices that have only LAN connection such as PC, Internet TV, game console. All I have are DLINK wireless router(DSL-264OBT) and USB wireless adapter. Objective: I’d like to access an internet from those devices. Is it possible to use wireless router to connect to wifi hotspot and then share an internet to LAN via its own Ethernet port ? One solution I can think of is to connect USB wireless adapter to PC and then share internet via router’s LAN. But this way, If I want to play games, I have to turn on my PC all the time even I don’t use it at all. Anyone has solution for this ? It’s OK for me to buy a new network device if it needed.
5 Answers 5
You need to create a wireless bridge, most home routers won’t have that option without a custom firmware, but i believe a few d-links I’ve had have actually had that option and is actually how i have my HTPC, tv and PS3 connected to my home network at home, using a cheap linksys router that has ddwrt on it it
If you need something temporary you can use a laptop to create a bridge from your wireless to your wired NIC without using any extra software, here’s a guide that has some info on it from technet.
DD-WRT is a custom firmware that would be able to get the job done with any compatible wireless router.
You can find the Router database for it here, your current dlink isn’t supported how ever.
How to Share LAN Internet via WiFi Hotspot Without a Router
This guide will help you create a Hotspot from your Computer using built-in wifi or adapter to share the wired internet connection (LAN). It eliminates the requirement of a router. Creating a wifi hotspot on a computer when connected to a wifi network is an easy task, and Windows 10 has a dedicated feature called Mobile Hotspot. You can share a Lan/Ethernet/Wired network connection over WIFi. This way, you can connect other devices to the internet via creating a Hotspot from your computer and then connecting devices to it.
Update: Windows 11 makes this process really easy with a Mobile hotspot, in order to create a WIfi network your PC should have a wifi adaptor. Then from Windows quick access, turn on the Mobile hotspot.
Make Hotspot
- Right-click on the network icon on the taskbar.
- Click open network and security settings.
- Click on Change adaptor options.
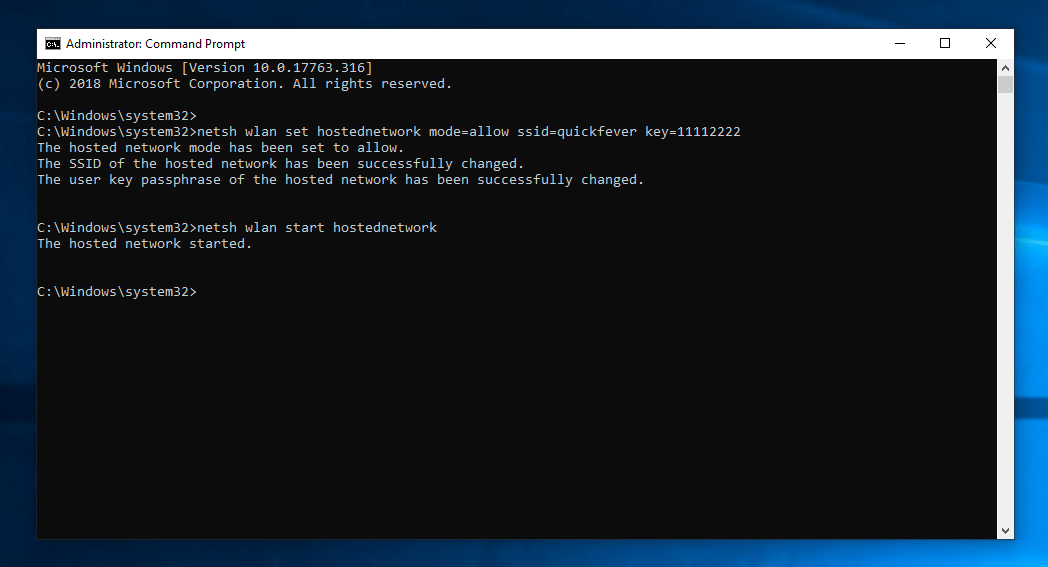
Open the command prompt as admin privilege, and type the following command. For this to work, your computer should be connected to Wired internet connect, and a wi-fi adapter is required (in case your PC Doesn’t have built-in wifi).
netsh wlan set hostednetwork mode=allow ssid=quickfever key=11112222This command will instruct Windows to create a Hotspot with Quickfever SSID, and 11112222 password. You’re free to change both as per your wish.
netsh wlan start hostednetwork netsh wlan stop hostednetworkThese commands will start or stop the Hotspot connection.
Slide the phone out of your pocket and scan for WiFi connections; you would see the Hotspot you just created.
Share the connection
This step is very, very important, which many people miss and in result created Hotspot doesn’t share the computer internet.
Open network and adaptor settings. You’ll see a new connection “Local area connection….“.
Now right-click on the main internet (LAN) go to its properties then to sharing tab. Choose the “Local area connection,” and you’re good to go. The main connection is labeled as “Broadband connection” on my computer as you can see in the screenshot.
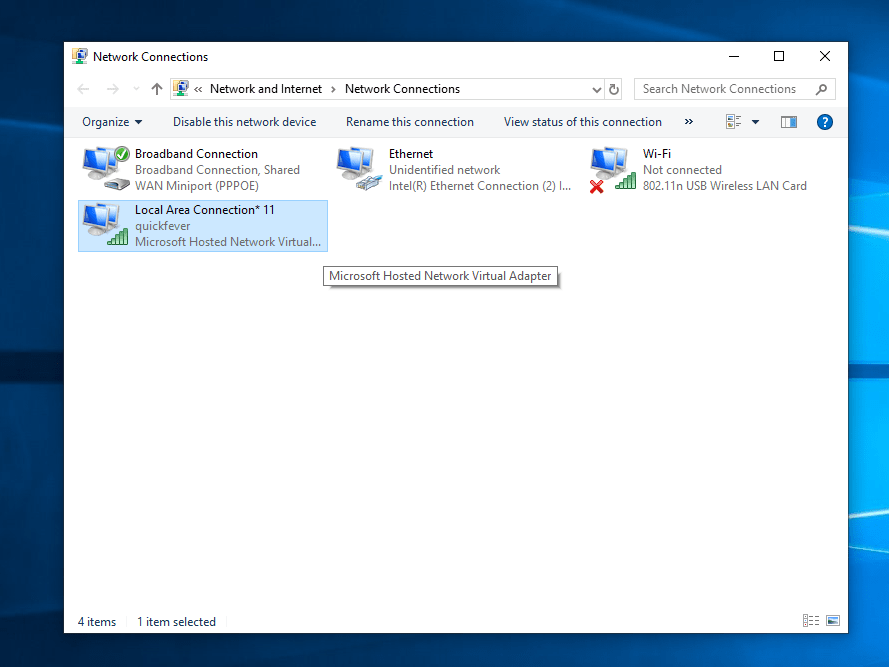
In sharing, allow by ticking the option and selecting “Local area connection..” in the field through your main connection will be shared. The method works on all laptops, computers with built-in wifi, or via WiFi adapter.

Share Wired Lan network over wifi without a router.
Sharing your wired internet connection to another device through your computer without a router is a nice trick to know. The connection stability and speed may vary since you’re using built-in WiFi or an adapter to share the internet. However, I tested and found it working correctly, and connecting two and more devices worked fine as expected.
These nifty tricks would allow you to share your computer’s internet connection to other devices over a WiFi hotspot. It is similar to Windows 10’s Mobile Hotspot feature, but sometimes Windows can’t recognize the LAN internet properly, which renders the Mobile Hotspot icon grey.
Since you are here…
I’ve got a small favor to ask. This is an independent site, and producing content takes a lot of hard work and time. Although many people are reading Quickfever, many use adblocker.. And unlike many other sites, there is no paywall blocking. So you can see why your help is needed. If everyone who finds this website useful and helps to support it, the future would be much more secure. Thank you.
If you use adblocker, please disable it for this site.
$0 raised so far by 0 people.
Bridge WiFi to Ethernet in Windows 10
Before we find out how to bridge WiFi to Ethernet in Windows 10, it is essential to know what exactly it is. When you create a network bridge from WiFi to Ethernet, you are letting the bandwidth of the WiFi internet connection on your PC be shared through Ethernet or the LAN port. By doing so, you will be providing internet to other devices through a LAN wire.
This technique is quite proper when you have WiFi internet, but a device you need to use only connects to the internet via LAN port or ethernet. You can also use this process to create a Local Area Network among multiple Windows 10 computers.
This article shows if Windows 10 lets you create a bridge connection from WiFi to LAN. If yes, then how to create this bridge connection. Let us find out all you need to know about WiFi to Ethernet bridge connection.
Is it Possible to Bridge the Internet from WiFi to Ethernet?
Yes, it sure is possible to create a bridge connection from WiFi to LAN. You can do it from Windows settings. This means that you do not require to install any third-party software to bridge WiFi to Ethernet in Windows 10. All you need to do is access the Control Panel, where you will find all the options required to carry out internet connection sharing between WiFi and Ethernet.
The following section will find the steps and screenshots that will guide you through creating a network bridge from WiFi to Ethernet.
How to Bridge WiFi to Ethernet in Windows 10
Creating an internet connection sharing bridge is quite simple and straightforward. As mentioned earlier, this can be done through the Control Panel window. Follow the steps provided below, and you will be able to make a network bridge yourself:
Bridge WiFi to Ethernet Using Control Panel
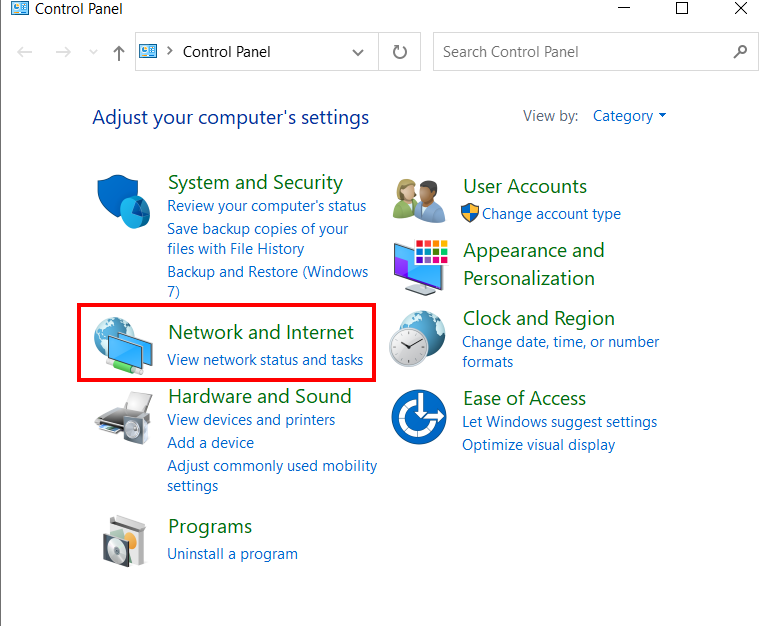
Step 1: Open Control Panel on your Windows PC. Although there are several ways to launch Control Panel, we will do it through the Run box. Press Win + R keys together. This will open the Run box. In the box, type control panel, then press the Enter key on your keyboard.
Step 2: The Control Panel window will open. In the Control Panel window, click Network and Internet option.
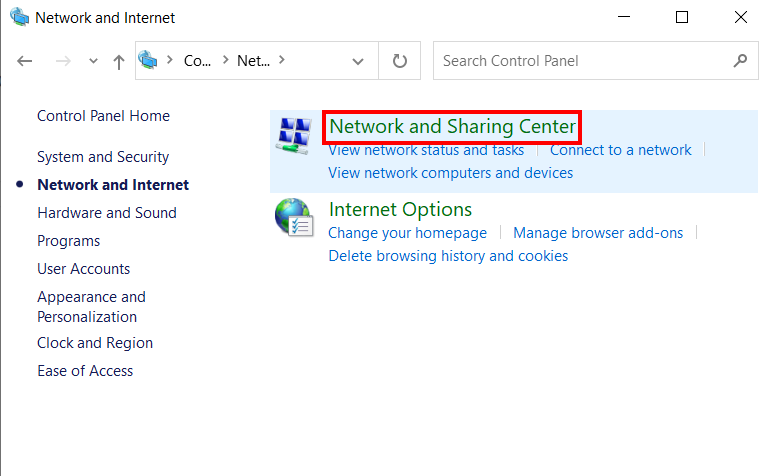
Step 3: On the next screen that opens, select the Network and Sharing Center option.
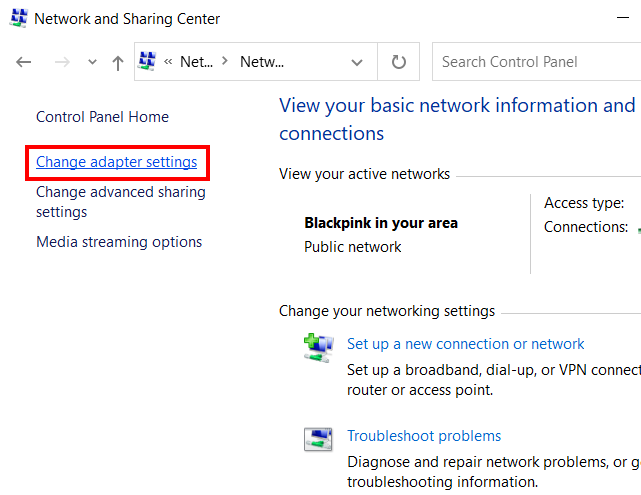
Step 4: Again, you will see new options on the next screen. Go to the left panel on this window, then select the option that says Change adapter settings.
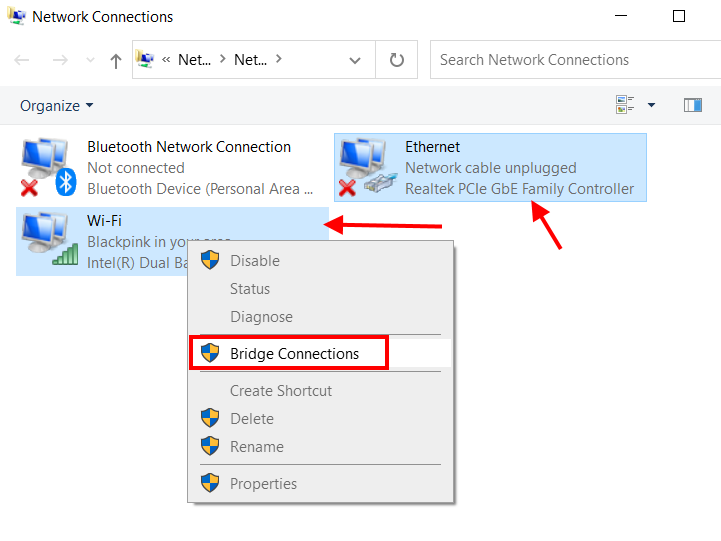
Step 5: A new window will appear now. Here, you will be able to see all the network adapters available on your Windows 10 PC, including the wireless network adapter and the ethernet adapter.
To create a bridge between the two, make a click on the wireless network adapter icon. Now press the Ctrl key and keep it pressed till you select the ethernet adapter icon. Once both the WiFI adapter and the Ethernet are chosen, make a right-click on any of the icons. A context menu will appear. Here, select the Bridge Connections option.
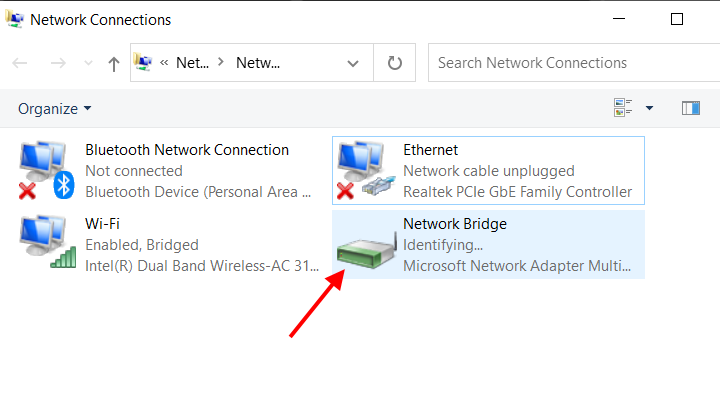
Once a network bridge is created, you will see a new WiFi adapter appear on the Network Connection window. The name of the adapter should be Network Bridge, as shown in the screenshot below.
Now, you should access the internet on any device that you connect the LAN cable to your Windows 10 PC. This way, you have been successful in creating a WiFi to Ethernet bridge in Windows 10.
But what if you want to manage the bridge connection between WiFi adapter and ethernet adapter? Well, by accessing the Network Connection window from the Control Panel, you can efficiently operate the Wi-Fi to ethernet bridge.
Here, you can disable, enable, rename, change properties, or even delete the bridge connection if you like. You can change the IP address and DNS setting too. If there seems to be a problem between the Wi-Fi to Ethernet bridge, you can even run a diagnosis for the same.
Go to the Network Connections window through Control Panel > Network and Internet > Network and Sharing Center > Change adapter settings.
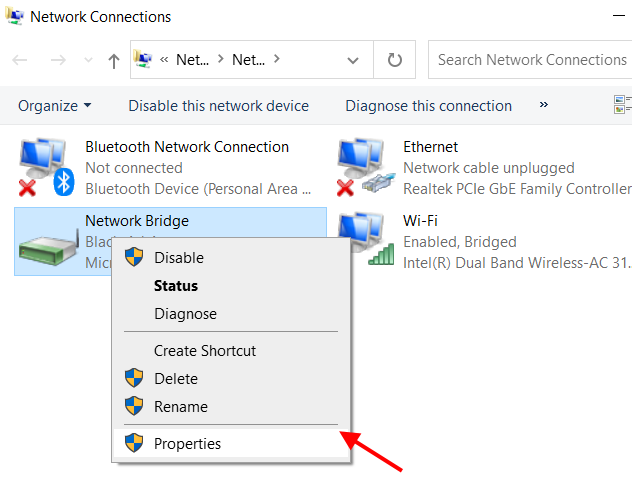
This will evoke the Network Connections window. Here, make a right-click on the Network Bridge icon to see all the options in the context menu.
By selecting the Disable option, you can disable the internet connection from Wi-Fi to the Ethernet or LAN port. After disabling the bridge, the device(s) accessing the internet from LAN wire won’t access it anymore.
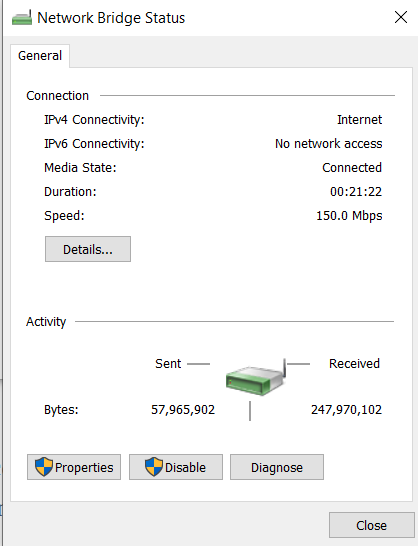
Through the Status section, you will view the internet connectivity type, the duration of the connection, along with the maximum connection speed. You also get to know about the amount of data sent and received over this connection.
To change the bridge connections settings and properties, you can access the Properties window and make any changes if required.
How to Remove a WiFi to Ethernet Bridge Connection
Now, we already know how to disable WiFi to Ethernet bridge connections, but what if you want to remove the network bridge altogether. Well, it is quite a simple process and involves only a couple of steps. Follow these steps:
Step 1: Select the Network Connections window. You can do it through the Control Panel, as mentioned in the above sections. Here, you will see all the network adapters, including the Network Bridge adapter.
Step 2: To remove the bridge connections between WiFi and Ethernet, make a right-click on the Network Bridge icon. A context menu will open. Here, select the Delete option.
A dialog box will open up to confirm if you want to delete the bridge. Click on Yes to confirm. After the confirmation, the bridge will be deleted from your Windows 10 PC.
Closing Words
Now that you know how to bridge WiFi to Ethernet on Windows 10 PC, we hope you can do it yourself without looking at any tutorials. Of course, you would be, as the steps involved are pretty simple to follow.
Recommended for You:
Johnny Crumley
A self-defined geek, Johnny Crumley comes from the USA. As a kid genius, he started DOS batch files at just five years old and was soon messing with BASIC in kindergarten. He was always into the bits and bytes. As luck would have it, Johnny became a freelance PC technician, something he’s genuinely passionate about. From his teenage years, he started writing about anime and games. He’s also an avid educator, spreading his knowledge and expertise in the tech sector. He has been a professional writer for six years and has written for several emerging tech publications.
Blog.rottenwifi.com is a participant in the Amazon Services LLC Associates Program which means we may get paid commissions on editorially chosen products purchased through our links to retailer sites. All names, logos, brands, and images are trademarks or copyrighted materials of their respective owners. Amazon and the Amazon logo are trademarks of Amazon.com, Inc., or its affiliates.