- Как подключиться по SSH
- Что такое SSH?
- Как подключиться по SSH
- 1. Подключение через SSH в Linux
- 2. Подключение через SSH в Windows
- Выводы
- Connecting to a Remote Server Over SSH on Linux
- Before You Begin
- Open the Terminal
- Connecting to the Remote Server Over SSH
- Ending the SSH Session
- Sending Commands Over SSH
- Sending a Single Command
- Sending Multiple Commands
- Using sudo
- Going Further
- Troubleshooting SSH Connection Issues
- Increasing Security
Как подключиться по SSH
SSH — это основной протокол для удаленного управления серверами на базе операционной системы Linux. Все действия при подключении к SSH выполняются в командной строке, но при достаточном уровне знаний и привилегий в системе там можно сделать практически все что угодно, в отличие от того же FTP где можно только передавать и редактировать файлы.
Если вы покупаете VPS сервер или продвинутый хостинг, обычно в письме вместе с другими данными авторизации есть данные доступа по SSH. В этой статье мы рассмотрим как подключиться по SSH к серверу из Linux или Windows.
Что такое SSH?
Поскольку эта статья рассчитана именно на новичков, то перед тем, как перейти дальше давайте подробнее разберемся что из себя представляет SSH. Исторически так сложилось что на большинстве серверов используется операционная система Linux, во многом этому посодействовала ее бесплатность. Графический интерфейс на серверах Linux не используется для экономии ресурсов, поэтому единственным способом администрирования сервера остается командная строка.
Но это не является недостатком, потому что в командной строке Linux можно сделать больше чем графическом интерфейсе. Протокол SSH позволяет вам выполнять команды в удаленной системе так, как будто вы это делаете в своей системе. Вам доступен буфер обмена, вы вводите команды и можете использовать их вывод. Недоступны разве что файлы из вашей файловой системы. Например, когда вы подключитесь к серверу по SSH из Ubuntu, то все будет выглядеть так, как будто вы открыли терминал в своей системе.
Как подключиться по SSH
Для подключения по SSH нам необходимо знать такие данные:
- ip адрес сервера, к которому мы собираемся подключится;
- порт, на котором ожидает подключения SSH сервер, по умолчанию используется 22, но в целях безопасности порт подключения ssh часто изменяют;
- имя и пароль пользователя на удаленном сервере.
Больше ничего не нужно, обычно эти данные присылают в письме вместе с описанием VPS. Теперь перейдем к практике.
1. Подключение через SSH в Linux
В Linux подключение по SSH выполняется с помощью утилиты ssh. Мы более подробно рассматривали работу с ней в статье как пользоваться ssh. Для подключения к удаленному компьютеру ее синтаксис будет выглядеть следующим образом:
$ ssh имя_пользователя @ айпи_адрес
Это самый простой вариант, если вам также нужно задать порт, используйте опцию -p:
$ ssh имя_пользователя @ айпи_адрес -p порт
Чтобы выполнить подключение по SSH Linux нажмите Ctrl+Alt+T для открытия терминала и наберите команду, заменив нужные значения:
Или, с нестандартным портом:
ssh sergiy@192.168.1.2 -p 2223
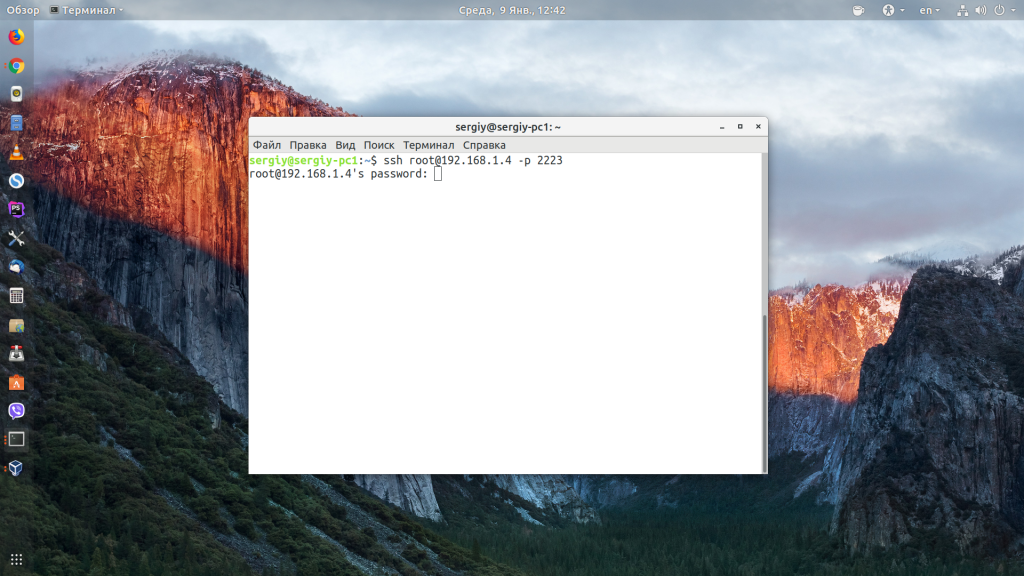
Если ip_адрес и порт правильные, то на следующем шаге программа попросит у вас ввести пароль:
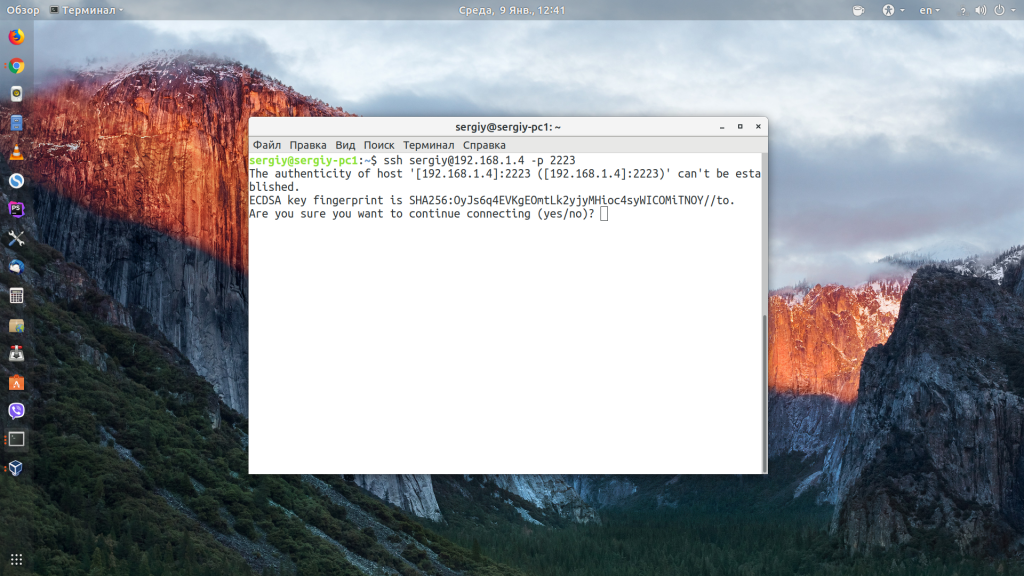
Если пытаетесь подключится через SSH к этому серверу первый раз, то утилита также попросит подтвердить добавление нового устройства в свой список известных устройств, здесь нужно набрать yes и нажать Enter:
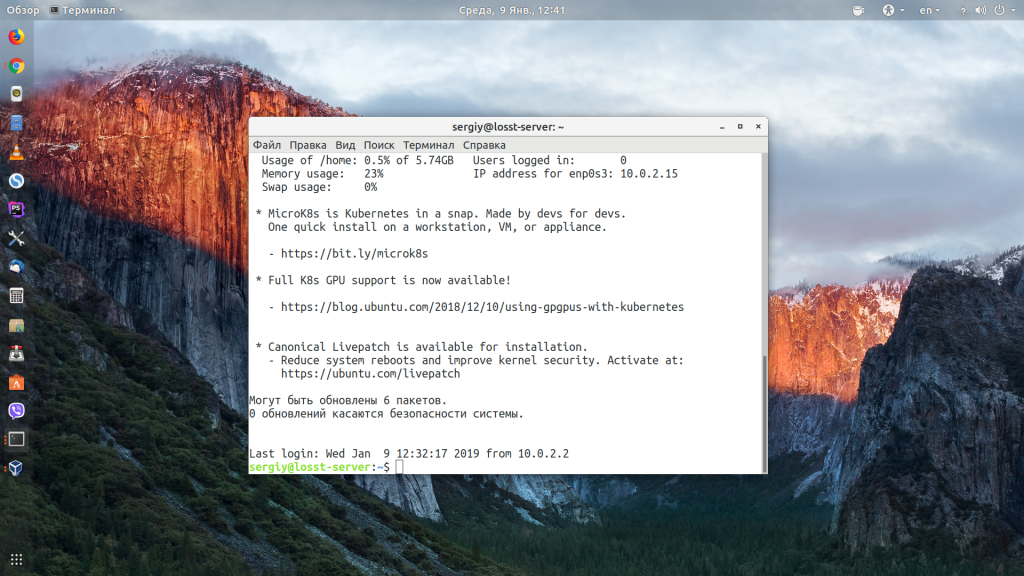
Теперь вы подключены, и все вводимые далее команды будут выполнены на удаленном сервере:
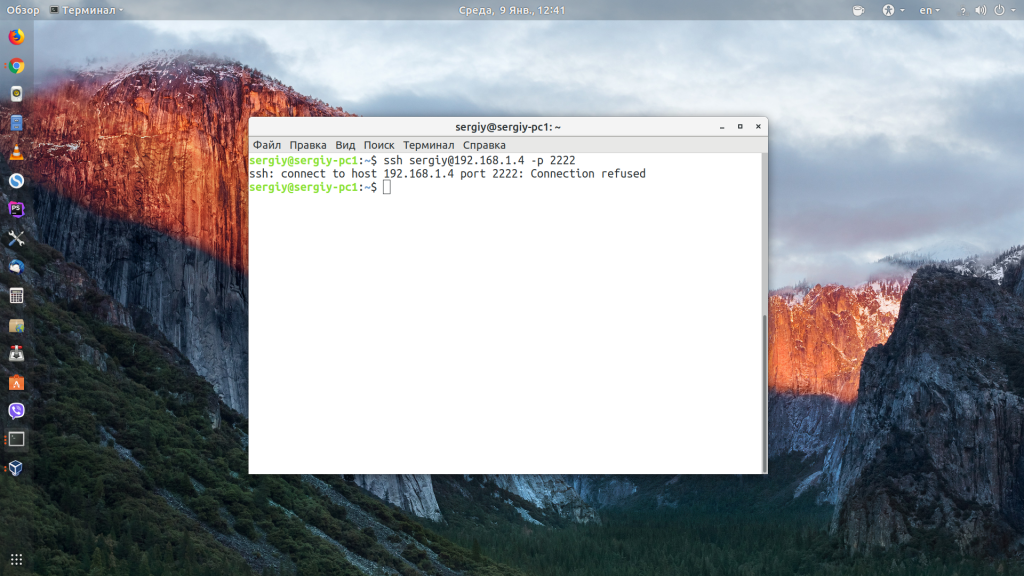
Если же произошла ошибка и IP адрес или порт введены неверно, то вы получите ошибку Connection Refused:
Просто убедитесь что порт введен верно. Если это ваш сервер, то, возможно на нем еще нужно разрешить подключение SSH в брандмауэре. В Ubuntu/Debian для этого на удаленном сервере выполните:
firewall-cmd —permanent —zone=public —add-port=22/tcp
Если вы используете другой порт для SSH, то замените 22 на свой порт. Для удобства подключения по SSH в дальнейшем можно настроить авторизацию по ключу ssh, чтобы не вводить каждый раз пароль.
Теперь вы знаете как подключиться по ssh linux и решить проблемы с подключением. А теперь перейдем к Windows.
2. Подключение через SSH в Windows
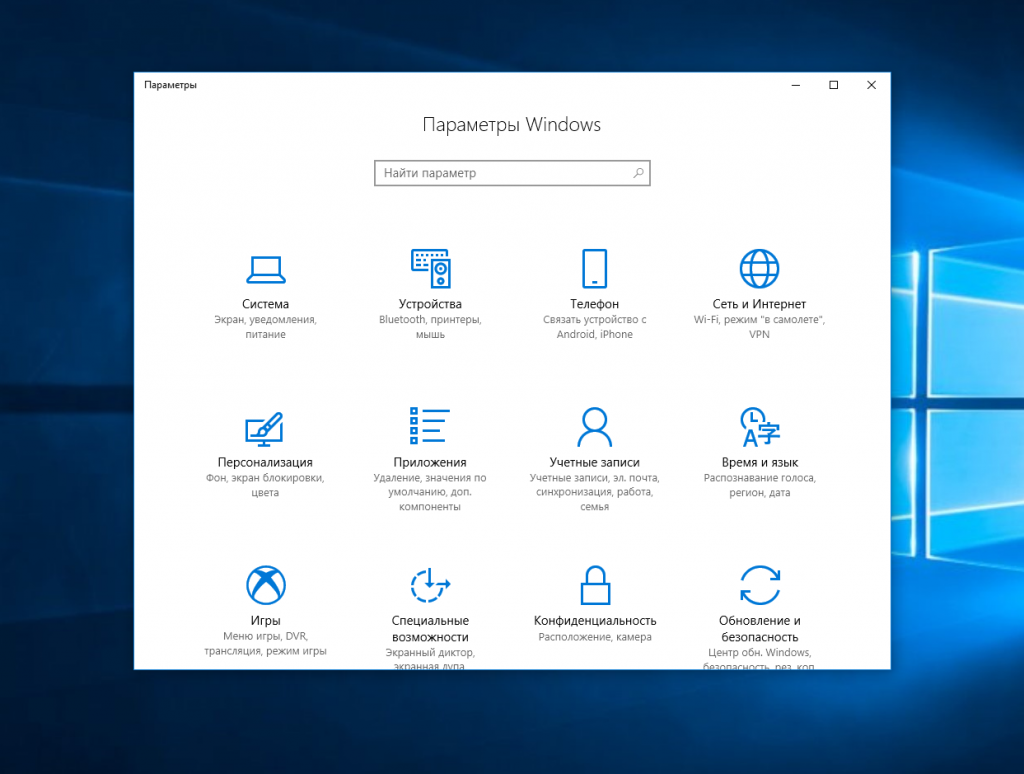
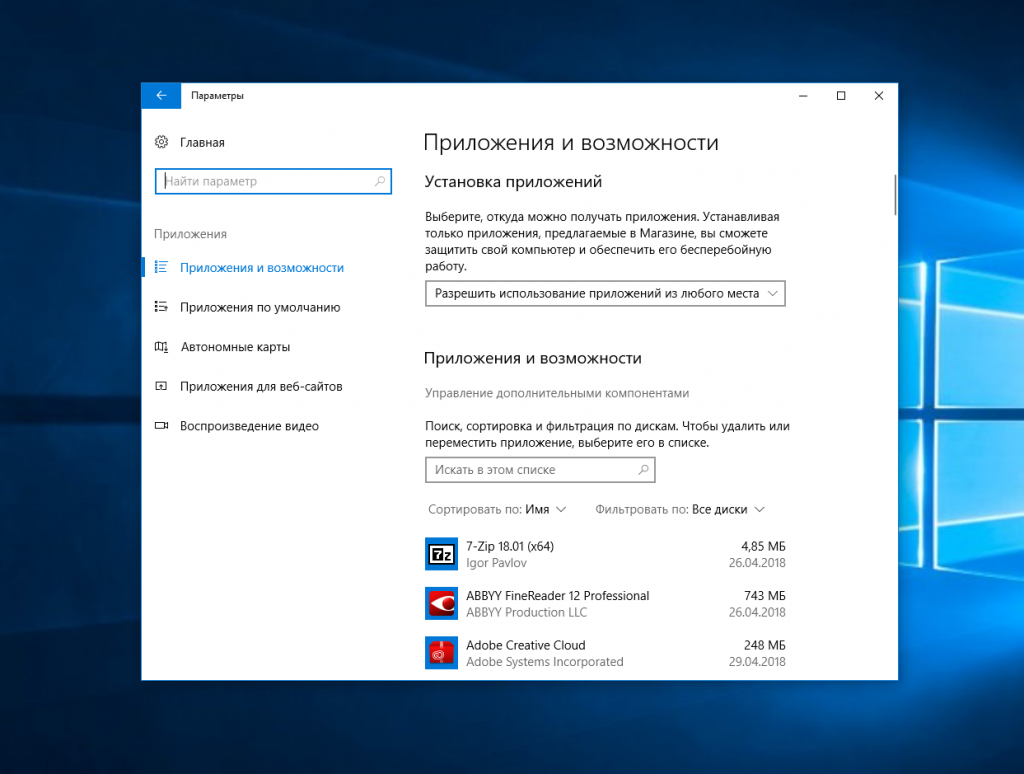
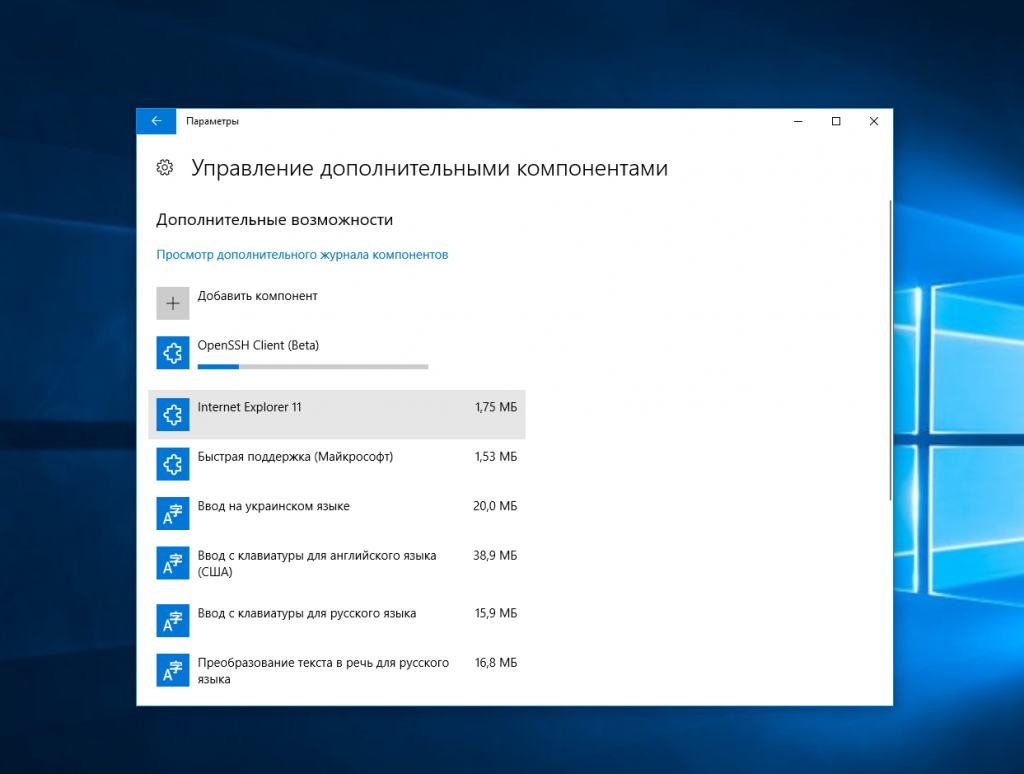
Раньше подключение по SSH из Windows выполнялось только с помощью сторонних утилит, например PuTTY. Но в Windows 10 был добавлен встроенный OpenSSH клиент и работает он точно так же, как и в Linux. По умолчанию этот компонент не активирован. Для его установки откройте Параметры -> Приложения:
Затем выберите Управление дополнительными компонентами:
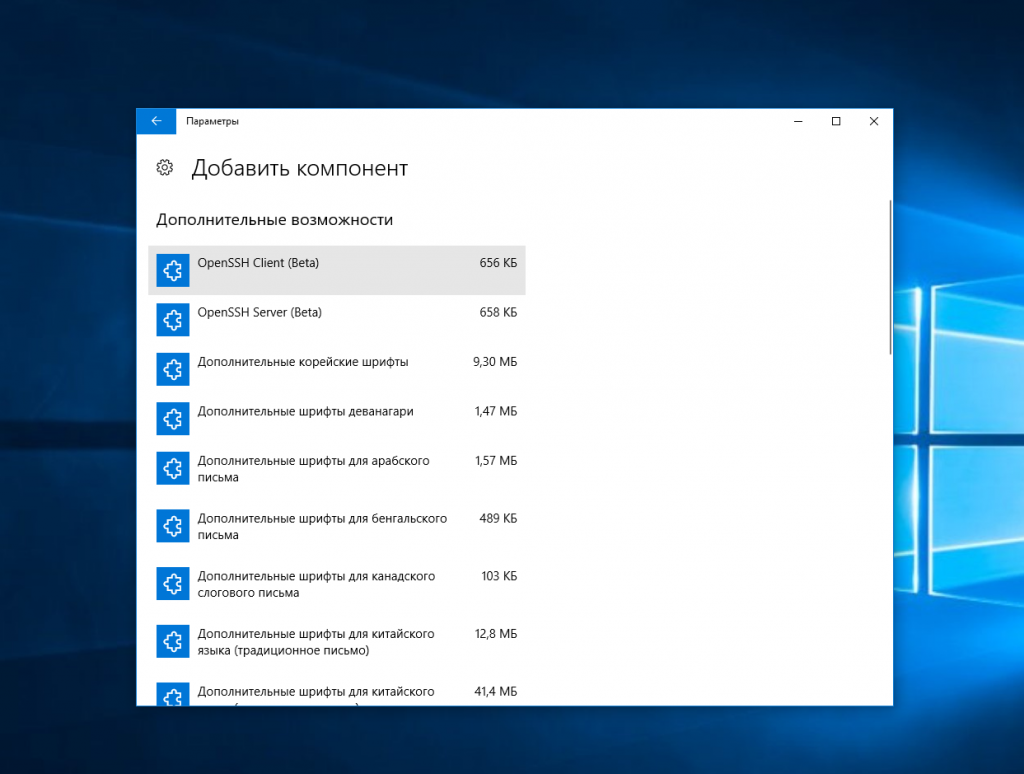
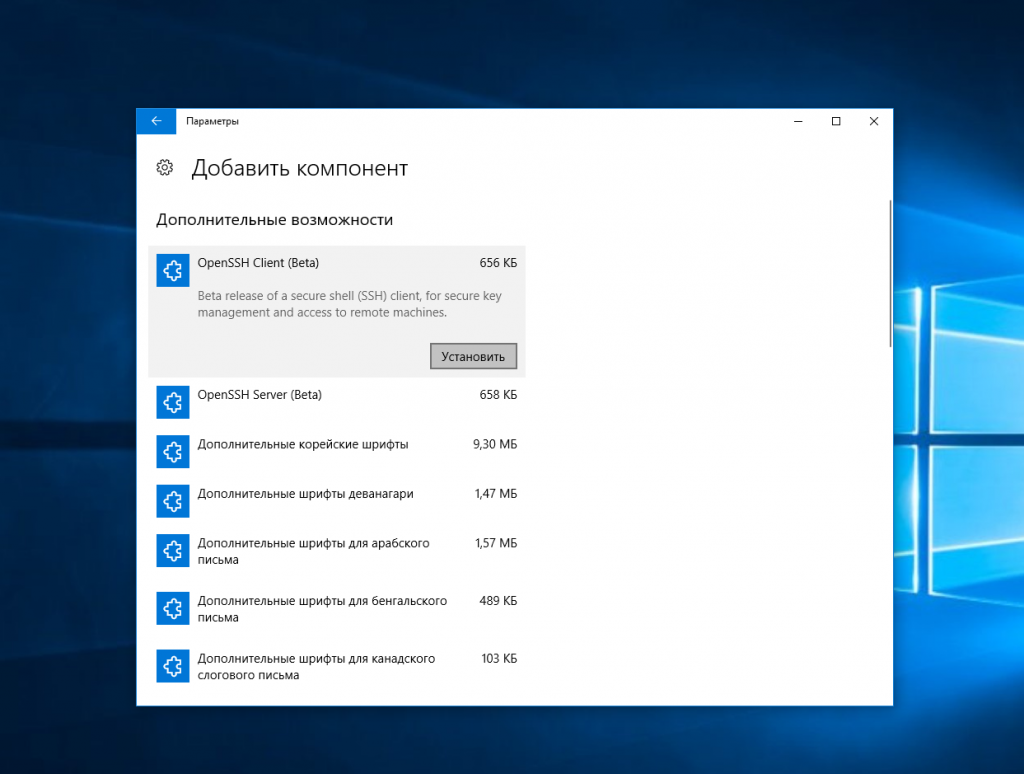
Здесь нажмите добавить новый компонент и в открывлемся меню выберите OpenSSH Client и нажмите Устанвоить:
Дальше вернитесь назад и дождитесь завершения установки. После того, как SSH клиент будет установлен нужно обязательно перезагрузить компьютер.
После перезагрузки нажмите Win+R чтобы открыть окно запуска команд и наберите в нем cmd:
Далее нажмите Enter. Перед вами откроется командная строка Windows. Здесь можно использовать утилиту ssh. Синтаксис у нее абсолютно такой же, как и для Linux:
ssh имя_пользователя @ айпи_адрес -p порт
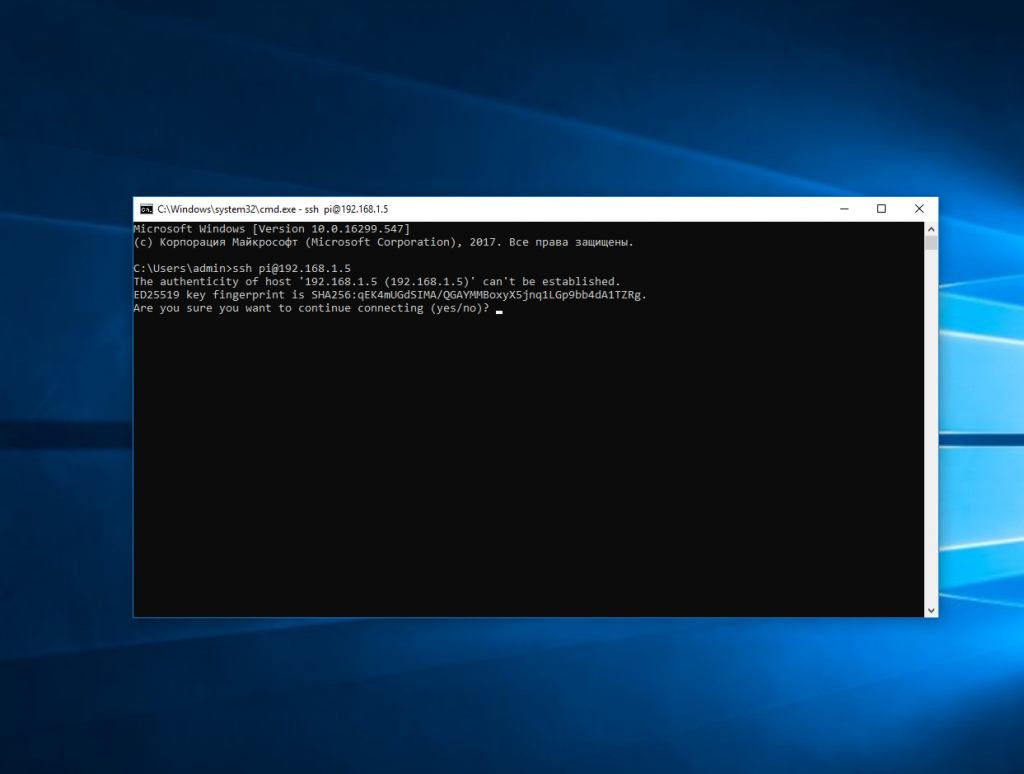
Например, такой командой можно подключится по SSH к Raspberry Pi, который находится в вашей локальной сети по адресу 192.168.1.5:
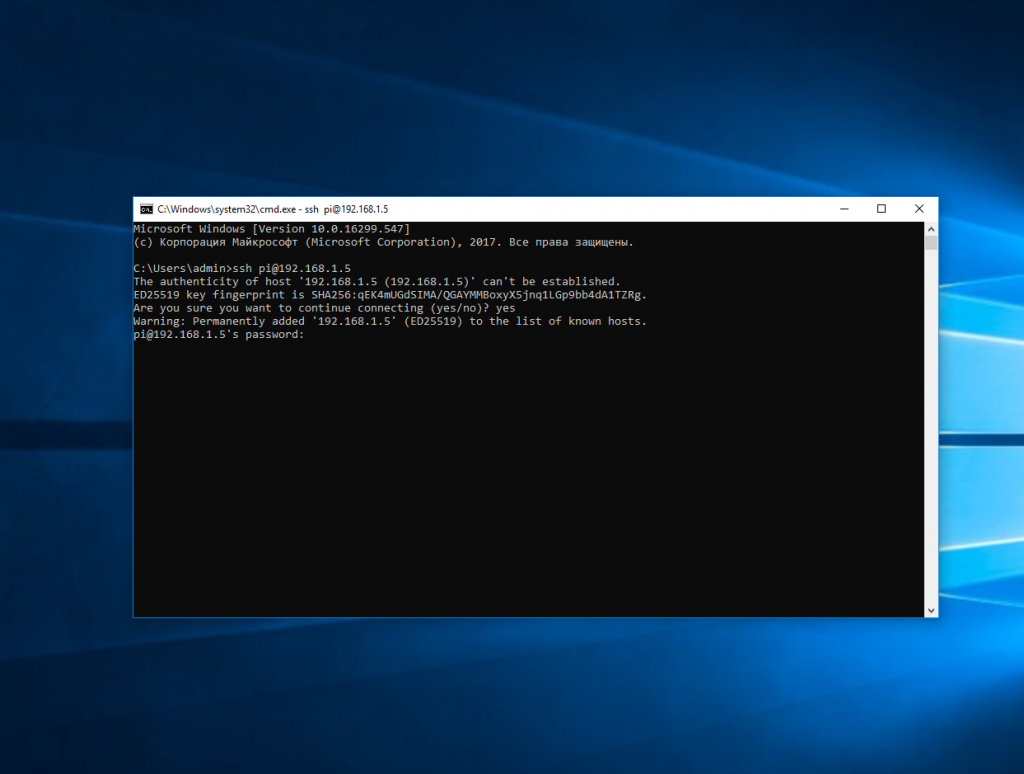
Утилита предложит добавить устройство в список известных:
Затем предложит ввести пароль:
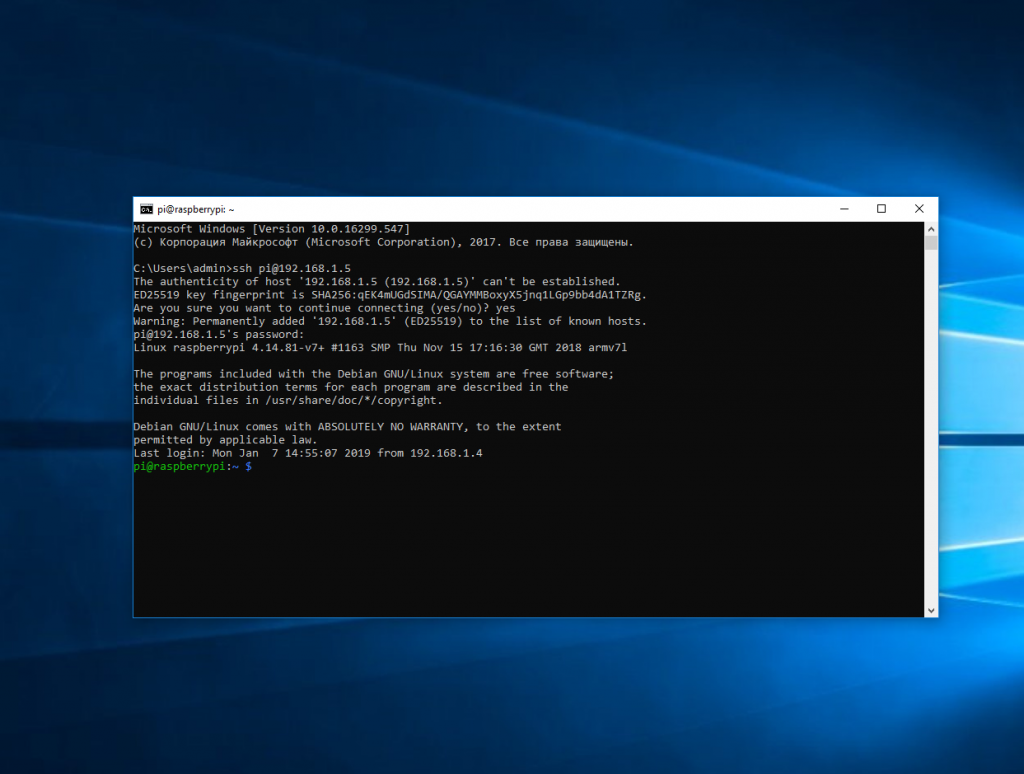
Все следующие команды будут выполняться уже на Raspberry Pi или другой удаленной машине, к которой вы подключились.
Теперь подключиться к серверу по ssh из этой операционной системы также просто как и из Linux.
Выводы
В этой статье мы рассмотрели как выполняется подключение к серверу по SSH из Linux или Windows. Как видите, это очень просто. А дальше, для работы с удаленным сервером вам понадобятся команды терминала Linux.
Обнаружили ошибку в тексте? Сообщите мне об этом. Выделите текст с ошибкой и нажмите Ctrl+Enter.
Connecting to a Remote Server Over SSH on Linux
Estamos traduciendo nuestros guías y tutoriales al Español. Es posible que usted esté viendo una traducción generada automáticamente. Estamos trabajando con traductores profesionales para verificar las traducciones de nuestro sitio web. Este proyecto es un trabajo en curso.
A secure shell (SSH) is used for secure communication between devices. When most people refer to SSH, it is within the context of connecting from a local computer to a remote server, commonly for administration tasks related to website hosting.
This article covers the basics of connecting to a remote server (such as a Linode) over SSH on a Linux system.
Before You Begin
- Ensure you have a Linux server with an SSH server (like OpenSSH) installed. Most Linux distributions have an SSH server preinstalled. If you wish to deploy a new server, follow the Creating a Compute Instance guide to create a Linode.
- Your local computer needs an SSH client that can be used through a terminal application. Most modern Linux distributions have SSH installed and ready to use.
Open the Terminal
On your local computer, open the terminal application you wish to use. The terminal allows you to access your operating system’s shell environment and run programs through the command line.
If you’re using Linux through the command line, you are already in the terminal and can skip this section. If you are using Linux through a desktop environment (a graphical interface), you’ll need to locate and open the terminal application that comes with your Linux distribution and desktop environment. In most cases, pressing Ctrl + Alt + T on your keyboard opens the default terminal.
- Gnome: The default terminal emulator is Gnome Terminal. Gnome is the default desktop environment for Ubuntu.
- KDE: The default terminal emulator is Konsole. KDE is the default desktop environment for Manjaro.
If this key combination does not work for you, other instructions for opening a terminal vary depending on the Linux distribution and desktop environment you are running. In many cases, you’ll want to open the application search tool and search for “terminal”.
Connecting to the Remote Server Over SSH
- Within the terminal, enter the following command, replacing [username] with the username of the remote user and [ip-address] with the IP address or domain name of the remote server.
If the server’s SSH port is something other than 22, it needs to be specified in the SSH command. To do this, use the -p option as shown in the command below. Replace [port-number] with the port number that the remote SSH server is using.
The authenticity of host ‘example.com (93.184.216.34)’ can't be established. ECDSA key fingerprint is SHA256:d029f87e3d80f8fd9b1be67c7426b4cc1ff47b4a9d0a84. Are you sure you want to continue connecting (yes/no)?You can verify the fingerprint by following the instructions on the Verifying the Authenticity of a Remote Server guide.
If you recently rebuilt your server, you might receive an error message when you try to connect. This happens when the remote host key changes. To fix this, revoke the key for that IP address.
Warning: Permanently added 'example' (ECDSA) to the list of known hosts.Once you have successfully connected, your terminal should be using the remote shell environment for the server. Your command prompt should now show the username and hostname configured for the server. You can now run any commands that you have available on that server. This includes many of the basic Linux commands, such as ls , cd , rm , and those covered in Using the Terminal guide. Getting to know these commands will help you navigate around your server.
Ending the SSH Session
After you are done, log out of the session by typing exit . The terminal then shows something similar to:
logout Connection to 93.184.216.34 closed.At this point, the shell prompt returns to the one for the local workstation and the terminal application can be closed if it’s no longer needed.
Sending Commands Over SSH
Instead of using SSH to open your remote server’s console, you can run commands on your server without leaving your local shell environment. This can enable you to quickly run commands both locally and remotely in the same terminal window.
Sending a Single Command
To run a single command on your remote server, use the following command. Replace [username] with the username of the remote user, [ip-address] with the IP address or domain name of the remote server, and [command] with the command you wish to run.
As an example, running ssh me@192.0.2.0 ls lists all the files in the home directory of the user called me . This can be useful to find the uptime of the server ( ssh me@192.0.2.0 uptime ) or maybe determine its Linux distribution and version ( ssh me@192.0.2.0 lsb_release -a ).
Sending Multiple Commands
To run multiple commands on your remote server (one after the other), use the following command. Replace [command-1], [command-2], and [command-3] with the commands you wish to run.
The commands should be separated by a semi-colon ( ; ) and all of the commands together should be surrounded by double quotation marks ( » ). For example, if you wanted to create a file named bar.txt in a directory called foo within the user me’s home directory, run: ssh me@192.0.2.0 «mkdir foo; cd foo; touch bar.txt .
Using sudo
It’s recommended to disable root access over SSH and only log in to your remote server through a limited user account. However, some commands require elevated privileges, which can usually be accomplished by prepending the command with sudo . If you attempt to do this while running commands directly through the SSH command, you may receive an error such as “no tty present” or there isn’t a “stable CLI interface”. To run the sudo command in these instances, use the -t option, which forces a psuedo-terminal allocation. For example, to update your packages on a Debian-based system, run ssh linode@example.com -t «sudo apt update» .
Going Further
Troubleshooting SSH Connection Issues
If SSH isn’t connecting you to your Linode, you may need to investigate the state of your server. See the guide Troubleshooting SSH for assistance.
Increasing Security
- Now that you can connect from your Linux machine to the Linode over SSH, save not only time but also make the connection even more secure by using SSH public key authentication. For more information, see SSH add keys.
- See the “Harden SSH Access” section of Setting Up and Securing a Compute Instance guide to review how to secure SSH on the server’s side, and the Advanced SSH Server Security for more information on making it even more secure.
This page was originally published on Friday, June 25, 2021.
