- How to Connect to Postgres Database From Command Line
- How to Connect to Postgres from Command Line
- Connect to Local Postgresql Database
- Connect to Remote Postgresql Database
- Fix sql: error: could not connect to server: Connection refused
- Fix FATAL: no pg_hba.conf entry for host ‘192.168.0.162’ Error
- Connecting PostgreSQL using psql and pgAdmin
- Connecting PostgreSQL using psql
- a. Locating psql:
- i. On Linux:
- ii. On Windows:
- iii. On Mac:
- b. Connecting psql:
- Server [localhost]:
- Database [postgres]:
- Port [5432]:
- Username [postgres]:
- Connecting PostgreSQL using pgAdmin 4
- Launching pgAdmin
- Connecting PostgreSQL using pgAdmin 4
How to Connect to Postgres Database From Command Line
PostgreSQL is a powerful open-source relational database management system known for its robustness and extensive feature set.
To interact with a PostgreSQL database, you can utilize the command-line interface, providing a flexible and efficient way to execute queries and perform administrative tasks.
In this article, we will guide you through the process of logging into a PostgreSQL database from the command line in Linux.
How to Connect to Postgres from Command Line
Before logging into a PostgreSQL database, ensure that you have the necessary client tools installed on your system. These tools include the PostgreSQL command-line client, psql, which allows you to interact with the database from the terminal.
You can install the psql client tool using package managers like apt, yum, or dnf, or by downloading them directly from the PostgreSQL website.
$ sudo apt install postgresql-client OR $ sudo dnf install postgresql
Connect to Local Postgresql Database
To begin, open your terminal and use the psql, a terminal-based front-end to PostgreSQL as follows, where the -d flag is used to specify the database you are connecting to and the -U specifies the username you are connecting as.
Note that the following command will allow you to log into a Postgres database running on the localhost:
If the database connection parameters are correct, psql will provide a prompt with the name of the database to which psql is currently connected, followed by the string => where you can run SQL commands.
Connect to Remote Postgresql Database
Before you can log into a remote database, you need to know the name of your target database, the hostname or IP address of the machine it is running on, and the port number the Postgres database server is listening on), and what user name you want to connect as.
To access a Postgres database running on a remote host, use the -h option to specify the host IP address or hostname of the machine on which the server is running, for example:
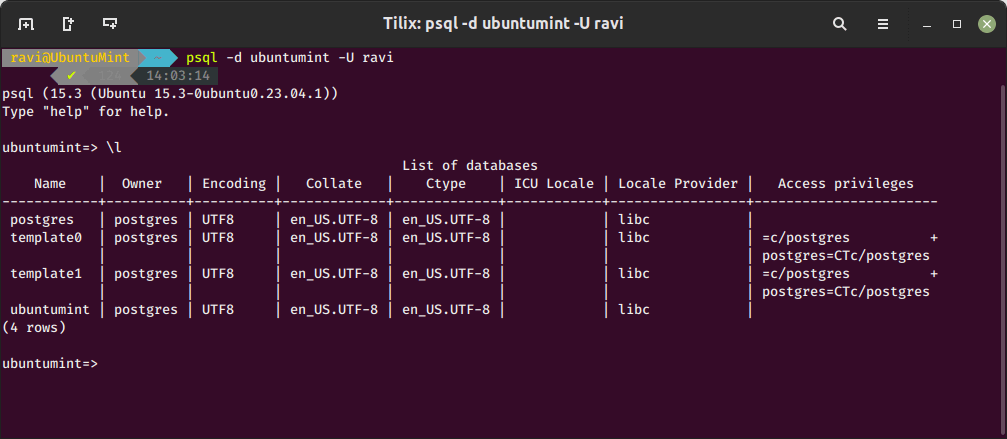
$ psql -U ravi -h 192.168.0.124 -p 5432 -d ubuntumint
By default, the Postgres database server listens on port 5432 which is why we specified the port number. If your server is listening on a different port, you can use the -p option to specify the port number (replace 5432 with the actual port number it is listening on).
Press Enter after entering the command, and provide the password to establish a connection to the specified database.
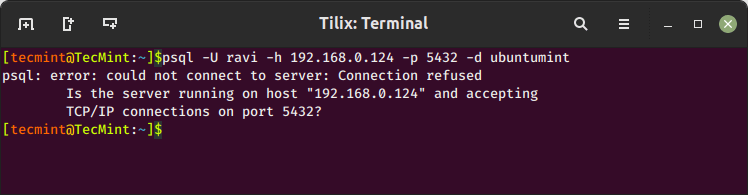
If you get an error message “could not connect to server: Connection refused” indicates that there is an issue establishing a connection to the PostgreSQL server on the specified host and port.
Fix sql: error: could not connect to server: Connection refused
To fix this error, open the configuration file is usually located in the PostgreSQL data directory (e.g., /etc/postgresql//main/postgresql.conf).
$ sudo nano /etc/postgresql/15/main/postgresql.conf
Look for the following lines:
listen_addresses = '192.168.0.124' # what IP address(es) to listen on; port = 5432 # (change requires restart)
If necessary, update the listen_addresses and port settings to match your server configuration. Remember to restart the PostgreSQL service after making changes to the configuration file.
$ sudo systemctl restart postgresql
By following these troubleshooting steps, you should be able to diagnose and resolve the “connection refused” error when connecting to the PostgreSQL server.
$ psql -U ravi -h 192.168.0.124 -p 5432 -d ubuntumint
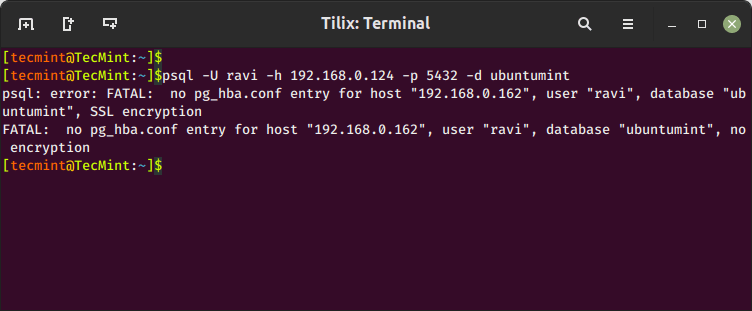
If you still getting an error such as “FATAL: no pg_hba.conf entry for host ‘192.168.0.162’“, then you need to fix it as shown.
Fix FATAL: no pg_hba.conf entry for host ‘192.168.0.162’ Error
To fix this error, open the configuration file is usually located in the PostgreSQL data directory (e.g., /etc/postgresql//main/pg_hba.conf).
$ sudo nano /etc/postgresql/15/main/pg_hba.conf
Inside the pg_hba.conf file, you need to add an entry that allows the specified host, user, and database to connect.
host ubuntumint ravi 192.168.0.162/32 md5
Make sure to replace ubuntumint with the correct database name, ravi with the correct username, and 192.168.0.162 with the actual IP address of the client machine.
After making the necessary changes, you need to restart the PostgreSQL service:
$ sudo systemctl restart postgresql
Now attempt to connect to the PostgreSQL server again using the specified host, user, and database, it should allow the connection.
$ psql -U ravi -h 192.168.0.124 -p 5432 -d ubuntumint
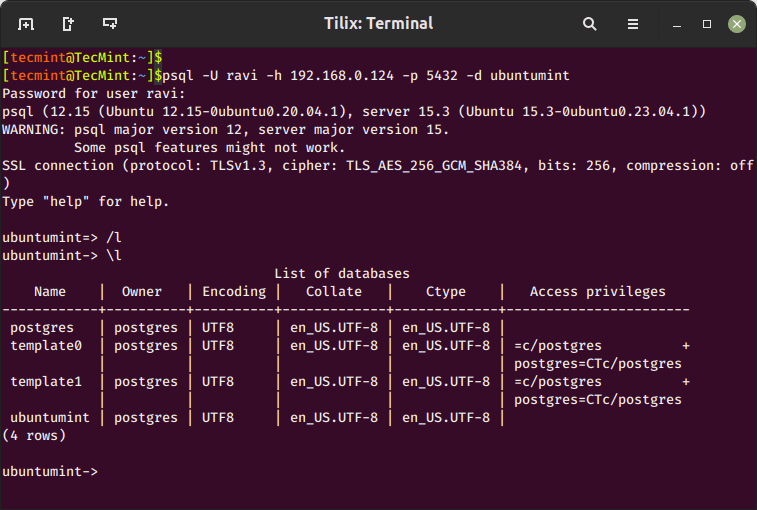
Once logged in, you can start executing queries and performing administrative tasks on the PostgreSQL database directly from the command line. The psql client provides a comprehensive set of commands and features to manage and query the database.
Conclusion
Logging into a PostgreSQL database from the command line using the psql client provides a convenient and efficient way to interact with the database.
By following the steps outlined in this article, you can establish a connection to a PostgreSQL database, execute queries, and perform administrative tasks directly from your terminal.
Mastering the command-line interface allows you to harness the full potential of PostgreSQL’s capabilities and efficiently manage your data.
Connecting PostgreSQL using psql and pgAdmin
SUMMARY: This article explains how to connect to the PostgreSQL database using the terminal or command line and the pgAdmin connection tool. Differences in connections in the three major operating systems are covered.
- Connecting to PostgreSQL using psql
- Locating psql
- On Linux
- On Windows
- On Mac
- Connecting with psql
- Connecting to PostgreSQL using pgAdmin 4
- Launching pgAdmin 4
- Connecting with pgAdmin 4
This is a two-part article for beginners who have installed the most advanced open source database, PostgreSQL, and are now looking to connect to it. Since terminal/command line and pgAdmin are the most favored ways for connecting to PostgreSQL, I explain the basics of using both methodologies.
Here I offer separate steps for users of different operating systems, where required; in cases where the operating system is not specified, the steps can be treated as a universal approach, and are valid for any operating system that you are using.
So let’s take our first steps and get connected to PostgreSQL.
Connecting PostgreSQL using psql
Since this is probably the first time you are trying to connect to a PostgreSQL database that you have installed, we will cover some of the possible scenarios you may encounter so you can start working in just a short period of time.
a. Locating psql:
PostgreSQL is supported on three major platforms. To connect using psql you will first need to locate its location on the operating system that you might be using:
i. On Linux:
The easiest way to connect is to check whether you already have psql in your environment variables on not. You can try the following command on the terminal:
[root@localhost data]# which psql /usr/bin/psql
This gives you the path, and also, since the OS knows the location, you will not need to browse for it. However, if it errors out, you can locate the psql utility by searching for the file with the following command on terminal:
[root@localhost /]# find / -name psql /usr/edb/as11/bin/psql
ii. On Windows:
On Windows, you can find psql in the Program Files, and you should be able to launch it in a command prompt simply by clicking on it.
iii. On Mac:
On a Mac you should be able to locate psql under the Applications > PostgreSQL (version number) > SQL Shell (psql).
b. Connecting psql:
Now that we have located psql, we need to understand what it requires to connect to the database. The basic parameters on any of the platforms are as follows:
Server [localhost]:
This is the address for the server. You can use an IP address or the hostname of the machine on which database server is running. If you do not give any value, by default it is localhost.
Database [postgres]:
The name of the database with which you want to connect. The default name of the database is the same as that of the user. (If you are using Advanced Server, the default name would be edb.)
Port [5432]:
This is the port on which you have configured your instance while installing or initializing. The default port is 5432. (If you are using Advanced Server this would be 5444.)
Username [postgres]:
This is the username that is created while the installation takes place. The default username for postgres is postgres. (If you are using Advanced Server it is enterprisedb.)
On a Mac or Windows, you are able to connect to the default instance by simply hitting enter at the shell or command prompt when trying to run psql and keying in the password.
On Linux, you will explicitly need to pass these parameters at the shell:
For PostgreSQL: -bash-4.2$ psql -d postgres -U postgres
For Advanced Server: -bash-4.2$ psql -d edb -U enterprisedb
If connecting to a remote server from any of the operating systems, you can pass on the specific parameters in the following format:
Connecting PostgreSQL using pgAdmin 4
pgAdmin is the community client for using PostgreSQL. It can be downloaded from the pgAdmin website (https://www.pgadmin.org/download/).
Launching pgAdmin
Launching pgAdmin is easy. It is available in the respective application or programs folder for the operating system that you may be using.
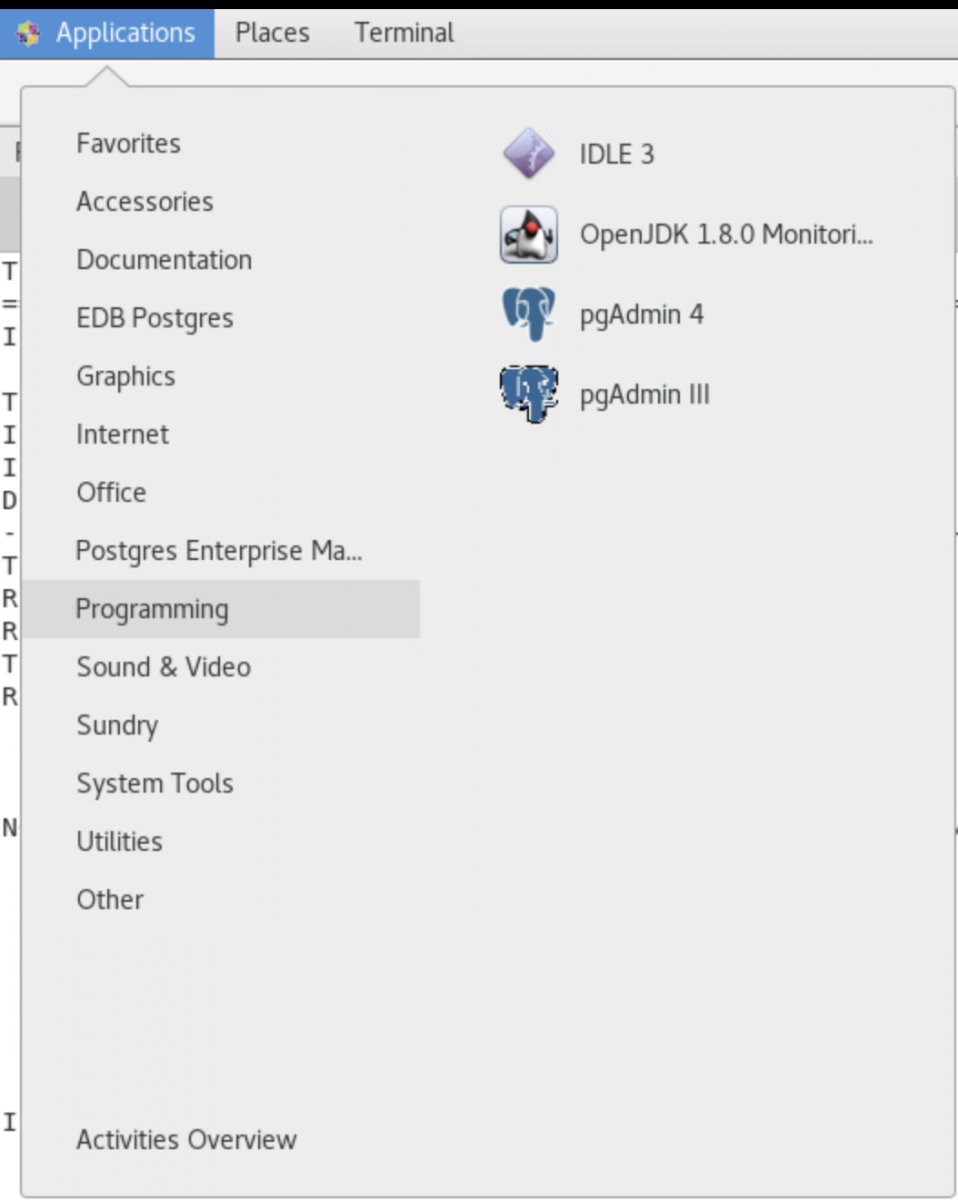
1. On Linux pgAdmin is available under Programming in the Applications menu:

2. On a Mac it is available in the Applications folder as an application:
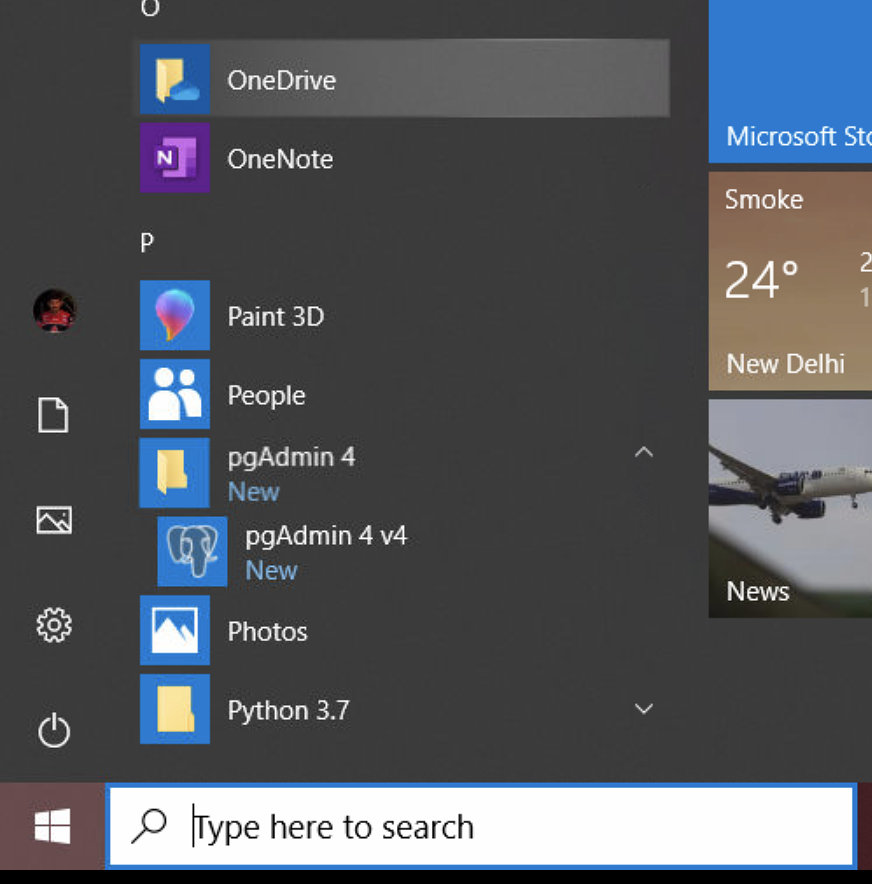
3. On Windows it is available under Program Files:
Connecting PostgreSQL using pgAdmin 4
pgAdmin 4 is a web application and works as a browser-based client for PostgreSQL. The interface is very user friendly, and most of the options are visible in the first go. Logging in to the pgAdmin client requires you to set a master password when you launch it for the first time.
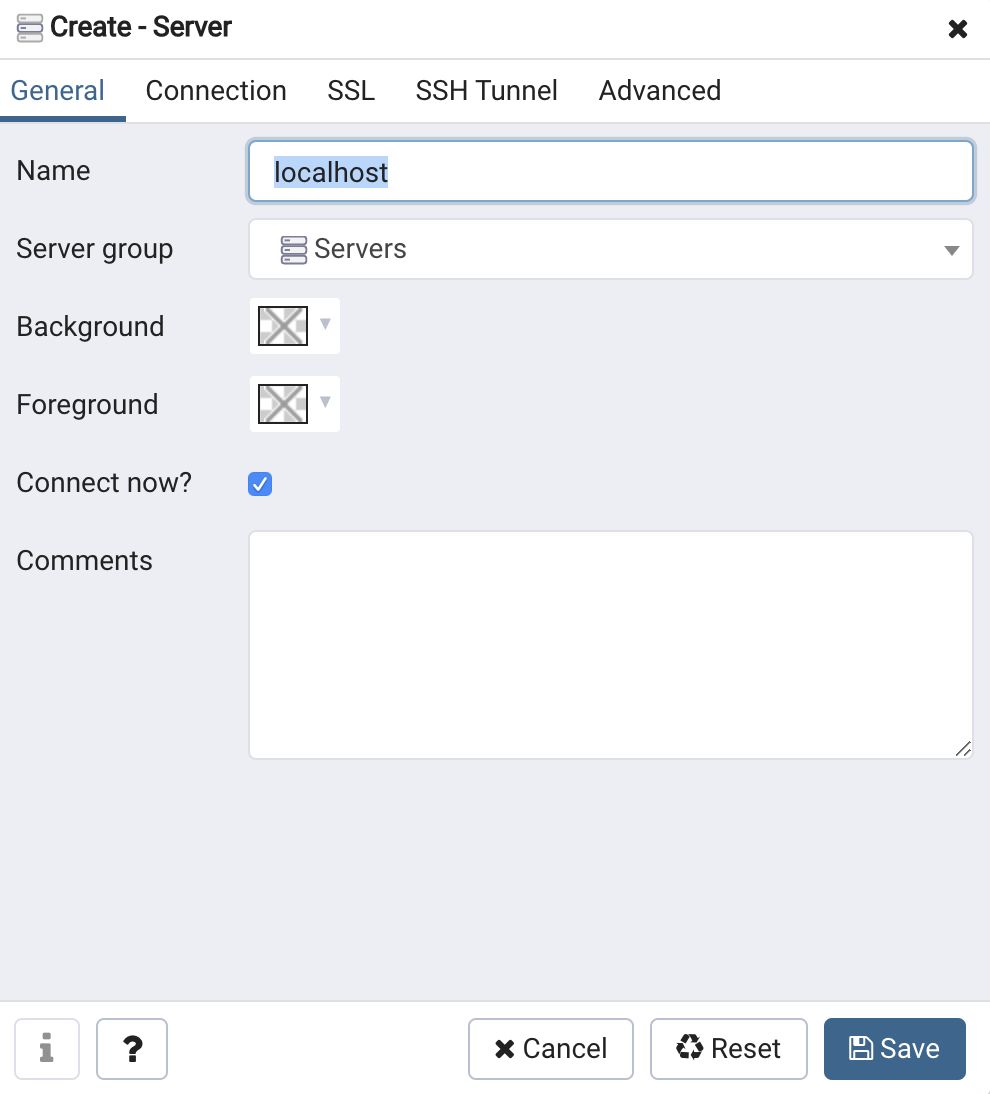
Once you have logged into the pgAdmin client, you can connect to your database servers using the Create Server option:
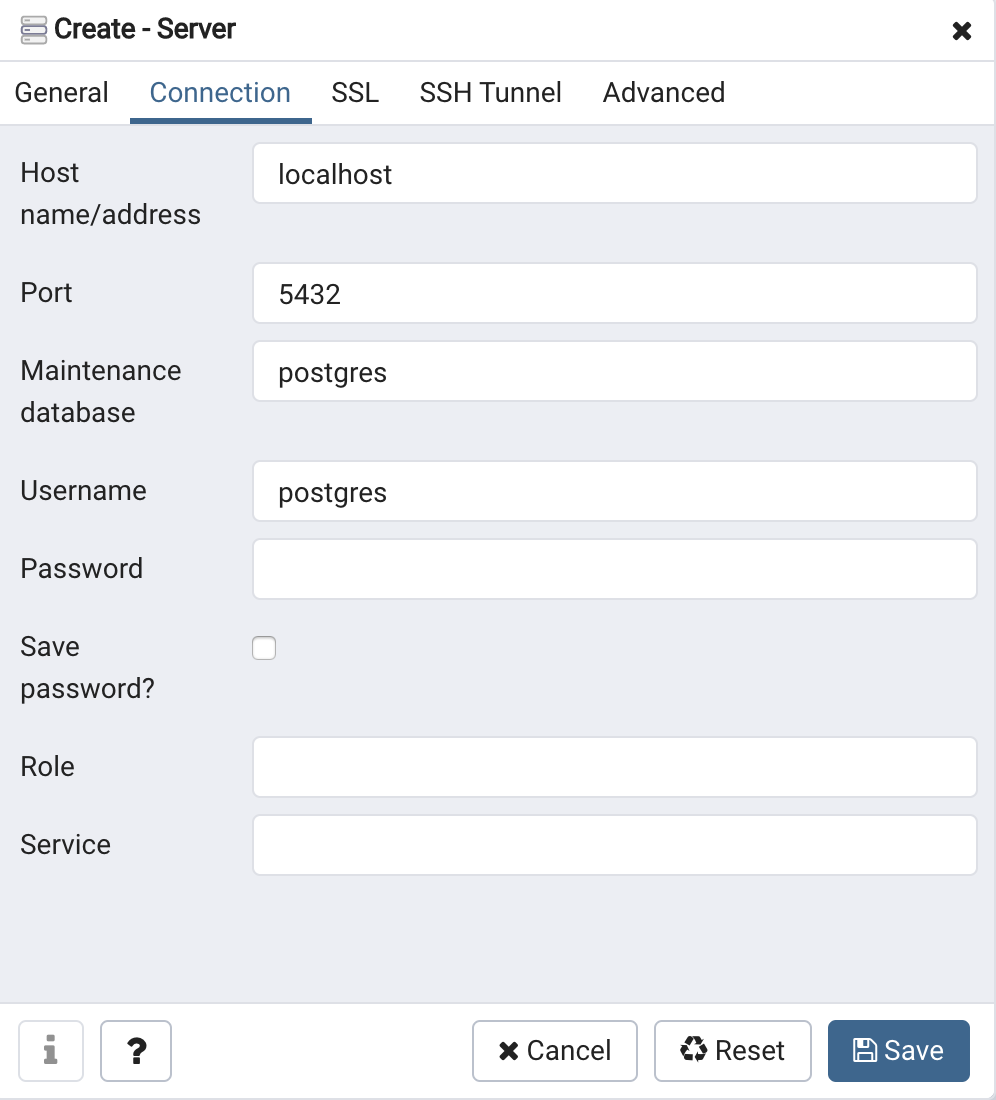
In the first window you only need to provide an identifiable name for the server. The connection details for that server are in the connection tab below::
Once you have filled in the required details, you can click Save, and it will add the name to the list of the servers on the left-hand side tab:
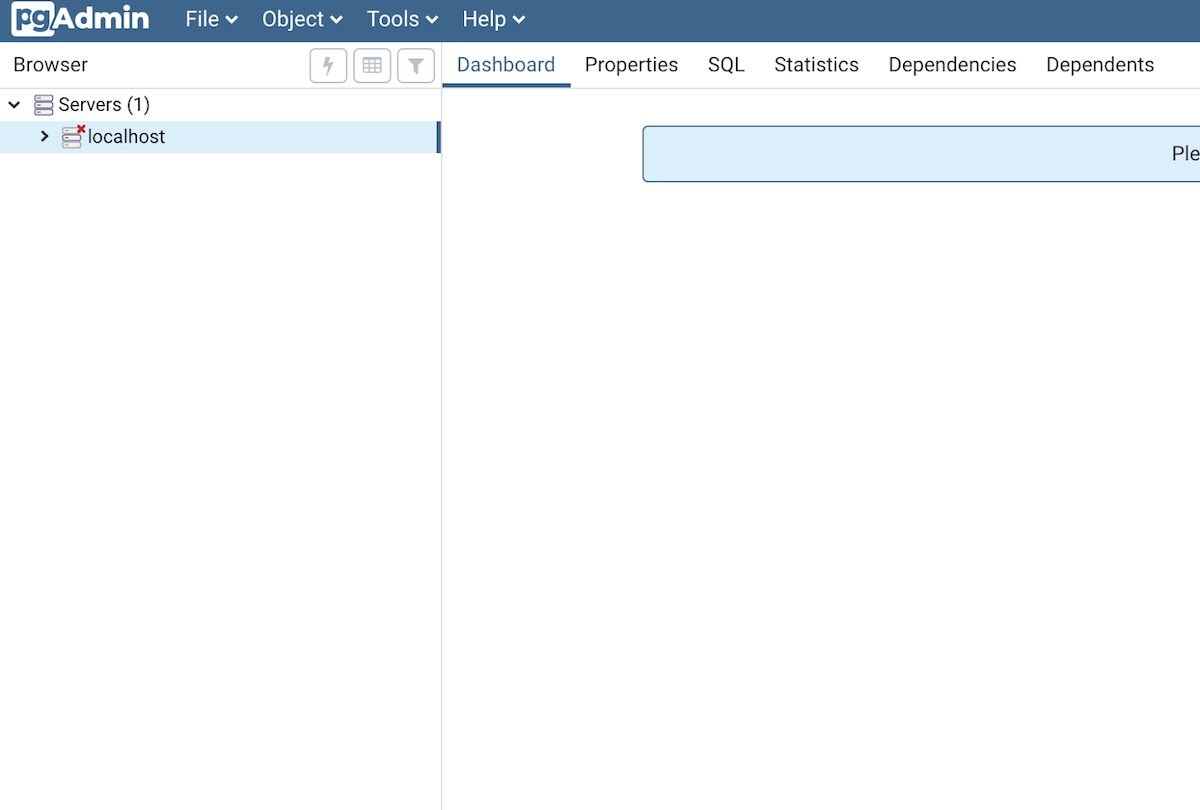
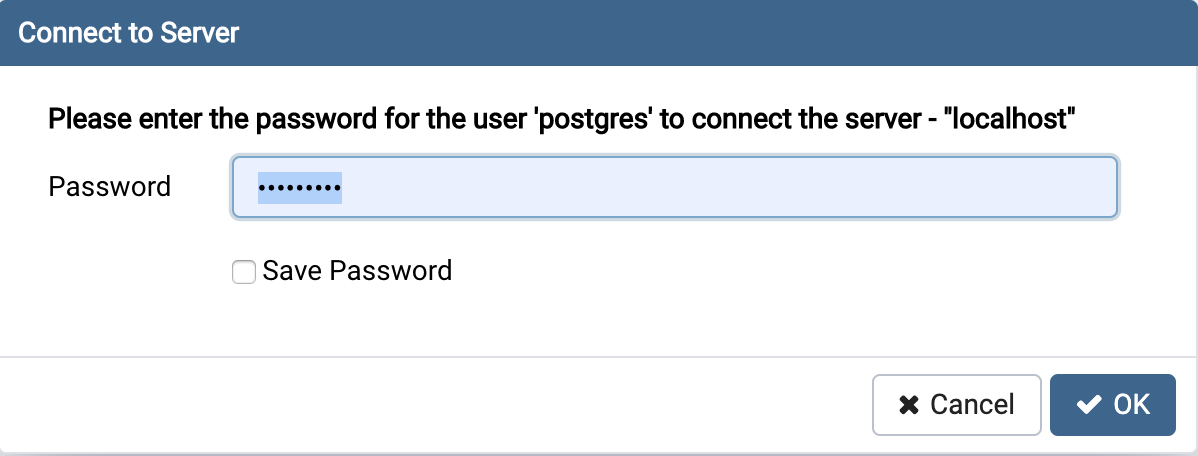
Now you are ready to connect to the server by double clicking the server name under Servers (1) and entering your password:
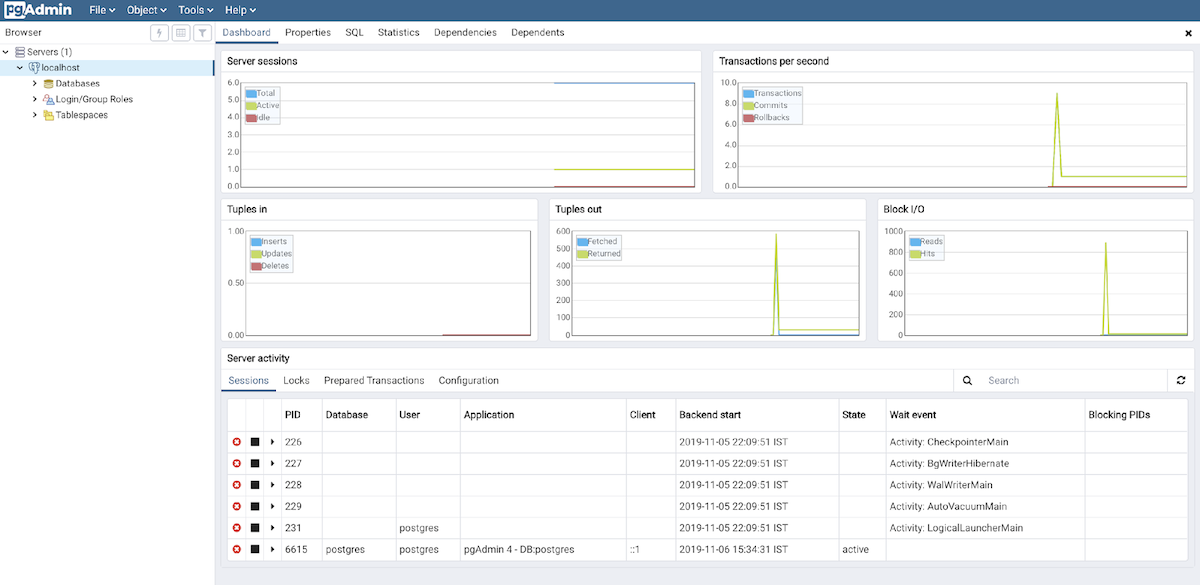
After you provide the server credentials, you will be presented with the server tree and dashboard:
You should be able to select any of the options from the tabs above the dashboard in order to proceed.