- Create Wi-Fi profiles
- Create a Wi-Fi profile
- How To Connect To Wi-Fi networks using CMD ( Command Prompt )
- How to connect to wifi using cmd with netsh wlan commands-
- 1# View various wireless network profiles saved on your PC
- 2# View WiFi adapter driver information
- 3# View wireless adapter settings
- 4# Recover your WiFi password from any of the WiFi connection profiles saved on your PC
- 5# Connecting to a WiFi network using command prompt
- 6# Stop your PC connecting automatically to a wireless network out of range
- 7# Delete wireless network profile stored on your PC
- 8# Export and import wireless network profiles
- 9# Generate a complete report of the wireless adapters on your PC/laptop
- How to connect to wireless networks and remove its profile on windows 10
- Method 1
- Method 2
Create Wi-Fi profiles
Starting in version 2203, this company resource access feature is no longer supported. For more information, see Frequently asked questions about resource access deprecation.
Use Wi-Fi profiles in Configuration Manager to deploy wireless network settings to users in your organization. By deploying these settings, you make it easier for your users to connect to Wi-Fi.
For example, you have a Wi-Fi network that you want to enable all Windows laptops to connect to. Create a Wi-Fi profile containing the settings necessary to connect to the wireless network. Then, deploy the profile to all users that have Windows laptops in your hierarchy. Users of these devices see your network in the list of wireless networks and can readily connect to this network.
You can configure Wi-Fi profiles for the following OS versions:
You can also use Configuration Manager to deploy wireless network settings to mobile devices using on-premises mobile device management (MDM). For more general information, see What is on-premises MDM.
When you create a Wi-Fi profile, you can include a wide range of security settings. These settings include certificates for server validation and client authentication that have been pushed using Configuration Manager certificate profiles. For more information about certificate profiles, see Certificate profiles.
Create a Wi-Fi profile
- In the Configuration Manager console, go to the Assets and Compliance workspace, expand Compliance Settings, expand Company Resource Access, and select the Wi-Fi Profiles node.
- On the Home tab, in the Create group, choose Create Wi-Fi Profile.
- On the General page of the Create Wi-Fi Profile Wizard, specify the following information:
- Name: Enter a unique name to identify the profile in the console.
- Description: Optionally add a description to provide further information for the Wi-Fi profile.
- Import an existing Wi-Fi profile item from a file: Select this option to use the settings from another Wi-Fi profile. When you select this option, the remaining pages of the wizard simplify to two pages: Import Wi-Fi Profile and Supported Platforms.
Important Make sure that the Wi-Fi profile you import contains valid XML for a Wi-Fi profile. When you import the file, Configuration Manager doesn’t validate the profile.
- None: Computers that fail this compliance rule don’t report a failure severity for Configuration Manager reports.
- Information
- Warning
- Critical
- Critical with event: Computers that fail this compliance rule report a failure severity of Critical for Configuration Manager reports. Devices also log the noncompliant state as a Windows event in the application event log.
Important Configuration Manager doesn’t support using the apostrophe ( ‘ ) or comma ( , ) characters in the network name.
- Security types: WPA2 Enterprise or WPA2 Personal
- Encryption types: AES or TKIP
- EAP types: Smart Card or other certificate or PEAP
- Security type: Select the security protocol that the wireless network uses, or select No authentication (Open) if the network is unsecured.
- Encryption: If the security type supports it, set the encryption method for the wireless network.
- EAP type: Select the authentication protocol for the selected encryption method.
Note For Windows Phone devices only: the EAP types LEAP and EAP-FAST aren’t supported.
Select Configure to specify properties for the selected EAP type. This option isn’t available for some selected EAP types.
Important The EAP type configuration window is from Windows. Make sure that you run the Configuration Manager console on a computer that supports the selected EAP type.
How To Connect To Wi-Fi networks using CMD ( Command Prompt )
Nowadays internet connectivity is everything. For the Internet, we have Wi-Fi connections that we manage and use through the network settings on Windows 7/8.1/10 computers.
You can also connect, manage, and delete your WiFi networks using the command prompt.
In fact, the command prompt offers many more features than the standard network connection settings in Windows 10.
To do this we only require a CMD(Command Prompt) with Administrator privileges and will have to use netsh wlan commands.
How to connect to wifi using cmd with netsh wlan commands-
Before we dive into the guide. You’ll need to open the Command Prompt with administrator rights to perform most of the commands. To do this, use the Windows key + X keyboard shortcut, and select Command Prompt (Admin).
Or search cmd and right click run as administrator
1# View various wireless network profiles saved on your PC
Command > Netsh WLAN show profiles
Every time you connect to a wireless access point, the operating system creates a “wireless network profile”, and it’s stored on your computer, you can view all these profiles using the following command line on the Command Prompt Netsh WLAN show profiles.
Alternatively, you can use the “interface” parameter to show the list of profiles for a particular wireless adapter:
Netsh WLAN show profiles interface=”your WiFi interface name”
2# View WiFi adapter driver information
Command > Netsh WLAN show drivers
When you need to get driver information about your computer’s wireless adapter, you can use the the above command. The result will show the exact drivers being used, the WiFi radios on your PC/laptop alongwith driver version number.
You can further use this command to check your WiFi capabilities. Type in the following command
C:\Netsh WLAN show wirelesscapabilities
The results will show you exactly what your WiFi connection is capable of including WiFi Direct service capabilities.
3# View wireless adapter settings
Command > Netsh WLAN show interfaces
You can see the details of your WiFi interfaces using above command. The results will show you description of the interface, SSID, BSSID, Cipher, authentication type, channel, average receive and transmit rate and radio type.
If you have multiple WiFi connections saved on your PC, the “Show interfaces” command will display the information for all the wireless adapters on your computer. If you only need to see the information for one adapter, you can use the following command:
Netsh WLAN show interface name=”your wifi connection name”
4# Recover your WiFi password from any of the WiFi connection profiles saved on your PC
Command > Netsh WLAN show profile name=”your WiFi connection name” key=clear
If you lost and cannot remember your network security key to connect another device to a particular Wi-Fi access point, you can use the above command to view your WiFi password. You can also use this command to see the data limits if you have set them.
5# Connecting to a WiFi network using command prompt
Command > netsh wlan set hostednetwork mode=allow ssid=”your WiFi connection name” key=”your WiFi connection password”
You can use the above command to sign into your WiFi network. The above command is particularly useful if your WiFi settings in Windows 10 is not visible/cannot be connected due to some reasons. The additional commands are C:\netsh wlan start hostednet and C:\netsh wlan stop hostednetwork These two commands will start and stop your WiFi hotspot connection.
6# Stop your PC connecting automatically to a wireless network out of range
Command > Netsh WLAN set profileparameter name=”your WiFi connection name” connectionmode=manual
Normally, you would have configured your Windows 10 PC to connect to different WiFi networks automatically. While this is the best way to connect, sometimes notice that your laptop connects automatically to a WiFi connection that has zero or poor connectivity instead of an available full network WiFi connection. In such a case you can use the above command to prevent your computer from connecting to different networks automatically. If you want to move again to the automatic mode use the following command C:\Netsh WLAN set profileparameter name=” your WiFi connection name” connectionmode=auto
7# Delete wireless network profile stored on your PC
Command > Netsh WLAN delete profile name=”the WiFi connection you want to delete”
When you no longer need to connect to a particular wireless network, the access point is no longer available, or you need to reset the network profile settings, you can also use Netsh WLAN to delete any profile stored on your computer using the above command. If you can’t remember the name of the network profile, you can use the C:\Netsh WLAN show profiles command to list all the available profiles and select the one you want to delete.
8# Export and import wireless network profiles
Command > Netsh WLAN export profile key=clear folder=”the folder you want to save this report”
Sometimes you need to export and import wireless profiles. The above command exports all your wireless network profiles available on your PC. If you want to export a specific WiFi connection profile to a specific location, use this command > C:\Netsh WLAN export profile name=”your WiFi connection name” key=clear folder=”the folder you want to save this report”
9# Generate a complete report of the wireless adapters on your PC/laptop
Command > Netsh WLAN show WLANreport
Trouble shooting WiFi connection problems is very difficult as Internet has lots of conflicting tutorials and troubleshooting guide. Also you should know the exact problem you are facing while connecting to WiFi.
Using the above command will generate a full detailed WiFi networks report to the following location > C:\ProgramData\Microsoft\Windows\WLANReport\ WLAN-report-latest.html.
Once the WLAN report has been created, copy and paste the path into your web browser’s address bar to open the report.
You can use this report to troubleshoot the problems, ask help on tech forums. The WLAN reports contain a graph with details of the connectivity status, including information, such as when the connection started, when it got disconnected, errors, and more.
The report also summarizes network adapters information configured on your system, session success/failures, disconnect reasons, and a lot more. It’s a very detailed report that can help you to ping point many Wi-Fi connectivity issues.
So this was how to connect to wifi using cmd (command prompt) with netsh wlan commands
How to connect to wireless networks and remove its profile on windows 10
![]()
Updated 06-28-2022 07:51:26 AM 243041
How to connect to wireless networks
How to remove the profile
Method 1
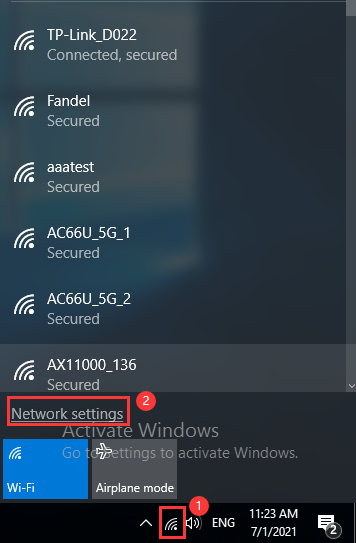
Step1 Click the Wi-Fi icon at the lower right corner in the task tray, and click “Network settings”.
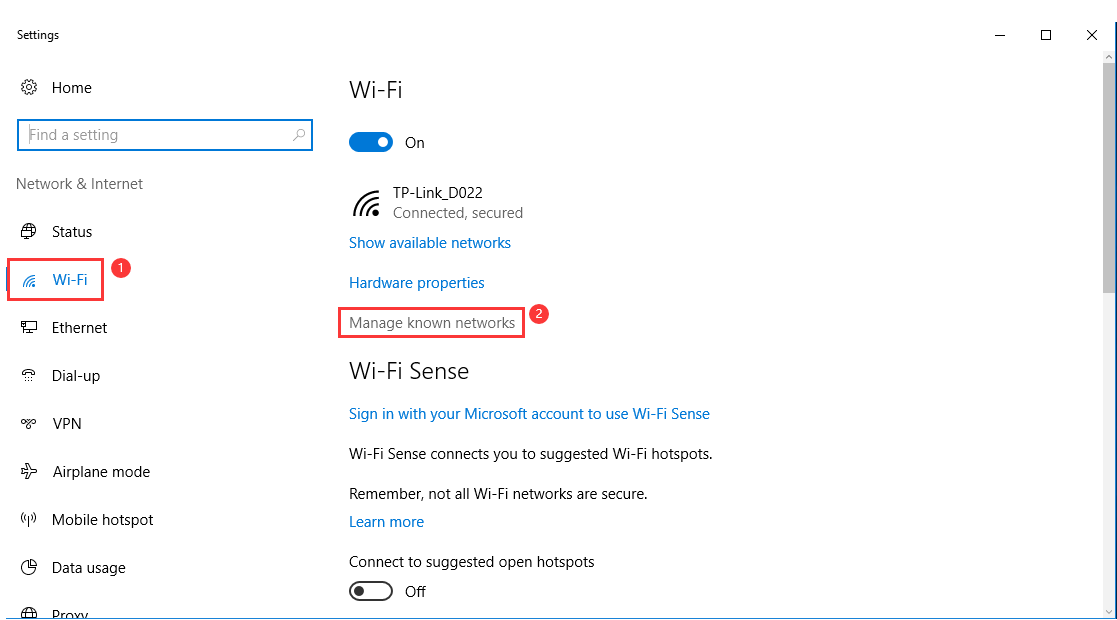
Step2Then please click on “Wi-Fi” and find “Manage known networks”/ “Manage Wi-Fi settings” on the left menu.
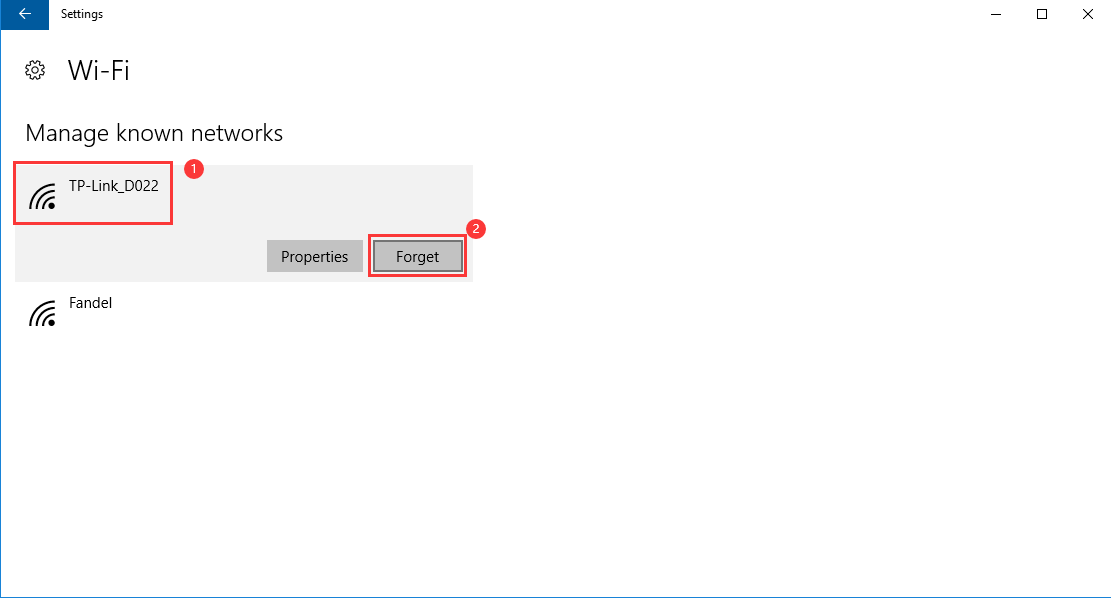
Step3 Highlight your Wi-Fi and click on “Forget”;
Method 2
Step 1 Click the Search symbol and then type Control Panel on the search bar and select.

Step 2 On the Control Panel page, please click on “Network and Internet” -> “Network and Sharing Center” -> “Change Adapter Settings” (on the left menu).

Step 3 Then right-click on “Wi-Fi” and go to “Connect/disconnect”.
You will see the same “Settings” window showed on the Step2 of the Method 1, so please go through the same process to forget your profile.
Is this faq useful?
Your feedback helps improve this site.
What’s your concern with this article?
- Dissatisfied with product
- Too Complicated
- Confusing Title
- Does not apply to me
- Too Vague
- Other
We’d love to get your feedback, please let us know how we can improve this content.
We appreciate your feedback.
Click here to contact TP-Link technical support.
Subscribe TP-Link takes your privacy seriously. For further details on TP-Link’s privacy practices, see TP-Link’s Privacy Policy.
Be The First To Get Exclusive Deals & News