EAP-TLS Certificates for Wireless on Android
In this lesson, I want to demonstrate to you how to install a user certificate on an Android device so that you can authenticate to a wireless network using EAP-TLS. This is the most secure method of authentication when it comes to wireless networks, but it requires some more effort as you require certificates on the server and each client device.
If you don’t have a RADIUS server and Certificate Authority yet, then you should take a look at my PEAP and EAP-TLS on Windows Server 2008 lesson. In this lesson, I will be using a Windows Server 2008 machine running Certificate Services to generate a client certificate for my Android device.
There are three devices that we require for this lesson:
- Android Device: I’m using my Samsung Galaxy S3 running Android 4.x
- Certificate Authority: required to generate the user certificate. I’m using Windows Server 2008 R2.
- Windows computer: Used to request the user certificate for the Android device. I will be using Windows 7 in my example.
And there are two certificates that we require:
The user certificate is required to authenticate the user, and the root CA certificate is required in case you created your own certificate authority. We’ll start with the creation of a user certificate.
Generate User Certificate on Windows 7
First, we will generate a user certificate for the Android device. I will use Windows 7 to connect to the Certificate Authority and request a user certificate. I will use Web enrollment for this as it’s probably the most convenient method of enrolling user certificates.
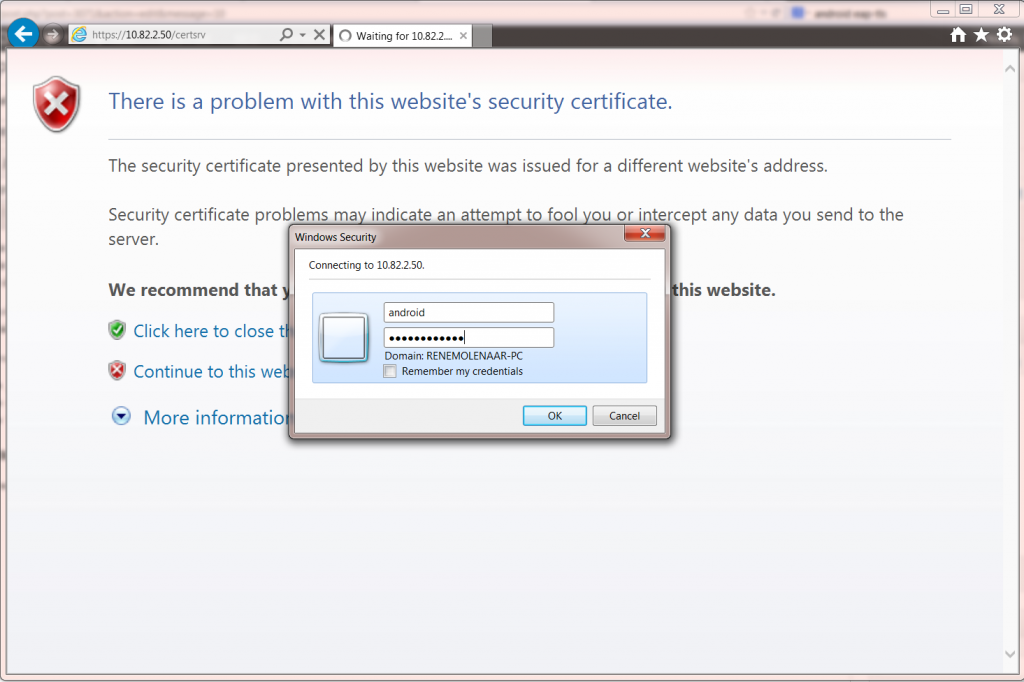
Open the web browser and open http://your-server-ip/certsrv. Enter the credentials of the user account that requires a certificate. I’m doing this for a user called “Android”.
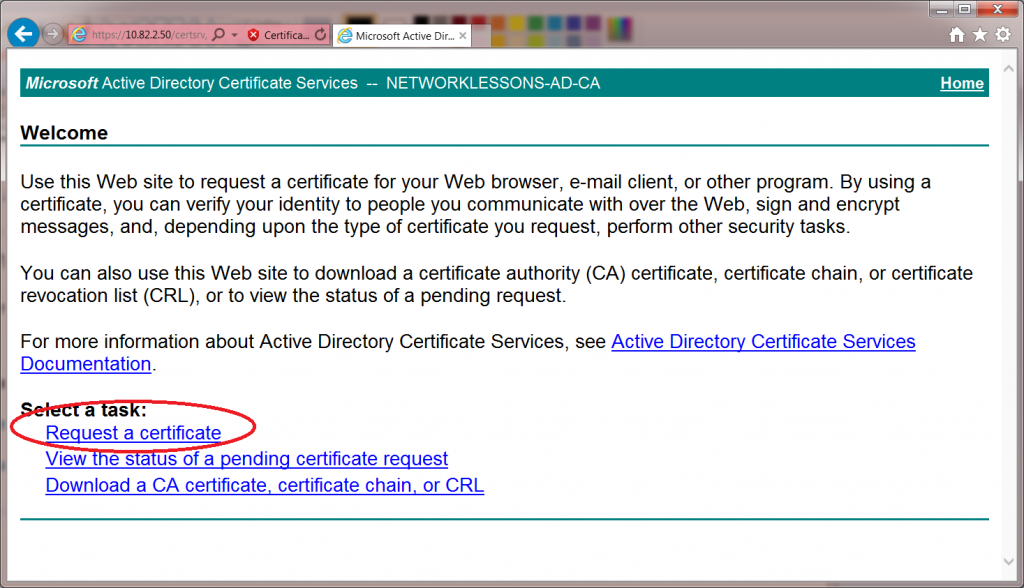
Click on the request a certificate button to continue.
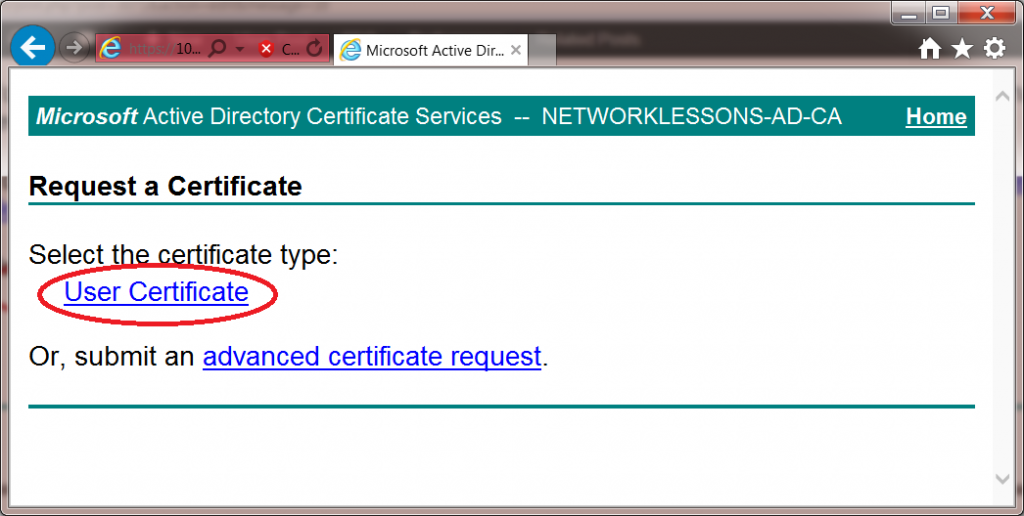
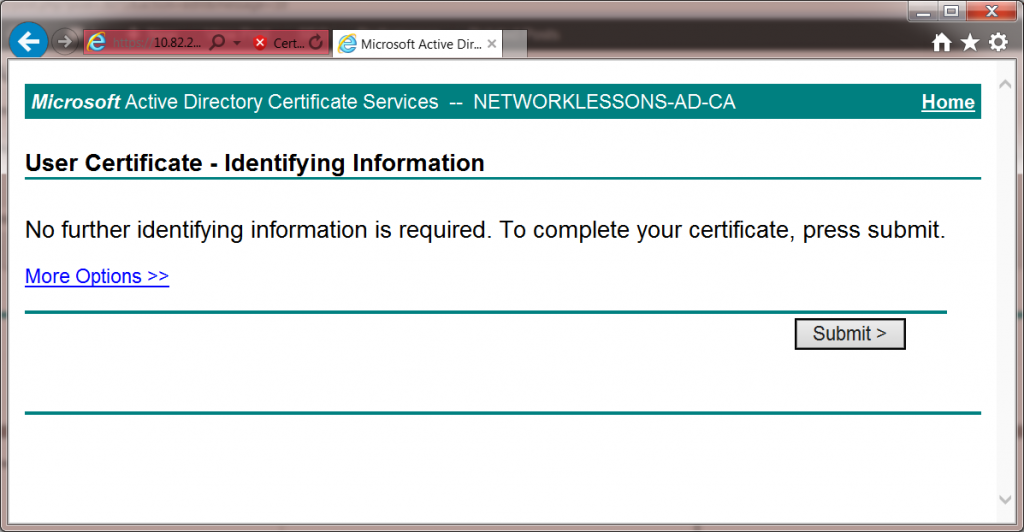
There is no need for advanced options. Click on user certificate to continue.
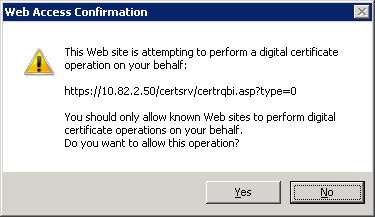
Your web browser will warn you that you are about to request a certificate, click on Yes to continue.
In the final screen, the web enrollment is ready to submit your request. Hit the submit button to continue.
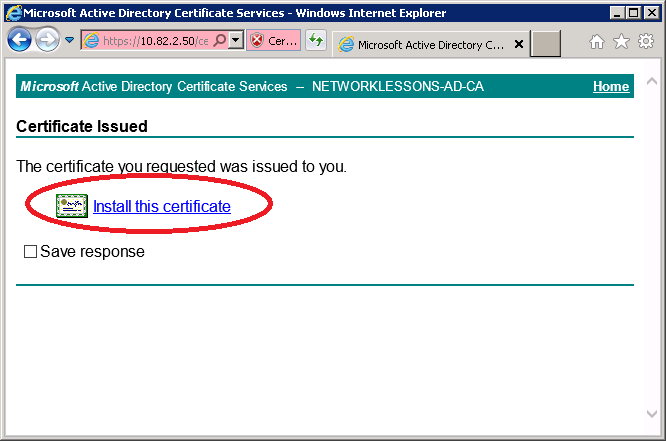
Your user certificate will be ready, and the web browser will ask if it should install the user certificate for you. Click on Install this Certificate to continue.
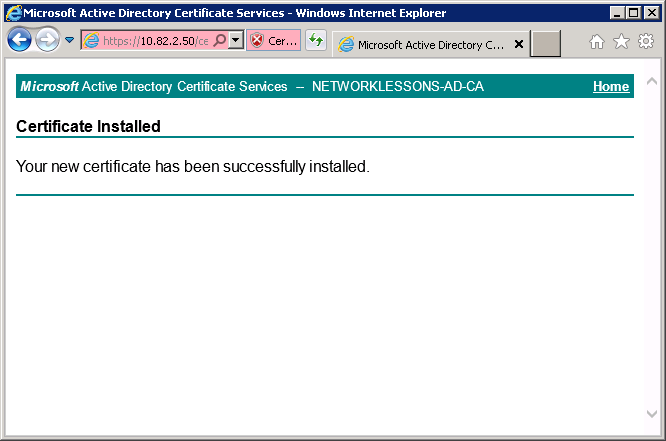
If everything went OK, you should get a message that the user certificate has been installed.
Now we have a user certificate on our Windows 7 computer. We will export this user certificate and import it to our Android device.
Export Certificates
Our Android device will require the user certificate that we just generated but also the root CA certificate in case you are running your own Certificate Authority. I will use my Windows 7 computer to export both certificates. We’ll start with the user certificate…
Export User Certificate
We will use the certificate manager on Windows 7 to view our certificates and export them.
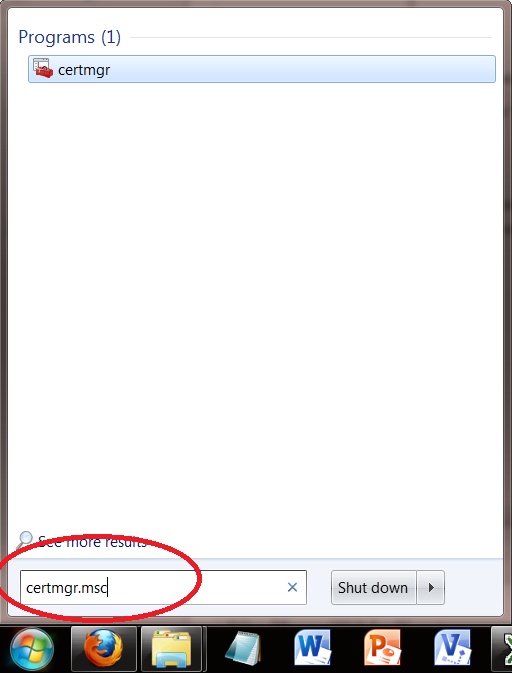
Click on Start > type “CERTMGR.MSC” (without the quotes) and hit enter.
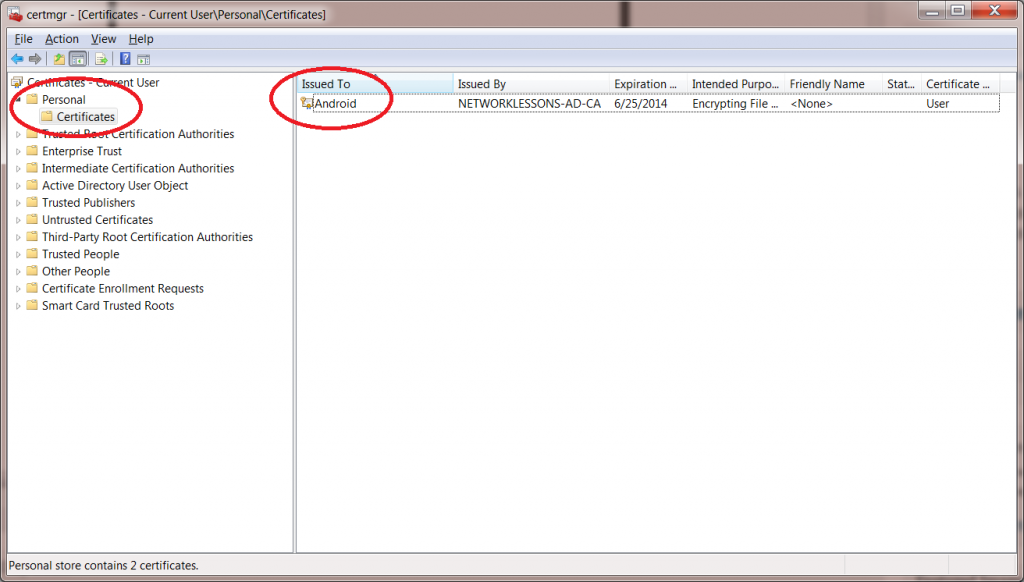
The Certificate manager will start. Click on Personal > Certificates and you will see the user certificate that we generated for the Android user.
Click on the Android user certificate (right mouse click) and select Export.
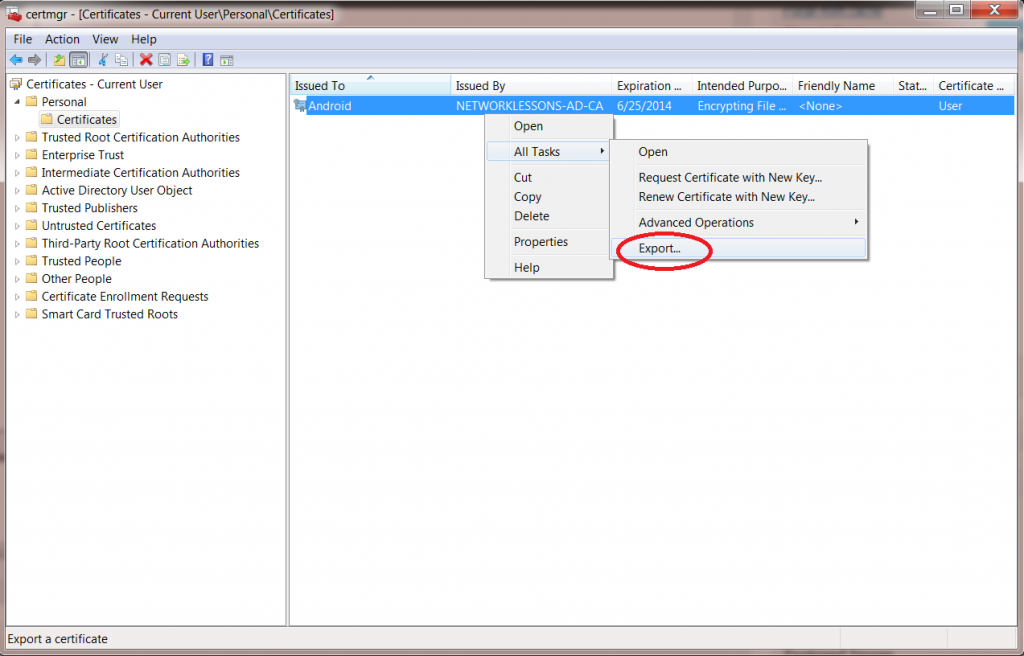
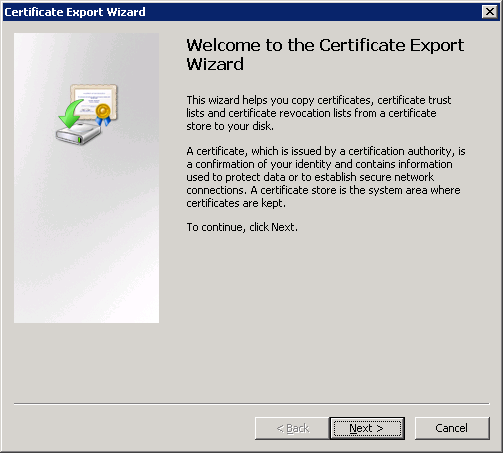
You will see the certificate export wizard. Click Next to continue.
The wizard will ask you to export the private key for the user certificate. Select Yes, export the private key, and click Next to continue.

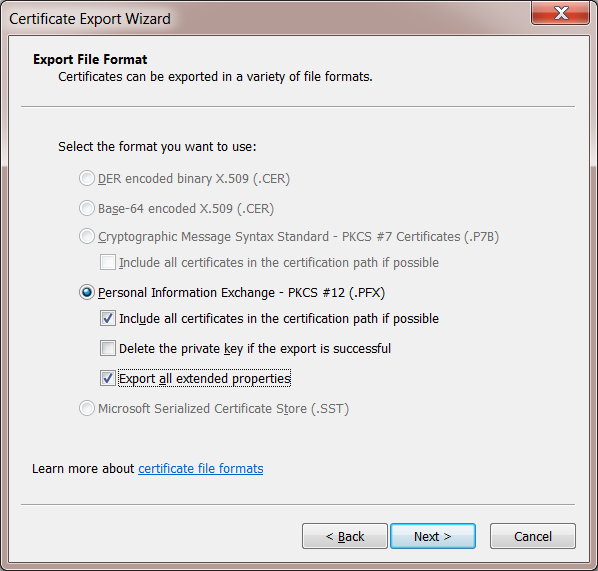
In the next screen, you will have to choose the file format. Everything is greyed out since this is a user certificate. Select the “Include all certificates in the certification path if possible” and “Export all extended properties” checkboxes. Click Next to continue.
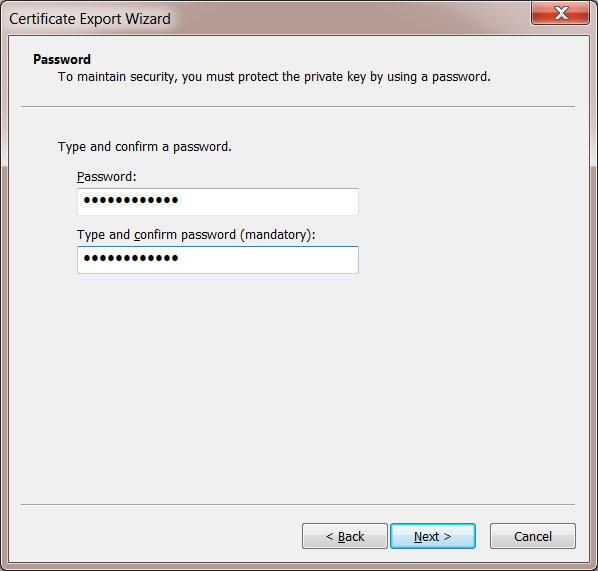
The export wizard will ask you to protect the private key with a password. This is a good idea, so enter a secure password. Click Next to continue.
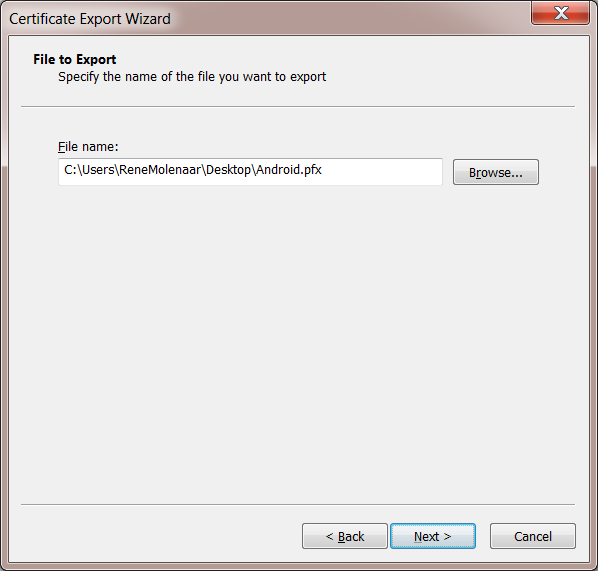
The export wizard will ask you for a filename. I’ll name my user certificate “Android”. Click Next to continue.
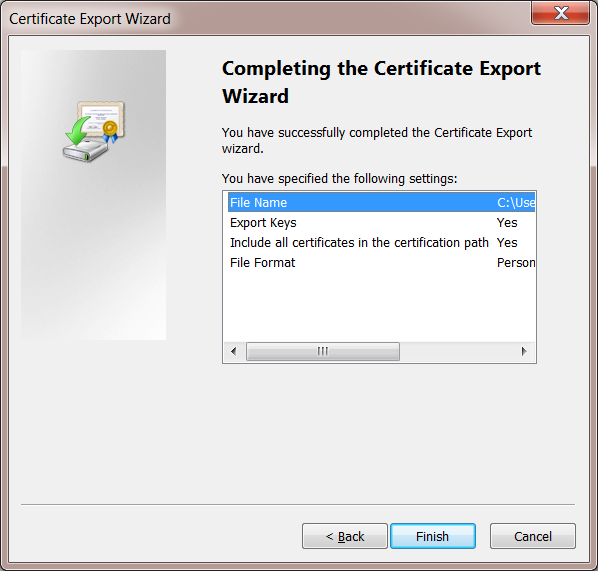
Finally, the export is done. Click Finish to continue.
Now we have the user certificate for user Android stored in a file. We still will need the root CA certificate…
Export Root CA Certificate
If you don’t have the root CA certificate yet, you will have to export it from the certificate authority or your Windows 7 computer. In my other lesson, I already covered how to export the root CA in installing PEAP and EAP-TLS on Windows Server 2008. Take a look at the Configure Wireless Client section to see how you can export the root CA to a filename.
Once you are done, you should have two files:
- The user certificate is in PFX file format.
- The root CA certificate is in DER file format.
We are now ready to import the certificates on our Android device.
Import Certificates on Android Device
Most Android devices will only import certificates from an SD card (internal or external). I am using a Samsung Galaxy S3 running Android 4.x but importing the certificates should be similar on other Android 4.x devices.
Some older Android versions might only recognize certain file formats. If your certificate is not recognized, try renaming the “cer” files to “crt” and the “pfx” file to “p12”.
First, you need to copy the two certificate files to your Android device. In my case, I had to copy it to the internal storage, but it’s possible that you need to copy it to an external SD card on other Android devices. Whatever storage “device” it is, you need to copy the files to the root…don’t use any sub-folders. Here’s an example of where I stored the certificate files on my Samsung Galaxy S3:
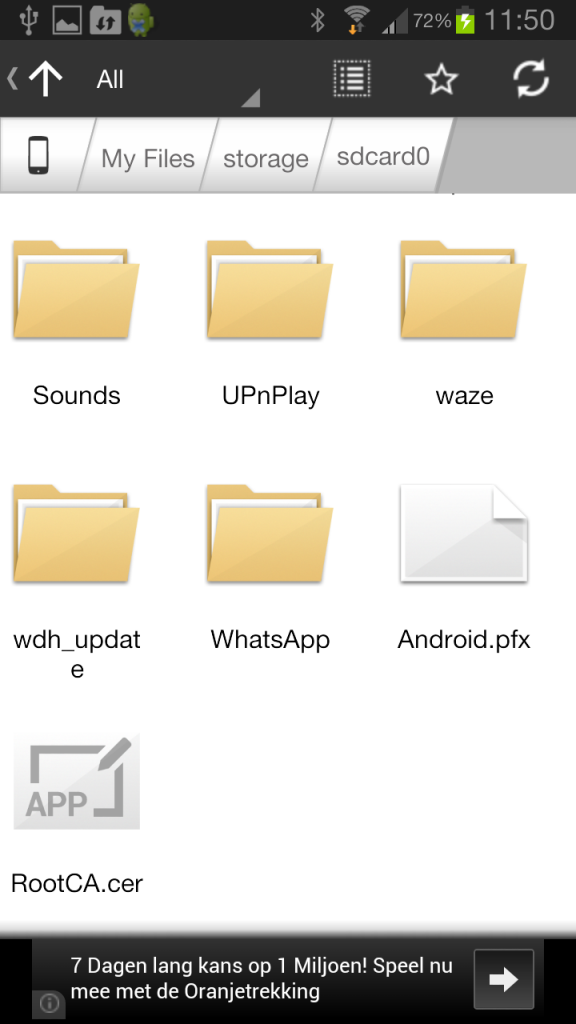
Above, you can see that I stored the following two files on sdcard0 (despite the name, this is the internal storage of the phone):
Once you have the files in place, you import them. Go to the settings of your Android device.
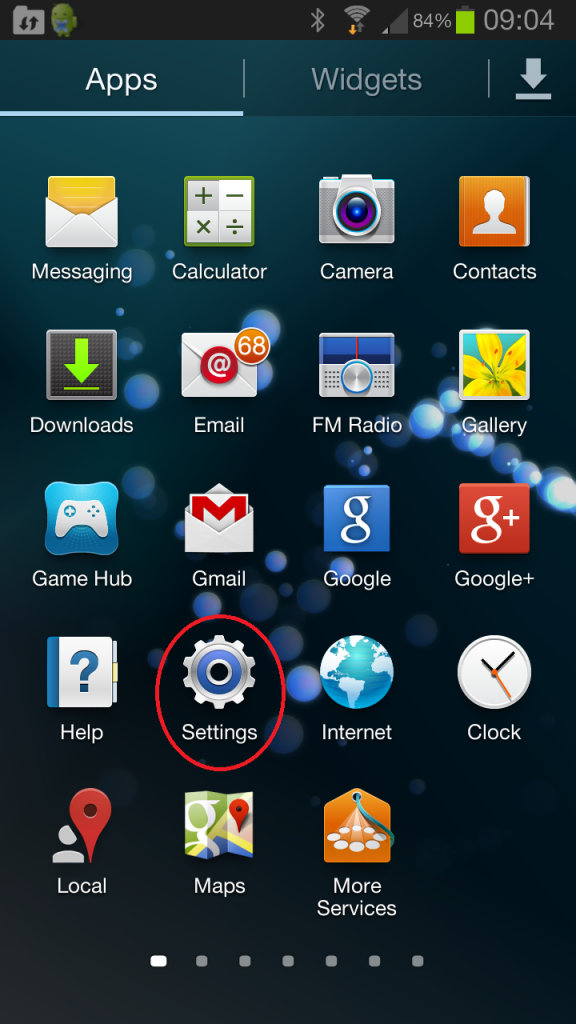
Select the Security option from the Settings menu.
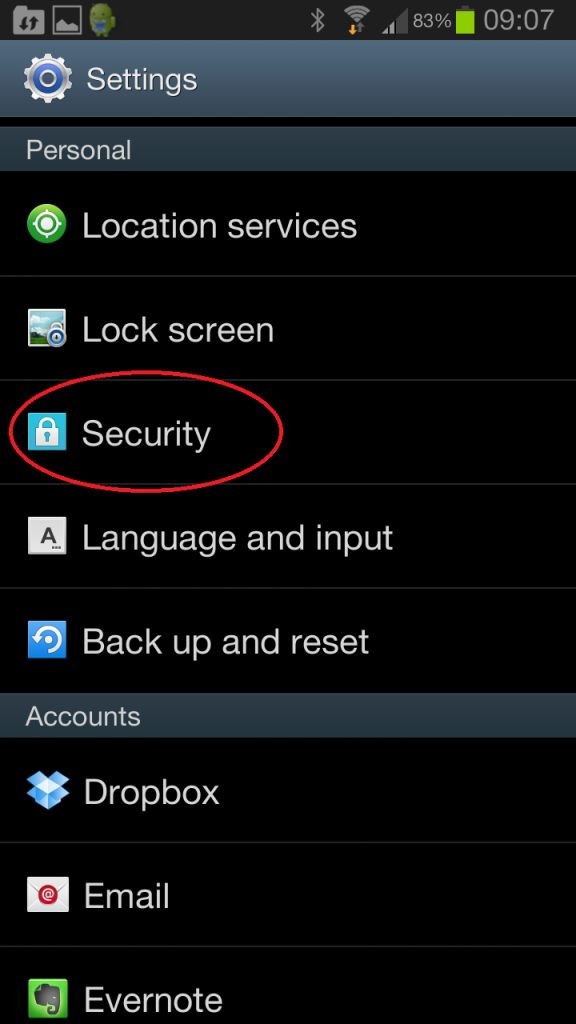
At the bottom, you will find the Credentials storage. Select Install from storage device.
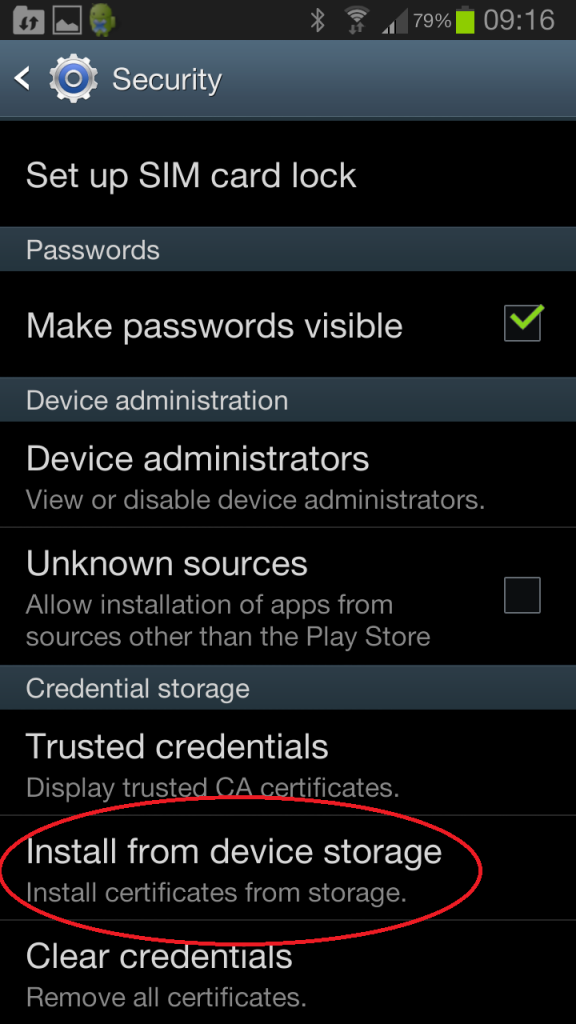
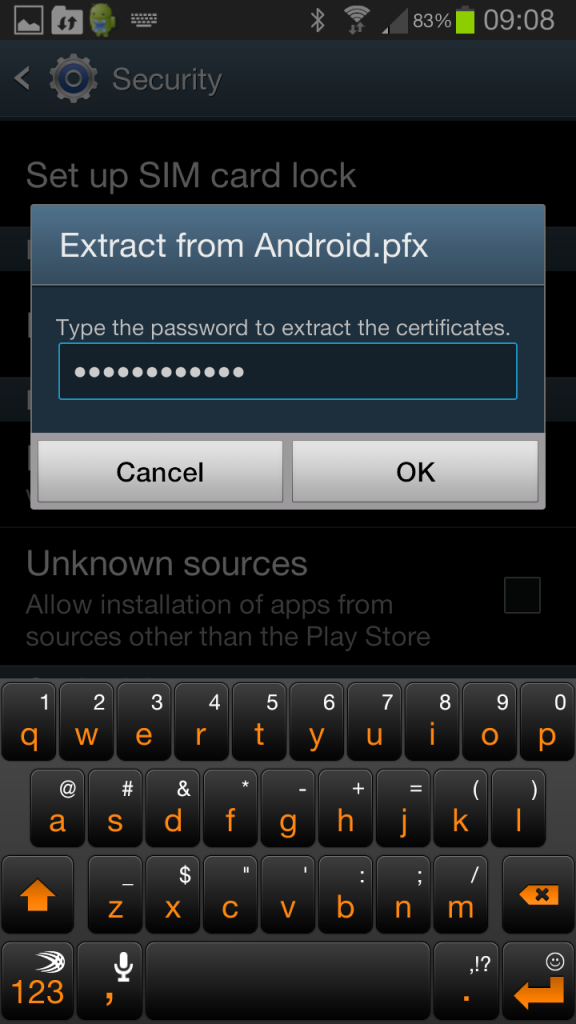
Your Android device will find the certificate files on your storage device and prompt you with the following screen.
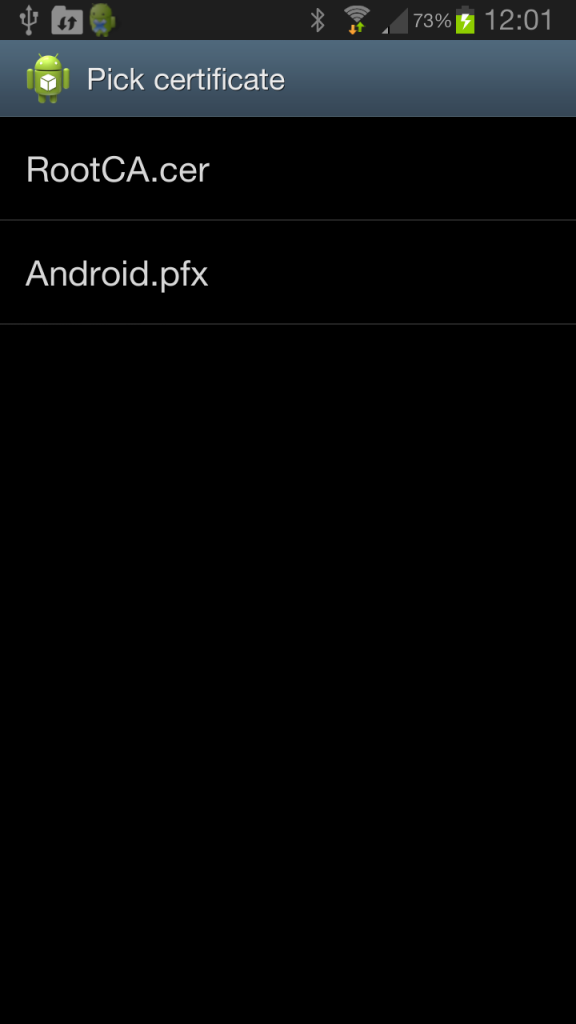
We need to install both. Let me give you an example of the user certificate. Type in the password for the private key and hit OK.
In case you get the error “No certificate file found on SD card” then A) your Android device doesn’t support the file format for the certificates that you copied or B) you copied the certificates to the wrong storage device.
Android will ask you for a certificate name. Keep the default or rename it to something else and press OK.
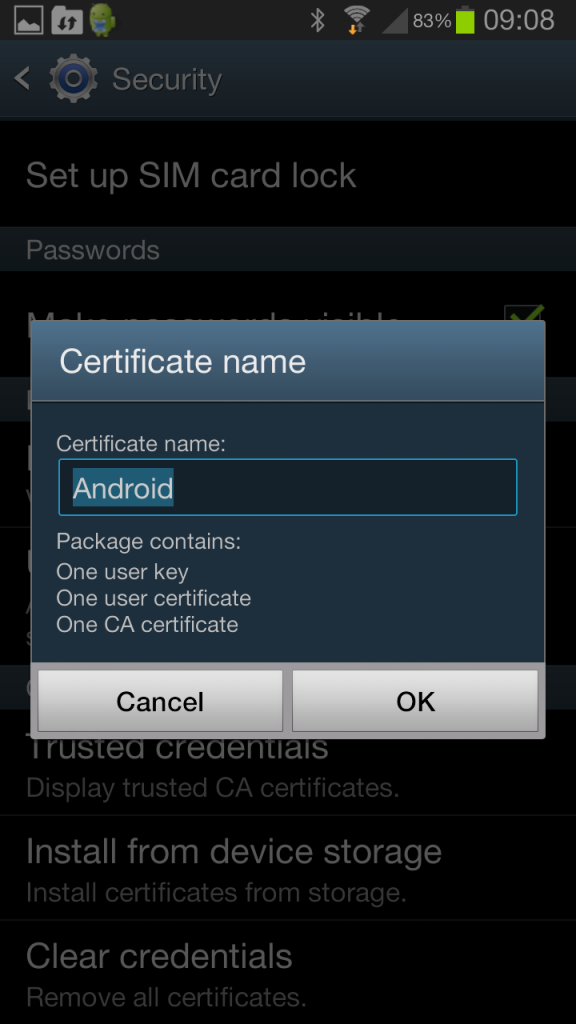
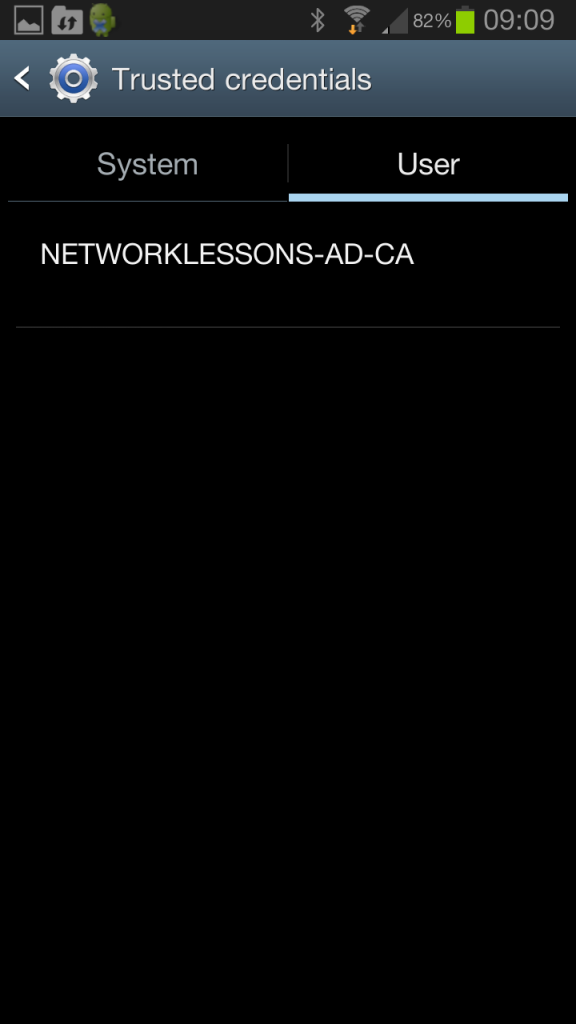
Make sure you import both certificates. You can verify that your Android device recognizes the certificates. Select Trusted credentials if you want to take a look.
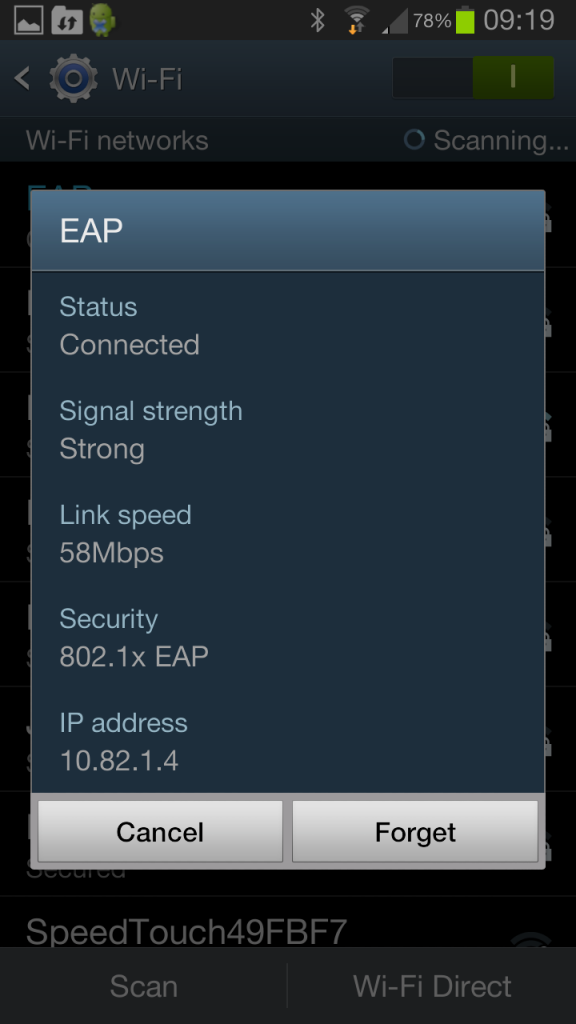
Below you can see that this Android device has a user certificate.
Our Android device now knows about the certificates that we require. Time to connect to the wireless network!
Connect to Wireless Network using EAP-TLS
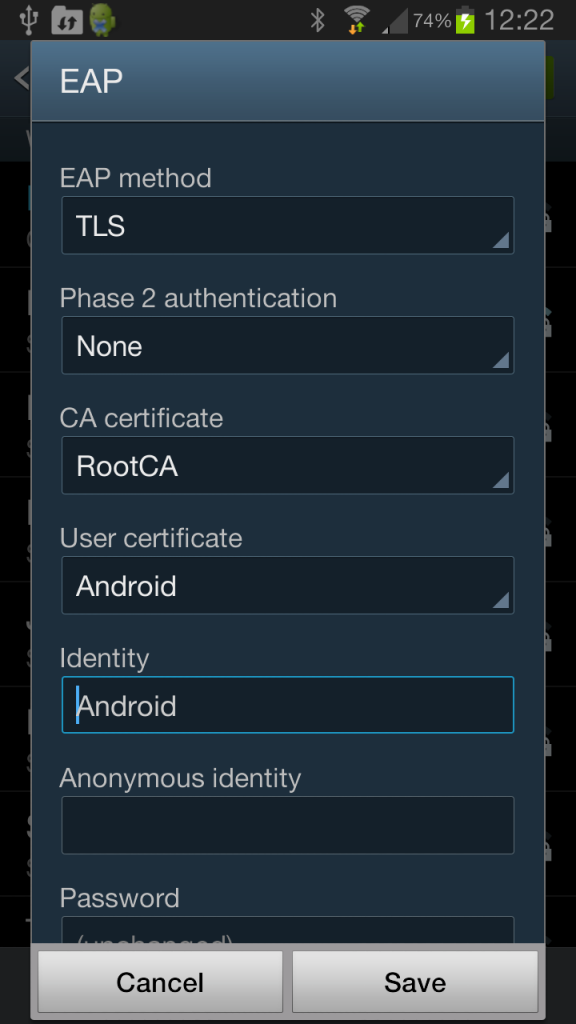
With the certificates in place, we are ready to connect to the Wireless Network. Go to the Wifi settings of your android device and connect to the correct SSID. You will be prompted for some security details. Enter the following items:
- EAP method: TLS
- Phase 2 authentication: none
- CA certificate: your root CA.
- User certificate: your user certificate.
- Identity: username
Leave the rest of the items empty and press Save.
You should now be connected to the wireless network:
That’s all there is to it! I hope this has been helpful in helping you connect your Android devices to the Wireless network using EAP-TLS. If you have any questions feel free to leave a comment in our forum!
Wi-Fi WPA-Professional with Certificate Authentication
Today, most Wi-Fi hotspots at home use the standard WPA/WPA2 authentication and encryption mechanism that uses a shared password between the Wi-Fi hotspot and clients. The downside of this approach is that all users have to share the same password which enables an attacker who is in range of the network and in possession of the password to decode encrypted packets if he has observed the initial EAPOL authentication and ciphering dialog of another client. Another downside is that the password needs to be stored in all access points of a Wi-Fi network. All these things are clearly not acceptable in company environments or during public events that want to offer air interface security. For such environments, the Wi-Fi alliance has specified the WPA-Professional authentication approach that can use various authentication methods with certificates and individual passwords for each user. Let’s have a closer look at one option of which I was recently able to take a Wireshark trace:
To address the need of companies for a centralized user management, WPA/WPA2-Professional manages certificates and passwords from a central authentication server, often referred to as a RADIUS server. In practice it’s not straight forward to discuss such setups because they are mostly used by companies and hence can’t be discussed in public. Fortunately I’ve now found one network that uses WPA2-Professional with a certificate and passwords that can be discussed in public: The Wi-Fi network that was used during 32C3.
As they’ve described on their Wiki, a server side certificate was used to authenticate the network towards the user via TTLS. To authenticate clients, a username/password of choice could be used in the network. As the conference network administrators were not interested to authenticate users, any username and password combination was accepted. In practice users could remain anonymous this way while at the same time an individual secret was used to generate cipher keys, i.e. packets can’t be deciphered by an attacker even if the authentication packets were captured.
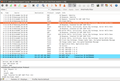
The screenshot of the Wireshark trace on the left (here’s the pcap in case you want to have a more detailed look) shows how the TTLS/Certificate authentication works in practice. After associating with the network, the Wi-Fi access point asks for a username, which can be anonymous and then tells the user that it wants to proceed with a TTLS-EAP authentication procedure. The client device then answers with a ‘Client Hello’ packet that contains all cipher suites it supports. The network then selects a cipher suite and sends it’s signed certificate to authenticate itself which contains it’s public key.
In company environments, the certificate used in Wi-Fi networks is usually signed by a private certificate authority. To enable the device to validate the signed certificate that was sent, the public key of the certificate authority that has signed the delivered certificate has to be stored in the device before it connects to the network for the first time.
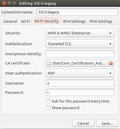
In case of the 32C3 network a public certification authority was used to sign the certificate delivered to the device. As anyone can get a signature for a certificate from a public certification authority if he is the owner of the domain specified in the certificate an additional client side configuration is required to ensure that only signed certificates with the correct domain name of the Wi-Fi network are accepted. Unfortunately, Ubuntu’s graphical network configuration tool doesn’t have a field to configure this extra information as shown in the second screenshot.
Fortunately it’s possible to modify Ubuntu’s configuration file for the network after it has been created in ‘/etc/NetworkManager/system-connections‘ by adding the ‘altsubject‘ line in the 802.1x section with the domain name used by the Wi-Fi network’s certificate.
[802-1x]
eap=ttls;
identity=x
ca-cert=/etc/ssl/certs/StartCom_Certification_Authority.pem
altsubject-matches=DNS:radius.c3noc.net;
phase2-auth=pap
password-flags=1
Putting in a wrong value in this line makes the connection establishment fail so I could verify that the overall authentication process is secure.
Once the client device has accepted the server certificate (packet 14 in the trace) an encrypted handshake message is exchanged that is client specific. For this dialog, the client uses the public key that was part of the certificate to encrypt the message. Decoding the packets on the network side is only possible with the private key. As the private key is never sent over the air an attacker can’t use a copy of the certificate for a rogue access point.
Afterward the standard 4 step EAPOL Wi-Fi messaging is used to activate link level wireless encryption, based on an individual secret exchanged during the TTLS process. Packet 22 shows the first encrypted packet exchanged between the access point and the client device, a DHCP message to get an IP address. As the trace was done on the client device the decoded version of the packet is shown. Once the IP address has been received the connection is fully established and user data packets can be exchanged.