- How do I connect to a WPA wifi network using the command line?
- 9 Answers 9
- 3 Ways to Connect to WiFi from the Command Line on Debian
- Discovering networks using Iwconfig:
- Connecting to wifi from the command line using nmcli:
- Connecting to wifi from the console using nmtui:
- Connect to wifi using wpa_supplicant:
- About the author
- David Adams
How do I connect to a WPA wifi network using the command line?
So basically, I’d like to use iwconfig to connect to my wifi network when I’m not inside X. But I just don’t see a way to do it in the man page. Any idea?
9 Answers 9
iw (list/config) can only handle WEP.
You need the wpasupplicant package which provides the wpa_supplicant command, install if necessary through sudo apt-get install wpasupplicant .
You put your SSID and password into /etc/wpa_supplicant.conf (requires sudo).
Assuming your interface is wlan0 you can connect with:
sudo wpa_supplicant -B -i wlan0 -c /etc/wpa_supplicant.conf -D wext sudo dhclient wlan0 «wext» is a driver and that will be specific for each card; refer to wpa_supplicant -h . Examples:
hostap (default) Host AP driver (Intersil Prism2/2.5/3). (this can also be used with Linuxant DriverLoader). hermes Agere Systems Inc. driver (Hermes-I/Hermes-II). madwifi MADWIFI 802.11 support (Atheros, etc.). atmel ATMEL AT76C5XXx (USB, PCMCIA). wext Linux wireless extensions (generic). ndiswrapper Linux ndiswrapper. broadcom Broadcom wl.o driver. ipw Intel ipw2100/2200 driver. wired wpa_supplicant wired Ethernet driver roboswitch wpa_supplicant Broadcom switch driver bsd BSD 802.11 support (Atheros, etc.). ndis Windows NDIS driver. well thats nice that iwlist/iwconfig can handle only WEP but in my case wpa_supplicant -B -iwlan0 -c/etc/wpa_supplicant.conf -Dwext && dhclient wlan0 did not connected to the wireless network, though by default NetworkManager connects me to the network I want to try the command line way is there some mistake I am doing?
@Rinzwind, Yes. Looking through wpa_supplicant’s manpage shows that the driver may vary, so your command will likely not work as literally given. You have to choose the -D
This link shows it all and worked fine for me: http://linux.icydog.net/wpa.php
I’m copying the contents here, so we have it, in case that site goes offline.
Command line WPA
Sometimes you’ll be at a command line with no access to GUI networking tools — but your access point is secured with WPA. What do you do?
Assuming your wireless card actually works (i.e. iwconfig can see it and interact with it), using wpa_supplicant is actually pretty simple. Installing wpa_supplicant
Most distros nowadays have wpa_supplicant installed by default. If you have the commands wpa_passphrase and wpa_supplicant available, then you’re good to go. Otherwise, you will need to install the package by doing something like (for Ubuntu):
$ sudo apt-get install wpasupplicant # yum install wpa_supplicant Or whatever the command is for your distro.
Generating the config file
Now that wpa_supplicant is installed, we will create its configuration file. Once you know the SSID and WPA passphrase, all you have to do is run:
$ wpa_passphrase myrouter mypassphrase > wpa.conf Of course, replace «myrouter» with the SSID of your router, «mypassphrase» with your WPA passphrase, and «wpa.conf» with whatever file you want to store the configuration in. This filename does not have to follow a particular format or have a particular extension.
Alternatively, to avoid typing the passphrase on the command line (so it doesn’t get saved in the shell’s history), you can specify just the SSID on the command line. wpa_passphrase will wait for you to type in the passphrase followed by enter:
$ wpa_passphrase myrouter > wpa.conf mypassphrase You should end up with a file looking like this:
Getting connected
Now we will actually run wpa_supplicant to connect to the wireless network. First, if your router broadcasts its SSID (they all do by default), you probably want to make sure your wireless card can actually see it:
You might have to run that as root to force a refresh.
Next, you will need to know three pieces of information:
- Which wpa_supplicant wireless drivers to use for your card. Running wpa_supplicant —help lists the different drivers it has (under «drivers:»). As of 0.5.8, the useful choices are: wext , hostap , madwifi , atmel , ndiswrapper , and ipw (ipw is for old kernels only; >=2.6.13 should use wext). If you don’t see a specific match for your card, try wext, as that’s kind of the catch-all.
- The network device of your card. This is usually eth1 or wlan0, but if you’re unsure you can just run iwconfig . It will report «no wireless extensions» for non-wireless devices and will display some data for any wireless devices.
- The path to the configuration file that you created in the previous step.
Now that you have this data, run (as root):
# wpa_supplicant -D[driver] -i[device] -c[/path/to/config] There are no spaces between the options and parameters. Don’t include the brackets as I just added those for clarity. For example, for my laptop it looks like this:
# wpa_supplicant -Dwext -ieth1 -c/root/wpa.conf You can also run it in the background by using the -B option so that it doesn’t take up your console.
Now you’re associated with the network.
Getting online
To actually get online, you’ll have to get an IP somehow. Most people will just want to get a dynamic IP from a DHCP server, probably the one built into the router. (I’m not going to cover setting a static IP and routing table because that’s a beast in itself.)
To get a DHCP lease, first release whatever leases you’re still holding onto (as root):
Then ask for a new lease (of course replacing eth1 with the name of your network device, the same one as you used in the previous section):
You now have an IP, in theory at least. Happy surfing!
3 Ways to Connect to WiFi from the Command Line on Debian
![]()
This tutorial briefly explains how to connect to Wifi from the command line on Linux Debian and Debian based distributions in 3 different ways: using nmcli, nmtui and wpa_supplicant. Additionally to nmcli, nmtui and wpa_supplicant, the commands iwconfig, iwlist and dhclient are used and briefly explained in this tutorial.
Discovering networks using Iwconfig:
Before starting we need to know the essid or name of the network we want to connect to.
This tutorial shows how to use the Iwconfig command to scan available networks. Iwconfig is similar to the command ifconfig but to manage wireless interfaces. This command allows the user to edit the frequency or channel, to change the network device mode (Ad-hoc, Managed, Master, Repeater, Monitor, Secondary), to set an ESSID, etc.
NOTE: SSID/ESSID are network or router names or identifiers.
To check if the wifi card is properly detected first execute the command iwconfig as shown in the following screenshot:
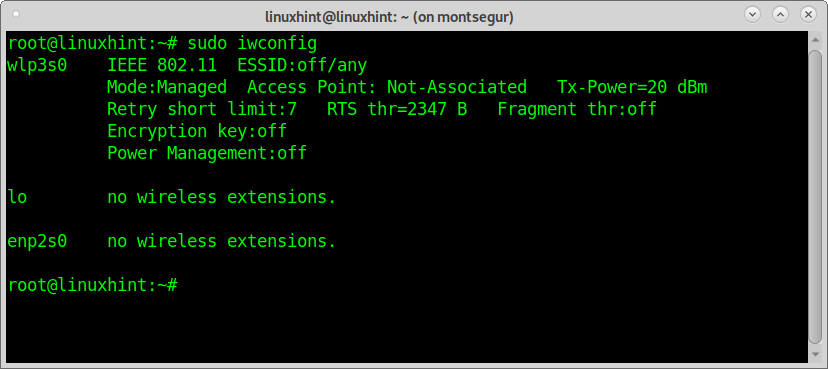
As you can see the output shows the loopback (lo) interface,the ethernet card (enp2s0) and the wifi card wlp3s0 which we’ll use to scan available networks using the command Iwlist.
The first line shows support for 802.11 standards and reveals the device isn’t connected. The second line shows the wifi card is in managed mode, not associated with an Access Point.
The third line includes Retry Short Limit which determines the number of attempts after a failed transmission and RTS Threshold defining the number of confirmations prior to a connection, Fragment Thr shows the maximum packet size your card will send.
Last two lines show there is no authentication and Power Management is off.
The command Iwlist provides additional information on wireless devices, including those which aren’t part of our computer. In this case we will scan available networks adding the argument scan. The output will display a list of Access Points with some information such as ESSID, signal quality, channel, mode, etc.
Run the following command to print a list of available networks:
NOTE: Replace wlp3s0 for your wireless card displayed when the command iwconfig was executed.
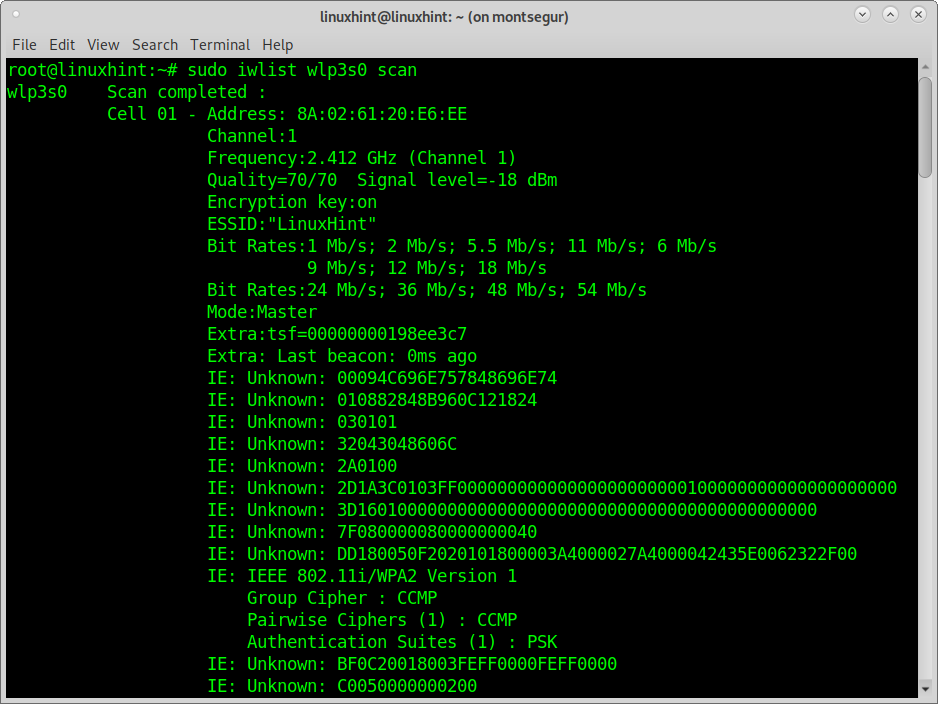
As you can see the output shows several networks including the LinuxHint Access Point, yet the format isn’t user friendly. If you only want to print the ESSID or names of available networks omitting the rest, run:
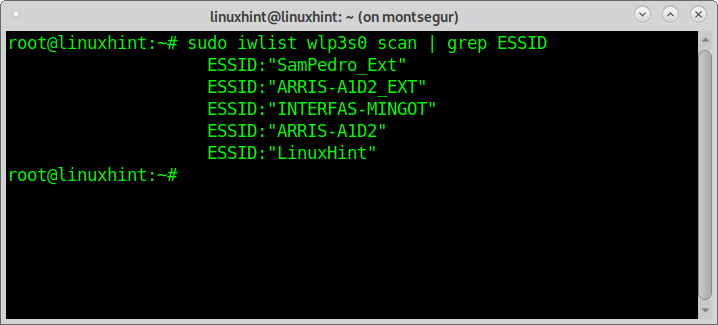
As you can see now the output is clear and limited to access point names (essid).
Connecting to wifi from the command line using nmcli:
NMCLI is a command line interface for the NetworkManager which can be used as an alternative to graphical managers. NMCLI allows the user to create, to edit and remove or to enable and disable connections as well as display device status.
The following syntax shows how to connect to the LinuxHint network (discovered with the previously used command Iwlist) by executing nmcli with the following arguments:
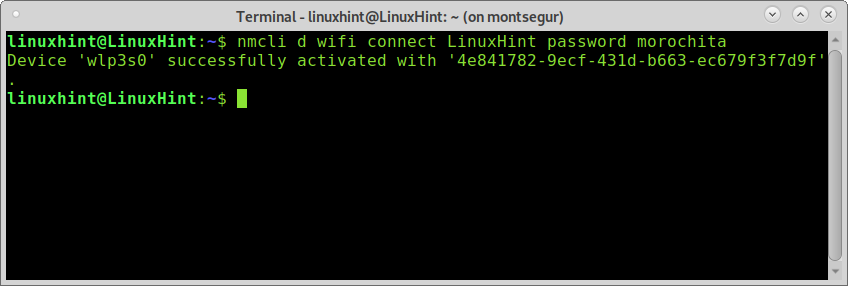
Where d wifi specifies the wireless device, connect LinuxHint specifies the essid and password morochita the password.
NOTE: Replace LinuxHint for your router ssid and morochita for your actual password.
You can get additional information on nmcli at https://linux.die.net/man/1/nmcli
Connecting to wifi from the console using nmtui:
Nmtui is an interactive curses-based alternative to nmcli and Network Manager, on the console run:
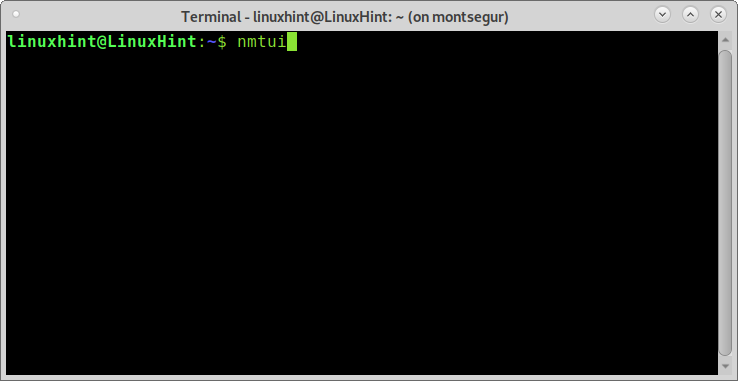
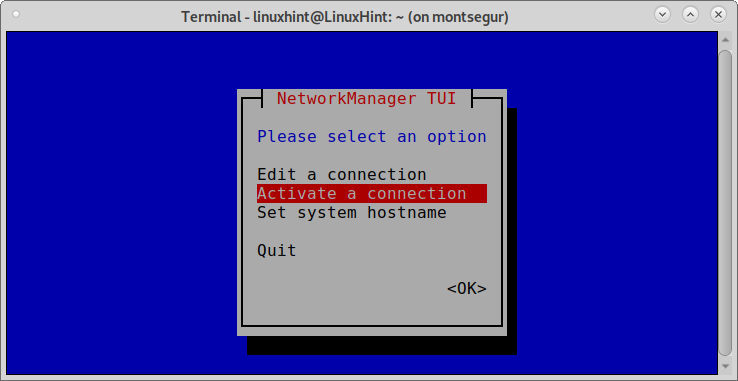
The first screen allows us to edit an existing connection, to activate a new connection and to edit our hostname. Choose the second option Activate a connection and press ENTER.
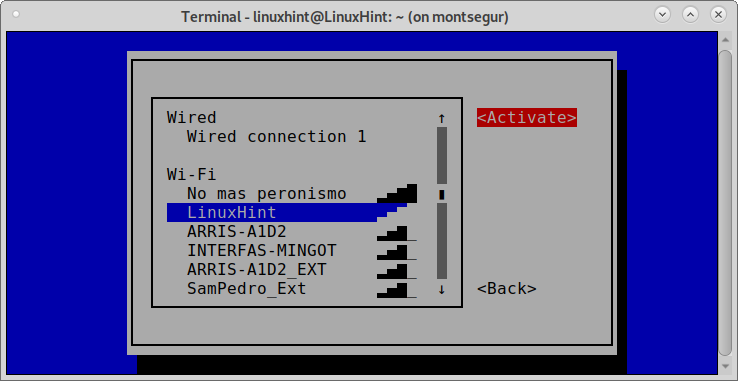
Nmtui will show both wired and wireless available networks. Select your Access Point and press ENTER.
Note: for this example the ESSID was changed from LinuxHint to LinuxH1nt to show the password request step.
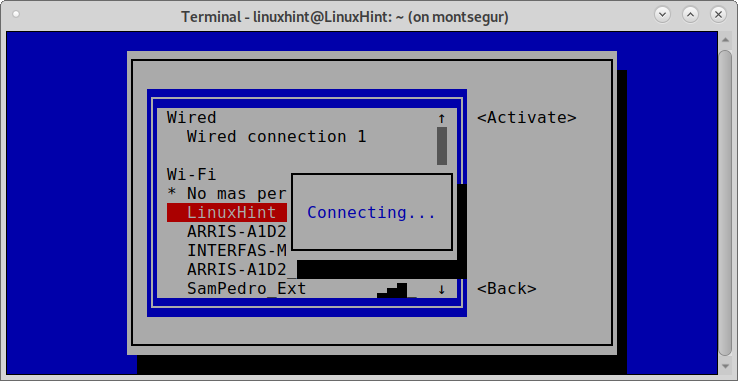
The next screen will ask for the password, fill it and press ENTER to continue.

You can get additional information on Nmtui on it’s man page at https://www.mankier.com/1/nmtui
Connect to wifi using wpa_supplicant:
Wpa_supplicant is a supplicant which allows the negotiation in the authentication process. Contrary to nmcli and nmtui, wpa_supplicant isn’t installed by default on Debian.
To install wpa_supplicant on Debian based systems run:

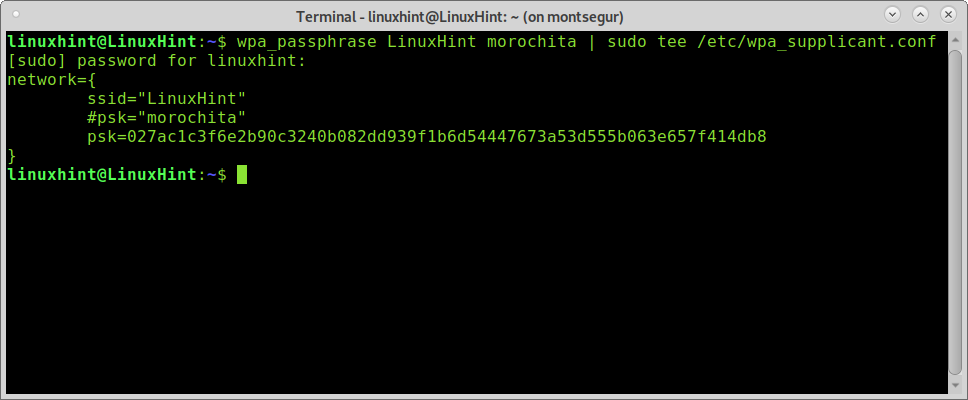
You need to edit the file /etc/wpa_supplicant.conf adding your Access Point essid and password, you can achieve it executing the following command:
NOTE: Replace LinuxHint for your essid and morochita for your actual password. You can use quotation marks for network names containing spaces.
Once wpa_supplicant.conf is edited, you can connect by executing the following command where -c specifies the configuration file and -i specifies the network interface:
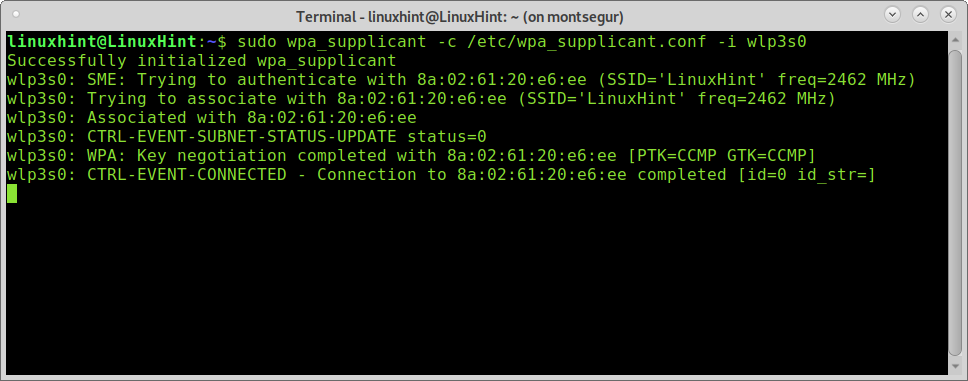
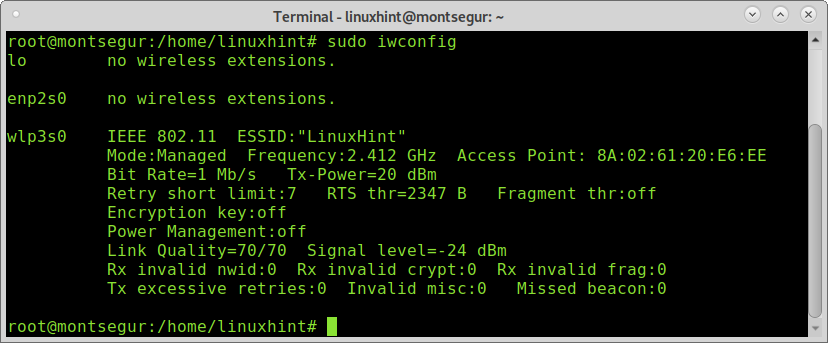
As you can see using iwconfig, now your wireless card is associated with the access point.
To connect, run the command dhclient as shown in the following screenshot to get a dynamic IP address:
NOTE: Replace wlp3s0 for your wireless card.
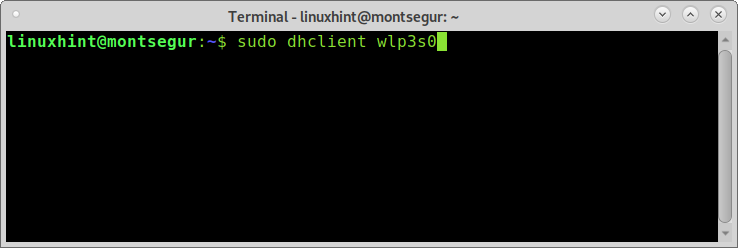
After executing dhclient, you should be connected to the internet through the associated access point.
You can get additional information on wpa_supplicant at https://linux.die.net/man/8/wpa_supplicant
I hope you found this tutorial useful to connect to wifi from the command line on Debian based systems. Keep following LinuxHint for more Linux tutorials and tips.
About the author
David Adams
David Adams is a System Admin and writer that is focused on open source technologies, security software, and computer systems.