- How to Connect Your Printer to WiFi
- What devices are you printing from?
- Have you finished the basics of your printer’s setup?
- Cordless set up or Ethernet connection — the choice is yours
- Connect HP devices easily with HP Auto Wireless Connect
- Other easy alternatives
- WiFi Protected Setup
- HP Wireless Setup Wizard
- Printer-to-computer via USB
- Still having trouble?
- Troubleshooting checklist
- About the Author
- How to Connect a Wifi Printer
- 1. Connect your wireless printer to WiFi
- 2. Add the wireless printer to computer
- Windows can’t find my printer?
- Way 1: The printer that I want isn’t listed
- Way 2: Update your printer driver
How to Connect Your Printer to WiFi
Are you updating some of your office tech and starting to wonder how to connect an HP printer to WiFi? While there are many different types of printers available today, there are a few related options to consider when it comes to getting your WiFi connection set up properly.
The method you use will be determined by your preferences and your existing office or mobile routines, as well as the type of hardware you’re using.
Many times, the process will be automated and handled during installation. However, because this isn’t always the case, you may have to configure your printer’s network separate from installation.
As simple as it may be to print wirelessly from your phone or any connected device, these are some things to consider before getting started with your preferred method:
We’ll start by talking about some of those concerns, and then move into specific tutorials for basic and wireless setup, and everything else you may need to know about connecting your printer to WiFi.
What devices are you printing from?
Wireless printing requires both a wireless printer and a compatible device. For many offices and homes, the primary printing hub is a desktop or laptop, although more and more users have started to incorporate mobile as a viable print platform.
Your only potential limitation is the strength of your internet connection and how close your printer is to the router. The closer it is to your router, the stronger your connection will be.
Whether it’s via tablet, smartphone, or smart home speaker systems like Google Home or Amazon Echo, the advantages of wireless printing can be substantial. A mobile wireless printing situation is a big potential boost to busy lifestyles with the convenience of printing from anywhere while not needing a hardwired printer in your workspace.
Note: If you’re working with both Google Home and an HP device, you’ll be pleased to see HP print functions are supported. You can follow our step-by-step guide to connect your HP printer to Google Home here.
Have you finished the basics of your printer’s setup?
Before configuring your printer’s WiFi and wireless settings, make sure you’ve completely unboxed and positioned your printer somewhere convenient with all inputs accessible. It should be in a safe and comfortable spot for you, either as a permanent situation or just a temporary spot for setup.
Even if you will be exclusively printing wirelessly, you’ll need to plug your device into a power source and install all your usual print cartridges before you get started. At this point, you’ll also want to let your printer complete its own automatic installation and calibration for page alignment.
Cordless set up or Ethernet connection — the choice is yours
There are other solutions if you don’t mind involving cords or extra connections. If your printer supports it and you prefer to start your setup with a hard Ethernet connection, you can simply connect that and start installing your printer software now. Just select the relevant options during configuration and you’re ready to go.
Connect HP devices easily with HP Auto Wireless Connect
One of the most convenient ways to configure wireless printing is through HP Auto Wireless Connect, a technology built into new HP printers allowing for automatic network configuration during the initial setup and installation process.
It’s extremely easy to use and is done from the comfort of your printer display. During configuration, simply select “Network (Ethernet/Wireless)” when prompted, then “Yes, send my wireless settings to the printer (recommended).” With compatible printers, it’s that easy to connect an HP printer to WiFi.
Despite that, some printers and networks may not recognize or be fully compatible with HP Auto Wireless Connect. In that case, you’ll have access to other options or to bypass during installation. If you’re dealing with an older printer, there are also a few boxes you’ll need to check in order to automatically connect to WiFi.
For HP Auto Wireless Connect to work properly, you’ll need an up-to-date operating system and a conventional wireless network setup. You’ll also need the standard dynamic IP address common for most users and a computer network connected at the 2.4 GHz frequency, though some routers can occasionally compensate for the difference.
Other easy alternatives
If you can’t connect to WiFi during your initial printer configuration using HP Auto Wireless Connect, there are several other easy alternatives that you can access.
WiFi Protected Setup
For users with a router and printer that both support WiFi Protected Setup (WPS), you have a solution that’s almost as easy as auto connect. To start, confirm that you have WPS setup by consulting your product manual. Or you can check your hardware visually for a WPS button, because many newer devices that support this method, such as routers and printers, have theirs clearly marked.
When available, simply press the WPS button on your printer and then the WPS button on your router. Otherwise, press the WPS button your router, then select the correct network via your printer.
HP Wireless Setup Wizard
On HP printers with built-in displays, you can also access the HP Wireless Setup Wizard by navigating to your printer’s Network options. From there, you’ll be able to consult a full list of available networks near you. Just choose the network you prefer and enter your security key to connect and start printing.
Printer-to-computer via USB
For those without printer displays, you can also create a manual connection between printer and PC while you install all of your printer software. This can be done by using your printer’s and computer’s USB ports.
Still having trouble?
Even with the widespread adoption of more and more mobile tech, the basic question of how to connect a wireless printer to WiFi can seem daunting. But wireless printer setup doesn’t have to be complicated. As long as you have the right information and compatible technology, you shouldn’t have too much trouble establishing a connection.
If you are still facing lingering issues, it helps to inventory your situation and make sure you know everything you need to know for wireless setup beforehand. If you do hit a wall, just slow down and double-check your work.
Troubleshooting checklist
Then run down this handy checklist, just to make sure you have a proper WiFi printer setup and everything you need in place for wireless printing:
If you’re still having difficulty connecting to WiFi after checking your information, devices, and connection, you may need to find help directly with the relevant customer support source. In that case, call support for your printer.
If it’s an HP printer, simply chat with one of our technical support representatives by contacting HP customer service. If you still can’t connect, you may need to consult your internet service provider.
About the Author
Dwight Pavlovic is a contributing writer for HP® Tech Takes. Dwight is a music and technology writer based out of West Virginia.
How to Connect a Wifi Printer

1. Connect your wireless printer to WiFi
Assuming that you have WiFi available in your office or house, we can start connecting your WiFi printer to your WiFi network. 1) Unpack your printer, run the startup routine for your printer, including plug in, turn on your printer, and install cartridges, etc. 2) After the startup routine, connect your WiFi printer to your WiFi network. This varies not only from manufacturer to manufacturer, but from printer to printer as well, so you can refer to the printer manual to connect it to your WiFi network step by step. Generally you’d need your SSID, network name and password to connect. Many printers now can directly search for your network name, so you can just select your WiFi network, and enter your WiFi password in your printer network settings.
Note: Make sure that your printer is within your WiFi network range when processing.
2. Add the wireless printer to computer
Now you’ve connected your WiFi printer to your wireless network, you can start adding it to your computer to print. To do so, follow these steps:
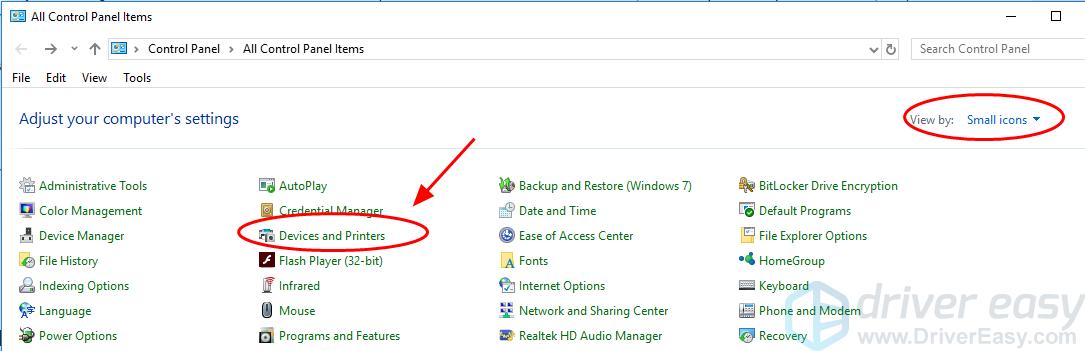
1) On your computer, open Control Panel. 2) Click Devices and Printers. Kindly note that you need to view by small icons in Control Panel.
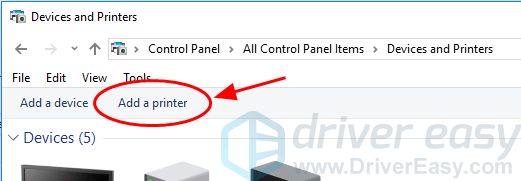
3) Click Add a printer.
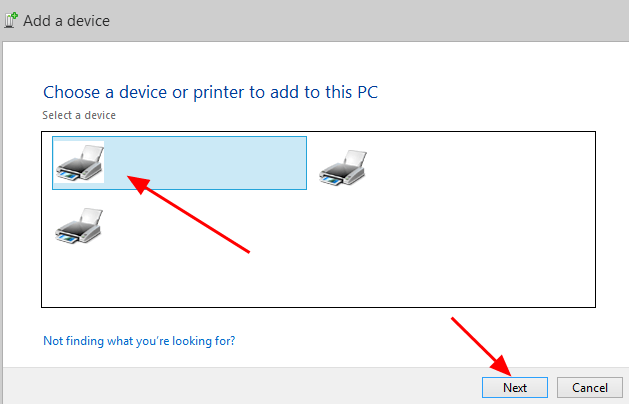
4) Select Add a network, wireless or Bluetooth printer (skip to the next step if you don’t have this option). 5) Wait for a while to your computer to search, then select your wireless printer from the device list, and click Next.

6) Follow the wizard to install the printer and its driver to your computer. Now you’ve finished connecting your WiFi printer, you can start a test print and it should work. It’s easy and quick, isn’t it?!
Windows can’t find my printer?
It’s possible that Windows can’t find your WiFi printer or you may fail to connect your WiFi printer to your computer, but don’t worry. There’re fixes to solve the issue. Way 1: The printer that I want isn’t listed Way 2: Update your printer driver
Way 1: The printer that I want isn’t listed
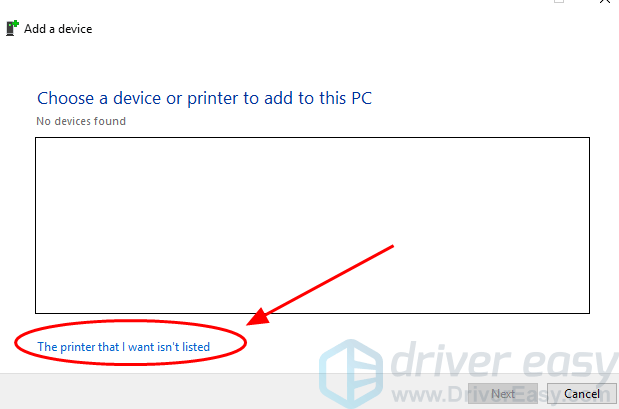
Wait for a while for Windows to search for your printer, until you see No device found: 1) Click The printer that I want isn’t listed.
2) Select Add s local printer or network printer with manual settings, and click Next.
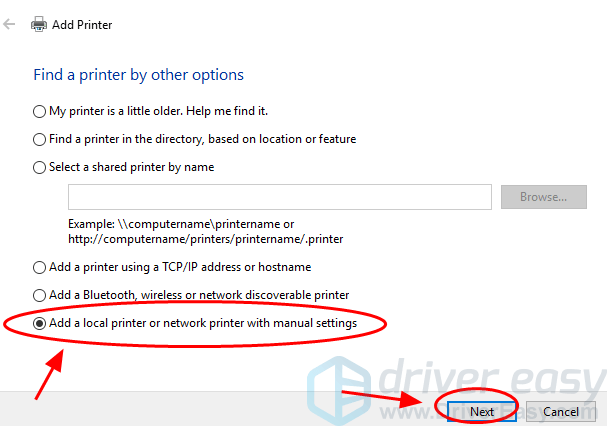
3) Follow the wizard prompted to add your printer.
Way 2: Update your printer driver

The missing or outdated printer driver can cause the issue, so you should update your printer driver to fix it. There are two ways to update drivers: manually and automatically. Manually – You can manually update the printer driver by searching the correct driver that is matched with your Windows OS on the manufacturer’s website, and install it in your computer. This requires the time and computer skills. Automatically – If you don’t have time or patience to manually update drivers, you can do that automatically with Driver Easy. Driver Easy will automatically recognizes your system after scanning, then find and install automatically the latest drivers for you, which saves your time – It only takes 2 clicks to automatically update your printer driver with Pro version and you’ll have a 30-day money back guarantee. 1) Download and install Driver Easy. 2) Run Driver Easy and click Scan Now. Driver Easy will then scan your computer and detect any problem drivers. 3) Click the Update button next to a flagged printer driver to automatically download and install the latest printer driver (you can do this with the FREE version). Or click Update All to automatically download and install the all the latest correct drivers that is missing or outdated in your system (This requires the Pro version . You will be prompted to upgrade when you click Update All).

4) Restart your computer and check whether your printer works. There you have it – connect you WiFi printer to your WiFi network and your computer. Now try printing and enjoy the flawless workload. If you have any question or idea, feel free to leave us a comment below.