- Fix WiFi Not Connecting In Linux Mint 18 And Ubuntu 16.04
- Reason
- Steps to fix wifi not connecting despite correct password in Linux Mint 18 and Ubuntu 16.04
- Step 1:
- Step 2:
- Step 3:
- Не работает Wi-Fi на Linux Mint, или он её не видит: все способы решения
- Подключение
- Подключение к скрытой беспроводной сети
- Причины
- На Ubuntu
- 1 Решение
- 2 Решение
- На Mint
- How to setup WiFi in Linux Mint
- How to connect to your wireless network
- Use your Linux machine as hotspot
- Related Posts
- How to disable threaded conversations in Thunderbird
- How to use Applets in Linux Mint Cinnamon – Linux Mint 21 edition
- How to prevent your Linux computer from falling asleep with Caffeine
- About John Been
- My Linux book is available now!
- Why this website
Fix WiFi Not Connecting In Linux Mint 18 And Ubuntu 16.04
I experienced this strange issue in Ubuntu 16.04 and Linux Mint 18. When I tried to connect to wifi, I clicked on the available wireless networks, entered the correct wifi password. A few seconds later, I was still not connected to the internet.
I thought it may be that I entered an incorrect password. So, I tried to connect again. This time typing the password slowly and then I double checked it to make sure that the password was correct.
But no, it won’t connect to the internet. This was frustrating as my wifi password is 26 characters long.
Reason
I went to the network settings to find out what was wrong with it. I noticed that my wifi password was not stored which could be normal as I was not asked if I wanted to connect to the network automatically.
I manually entered the wifi password and saved it in the network settings in an effort to not have to enter the long passwords again.
What surprised me that it just got connected to the internet after that. I don’t know exactly what made it work but it worked.
I haven’t looked to find if it is a bug in this version of the network manager or not but I experienced the same issue after installing Linux Mint 18. And using this trick again saved me.
Steps to fix wifi not connecting despite correct password in Linux Mint 18 and Ubuntu 16.04
Basically, all you need to do here is:
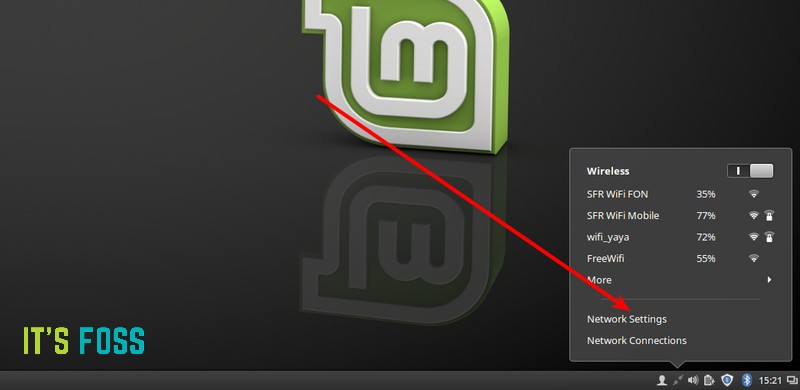
- go to Network Settings
- choose the network you are trying to connect to
- under the security tab, enter the wifi password manually
- save it
This trick has worked for me repeatedly, both in Ubuntu and Linux Mint. I hope that it works for you too.
Since I am using Linux Mint 18 right now, I am going to share screenshots so that it would help beginners to fix this issue.
Step 1:
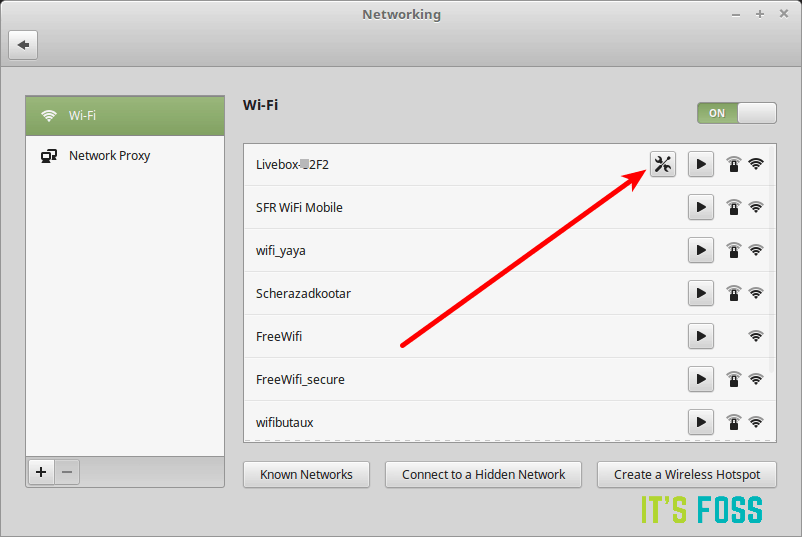
Step 2:
Choose the network you are trying to connect to. Note that it already provides a configuration option because I tried to connect to it earlier.
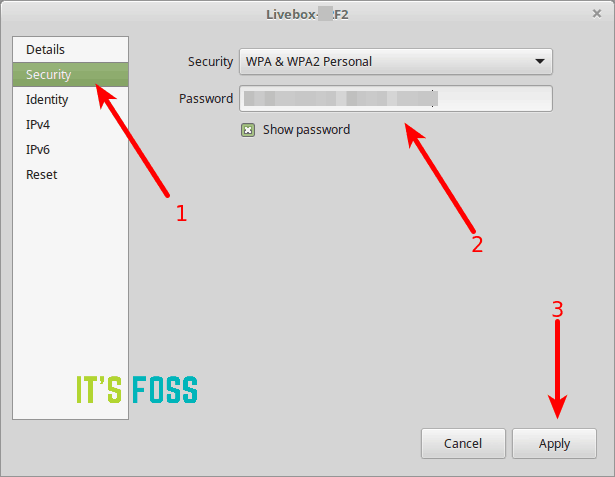
Step 3:
Under the security tab, enter the wifi password manually and click on apply to save it:
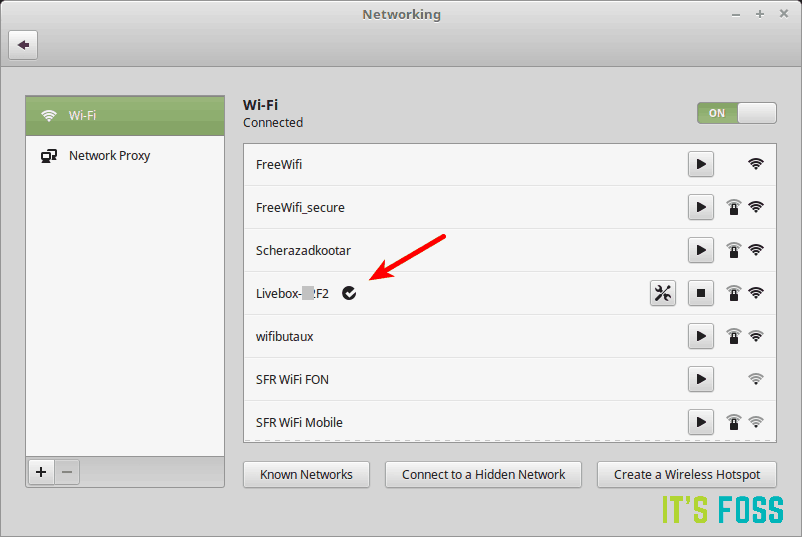
You’ll see that your network is now connected:
I hope this helps you. Note that this article deals with the problem when the wireless network is working fine in your system but it cannot connect to the access point despite correct password. I suggest this article if there is no wireless network in Ubuntu or Linux Mint.
Have you already encountered the same wireless connection issue in Linux Mint 18 or Ubuntu 16.04? If yes, how did you fix it?
Не работает Wi-Fi на Linux Mint, или он её не видит: все способы решения
![]()
Всем привет! После использования новой операционной системы периодически сталкивался с проблемой – когда Linux Mint не видит WiFi. Немного поднабравшись опыта, я решил написать более детальную статью, в отличие от тех, которые есть в интернете. Они конечно неплохие, но как правило не полностью решает некоторые мелкие нюансы.
Подключение
Прежде чем паниковать, давайте попробуем подключиться снова. Нажимаем по подключению правой кнопкой.
Далее вы должны увидеть список всех сетей. Если каким-то образом вы все же увидели свою – то нажимаем по ней и вводим пароль.
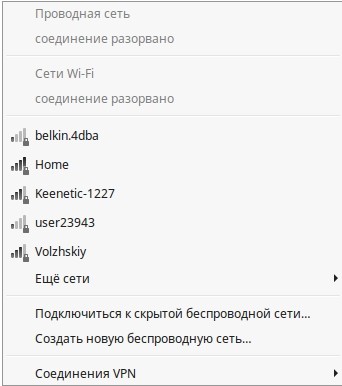
Если нужной сети нет, то подойдите к вашему роутеру и проверьте, чтобы он был включен. На всякий случай я бы его перезагрузил. Для этого находим на нем кнопку включения и два раза нажимаем по ней. Если кнопки нет, то можно просто выдернуть его из розетки, а потом снова включить.
Если вообще никаких сетей нет, то проверьте, чтобы у вас был установлен драйвер на ваш WiFi адаптер. Для этого можно прописать одну из двух команд:
По установки драйверов вы можете почитать отдельную нашу статью – по этой ссылке. Также данная статья решает проблемы, когда на Linux Mint не работает WiFi.
Подключение к скрытой беспроводной сети
Если драйвера установлены и не видно только одну сеть, то возможно она просто скрыта или невидима. Данная настройка стоит внутри маршрутизатора.
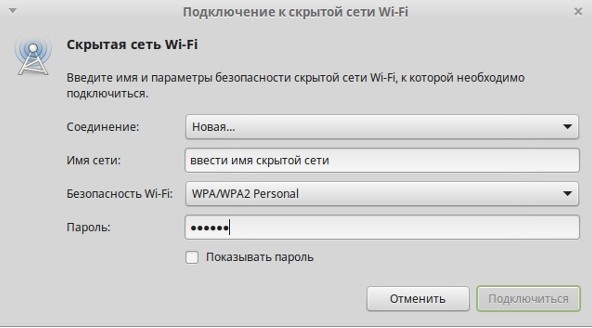
- Подключиться можно по названию, для этого опять открываем список подключений. Далее нужно выбрать «Подключить к скрытой беспроводной сети»;
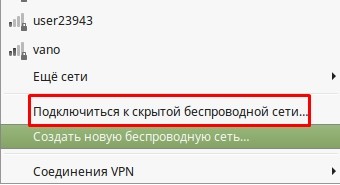
- Далее вводим название сети, выбираем тип безопасности. Чаще используется именно «WPA/WPA2 Personal» – поэтому если вы не знаете, что именно указать, укажите этот параметр. Ниже введите ключ и нажимаем «Подключиться».
Причины
Я составил список самых частых причин, когда сеть невозможно увидеть.
- Установлены не те драйвера. По установке драйверов я оставил ссылку в самом начале статьи. При чем может быть так, что не видно только одну или несколько сетей.
- Вирусы, сторонние программы, которые мешают работе системы. Конечно в Linux данная проблема встречается реже чем на Windows, но она также есть. Бывает также, что работе модуля мешают обычные программы.
- Роутер находится слишком далеко или сигнал слишком слабый. Посмотрите, чтобы на пути волны не было сильно толстых стен, зеркал и металлических препятствий.
- Проблема в роутере – попробуйте подключиться к нему с других устройств. Если будут такие же проблемы, то сбрасываем его до заводских настроек, а потом заново настраиваем. По настройке маршрутизаторов у нас на портале также есть инструкции по настройке.
На Ubuntu
1 Решение
- Находим раздел «Параметры системы» и переходим туда.
- Далее «Программы и обновления».
- Найдите в списке тот сетевой адаптер, который используется и выберите пункт «Не используется».
- Вводим ключ и нажимаем «Аутентифицировать».
- Ждём обновления системы и перезагрузки.
- Ещё раз пробуем переподключиться.
- Если это не поможет, то полностью удалите драйвер адаптер и установите его заново.
2 Решение
sudo apt-get update
sudo apt-get upgrade
sudo apt-get install linux linux-headers-generic kernel-package
sudo apt-get install —reinstall bcmwl* firmware-b43-lpphy-installer b43-fwcutter
sudo apt-get remove bcmwl-kernel-source
sudo apt-get install firmware-b43-installer b43-fwcutter
На Mint
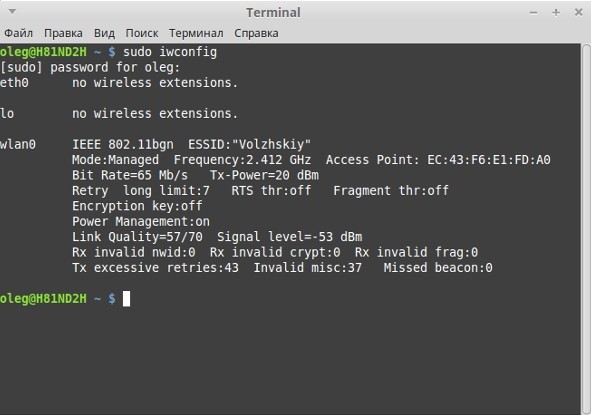
- Открываем консоль и прописываем: iwconfig, чтобы узнать о всех интерфейсах.
- Далее вводим две команды:
sudo ip link set wlan0 up
sudo iw dev wlan0 scan | less
- В первой, проверяем включенный интерфейс, второй смотрим доступные сети – авось увидим нужную.
- Теперь прописываем вручную имя сети и ключ.
sudo iw dev wlan0 connect [ИМЯ СЕТИ] key 0:[ПАРОЛЬ] network=
sudo wpa_supplicant -i wlan0 -c /etc/wpa_supplicant/wpa_supplicant.conf
sudo dhcpcd wlan0
Я как обычный человек, мог что-то упустить – так что пишите свои решения в комментариях. Также если вы нашли ошибку, то сообщите о ней там же.
How to setup WiFi in Linux Mint

Setting up WiFi in Linux Mint is pretty easy, but of course you need to setup your WiFi adapter first, which in Linux can be everything between very easy and almost impossible. In the previous chapter of this Linux Mint beginner course I explained how to install WiFi drivers in Linux Mint. It all depends on which hardware components or which laptop you have. For my Dell Latitude E7450 it was a no brainer to have a working WiFi adapter, as it was recognized by Linux Mint out of the box. This is often the case for a lot of A-class laptops, like the Lenovo ThinkPad, HP Stream, Dell XPS and Dell Latitude. But on my custom build i7 workstation it was much more difficult to come up with a working solution for several usb WiFi adapters, so that one is wired. So now it is time to setup the WiFi connection itself.
How to connect to your wireless network
I assume you have a working WiFi adapter (based on the explanation in the previous chapter How to install WiFi drivers in Linux Mint), so it is time now to setup the WiFi connection itself. When you have your Linux Mint desktop in front of you and you didn’t yet connect to your wireless network you will see the following icon on the right hand side of your panel in what we call the system indicator area. This “two arrows with a small x” icon tells you that the wireless connection is not active yet.

If the wireless connection is active then you will see the WiFi indicator. There are embedded four levels in this icon that will give you information on the strength of your received signal. In this example the strength of your signal is approximately 75%.

But let’s assume this is the first time we try to activate a WiFi connection. Start by left-clicking on the “two arrows with a small x” icon and the following screen will pop-up.
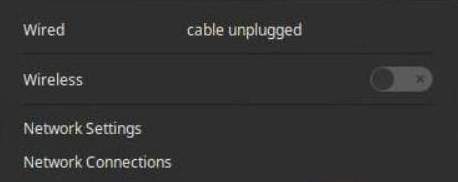
In this screen you see that both the wired and the wireless connections are not active. So click on the on/off switch on the right of the Wireless section.
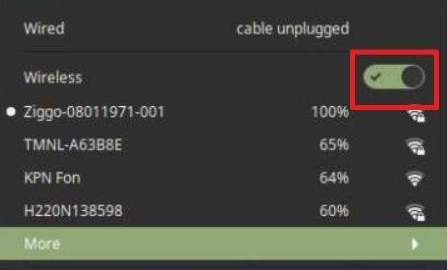
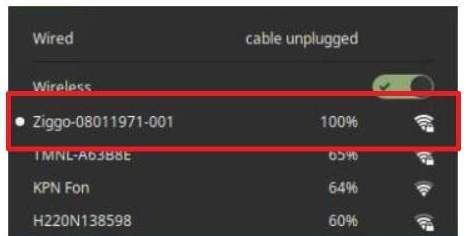
Now the activation switch will change to activated and one or more available WiFi networks will hopefully be shown with their strength levels. Here you can select your own wireless network.
When you selected your preferred wireless network, a WiFi Network Authentication pop-up will be presented to you. Give your administrator password here and click Connect.
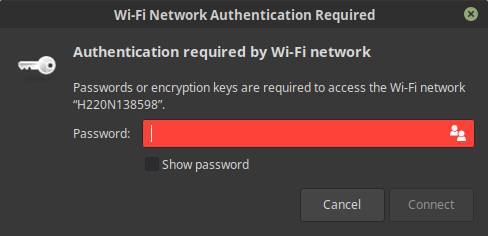
If everything goes as expected you are now connected to your wireless network and you can start surfing the web.
Use your Linux machine as hotspot
With respect to wireless connectivity Linux Mint has an additional trick under its sleeve. It is possible to use your workstation or laptop installed with a Linux Mint distribution as a wireless hotspot for other wireless devices like laptops, tablets and mobile phones. The only catch is that this Linux hotspot computer must be connected by wire to your internet router. When wireless connected your computer can’t be used as a wireless hotspot.
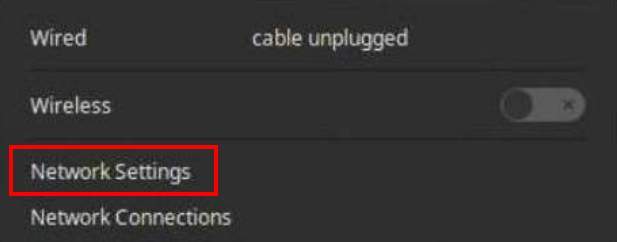
So to setup a wireless hotspot, first make sure your computer has a wired connection. Now left-click on the network icon in the system indicator area on the right hand side of the panel.

Click on Network Settings.
Now the Network settings screen will be opened. Here you find the button “Use as hotspot”.

So click on it to open the hotspot settings.
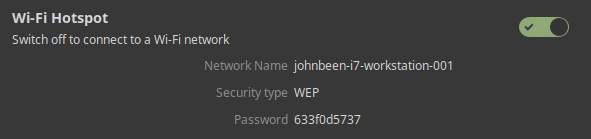
In the above screenshot you see that a Network Name has been created together with a Password. Now you simply search in the network settings of your mobile phone or tablet or another laptop for this network name and type the provided password to log in this wireless network. That’s all.
Related Posts

How to disable threaded conversations in Thunderbird

How to use Applets in Linux Mint Cinnamon – Linux Mint 21 edition
June 11, 2023 June 11, 2023

How to prevent your Linux computer from falling asleep with Caffeine
About John Been
Hi there! My name is John Been. At the moment I work as a senior solution engineer for a large financial institution, but in my free time, I am the owner of RealAppUser.com, RealLinuxUser.com, and author of my first book «Linux for the rest of us». I have a broad insight and user experience in everything related to information technology and I believe I can communicate about it with some fun and knowledge and skills.
My Linux book is available now!
Linux for the rest of us — my starter guide for all of you who just want to be productive with your Linux system. The book is available in Paperback and Kindle format. Click on the image below to see for yourself. Or maybe you want to have some information first.

Why this website
Hi, my name is John Been. I started this website because I think that many Linux-oriented websites are too technical to be of any interest for novice users or people who just want to be productive with their computer, and that scares off a potentially large group of new people to take the step to Linux. And that is a pity because Linux is a formidable platform and with the right user-centered approach Linux could get a much larger footprint. So this website tries to be different and will be simple and focused on users who just want to be productive with Linux and related software.