- How do I log all input and output in a terminal session?
- 4 Answers 4
- Linux — Local & Remote Graphical and Text Mode Console
- Logging into Local Linux Systems
- Local GUI
- Local Text Console (or Virtual Terminal)
- Logging into Remote Linux Systems
- Remote GUI
- Logging into Remote Systems with SSH (text-mode logins)
- Logging terminal commands
How do I log all input and output in a terminal session?
How do I keep logs of all the work done via terminal? For example, I want a record of all the work done on database via terminal.
4 Answers 4
When you are ready to start recording a log file, type:
Now, until you stop the script, all input and output in the Terminal will be stored in screen.log. When you are done, just type:
Your screen.log file will stored in the local directory. If you want to redirect it, use an absolute pathname such as ~/screen.log . This will do exactly what you are looking for.
Hi, thanks for the reply. But will this work if I login to the mysql database from the shell using the following sequence:- 1) script screen.log 2)mysql -u
it should work with everything running in the console reading from «standard input» (usually your keyboard) and writing to standard output (usually your terminal window). So it should include the mysql command-line client. The man page ( man script ) even mentions vi (editor).
You may want to try out Asciinema. In addition to just making a recording you get the ability to share it and embed the player on your blog, article or in a conference talk.
I have a better way to use syslog for logging every shell command this can be vary upon linux distribution but method will remain same
You need to follow some steps:
Step # 1 (Create Syslog service)
# vim /etc/rsyslog.d/bash.conf local6.* /var/log/commands.log Step # 2 (Open bashrc and enter below command)
# vim /root/.bashrc # Enable CLI Logging by Mansur 08-12-2016 whoami="$(whoami)@$(echo $SSH_CONNECTION | awk '')"export PROMPT_COMMAND='RETRN_VAL=$?;logger -p local6.debug "$whoami [$$]: $(history 1 | sed "s/^[ ]*3\+[ ]*//" ) [$RETRN_VAL]"' Ste # 3 (Restart Syslog Service)
Dec 7 22:13:00 validationdb2 mahasan: root@export [13291]: tail -f /var/log/mysql/mysql.log [0] Dec 7 22:13:09 validationdb2 mahasan: root@export [13291]: ls -lh [0] Dec 7 22:13:27 validationdb2 mahasan: root@export [13291]: touch test command [0]
Linux — Local & Remote Graphical and Text Mode Console

In this blog, we will see how to log into the local console & remote graphical and text mode consoles in Linux.
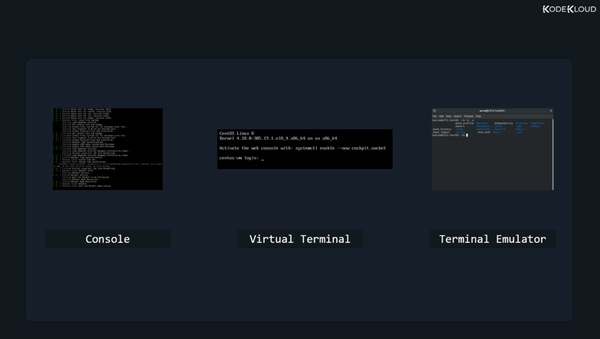
We’re all used to logging in to apps or websites by providing a username and password. Logging into a Linux system is pretty much the same, so there’s not much mystery here. We’ll look at four ways to log in:
- Log into a local Linux system (local text-mode console).
- Log into a local Linux system (local graphical-mode console).
- Log into a remote Linux system (text-mode login)
- Log into a remote Linux system (graphical-mode login)
Watch this video to learn more about Linux’s main concepts.
Let’s move back to logins. In practice, most often you’ll log in to remote Linux systems. But let’s start with the less common scenarios.
Logging into Local Linux Systems
“Local” is just a tech word for “something that is in front of you” or “something you can physically access”. A computer on your desk is local. A server running on Google Cloud is remote.
Local GUI
Usually, when Linux is installed on servers, it is installed without GUI (Graphical User Interface) components. There’s no mouse pointer, no buttons, no windows, no menus, nothing of that sort, just text. But you might sometimes run across servers that include this GUI. Logging in is super easy, as it’s all “in your face”. You’ll see a list of users you can choose from and you can then type your user’s password.
Don’t forget to log out when you’ve finished your work.
Local Text Console (or Virtual Terminal)
If the device has the typical server-oriented Linux OS installed, without any GUI components, logging in (locally) is also easy. You’ll usually see something like this on your screen:
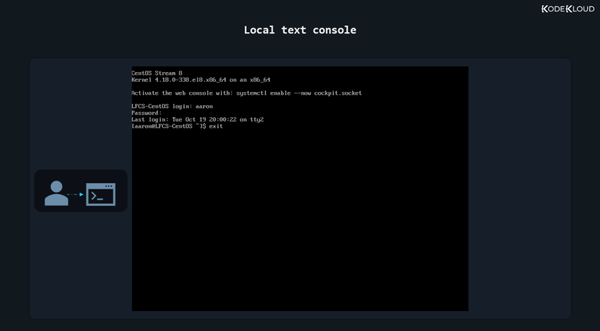
There’s no list of users this time, but you can just type your username and then your password. Note that as you type the password no text is displayed. If you’ve already done this a few times in the past, it will be no surprise. But for someone doing it for the first time, it might be misleading, giving the impression that the password is not accepted, or received, or something along those lines. It’s no issue. And if you type something wrong, you can actually press backspace to delete the last character you mistyped. Or you can press backspace multiple times to delete the whole password and type it again.
When your work is done, you should type
Logging into Remote Linux Systems
Most of your logins will be to remote systems as fewer and fewer companies keep servers on-site these days, preferring to use the cloud.
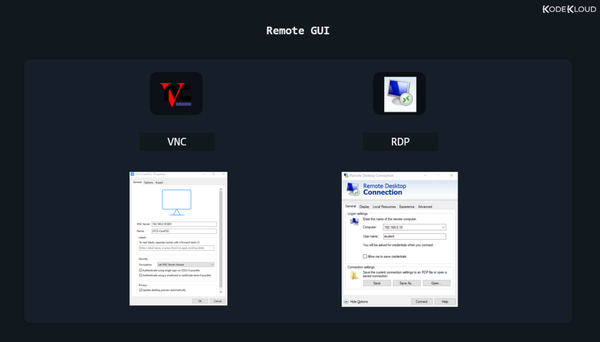
Remote GUI
Again, most Linux operating systems running on servers will have no GUI components installed. But you will sometimes run into exceptions. Connecting to a remote server, to its graphical user interface is slightly more tricky. First of all, there is no standard set in stone. Whoever configured that server chose their preferred way of dealing with these remote graphical logins. They could have chosen to install a VNC (Virtual Network Computing) solution. In this case, you’d need to download the proper VNC client (also called “VNC viewer”) to connect to it. This might be TightVNC or RealVNC or something else entirely. It all depends on the VNC server running on the remote system and what VNC clients your local operating system supports.
If the administrator of that server wanted to let Windows users connect easily, it might mean that they used a solution allowing for RDP connections (Remote Desktop Protocol). This means you can just click on the Windows start button, type “Remote Desktop Connection”, open that app, and then enter the username and password you’ve been provided.
Whatever it might be, connecting to a remote graphical console is pretty easy. It all boils down to downloading the application that lets you do that, entering the remote system’s IP address, followed by a username and a password.
Finally, we get to the most common way you’ll log into a Linux system.
Logging into Remote Systems with SSH (text-mode logins)
Initiating a text-based remote connection to a Linux system is pretty standard. That’s because almost every Linux server uses the same tool that allows for remote logins: the OpenSSH daemon (a program that runs in the background, on the server, all the time). SSH comes from Secure SHell. Until SSH, something called telnet was the standard. telnet was highly insecure as it did not encrypt communication between you and the server you were connecting to. This meant that anyone on the same network with you could steal your Linux user password and see everything you did on that server, during your telnet session. The SSH protocol uses strong encryption to avoid this and the OpenSSH daemon is built carefully to avoid security bugs as much as possible. Long story short, OpenSSH is used by millions of servers and has stood the test of time, proving to be very hard to hack. For these reasons everyone happily uses it and trusts that it can do a pretty good job at only letting authorized people log into their operating systems while keeping bad people out.
In case you’re following along on your virtual machine, log in locally (directly from the virtual machine window) and then enter this command:
You’ll see what IP your machine uses.
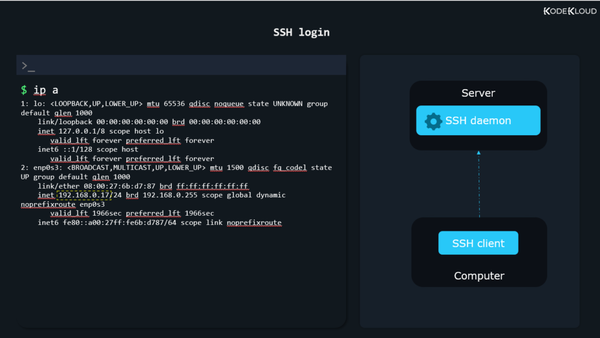
We’ll use this IP, 192.168.0.17 to simulate a situation where we have a server in a remote location.
Now to recap. We have an SSH daemon (program) running on the server. This listens for any incoming connections. To be able to connect to this remote SSH daemon, we’ll need something called an SSH client (yet another program). This client will run on our current laptop/desktop computer.
MacOS systems and Linux-based operating systems, such as Ubuntu, already have an SSH client preinstalled. If your computer/laptop had Windows on it, however, in the past, you needed to install an SSH client like PuTTY. On the latest Windows 10 this is no longer necessary as an SSH client is also preinstalled. If you’re on MacOS or Linux, open a terminal emulator window. If you’re on Windows, click the Start Menu and type “cmd” to open up Command Prompt.
To connect to a remote Linux system through SSH, type:
Of course, replace “alex” with the actual username you created inside your Linux OS running in the virtual machine. Same with the IP number.
To learn more about Linux checkout our hands-on Linux course here
To get free hands-on experience on System Administration and DevOps tasks please checkout our KodeKloud Engineer program here.
Logging terminal commands
Assuming you’re doing this for security purposes, take a look at process accounting. You didn’t say which UNIX variant you’re on, but for Linux, take a look at http://www.gnu.org/software/acct/ Beware that you will generate a lot of data as process accounting writes data about every command run system wide (its a kernel feature). Your distro probably has the utilities already; in Debian check the ‘acct’ package.
If you’re just trying to log what you did so you can go back and look at it later, script (as in the other answer) or screen (with -L) will provide a better solution. However, they will not work for security auditing because its trivial to bypass them: just run a shell script. Also, line editing makes a royal mess of the files. Curses apps (like, say, a text editor) are even worse.
Also, if you force your users through e.g., script, you may wind up capturing information (e.g., email messages) which it may be illegal for you to intercept.
One more option — sudosh or other equivalents. Not sure that they provide much benefit compared to script, but probably worthy of mention.
Process accounting is the way to go, despite it sucking up lots of disk space. It’s not something I’d leave running unless you have a very grunty box but it’s very useful for problem solving since it basically tracks every process, a claim the simpler «snapshot of ps» tools can’t match.
You basically turn it on with accton /var/account/pacct and the kernel then writes details of every process that exits, including:
- process name (not args, unfortunately).
- start time.
- elapsed time.
- user and system CPU times.
- exit code.
- memory, I/O, fault and swap statistics.
- process ID.
- parent process ID.
You shut it down with a naked accton so all you people who laughed at Windows for using a Start button to shut down, HAH !! 🙂
There are two variants of records that can be logged, v1 and v3 — make sure you’re using the latest process accounting software and v3 records as they hold more useful information. The /usr/include/linux/acct.h file shows what you can get from there.
The records are all fixed size (regardless of version) and easy to process.
We’ve just recently finished a Linux agent for our performance monitoring software — I thought I’d jot this down while it’s still fresh in my memory.
One thing to watch out for are the comp_t fields — these are actually a weird exponent/mantissa type for holding a large range of values in 16 bits — the algorithm is pretty simple for turning it into a long:
Another thing is that some values are in clock ticks, not seconds, so you have to divide by the value returned by sysconf (_SC_CLK_TCK) .