- How to Make Bluetooth Controlled car using Arduino UNO R3, H
- Video Tutorial:
- Schematics
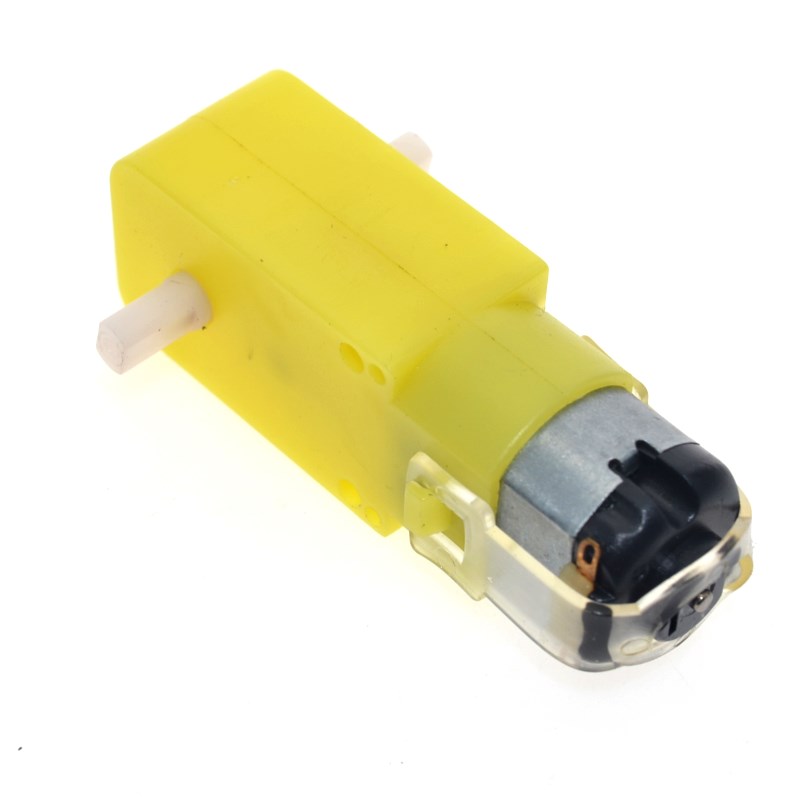
- Motor
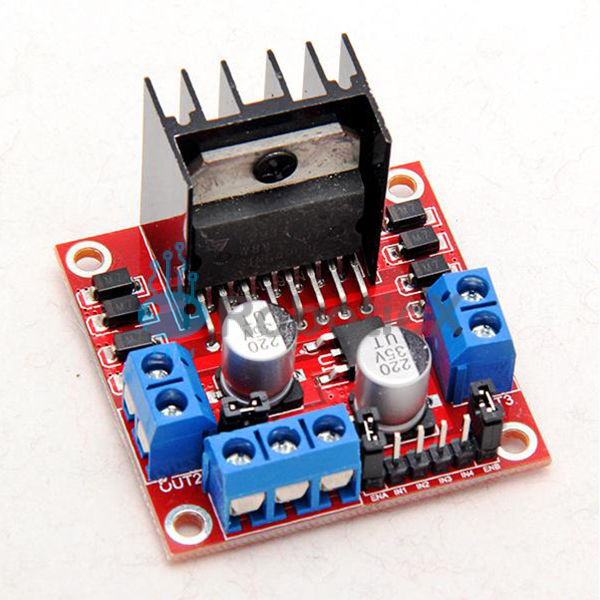
- Motor Driver
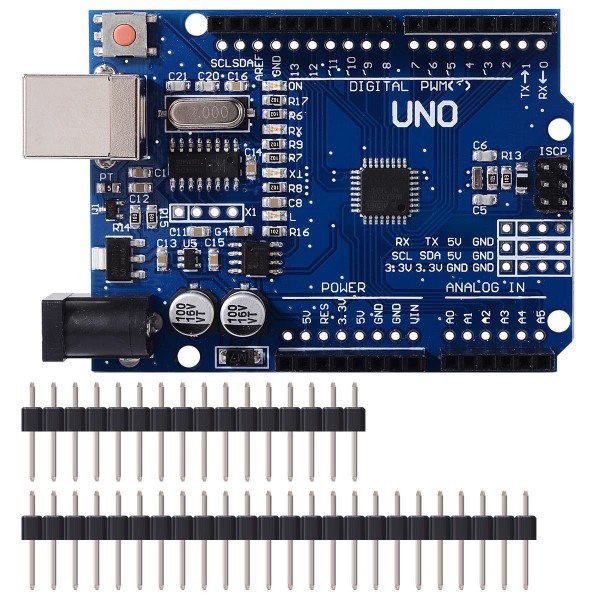
- The primary controller Arduino Uno R3:
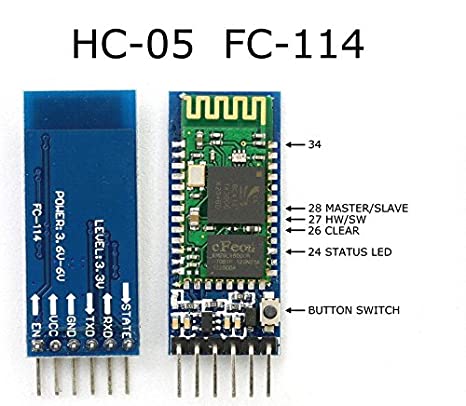
- Bluetooth module:
- Code
- Arduino Bluetooth Control Car
- Bluetooth Controlled Car using Arduino
- Main components needed for making a Bluetooth controlled car.
- Schematic for Bluetooth Controlled Car using Arduino.
- Code for controlling the Bluetooth Controlled car with Arduino.
- Android App for controlling the car.
How to Make Bluetooth Controlled car using Arduino UNO R3, H
Today in this article we will talk about How to make a Bluetooth Controlled vehicle utilizing Arduino so without burning through whenever we should make the Arduino vehicle. Arduino Bluetooth control vehicle is a straightforward robot vehicle that can be constrained by your cell phone. This Smartphone gives a Bluetooth sign to the vehicle and from the sign, the vehicle works. 0 Profit selling KN95 masks and Infrared Thermometer from UTSOURCE.net: https://www.utsource.net/home/healthcare How might I make my robot vehicle Bluetooth? Arduino Bluetooth control vehicle is a straightforward robot vehicle that can be constrained by your cell phone. This Smartphone gives a Bluetooth sign to the vehicle and from the sign, the vehicle works. For running the vehicle remotely we are utilizing the HC-05 Bluetooth module. We interface your telephone with the BlueTooth module. At that point, the telephone sends some arbitrary characters which are expressed for running the vehicle. When all is said in done, case, F is utilized for sending vehicle development. B is utilized for a retrogressive vehicle second. So also, Other characters are utilized for different headings which are referenced in the Arduino code. Make Bluetooth Controlled vehicle utilizing Arduino: For controlling the Motors we are utilizing an l298n engine driver. you can likewise utilize l293d too. I picked l298n in over l293d on the grounds that it has high force yield. In the event that you are keen on l293d Bluetooth vehicle, at that point ensure you buy into our YouTube channel. Presently for running the vehicle clearly we need a force source. In this way, For the force source, we are utilizing 18650 Lithium-particle cells. You can likewise utilize whatever other battery which is recorded beneath
Video Tutorial:
Note: You should realize that when you are transferring the code to the Arduino. You should unplug the RX and TX pin of the Bluetooth module. Else, you won’t have the option to transfer the code to the Arduino. Arduino Bluetooth vehicle circuit graph:
Programming/Coding part: For transferring the code pick the correct board. At that point pick the compose com port and afterward aggregate first and afterward transfer to Arduino. As straightforward as that. Presently introduce the application in your Android gadget and afterward open it and interface it with the Bluetooth HC 05. Presently you can see the red flickering however will be changed in green. In this way, It implies that you are associated with the Bluetooth vehicle robot. Next, you can play out the forward-in reverse Left Right capacities and you can see the inquiries working.
Schematics
Motor
For the engine area, I am utilizing a TT engine. These are some incredible for our Bluetooth control vehicle venture. Also, it has some low voltage extend like 3V to 6V. In this way, These Motors are incredible for DIY ventures. Here I have additionally included some high torque Motors well on the off chance that you need more force.
Motor Driver
Here, I have utilized for engines two Motors each site. Two side Motors are associated in equal for high torque. What’s more, the two-sided Motors links will go to the engine driver.
For the engine driver, I am utilizing a l298n H Bridge engine driver. This is some acceptable force yield so I am utilizing it. Presently simply associate two-sided engine links with the engine driver.
The primary controller Arduino Uno R3:
For the controller, I am utilizing an essential Arduino microcontroller for example Arduino Uno R3. Presently utilized twofold sided tape for joining it on the wood. Furthermore, presently I have associated the information distribution center with the l298n engine driver for sending the peruser totes which will drive the engine.
Bluetooth module:
For the Bluetooth module, I am utilizing HC 05 Bluetooth module. You can likewise utilize a HC-06 Bluetooth module also. For keeping it basic I am utilizing it.
Code
Arduino Bluetooth Control Car
This program is used to control a robot using a app
that communicates with Arduino through a bluetooth module.
/* Code Name: Arduino Bluetooth Control Car Code URI: https://circuitbest.com/category/arduino-projects/ Author: Make DIY Author URI: https://circuitbest.com/author/admin/ Description: This program is used to control a robot using a app that communicates with Arduino through a bluetooth module. App URI: https://bit.ly/2BlMAea Version: 1.0 License: Remixing or Changing this Thing is allowed. Commercial use is not allowed. */ #define in1 5 //L298n Motor Driver pins. #define in2 6 #define in3 10 #define in4 11 #define LED 13 int command; //Int to store app command state. int Speed = 204; // 0 - 255. int Speedsec; int buttonState = 0; int lastButtonState = 0; int Turnradius = 0; //Set the radius of a turn, 0 - 255 Note:the robot will malfunction if this is higher than int Speed. int brakeTime = 45; int brkonoff = 1; //1 for the electronic braking system, 0 for normal. void setup() pinMode(in1, OUTPUT); pinMode(in2, OUTPUT); pinMode(in3, OUTPUT); pinMode(in4, OUTPUT); pinMode(LED, OUTPUT); //Set the LED pin. Serial.begin(9600); //Set the baud rate to your Bluetooth module. > void loop() if (Serial.available() > 0) command = Serial.read(); Stop(); //Initialize with motors stoped. switch (command) case 'F': forward(); break; case 'B': back(); break; case 'L': left(); break; case 'R': right(); break; case 'G': forwardleft(); break; case 'I': forwardright(); break; case 'H': backleft(); break; case 'J': backright(); break; case '0': Speed = 100; break; case '1': Speed = 140; break; case '2': Speed = 153; break; case '3': Speed = 165; break; case '4': Speed = 178; break; case '5': Speed = 191; break; case '6': Speed = 204; break; case '7': Speed = 216; break; case '8': Speed = 229; break; case '9': Speed = 242; break; case 'q': Speed = 255; break; > Speedsec = Turnradius; if (brkonoff == 1) brakeOn(); > else brakeOff(); > > > void forward() analogWrite(in1, Speed); analogWrite(in3, Speed); > void back() analogWrite(in2, Speed); analogWrite(in4, Speed); > void left() analogWrite(in3, Speed); analogWrite(in2, Speed); > void right() analogWrite(in4, Speed); analogWrite(in1, Speed); > void forwardleft() analogWrite(in1, Speedsec); analogWrite(in3, Speed); > void forwardright() analogWrite(in1, Speed); analogWrite(in3, Speedsec); > void backright() analogWrite(in2, Speed); analogWrite(in4, Speedsec); > void backleft() analogWrite(in2, Speedsec); analogWrite(in4, Speed); > void Stop() analogWrite(in1, 0); analogWrite(in2, 0); analogWrite(in3, 0); analogWrite(in4, 0); > void brakeOn() //Here's the future use: an electronic braking system! // read the pushbutton input pin: buttonState = command; // compare the buttonState to its previous state if (buttonState != lastButtonState) // if the state has changed, increment the counter if (buttonState == 'S') if (lastButtonState != buttonState) digitalWrite(in1, HIGH); digitalWrite(in2, HIGH); digitalWrite(in3, HIGH); digitalWrite(in4, HIGH); delay(brakeTime); Stop(); > > // save the current state as the last state, //for next time through the loop lastButtonState = buttonState; > > void brakeOff() >
Bluetooth Controlled Car using Arduino
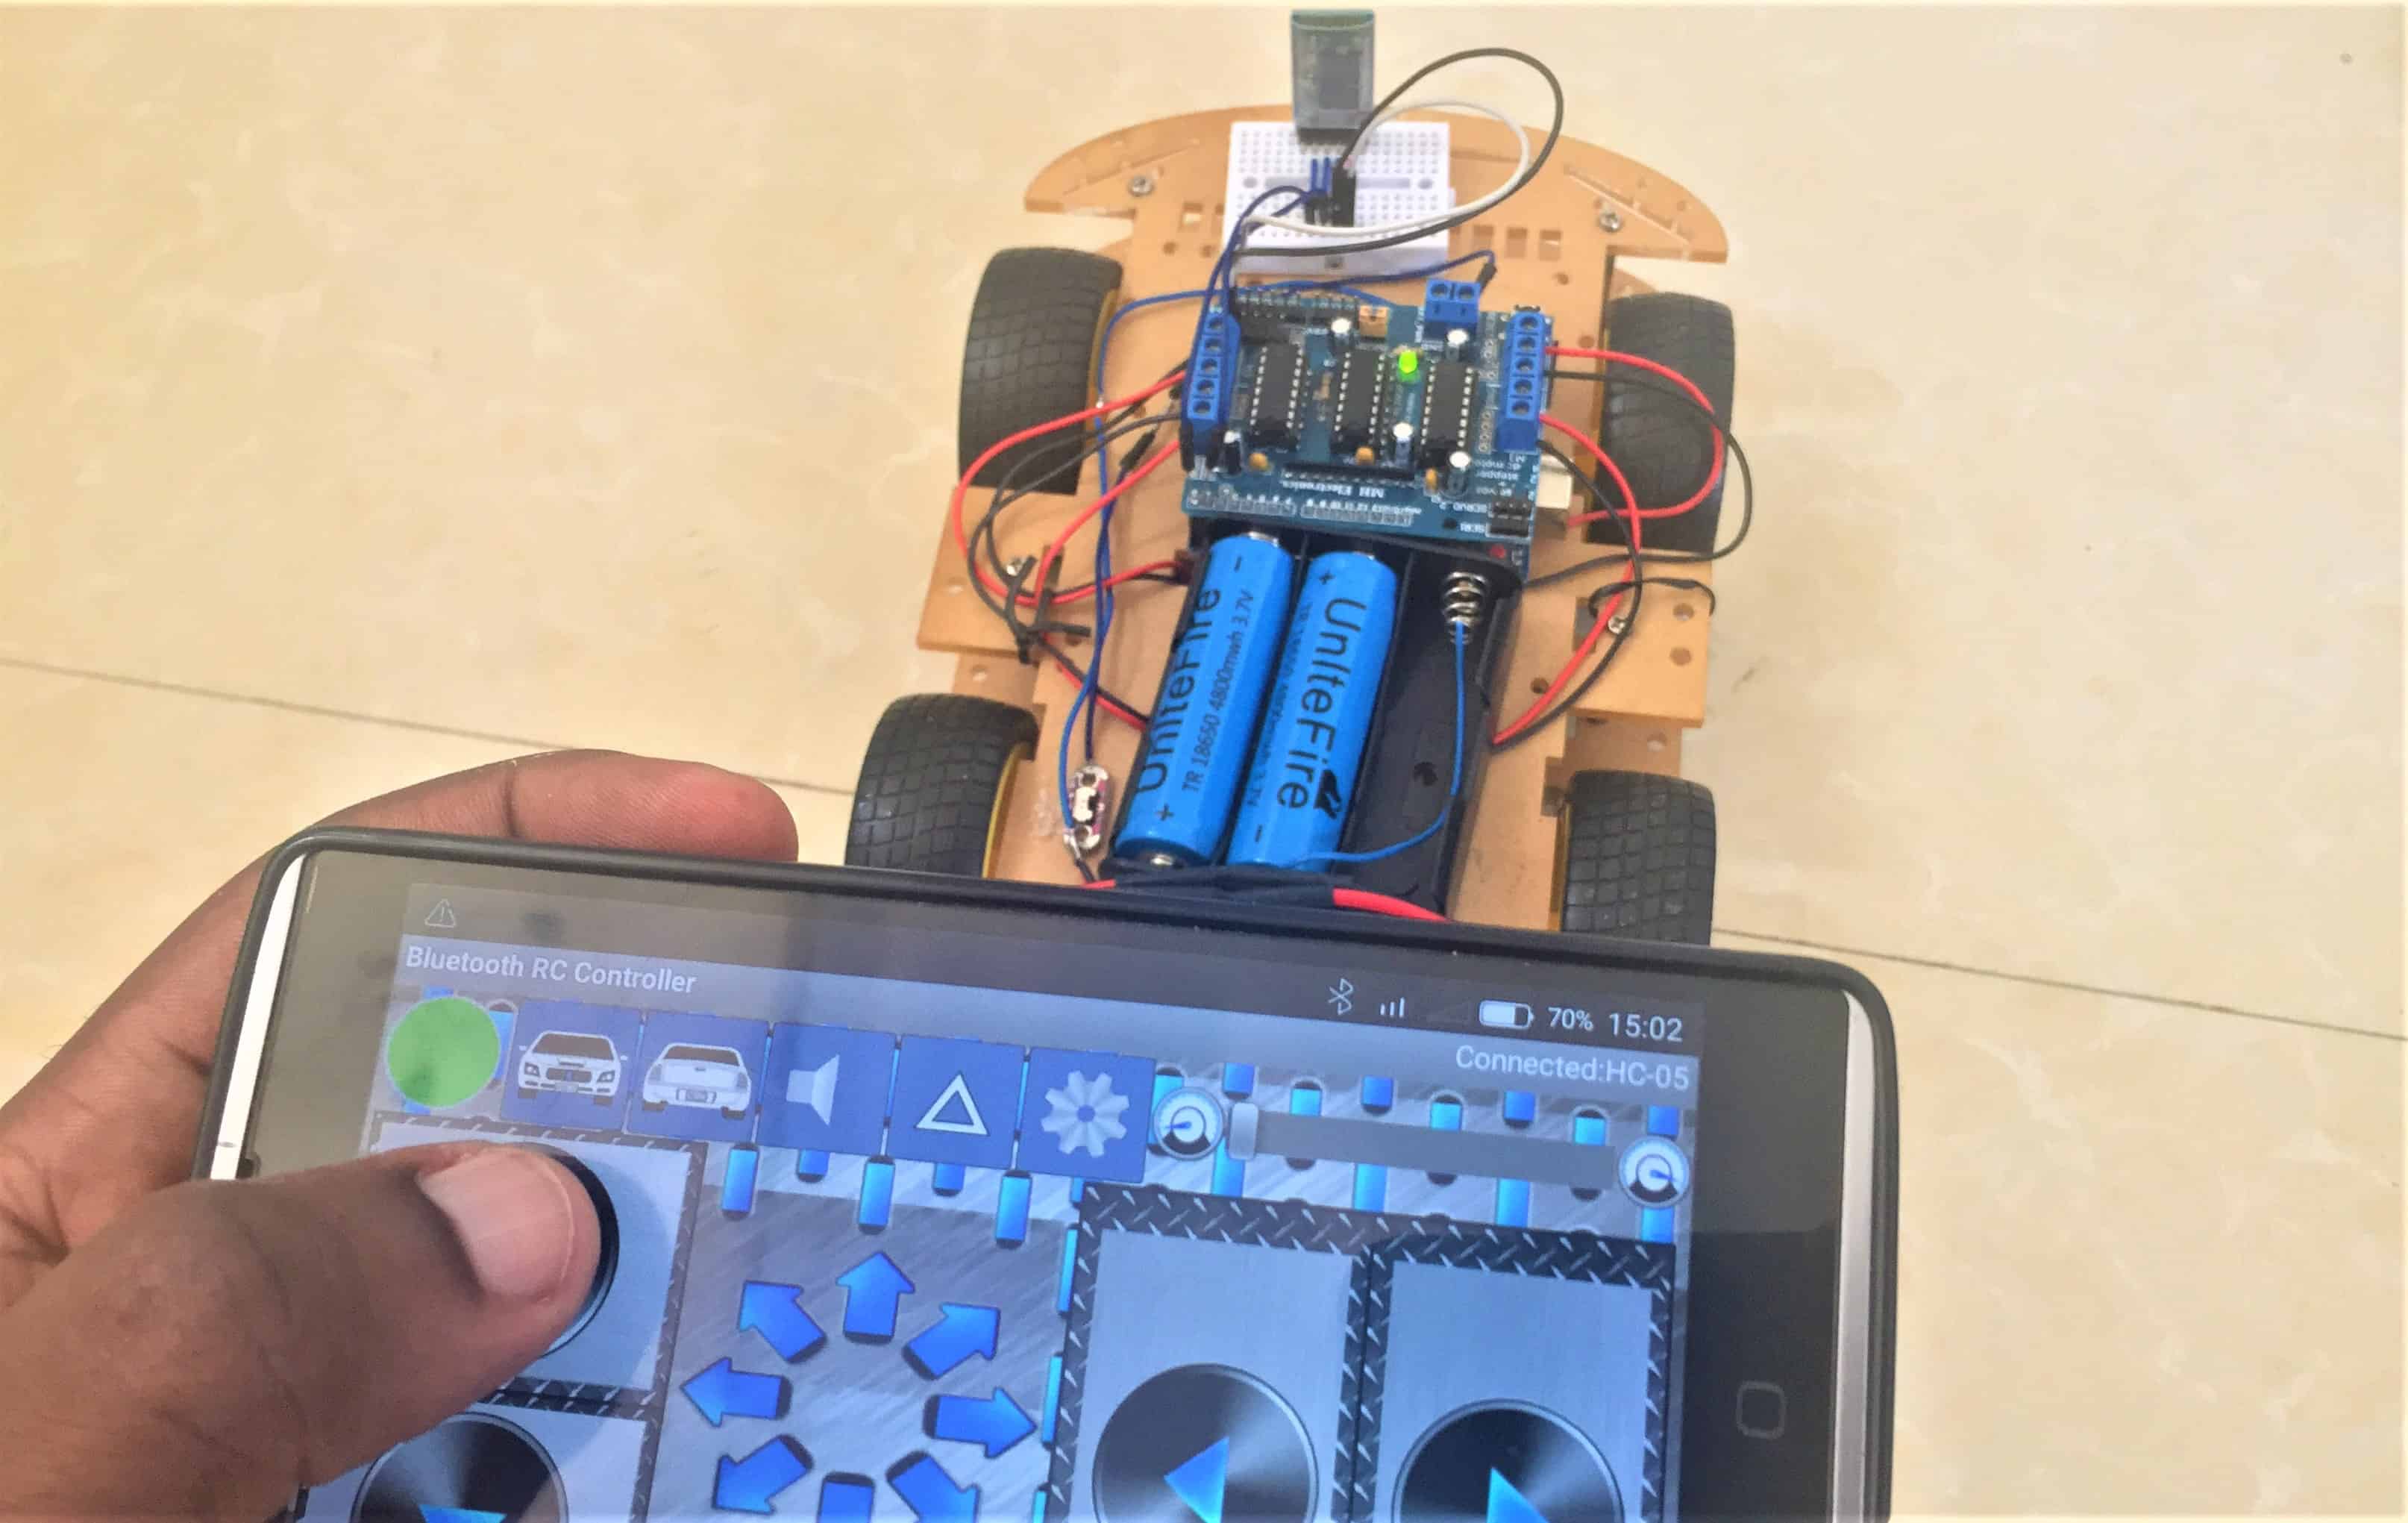
In this project, we will learn how to make a bluetooth controlled car using Arduino. we will be using HC-05 Bluetooth Module and L293D Motor Driver Module. To enable bluetooth communication, we will use a smart phone and a simple Android app to control the car.
Before proceeding with this tutorial, it’s good to go through my other tutorials on HC-05 Bluetooth module and L293D Motor Driver module.
Main components needed for making a Bluetooth controlled car.
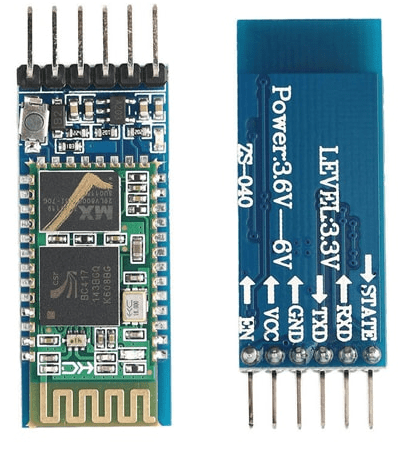
The HC-05 Bluetooth Module is responsible for enabling Bluetooth communication between Arduino and the Android Phone.
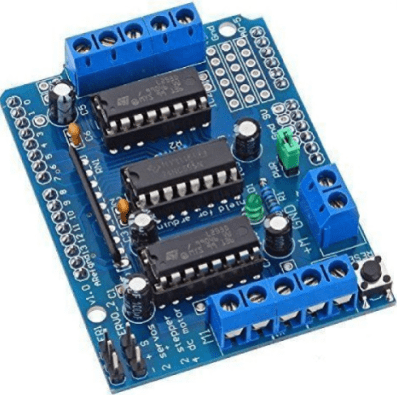
The L293D Motor Driver module is responsible for providing the necessary current to drive the motors of the car.
Schematic for Bluetooth Controlled Car using Arduino.
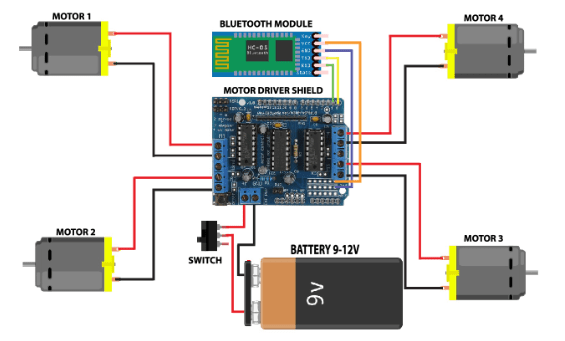
The RX and TX pins of the Bluetooth module are connected after uploading the code to the Arduino.
This setup requires sufficient power supply to be able to run the four motors and the Bluetooth Module. If the power is not sufficient, even though the Bluetooth Module powers on, it cannot transmit data or cannot be paired with other Bluetooth devices. I recommend using rechargeable batteries that can supply a steady current for a longer period of time.
Code for controlling the Bluetooth Controlled car with Arduino.
Since we are using the L293D motor driver shield, we have to use the AFMotor.h library which contains the commands for driving the four dc motors attached to the shield.
#include //initial motors pin AF_DCMotor motor1(1); AF_DCMotor motor2(2); AF_DCMotor motor3(3); AF_DCMotor motor4(4); char command; void setup() < Serial.begin(9600); //Set the baud rate to your Bluetooth module. >void loop() < if(Serial.available() >0) < command = Serial.read(); Stop(); //initialize with motors stoped //Change pin mode only if new command is different from previous. //Serial.println(command); switch(command)< case 'F': forward(); break; case 'B': back(); break; case 'L': left(); break; case 'R': right(); break; >> > void forward() < motor1.setSpeed(255); //Define maximum velocity motor1.run(FORWARD); //rotate the motor clockwise motor2.setSpeed(255); //Define maximum velocity motor2.run(FORWARD); //rotate the motor clockwise motor3.setSpeed(255);//Define maximum velocity motor3.run(FORWARD); //rotate the motor clockwise motor4.setSpeed(255);//Define maximum velocity motor4.run(FORWARD); //rotate the motor clockwise >void back() < motor1.setSpeed(255); //Define maximum velocity motor1.run(BACKWARD); //rotate the motor anti-clockwise motor2.setSpeed(255); //Define maximum velocity motor2.run(BACKWARD); //rotate the motor anti-clockwise motor3.setSpeed(255); //Define maximum velocity motor3.run(BACKWARD); //rotate the motor anti-clockwise motor4.setSpeed(255); //Define maximum velocity motor4.run(BACKWARD); //rotate the motor anti-clockwise >void left() < motor1.setSpeed(255); //Define maximum velocity motor1.run(BACKWARD); //rotate the motor anti-clockwise motor2.setSpeed(255); //Define maximum velocity motor2.run(BACKWARD); //rotate the motor anti-clockwise motor3.setSpeed(255); //Define maximum velocity motor3.run(FORWARD); //rotate the motor clockwise motor4.setSpeed(255); //Define maximum velocity motor4.run(FORWARD); //rotate the motor clockwise >void right() < motor1.setSpeed(255); //Define maximum velocity motor1.run(FORWARD); //rotate the motor clockwise motor2.setSpeed(255); //Define maximum velocity motor2.run(FORWARD); //rotate the motor clockwise motor3.setSpeed(255); //Define maximum velocity motor3.run(BACKWARD); //rotate the motor anti-clockwise motor4.setSpeed(255); //Define maximum velocity motor4.run(BACKWARD); //rotate the motor anti-clockwise >void Stop() < motor1.setSpeed(0); //Define minimum velocity motor1.run(RELEASE); //stop the motor when release the button motor2.setSpeed(0); //Define minimum velocity motor2.run(RELEASE); //rotate the motor clockwise motor3.setSpeed(0); //Define minimum velocity motor3.run(RELEASE); //stop the motor when release the button motor4.setSpeed(0); //Define minimum velocity motor4.run(RELEASE); //stop the motor when release the button >Android App for controlling the car.
In order to control the car using a mobile phone, we need to install an application to enable Bluetooth communication between the Arduino board and the car. This App can be downloaded from here.
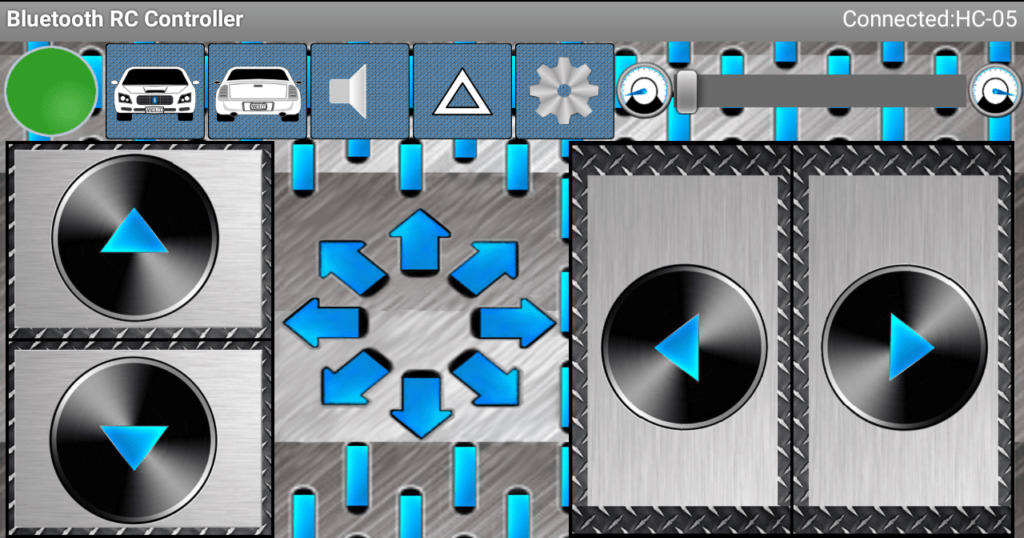
The Android application controls are as shown above. The car will move in the direction depending on the arrow pressed.
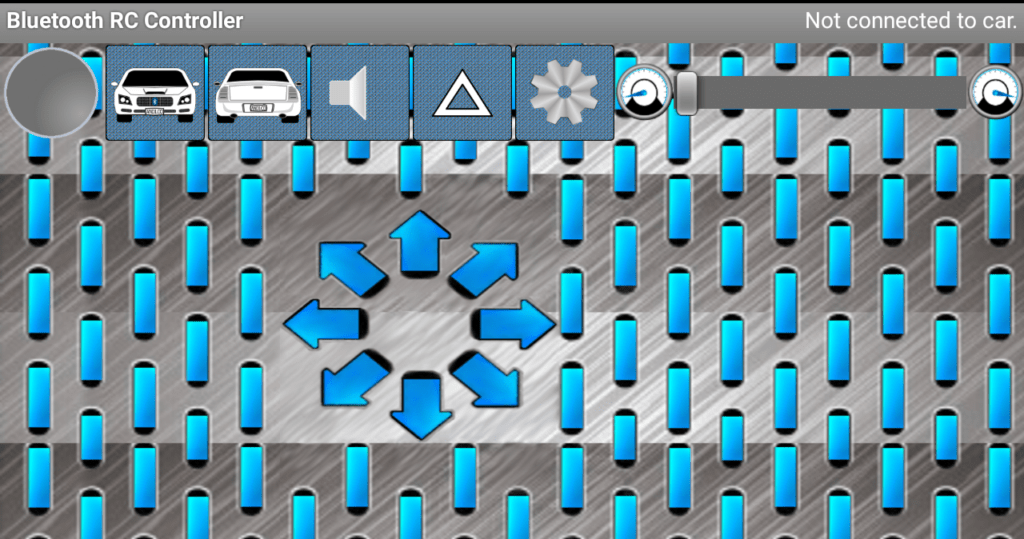
This application also supports accelerometer control which means the movement of the car is determined by the direction in which the phone is tilted.
