- Tutorial 9: Device control using smart phone’s Bluetooth and ATtiny85
- Saved searches
- Use saved searches to filter your results more quickly
- License
- tjntomas/MI-Bluetooth-Remote-for-Home-Assistant
- Name already in use
- Sign In Required
- Launching GitHub Desktop
- Launching GitHub Desktop
- Launching Xcode
- Launching Visual Studio Code
- Latest commit
- Git stats
- Files
- README.md
- About
- How to Manage Bluetooth Devices on Linux Using bluetoothctl
- Checking Bluetooth Status
- Scanning for Nearby Devices
- Connecting to Your Device
Tutorial 9: Device control using smart phone’s Bluetooth and ATtiny85
In this tutorial series, we have learned about interfacing potentiometer to get analog input, interfacing of RGB LED by generating PWM output, DC Motor speed control using PWM output, and some other things.
This tutorial explains the serial communication of ATtiny85 with Bluetooth module HC05. ATtiny85 does not have built-in UART or USART with Rx and Tx pins, but it supports configurable USI (universal serial interface). The Arduino programming allows us to use digital IO pins as Tx and Rx pins using SoftwareSerial library. So using this library, we shall make pin 7 (PB2) and pin 2 (PB3) of ATtiny85 work as Rx and Tx pins. The Bluetooth module HC05 communicates with ATtiny85 using these Tx and Rx pins.
The more interesting part is yet to come. The HC05 module gets commands from any smartphone Bluetooth through the Android app – that sends commands from the phone’s built-in Bluetooth. So the smartphone sends a command to ATtiny85 via the HC05 module to control any device. Sounds interesting? Let’s see how it is done.
If you are not following the series from the beginning, you should go through the following two tutorials that explain and demonstrate how to work with ATtiny85 and step by step guide to build hello world (LED blinking) application.
Circuit diagram

Circuit connections
The circuit is built using only three components HC05 module, relay module, and ATtiny85. HC05 (Bluetooth module) has four interfacing pins (1) Vcc (2) GND (3) Tx, and (4) Rx. Tx pin is connected with PB2 (pin 7), and Rx pin is connected with PB3 (pin 2). Vcc pin is connected with 5V, and GND pin is connected to pin four connected to ground. The relay module has three interfacing pins (1) Vcc, (2) GND, and (3) IN. Vcc pin is connected with 5V because the relay is of 5V. GND pin is connected to pin 4 of ATtiny85. PB0 pin is connected to IN pin to switch relay ON/OFF. A 5 V supply is given in the circuit.
Note: one may connect any AC (or DC) device with relay to its contact terminals so that when the relay is switched ON/OFF, the device will be turned ON/OFF
Circuit operation
- When a 5V supply is sent to the circuit, the relay is OFF (so the device will also be OFF). The HC05 module will start blinking to indicate it is searching for another Bluetooth device to which it will be paired (connected)
- The person, who wants to control the device, will first open the Android application by having Bluetooth data sending facility in his smartphone (you may get so many such applications in Google play store. search for “Bluetooth control for Arduino”). This application will search and pair with HC05 module (for pairing 1 st time, it is required to enter Bluetooth passkey for HC05 module, which is by default 1234). When the smartphone get connected with the HC05 module, its blinking rate will be slow
- Now type and send ‘1’ from the application. The phone Bluetooth will send this ‘1’ to the HC05 module
- HC05 module will receive this ‘1’ and gives it to ATtiny85 through serial communication
- When ATtiny85 gets command 1, it will turn ON relay by sending high to pin PB0. The device connected with the relay is also turned ON
- Now to turn OFF the device (relay), the person has to send the command ‘0’ from the smartphone
- Thus, the device is turned ON / OFF by sending commands through the smartphone
Program
The program is written in Arduino IDE software using the C programming language. It is compiled, and a HEX file is created that is downloaded into the internal FLASH of ATtiny85
Program logic
Initially, the program sends a message to the user’s smartphone that phone Bluetooth is connected with HC05 and sends command 1/0 to turn ON/OFF the device.
Then it waits for any data available from the serial port. If the ‘1’ or ‘0’ command is received, it will switch ON/OFF the relay by sending HIGH/LOW to the relay module input pin. Also, it sends a message to the user’s smartphone that the device is ON/OFF.
In the next tutorial, we shall learn to build a wireless sensor data logger.
Saved searches
Use saved searches to filter your results more quickly
You signed in with another tab or window. Reload to refresh your session. You signed out in another tab or window. Reload to refresh your session. You switched accounts on another tab or window. Reload to refresh your session.
Use a bluetooth remote control with Home Assistant
License
tjntomas/MI-Bluetooth-Remote-for-Home-Assistant
This commit does not belong to any branch on this repository, and may belong to a fork outside of the repository.
Name already in use
A tag already exists with the provided branch name. Many Git commands accept both tag and branch names, so creating this branch may cause unexpected behavior. Are you sure you want to create this branch?
Sign In Required
Please sign in to use Codespaces.
Launching GitHub Desktop
If nothing happens, download GitHub Desktop and try again.
Launching GitHub Desktop
If nothing happens, download GitHub Desktop and try again.
Launching Xcode
If nothing happens, download Xcode and try again.
Launching Visual Studio Code
Your codespace will open once ready.
There was a problem preparing your codespace, please try again.
Latest commit
Git stats
Files
Failed to load latest commit information.
README.md
Use a bluetooth remote control connected to a linux device with Home Assistant
NOTE: There is a dockerized version here that might suit some persons better. Docker version of bluetooth remote for HA
I wanted to be able to use a spare Xiaomi MI Remote control and get the keypresses as events into Home Assistant so I can use it as general purpose remote. The remote I used can be bought for around $12 on banggood.com or wish.com. Mi bluetooth remote

The cheap WeChip G20S remotes will also work: WeChip remote
I paired the remote control with a NUC running Ubuntu that I use as a media player, but a Raspberry Pi or any other maching running a linux OS should work. I then wrote a simple python3 script to listen to the remote keypress events and send the events to Home Assistant.
To use the script, you need to:
- Install the dependencies in the script. They should all be present on your system with the exception of the evdev module which you can find here. https://pypi.org/project/evdev/
- Look in /dev/input and make a note of the highest numbered device
- Pair the remote control to the computer, as you would pair any bluetooth device.
- Look again in /dev/input and make note of the new device that has been created. This is your bluetooth remote control.
- Fill in the name of the path to your remote control device in the python script, i.e. /dev/input/event9
- Add the details for your Home Assistant instance in the script.
In total, you will need to edit the following lines in the script:
BASE_API = "http://192.168.1.20:8123/api/" # URL to your HA instance. DEV_INPUT = "/dev/input/event9" API_KEY = "A valid HA long-lived access token" HA_EVENT_NAME = "mi_bt_remote" # Arbitrary name of the event that will get fired. GRAB_DEVICE = False # Set to True to lock the device to this script. The system will not receive any events from the device. # i.e, the remote will not work as a volume control by default.
sudo python3 bt_remote_event.py
to see that it works. Sudo is necessary to access the input device. Then, in Home Assistant, you can subscribe to the mi_bt_remote event in developer tools.
Now, set up the script as a daemon by copying the btmon.service file to your service directory. You need to edit the path to the python script in the service file. Enable the service and start it. The service need to run as user root.
You can now use the events as triggers in automations in Home Assistant.
About
Use a bluetooth remote control with Home Assistant
How to Manage Bluetooth Devices on Linux Using bluetoothctl
Want to learn how to manage and connect to Bluetooth devices on Linux? Here’s what you need to know about bluetoothctl.

Readers like you help support MUO. When you make a purchase using links on our site, we may earn an affiliate commission. Read More.
Bluetooth is one of the most effective ways of connecting multiple hardware devices to your computer wirelessly. Knowing how to manage Bluetooth devices is vital as more wireless gadgets are gaining recognition among users.
Bluetoothctl is an interactive and easy-to-use tool for controlling Bluetooth devices. It is the main utility for managing Bluetooth on Linux-based operating systems. This guide will show you how to easily set up Bluetooth devices and connections on your Linux PC using bluetoothctl.
Checking Bluetooth Status
Before you can add Bluetooth devices, the Bluetooth service on your computer must be up and running. You can check it with the help of the systemctl command.
sudo systemctl status bluetooth 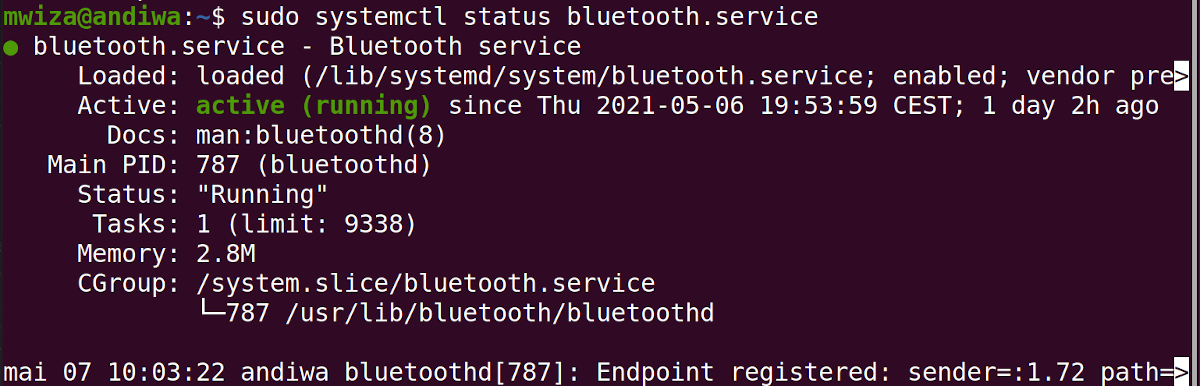
If the Bluetooth service status is not active you will have to enable it first. Then start the service so it launches automatically whenever you boot your computer.
sudo systemctl enable bluetooth
sudo systemctl start bluetooth
If you do not have built-in Bluetooth on your PC, you can easily add Bluetooth using external Bluetooth adapters.
Scanning for Nearby Devices
To actively search for Bluetooth devices that you can connect to, use the scan command as follows:
When you run the command above, your PC will look for and list all the Bluetooth devices that are within the reach of your system.
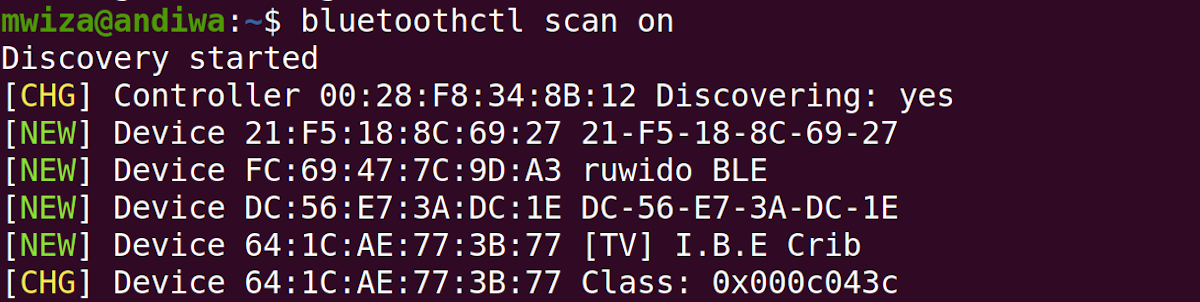
All Bluetooth devices are labeled as Device followed by their respective Media Access Control (MAC) addresses, a unique identifier for a device on a network. The MAC address follows the format XX : XX : XX : XX : XX : XX. Bluetoothctl also displays the name of the device, for example, ruwido BLE in the output above.
Note: If you can’t find the Bluetooth device you are looking for, make sure that your system Bluetooth is discoverable.
To make your Bluetooth adapter discoverable to other devices, use the following command:
bluetoothctl discoverable on Connecting to Your Device
Now that you have a list of Bluetooth devices you can connect to, use the MAC address to connect to a particular device.
The simplest way to connect with a Bluetooth device is to pair it with your PC using the pair command.
bluetoothctl pair FC:69:47:7C:9D:A3 Note: Remember to replace the MAC address FC:69:47:7C:9D:A3 used in this guide with the respective MAC address of your device.
If the device you are connecting to has a GUI interface, for example, a smartphone, the device will display a prompt asking you to accept the connection. The system will also ask you to confirm the pairing on your PC. You can do so by typing yes in the command line.