- How to Copy Files and Directories in Linux [14 cp Command Examples]
- Cp Command Syntax
- 1. How to Copy a File in Linux
- 2. Show Copy Command Progress
- 3. How to Copy Multiple Files to the Directory
- 4. How to Avoid Overwriting the File
- 5. How to Overwrite the File with Confirmation
- 6. Overwrite File Only if the Source Is Newer
- 7. How to Backup File Before Overwriting
- 8. How to Force Copy to Overwrite File
- 9. How to Remove the Destination File Before Copying
- 10. How to Create a Hard Link File Instead of Copying
- 11. How to Create a Soft Link File Instead of Copying
- 12. How to Preserve the File Attributes While Copying
- 13. How to Perform Copy Operation Recursively
- 14. How to Copy Multiple Directories
- replace a whole file with another file in bash
- 4 Answers 4
How to Copy Files and Directories in Linux [14 cp Command Examples]
Brief: In this easy-to-follow guide, we will discuss some practical examples of the cp command. After following this guide, users will be able to copy files and directories easily in Linux using the command line interface.
As Linux users, we interact with the files and directories from time to time. One common operation users perform is copying files and directories. Certainly, we can use a graphical file manager to perform the copy operation. However, most Linux users prefer to use the cp command due to its simplicity and rich functionality.
In this beginner-friendly guide, we will learn about the cp command. As the name suggests, the cp command is used to copy files and directories at a given path.
Throughout this guide, we will understand the usage of the cp command using practical examples that can be used on a day-to-day basis.
Cp Command Syntax
The syntax of the cp command is identical to other Linux commands. At a high level, it is divided into two parts – options and arguments:
In the above syntax, the square brackets ([]) represent the optional arguments whereas angular brackets (<>) represent the mandatory arguments.
1. How to Copy a File in Linux
One of the basic use of the cp command is to copy a file into a current directory. Most of the time users perform this operation to take a backup of the important configuration.
For example, we often create a backup copy of /etc/ssh/sshd_config file before updating the SSH configuration.
To understand the usage, let’s create a simple file:
Next, create a copy of the file using the following command:

2. Show Copy Command Progress
In the previous example, we used the ls command to verify whether or not the file copy operation succeeded. However, it doesn’t make sense to use one more command just to verify the result of the previous commands.
In such cases, we can enable the verbose mode using the -v option, which provides diagnostics for every processed file.
Let’s make a copy of the file-1.txt file using the following command:

In the above output, the arrow represents the file that is being copied. The left side argument is the source file whereas the right side argument is the destination file.
3. How to Copy Multiple Files to the Directory
So far we worked with a single file and the current working directory only. However, in the real production environment, we have to work with a large number of files. One of the common use cases in such environments is to copy multiple files into a single directory.
Obviously, we can execute the cp command multiple times to achieve it, but that won’t be the most effective way. To perform such an operation effectively, we can use an alternative syntax of the cp command.
So, first, create a new directory with the name dir-1:
Now, let’s copy all three files into the dir-1 directory using the single command:
$ cp -v file-1.txt file-2.txt file-3.txt dir-1

The above output shows that all files have been copied to the dir-1 directory. Also, it is important to note that, to use this alternative syntax the directory must be present already and it must be the last argument of the command.
4. How to Avoid Overwriting the File
By default, the cp command replaces the destination file, which means it will overwrite the file if it exists at the destination with the same name. However, we can disable this default behavior using the -n option.
To understand this, let’s try to overwrite the existing file:
In this example, we have used the -v option to illustrate that the file-2.txt file hasn’t been overwritten.
5. How to Overwrite the File with Confirmation
In the previous example, we saw how to avoid the overwriting of the destination file. However, sometimes we want to overwrite the file destination in a safer way.
In such cases, we can use the -i option of the command to make the copy operation interactive. This option shows the warning message and waits for the user’s confirmation before overwriting the file.
To illustrates this, let’s try to overwrite the existing file:
$ cp -i file-1.txt file-2.txt cp: overwrite 'file-2.txt'?
As we can see, the command is waiting for confirmation. Just like other Linux commands, we can use ‘y’ to continue or ‘n’ to abort the operation.
This default non-interactive behavior of the cp command is not very safe. There are chances that the user might overwrite an important configuration by mistake. Hence some of the Linux distributions enforce the interactive behavior by default using the alias command:
6. Overwrite File Only if the Source Is Newer
In the previous example, we saw how to use the interactive mode. However, sometimes, a user might overwrite the newer file inadvertently.
To avoid such error-prone cases, we can use the -u option, which attempts copy operation only if the source is newer than the destination or if the file is not present at the destination.
First, update the timestamp of the source file:
$ touch -t 10101010 file-1.txt $ ls -l file-1.txt
In the above example, we have used the -t option of the touch command to set the timestamp of the file to 10-Oct-2010.
Next, let’s update the timestamp of the destination file to the current time:
Now, let’s try to perform copy operation using the -u option:
Here, we can see that copy operation hasn’t been attempted because the destination file is newer than the source.
Finally, let’s swap the source and destination arguments and perform the copy operation:
In the above output, we can observe that copy operation succeeds because the source file is newer than the destination.

7. How to Backup File Before Overwriting
We can instruct the cp command to take a backup of the destination file before overwriting it. To achieve this we can use the —backup option, which performs automated backups.
$ cp --backup=numbered -v file-1.txt file-2.txt
In this example, we have used the numbered backup policy. This policy uses incremental numbers in the backup file names.
To understand this, let’s execute the same command multiple times and observe the output:
$ cp --backup=numbered -v file-1.txt file-2.txt $ cp --backup=numbered -v file-1.txt file-2.txt $ cp --backup=numbered -v file-1.txt file-2.txt

8. How to Force Copy to Overwrite File
In the previous few examples, we saw how to overwrite the file in a safer way. However, in some rare cases, the requirement is to overwrite the file. However, there isn’t a guarantee that the operation will succeed every time.
For example, the copy operation will fail if the destination file doesn’t have the write permissions. Let’s illustrate this with an example.
First, change the permissions of the destination file:
$ chmod 444 file-2.txt $ ls -l file-2.txt
Now, let’s try to overwrite the file-2.txt file:
In the above output, we can see that the command has failed with the permission denied error.
To overcome this limitation, we can use the -f option, which deletes the destination files and attempts the copy operation if the destination file cannot be opened.
Now, let’s use the -f option to overwrite the file forcefully:
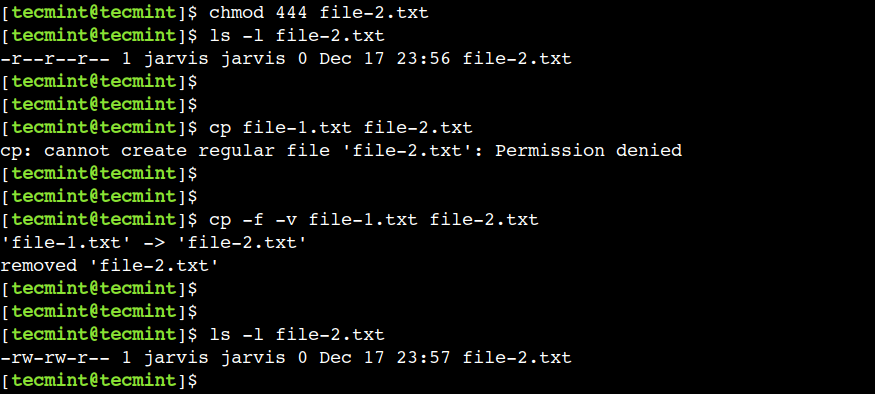
9. How to Remove the Destination File Before Copying
In the previous example, we saw how to remove the destination file if there is an error while operating it. However, sometimes the requirement is to remove the destination file first and then perform the copy operation.
To fulfill such a requirement, we can use the —remove-destination option.
$ cp --remove-destination -v file-1.txt file-2.txt

In the above output, we can see that the cp command first removes the destination file and then performs the copy operation.
10. How to Create a Hard Link File Instead of Copying
We can create a hard link instead of creating a new copy of the source file. This option plays an important role when there is a scarcity of disk space.
So, let’s use the -l option to create a hard link:
Now, let’s check the inode numbers of both files to verify the hard links:

In the above output, the numbers in the first column represent the inode numbers.
11. How to Create a Soft Link File Instead of Copying
In a similar way, we can create a soft link instead of creating a new copy using the -s option as shown below:
Now, let’s verify that the symbolic link has been created correctly:

In the above output, the last columns represent the symbolic link relation.
12. How to Preserve the File Attributes While Copying
There are various attributes associated with the file, such as its access time, modification time, permissions, etc. By default, these attributes are not preserved while copying the file. To override this default behavior we can use the -p option.
To understand this, first, update the timestamp of the file-1.txt:
$ touch -t 10101010 file-1.txt
Now, let’s create a copy of this file by preserving all its attributes:
Finally, verify the timestamp of the file-6.txt file:


13. How to Perform Copy Operation Recursively
So far we saw how to copy a single file. However, often times we have to copy all files and sub-directories of the particular directory.
In such cases, we can use the recursive mode either using the -r or -R option.
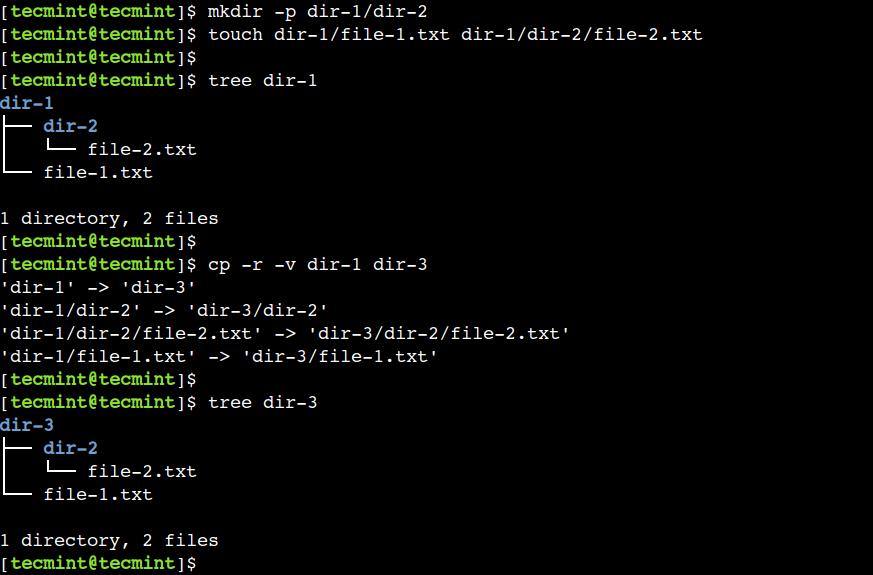
So, let’s create a directory and add a few files and sub-directories under it:
$ mkdir -p dir-1/dir-2 $ touch dir-1/file-1.txt dir-1/dir-2/file-2.txt
Next, verify the directory structure has been created correctly:
Now, let’s copy the directory dir-1 recursively using the following command:
Finally, verify that all files and sub-directories have been copied successfully:
14. How to Copy Multiple Directories
Similar to files, we can copy multiple directories recursive using a single command. However, to achieve this the destination directory must be present already and it must be the last argument in the command. Let’s understand this with an example.
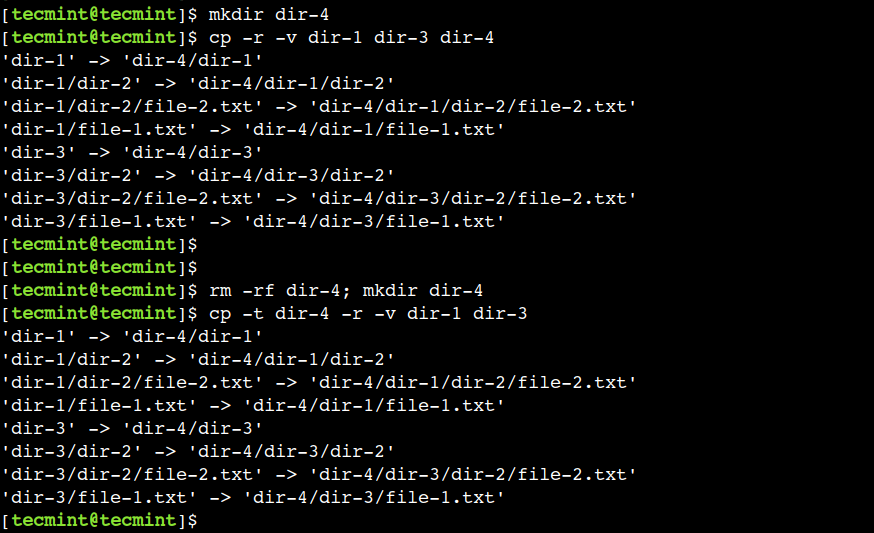
First, create a directory a new directory:
Now, let’s copy the dir-1 and dir-3 directories into the dir-4 directory using the below command:
In a similar way, we can use the -t option of the command to achieve the same result. This option allows us to specify the destination directory. So we can use it as a first argument as well:
In this article, we discussed how to copy files and directories using the cp command. Beginners can refer to these examples in day-to-day life while working with Linux systems.
You might also like:
Do you know of any other best example of the cp command in Linux? Let us know your views in the comments below.
replace a whole file with another file in bash
Ive learned how to replace a line using bash script but I am wanting to learn how to replace a whole file with another file in a different folder with the same name. Is this possible??
4 Answers 4
cp -f [original file] [new file] Copies the original file and overwrites the target file (hence -f which stands for «force»).
Looks like you switched up the arguments, It should be the other way around. cp -f [new file] [original file]
In case you are attempting to copy just the content of the file try
cat /first/file/same_name > /second/file/same_name This will overwrite all the content of the second file with the content from the first. However, your owner, group, and permissions of the second file will be unchanged.
«overwrite content» and «copy» are kinda different operations if the destination file is a symlink 🙂
This is exactly what I needed to deal with hardlinked files updated in a way the caused the link to be broken (saved as a separate file.)
If file2 does not exist, then file1 is renamed file2. If file2 exists, its contents are replaced with the contents of file1.
Like above however, since the «-i» (interactive) option is specified, if file2 exists, the user is prompted before it is overwritten with the contents of file1.
mv file1 file2 file3 dir1 The files file1, file2, file3 are moved to directory dir1. dir1 must exist or mv will exit with an error.
If dir2 does not exist, then dir1 is renamed dir2. If dir2 exists, the directory dir1 is created within directory dir2.