- How to copy a file from a remote server to a local machine?
- 6 Answers 6
- SCP Command Syntax
- SCP Command Options
- SCP Command Examples
- Copy a File from Local to Remote Server
- Copy a File from a Remote Server to the Local Host
- Copy a File from One Remote Server to Another
- Copy Multiple Files with SCP
- Copy a Folder from Local Host to Remote Server Recursively
- Copy a File with SCP Using a Specific Port
- Copy a File with SCP in Quiet Mode
- Copy a File with SCP in Verbose Mode
- Copy a File with SCP and Limit Bandwidth
- Copy a File with SCP Faster
- Copy a File with SCP Using a Specific Cipher
- Copy a File with SCP Using IPv4 or IPv6
- Copy a File with SCP Preserving File Attributes
How to copy a file from a remote server to a local machine?
In my terminal shell, I ssh’ed into a remote server, and I cd to the directory I want. Now in this directory, there is a file called table that I want to copy to my local machine /home/me/Desktop . How can I do this? I tried scp table /home/me/Desktop but it gave an error about no such file or directory. Does anyone know how to do this?
If you find yourself copying with scp often, you can mount the remote directory in your file browser and drag-and-drop. On my Ubuntu 15 host, it’s under the menu bar «Go» > «Enter Location» > debian@10.42.4.66:/home/debian . Alternatively, one can use sshfs to mount the remote machine’s filesystem on the host. But that setup is a little more involved.
Give rsync a try. It’s great both for local and remote copies, gives you copy progress, etc. An example
6 Answers 6
If you are on the computer from which you want to send file to a remote computer:
scp /file/to/send username@remote:/where/to/put Here the remote can be a FQDN or an IP address.
On the other hand if you are on the computer wanting to receive file from a remote computer:
scp username@remote:/file/to/send /where/to/put scp can also send files between two remote hosts:
scp username@remote_1:/file/to/send username@remote_2:/where/to/put scp username@source:/location/to/file username@destination:/where/to/put You can read man scp to get more ideas on this.
What if I want to copy multiple files? I added a space and just used another /file/to/send Thanks for your awesome answer!
@heemayl +1 for the good answer. Thought to add that in the case that it is a secure connection (that requires an authentication) you can use the following (for copying file from local to remote): scp -i mykey.pem somefile.txt root@remotehost.ip.address:/some/folder/in/remote
You can use rsync as an alternative. It is mainly for syncing files.. but you can use it for this purpose as well.
rsync -avzh --stats --progress remoteuser@remoteip:/path/ localpath rsync -e "ssh -P $port_value" remoteuser@remoteip:/path/ localpath —progress and —stats are useful for real-time display of transfer.
I think it a better option then SCP, since it skips already transferred files, which is noticeable when you’re copy-ing lot of files.
scp root@10.240.179.4:/root/Jmeter/reports.jtl Downloads/ scp username@ipaddress:pathtofile localsystempath scp sadananad@ipaddress:/home/demo/public_html/myproject.tar.gz . scp -Pportnumber username@ipaddress:pathtofile localsystempath scp -P2233 sadananad@ipaddress:/home/demo/public_html/myproject.tar.gz . If you completely trust everyone in the network and you can connect a port of the destination machine directly, you can use netcat: nc .
Let’s say the IP address of the destination machine is 192.168.1.123
nc -l -p 7777 0.0.0.0 | tar zxvf - -C dest_dir You can choose a different port, and also bind to another IP of your interfaces, 0.0.0.0 just catches on all interfaces.
tar zcvf - filename | nc 192.168.1.123 7777 IMHO, this is the fastest possible way to send a file from one computer to another using digital networks.
The arguments and command line options might slightly change between different versions of nc and tar , but it will definitely work with recent Linux distributions.
Linux SCP Command Explained: Securely Copy & Transfer Files
SCP (Secure Copy Protocol) is a network protocol used to securely copy files/folders between Linux (Unix) systems on a network. To transmit, use the scp command line utility, a safer variant of the cp (copy) command.
SCP protects your data while copying across an SSH (Secure Shell) connection by encrypting the files and the passwords. Therefore, even if the traffic is intercepted, the information is still encrypted.
- Copying files from a local host to a remote host.
- Copying files from a remote host to a local host.
- Copying files between two remote servers.
This guide shows you how to copy files using the SCP command and includes 13 examples of the command being used in practice.
- A secure shell login on the server
- (optional) Root access on both the client and server
- A secure shell login on the server system
SCP Command Syntax
The syntax for using the scp command is:
scp [option] [user_name@source_host:path/to/source/file] [user_name@target_host:target/path] - the user_name of the host (or target), the command defaults to the current user.
- the path/to/source (or the target/path) from the command, the program looks for (or copies) the file locally.
When working with remote files, always specify the user and host specifications.
Make sure to use an account with read access to the file(s) you want to copy on the source system. Additionally, you need to use an account with write access to the directory where the file(s) will be saved on the destination system.
Note: The scp command does not check the destination location before writing. Any files in the destination with the same name will be overwritten without notification.
SCP Command Options
You can add many scp command options to the command to customize and speed up the process. Options are added as attributes right after the scp command.
Each option has a short, single-character form and a longer, descriptive equivalent.
| -1 | Use protocol 1. |
| -2 | Use protocol 2. |
| -4 | Only use Ipv4 addresses. |
| -6 | Only use IPv6 addresses. |
| -B | Run in batch mode, disabling all queries for user input. |
| -b buffer_size | Specify the buffer size used for data transfer. If not specified, uses the default — 32768 bytes. |
| -C | Enable compression. |
| -c cipher | Select the cipher for data encryption. If not specified, SCP uses the default — ‘AnyStdCipher’. |
| -D debug_level | Set the debug level (1, 2, 3, or 99). |
| -d | Copy the file, only if the destination directory already exists. |
| -F file | Specify an alternative configuration file for SSH. |
| -h | Show a list of command options. |
| -i file | Specify the file from which to read the identity for public key authentication. |
| -l limit | Limit the bandwidth (specify the limit in Kbit/s). |
| -o ssh_option | Set options to SSH in ssh_config format. |
| -P port | Specify the port to which to connect. If not specified, SCP uses port 22. |
| -q | Run SCP in quiet mode. |
| -Q | Disable displaying any file transfer statistics. |
| -r | Copy recursively. |
| -S program | Use a specified program for encryption connection. |
| -u | Delete the source file once the copy is complete. |
| -v | Enable verbose mode, which sets the debug level to 2. |
SCP Command Examples
To understand this useful utility better, take a look at the following scp command examples.
Copy a File from Local to Remote Server
In the example below, we copy a sample file from a local host to a remote server:
scp Desktop/sample_example.txt root@136.183.142.28:/home/remote_dir The command includes the following information:

- Desktop/sample_example.txt — the name of the file being copied and its location.
- root@136.183.142.27 — the username and IP address of the remote server.
- /home/remote_dir – the location where to store the copied file.
Copy a File from a Remote Server to the Local Host
To copy a sample file from a remote host to a local host, we run:
scp 147.182.143.27:/home/remote_dir/sample_example.txt home/DesktopThe information provided is
- root@147.182.143.27 — the username and IP address of the remote server from where the file is currently located.
- /home/remote_dir/sample_example.txt — the name of the file being copied and its location.
- home/Desktop – the location where to store the copied file.

Copy a File from One Remote Server to Another
Next, let’s see how to copy a file from one remote server to another remote server using the scp command:
scp root@147.182.143.27:/home/remote_dir/sample_example.txt sofija@146.153.129.25:home/DesktopThe command above specifies:
- root@147.182.143.27 — the username and IP address of the remote server from where the file is currently located.
- /home/remote_dir/sample_example.txt — the name of the file being copied and its location.
- sofija@146.153.129.25 – the username and IP address of the remote server where we want to copy the file.
- home/Desktop – the location where to store the copied file on the remote server.
Copy Multiple Files with SCP
SCP allows you to copy multiple files in a single command. For example, the command below copies two files from a local host to a remote server:
scp example/sample1.txt example/sample2.txt root@147.182.143.27:/home/remote_dirIt includes the following information:
- example/sample1.txt – the name and location of the first file being copied.
- example/sample2.txt – the name and location of the second file being copied.
- root@147.182.143.27 — the username and IP address of the remote server receiving the files.
- /home/remote_dir — the location where to store the copied files on the remote server.

Copy a Folder from Local Host to Remote Server Recursively
Apart from files, scp can also securely copy folders to or from remote servers. The following command shows how to copy a sample directory to a remote server recursively:
scp -r example root@147.182.143.27:/home/remote_dir- -r – the option for copying the folder recursively.
- example – the name of the folder that is being copied from the local server.
- root@147.182.143.27 — the username and IP address of the remote server receiving the folder.
- /home/remote_dir — the location where to store the copied folder on the remote server.
Copy a File with SCP Using a Specific Port
By default, SCP uses port 22. However, if a remote system is configured to listen to SSH requests on a different port, use the –P switch to specify the port.
For example, the following command copies a file from a local to a remote server, using port 2222:
scp -P 2222 Desktop/sample_example.txt root@147.182.143.27:/home/remote_dirThe components of the command above are:
- -P 2222 – use the port 2222.
- Desktop/sample_example.txt — the file name you want to copy and its location.
- root@147.182.143.27 — the username and IP address of the remote server receiving the file.
- /home/remote_dir — the location where to store the copied file on the remote server.
Copy a File with SCP in Quiet Mode
Running a scp command in quiet mode means disabling the progress meter and non-error messages from showing in the output. To do so, you need to add the -q option:
scp -q Desktop/sample_example.txt root@136.183.142:/home/remote_dir
Copy a File with SCP in Verbose Mode
You can run scp in verbose mode by adding the -v option which sets the debug level to 2. Doing so, prints debugging information in the output which can help you when troubleshooting.
Add the -v option after scp to enable verbose mode, like in the example below:
scp -v Desktop/sample_example.txt root@147.182.143.27:/home/remote_dir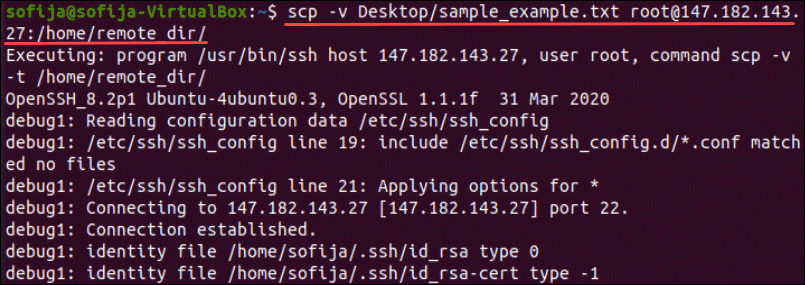
Copy a File with SCP and Limit Bandwidth
Another helpful option is limiting the bandwidth used by the scp command by adding the -l parameter. This is especially useful when copying large files to prevent SCP from draining the bandwidth.
When limiting bandwidth, you need to specify the number in Kilobits/s. Bear in mind that 1 byte = 8 bits. Therefore, if you want to limit the bandwidth for SCP to 100 KB/s, the value for l in kbps would be 800 (100 x 8), as in the command below:
scp -l 800 Desktop/sample_example.txt root@147.182.143.27:/home/remote_dirCopy a File with SCP Faster
To speed up the file transfer from one server to another, add the -C option that compresses the file while it’s being transferred. Once the file reaches its destination, it returns to its normal size.
scp -C Desktop/sample_example.txt root@147.182.143.27:/home/remote_dirCopy a File with SCP Using a Specific Cipher
By default, SCP uses AES-128 to encrypt files. However, the -c option allows you to change the cipher SCP will use to encrypt the file.
For instance, to increase security, you can switch to 3des encryption, as in the following example:
scp -c 3des Desktop/sample_example.txt root@147.182.143.27:/home/remote_dirCopy a File with SCP Using IPv4 or IPv6
You can force SCP to only use IPv4 or IPv6 depending on your needs by adding the -4 or -6 attribute.
To copy a sample file from a local server to a remote host only using IPv6, you would run:
scp -6 Desktop/sample_example.txt root@147.182.143.27:/home/remote_dirNote: Learn about the main differences between IPv4 and IPv6.
Copy a File with SCP Preserving File Attributes
To copy a file using SCP and preserve file attributes such as modification and access times, modes, and permissions, use the -p option:
scp -p Desktop/sample_example.txt root@147.182.143.27:/home/remote_dirIn this guide, you have learned what the scp command is and how to use it to secure the transmission of files.
This is especially useful as a replacement for FTP, which is inherently insecure by default. The secure copy protocol also follows regular command-line and SSH functionality, helping to create a seamless command set for managing files between Linux machines.