- SCP copy windows local file to linux remote folder
- How to copy files from windows to Linux using SCP command
- How to access the PowerShell scp command?
- Windows to Linux file copy using scp – Example 1
- FAQ: What is the message – The authenticity of host … cant be established
- The latest
- Part 2.5 — Copy and extract files from your development environment to Linux
- Prerequisites
- Goal of this part
- Copy files from Windows to Linux and vice versa
- Basic pscp parameters
- Copy a file to Linux and extract it to another folder
- Download a sample project
- Copy buggyamb_v1.1.tar.gz file to a Linux VM
- Extract the files and copy to the /var/ folder
- Next steps
- copy file/folder using scp command
- 3 Answers 3
SCP copy windows local file to linux remote folder
Or you can use WinSCP, you’ll probably find that simpler.
The best way to copy files from Windows to Linux using the command line is through pscp. It is very easy and secure. For pscp to work on your windows machine, you need it add its executable to your systems path. Once it is done, you can use the following format to copy the file.
pscp -pw password D:\test.txt user@192.168.33.10:/etc/var/test/test.txt You can refer the following blog post for more information on pscp setup.
To improve your answer, I suggest you include some relevant quotes / summary in your answer . (leaving the hyperlink in it is fie, eg for those who want more background info, etc)
Assuming you are on Windows, best way is to download and install cygwin. Get the path to the binary folder and add it to the system path. You can now run Linux commands on your command line.
Open the command prompt and go to the directory where your file is that you want to copy. Run the following command;
- scp — secure copy command
- file.txt — file you want to copy
- root — username used to log onto CentOS machine
- 1.1.1.1 — IP address of CentOS machine. Needless to say your Windows machine and the CentOS machine have to be able to communicate with one another
- :/opt — This is the directory with which you save the file to, I generally save everything to the /opt directory
- Don’t forget the @ between the username and IP Address and the : between the IP Address and directory you are saving the file to
If you need a key to login into the server, enter the following;
scp key.pem file.txt root@1.1.1.1:/opt For handiness sake I just copy the file I want to copy across to the key file directory, that way you know everything will run smoothly
How to copy files from windows to Linux using SCP command
Today we will explore, how to copy files from Windows to Linux using the SCP command (the command must be used in lowercase, we are using upper case in this document for better readability).
How to access the PowerShell scp command?
Here we use the command scp to copy the file from Windows to the Linux server. The latest version of Windows PowerShell has the SCP command build-in. For example, if you open Powershell from your desktop and run the command scp, it will display the usage, please refer to the below example:
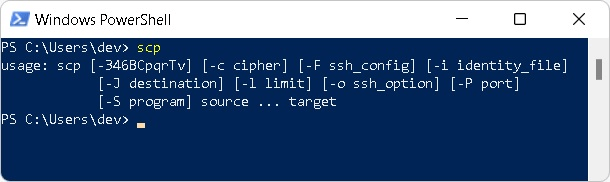
To copy a file or a number of files, we need to specify more details to the command as parameters (or command line arguments), as shown in the usage.
Simply put, you would need the below information handy:
- The source file(s) path (Windows local file path)
- source file names and extensions (optional)
- Remote server name (your Linux server)
- Remote server username (and have the remote server password)
- Specific path of the remote location, where you want to copy the file(s) using the SCP command.
Let us jump into a practical example now.
Windows to Linux file copy using scp – Example 1
providing the local-filename, remote server details as:
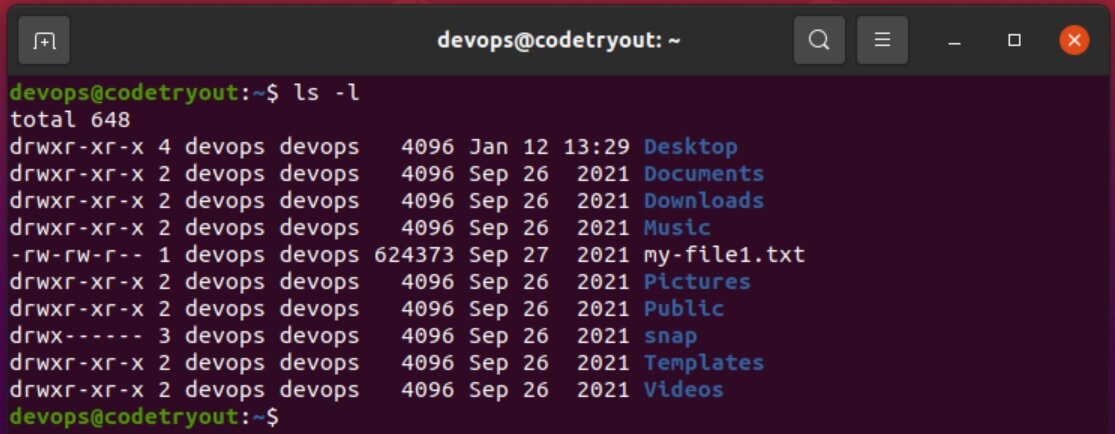
PS C:\Users\dev\codetryout\demo> scp my-file1.txt [email protected]: [email protected]'s password: my-file1.txt 100% 5681 1.9MB/s 00:00 You have successfully copied the file my-file.txt to the remote server codetryout!
Note the ending column in the command line, which specifies the scp command to copy the file to the remote user’s home directory. That is typically the first directory when you log in (such as in my case, /home/devops).
We have tested this on Windows 11 Powershell, and the remote server is Ubuntu 20.04.3
FAQ: What is the message – The authenticity of host … cant be established
If you are copying the file(s) for the first time, or ssh to the server for the first time, there will be a message as shown below.
The authenticity of host 'codetryout (192.168.1.123)' can't be established. ECDSA key fingerprint is SHA256:0M8vQMz8T5j6A7xeni1ex6d825RKLRy/h6pvKggaNUU. Are you sure you want to continue connecting (yes/no/[fingerprint])?Just type in yes if prompted and enter to continue.
The latest
Part 2.5 — Copy and extract files from your development environment to Linux
This article introduces how to copy files from a Windows-based computer to a Linux virtual machine and extract files.
Prerequisites
This part doesn’t have any prerequisites.
Goal of this part
You’ll learn how to copy files from a Windows-based computer to a Linux virtual machine (VM). This will be helpful when you deploy your application to Linux.
Although there are no prerequisites for this part, the ideal setup would follow the guidance from the previous parts. You should have the following:
- Nginx running automatically and configured to listen to requests sent on port 80
- Nginx configured as a reverse proxy and routing incoming requests to an ASP.NET Core application this is listening on port 5000
- The ASP.NET Core application that is configured to start automatically after the server is restarted or when the process is stopped or crashes.
- A Linux local firewall that is configured to allow SSH and HTTP traffic
Copy files from Windows to Linux and vice versa
There are several options to copy files between Windows and Linux. You can find the different methods in several good articles, such as this one. Here are some options:
- Share network folders. Refer to SMB protocol and Samba.
- Transfer files by using FTP. One of the best-known FTP servers in Linux is PureFTPd.
- Securely copy files through SSH. You can use the scp command to copy over SSH. However, a better tool is pscp (included with PuTTY).
- Share data by using sync software. A sync program helps you create sync points in both Windows and Linux, and then sync it by using an encryption key.
- Use shared folders if Linux is running as a VM in your VM. Several tools, such as Oracle’s VirtualBox, help you create virtual shared directories.
In this part, you’ll use pscp to transfer files from Windows to Linux.
Basic pscp parameters
Pscp makes it easy to do basic tasks, such as copying a file to Linux. This tool is included with PuTTY, so it should be installed on your Windows-based computer together with PuTTY. If it is not, install it now.
For example, to copy the c:\web\publish.zip file to your user’s home directory in Linux, use this command:
pscp -i d:\secure\myprivatekey.ppk c:\web\publish.zip @buggyamb:
The private key is the same .ppk key that was converted from a .pem file when you tried to connect to your VM by using PuTTY. If you did this successfully, you should already have this file. If you don’t have the .ppk file, follow the instructions from the «Connecting with PuTTY» section, and convert your .pem file to .ppk.
Copy a file to Linux and extract it to another folder
Download a sample project
For this tutorial, you’ll copy a test application that is named BuggyAmb. This application is available on BuggyAmb debugging sample application. We recommend that you use this sample application because the next parts use this application to simulate high and low CPU performance problems and crash issues in the troubleshooting labs.
BuggyAmb is simply a buggy ASP.NET Core 3.1-based Razor Pages application. This application was intentionally created as a buggy application to be used as a learning resource to troubleshoot problematic scenarios for an ASP.NET Core application on Linux.
You can find the source code files at ASP.NET Core binaries for Linux. This is in .tar.gz format because that format is common in the Linux world. You can also download the buggyamb_v1.1 in .zip format for Windows.
Copy buggyamb_v1.1.tar.gz file to a Linux VM
Open a Command Prompt window on your Windows-based computer, and go to the folder that PuTTY is installed in. To copy the file, run the following command:
pscp -i d:\secure\myprivatekey.ppk D:\Learn\Linux\buggyamb_v1.1.tar.gz @buggyamb:/home/
Also run the pscp command after you modify it by using your own private key and paths accordingly. The following screenshot shows a successful file transfer between Windows and the Linux VM.

When you connect to your VM for the first time by using the pscp command, you may see a warning message about a host key mismatch.
Connect to your Linux VM, and check whether the file is there. You can do this by using the ls command.

There are other methods to copy files between Linux and Windows. But this method is sufficient for this tutorial.
Use the buggyamb_v1.1.tar.gz file to create a second ASP.NET Core application that runs behind Nginx. This time, this application will be configured to use a hostname to browse it. The same application will be used in the troubleshooting labs that comprise this tutorial.
If you have difficulties copying the buggyamb_v1.1.tar.gz file to your Linux machine, you can simply download the .tar.gz file from your Linux VM by using this simple wget command:
wget https://buggyambfiles.blob.core.windows.net/bin/buggyamb_v1.1.tar.gz Extract the files and copy to the /var/ folder
Buggyamb_v1.1.tar.gz contains everything that you need to run your buggy application. Just as you did for your first ASP.NET Core application, follow the same steps to configure this application to run always behind Nginx.
Extract the .tar.gz file, and copy it to the /var folder. There are two simple ways to accomplish this:
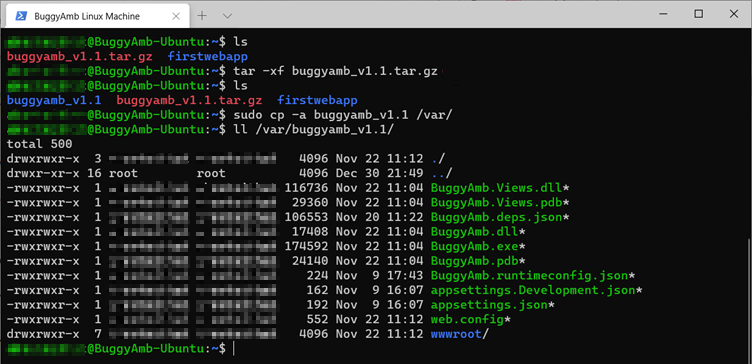
- Option 1: Extract the tar.gz file to the current directory by running tar -xf filename.tar.gz . Then, copy the extracted folder to the /var folder.
- Option 2: Extract the tar.gz file directly to the /var directory.
Option 1: Run tar -xf buggyamb_v1.1.tar.gz to create the buggyamb_v1.1 folder. Then, copy it to the /var folder using the sudo cp -a buggyamb_v1.1 /var/ command.
Option 2: Extract the application directly to the /var/ folder by using the sudo tar -xf buggyamb_v1.1.tar.gz -C /var/ command.
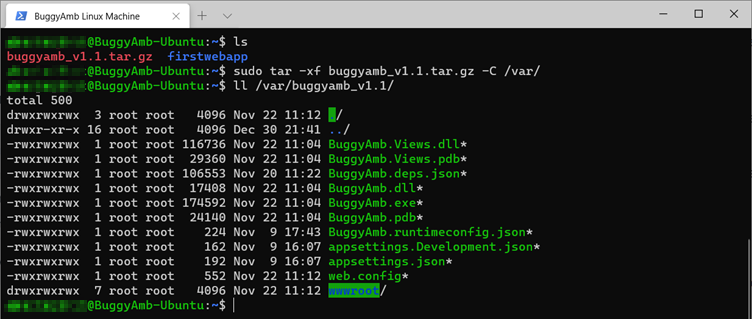
Choose either option, to extract the buggyamb_v1.1 application files. These should be extracted or moved to /var/buggyamb_v1.1 folder to complete the setup. This folder will be used as the working directory for the new ASP.NET Core application.
Next steps
Configure and run the buggy ASP.NET Core application behind Nginx. At the end of those steps, you’ll have two ASP.NET Core applications running behind Nginx.
copy file/folder using scp command
How can I copy a file/folder from windows to linux (putty), probably using scp command? I used scp user@hostname(windows):c:\folder\filname user@hostname(Linux):/folder/filename(destination), but unfotunately I got an error. Basically, I am trying to copy from windows to Linux. Hope it works whether I am on windows or Linux.
3 Answers 3
I don’t think this can work in this form, with the backslash \ separators:
scp user@hotname:c:\folder\filname user@hostname:\folder\filename(destination) First of all, the path separator in Linux is / instead of \ , so this would be better:
scp user@hotname:c:\folder\filname user@hostname:/folder/filename Secondly, your command looks like as if you’re running this command on a third PC, on machineC to copy files from machineA to machineB. If this is not the case and you are in fact on machineA copying files to machineB, then this would be better:
scp c:\folder\filname user@hostname:/folder/filename If you don’t have the scp command in Windows, here are a few options:
- Install Git. Even if you don’t use Git, this installer includes an excellent terminal and common *nix commands, and scp too
- Download PuTTY. You can use pscp.exe instead of scp , the above syntax will work.
- Install WinSCP. It has scripting features, but if you want to use the command line the previous two options are easier.
If I do from windows I get ‘scp’ is not recognized as an internal or external command,operable program or batch file. If I do from Linux to my windows machine then I get «ssh: connect to host
In *nix systems, this should work:
# to copy file.ext from remote server to current working directory # note the dot (.) at the end, which means current directory $ scp user@remote.server.com:~/desired/folder/file.ext . # to copy all files in a folder from remote server # to current directory # note the dot (.) at the end, which means current directory $ scp -r user@remote.server.com:~/desired/folder/* . # copy a folder and all its contents as it is from remote server # to current directory # note the dot (.) at the end, which means current directory $ scp -r user@remote.server.com:~/dersired/folder . More information can also be found in this article: scp command syntax