- How to Create Your Own Commands in Linux
- What are Alias commands in Linux?
- How to Create Your Own Linux Commands
- How to View Created Alias Commands
- How to Remove an Alias Command in Linux
- How to Remove All Alias Commands in Linux
- How to Create a Permanent Alias Command
- Some Helpful Alias Commands to Try
- Navigate to the Home folder
- How to Run Multiple Commands in a Single Alias Command
- Method #1:
- Method #2
- Conclusion
- How to Create and Use Alias Command in Linux
- List Currently Defined Aliases in Linux
- How to Create Aliases in Linux
- Creating Temporary Aliases
- Creating Permanent Aliases
How to Create Your Own Commands in Linux

Arunachalam B
In this article, let’s learn about creating your own commands in Linux. Yes – we’re going to talk about creating an alias command.
Before we begin, I want to tell you how the idea for this tutorial came about.
One of the followers of my blog asked me,
«Hey Arun! I wonder about your brain’s capability to store a lot of commands. How is that possible?»
«I’ve been learning Linux and writing code since I started college (almost 7+ years). During that time I encountered a lot of errors and solved each and everyone on my own which helped me to master it», I replied.
«Even then, how could you memorize those flags and options along with each command?», he enquired.
«I cannot memorize each and every command with its options and flags. So, I create my own commands», I replied.
«What? You created your own commands? Can I create my own commands?», he asked with great excitement.
«Yes. You can. It’s called an alias command in Linux», I replied.
He asked me to write a blog on it and here it is. Let’s learn about alias commands in this blog.
What are Alias commands in Linux?
The alias command provides a string value that replaces a command name when it is encountered.
The alias command lets you create shortcuts for long commands, making them easier to remember and use. It will have the same functionality as if the whole command is run.
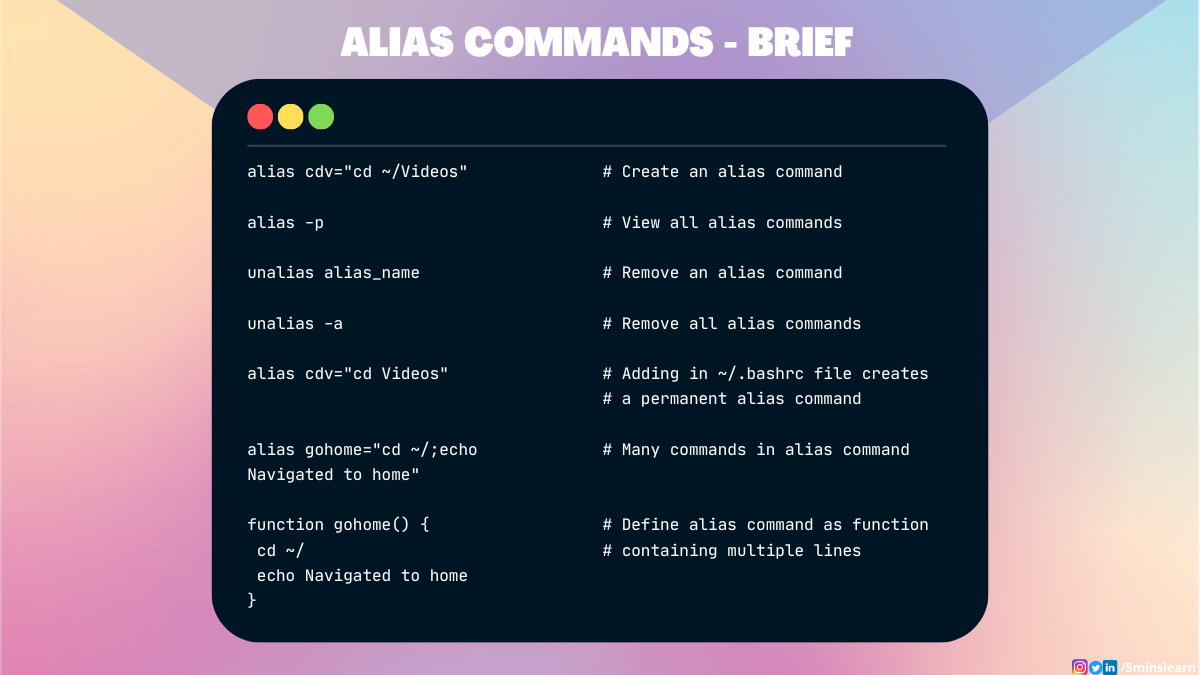
How to Create Your Own Linux Commands
Using the alias command, you’ll be able to create your own commands. It’s so simple to create your own command.
Here’s the syntax for the alias command:

Let’s create our command called cdv to navigate to the Videos directory. To achieve that, you have to enter the following command in your terminal:
![]()
We have created our command. From the above screenshot, you can see that it does not return anything.
But, how can we verify that the command is created and it is working?
There’s only one way to verify if the command is working: that’s by executing the created command.
Run the cdv command on your terminal to see what happens:
![]()
BOOM. You created your own command.
How to View Created Alias Commands
You may have the following question after creating a few commands:
Let’s assume I created multiple alias commands. How can I view all of them together? How can I view the equivalent command of my alias?
You can view all your alias commands by appending the -p flag to the alias command like this:

I have created many alias commands. From the above screenshot, you can see all the alias commands that I’ve created.
How to Remove an Alias Command in Linux
Pass your alias name to the unalias command as an argument to remove the alias command.

How to Remove All Alias Commands in Linux
Let’s assume you have added around 20 alias commands. After some time, you realized that using alias commands will make you forget other commands in the long term. Fearing that, you wish to remove all the alias commands.
We have a command to achieve that:

You may be curious to know more about one thing that I’ve written in the above passage.
«After some time, you realized that using alias commands will make you forget other commands in the long term»
Is this something you should worry about? Can this happen?
The answer to your first question is, yes. Definitely, you’ll get this feeling when you’re learning and trying out alias commands. Because I had the same feeling.
The answer to your second question is, absolutely no. This will result in increased productivity. There’s a high chance that you’ll forget the command you created but you’ll never forget the original command. So I always recommend revisiting your alias commands often and ensure you’re using all the alias commands you created.
I have a shocking surprise for you. Open a terminal window and create an alias command (we’ll use the cdv command we created above). Open another terminal window and type the cdv command there.

Yes. If you create an alias command, it’ll be active only for the particular instance of the terminal. It’ll not be created permanently, so you won’t be able to access it in two different terminal windows unless you run the alias command on both terminals.
How to Create a Permanent Alias Command
To create a permanent alias command, you have to add the alias command to the shell configuration file. There are many shell configurations available. A few of the well-known shells are:
Most Linux distros work with bash , so let’s look at creating a permanent alias in the bash shell. Other shells work pretty much the same.
Let’s open the .bashrc file using Vim.

You may open multiple windows and check by entering the alias -p command.
Some Helpful Alias Commands to Try
Here’s a bonus for you all.
At the company where I work, we follow common alias commands, which we set up in everyone’s machine at on-boarding. If people wish to add their own commands, they’ll be able to do so and it’ll not be reflected for others (built with the OCP principle in mind). We feel highly productive in using those commands.
I’ve planned to share a part of those commands with you all.
You can either follow the instructions in the README file of this repo or follow the instructions below to set up the alias commands on your machine.
Navigate to the Home folder

You’ve installed it the right way if you get the above message.
Let me explain the alias commands you’ll have access to using this repo.
| Alias Command | Original Command | Description |
| f | cd $1 | Go forward. Navigate to the next specified directory |
| b | cd .. | Go backward. Navigate back 1 directory |
| c | code ./ | Open Visual Studio Code in the current directory |
| e | exit | Close the terminal tab/window |
| home | cd ~ | Navigate to the home directory |
| a | xdotool key ctrl+shift+t | Open a new terminal tab |
| cdb | cd — | Go to the last directory where you were previously |
| gst | git status | Find the status of the git repo |
| gpr | git pull -r | Pull and rebase the git commits |
| glo | git log —oneline | Show git commit logs in a single simplified line |
| gcl | git config -l | Show the git configuration of the current repo |
| gca | git commit —amend | Add the current changes to the existing commit |
| gcane | git commit —amend —no-edit | Add the current changes to the existing commit without editing the existing commit message |
| ad | ~/Android/Sdk/emulator/emulator -list-avds | Show available android emulators |
| off | sudo /opt/lampp/lampp stop poweroff systemctl poweroff -i | Turn off your machine |
| bb | if [ -z «$1» ] then b;b else for (( i=0;i<$1;i++ )) do b done fi | It’s an advanced version of go back command. Entering the b command goes back to only one directory. But entering bb goes back to 2 directories. If you want to go 5 directories back, run bb 5 command |
| pokill | kill $(lsof -t -i:$1) | Kill the program running on the port |
| cc | sudo nano ~/x-commands/aliasCommands.sh | Edit the alias commands file |
| bc | sudo nano ~/.bashrc | Edit the .bashrc file |
| scc | source ~/x-commands/aliasCommands.sh | Refresh the terminal after updating an alias command |
| bcc | source ~/.bashrc | Refresh the terminal after updating .bashrc file |
| welcome | echo Welcome to shell automation echo Enter Your Name read testName echo Welcome to new shortcut world ~~ $testName ~~ Enjoy Coding. | Verify if alias commands installation is done right |
If you look at the aliasCommands.sh file carefully, you’ll see that I’ve added a few functions. You may wonder why I use functions. Read more to have a quick dive into this topic.
How to Run Multiple Commands in a Single Alias Command
You can achieve this in 2 ways. Let me explain both of them here.
Let’s learn this with an example.
Say you have to create an alias command called gohome . Running this command should take you to the home directory and display the «Navigated to home directory» message.
Method #1:
This way is the usual way of adding an alias command. You have to add the two commands separated by a semicolon ( ; ).

Method #2
This is a bit of a different way. To achieve this you have to make a change in your .bashrc file. You have to define a function in the .bashrc file with all the commands nested within it.
Open the .bashrc file using Vim.

Note: Creating a function will not list it as an alias command on running the alias -p command.
Conclusion
In this article, you learned how to create your own commands in Linux.
Using an alias command will definitely increase your productivity. I’ve witnessed exponential growth in many people after seeing them using alias commands. I would recommend that you all setup your own alias commands.
To learn more about Linux, subscribe to my email newsletter on my site and follow me on social media.
How to Create and Use Alias Command in Linux
Linux users often need to use one command over and over again. Typing or copying the same command again and again reduces your productivity and distracts you from what you are actually doing.
You can save yourself some time by creating aliases for your most used commands. Aliases are like custom shortcuts used to represent a command (or set of commands) executed with or without custom options. Chances are you are already using aliases on your Linux system.
List Currently Defined Aliases in Linux
You can see a list of defined aliases on your profile by simply executing alias command.
Here you can see the default aliases defined for your user in Ubuntu 18.04.
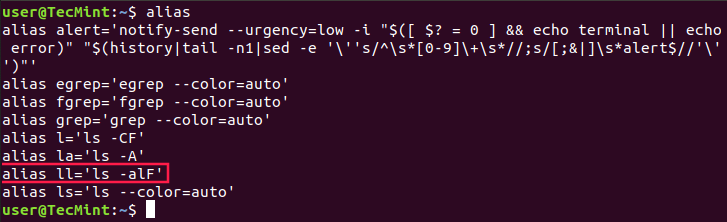
You can create an alias with a single character that will be equivalent to a command of your choice.
How to Create Aliases in Linux
Creating aliases is relatively easy and quick process. You can create two types of aliases – temporary ones and permanent. We will review both types.
Creating Temporary Aliases
What you need to do is type the word alias then use the name you wish to use to execute a command followed by » your custom command here»
Here is an actual example:
You can then use «wr» shortcut to go to the webroot directory. The problem with that alias is that it will only be available for your current terminal session.
If you open new terminal session, the alias will no longer be available. If you wish to save your aliases across sessions you will need a permanent alias.
Creating Permanent Aliases
To keep aliases between sessions, you can save them in your user’s shell configuration profile file. This can be:
The syntax you should use is practically the same as creating a temporary alias. The only difference comes from the fact that you will be saving it in a file this time. So for example, in bash, you can open .bashrc file with your favorite editor like this:
Find a place in the file, where you want to keep the aliases. For example, you can add them in the end of the file. For organizations purposes you can leave a comment before your aliases something like this:
#My custom aliases alias home=”ssh -i ~/.ssh/mykep.pem [email protected]” alias ll="ls -alF"
Save the file. The file will be automatically loaded in your next session. If you want to use the newly defined alias in the current session, issue the following command:
To remove an alias added via the command line can be unaliased using unalias command.
$ unalias alias_name $ unalias -a [remove all alias]
Conclusion
This was a short example on how to create your own alias and execute frequently used commands without having to type each command again and again. Now you can think about the commands you use the most and create shortcuts for them in your shell.