- 3 Ways to Create a Linux Bootable USB Stick
- Part 1: Linux Bootable USB Creator for Windows 10
- Part 2: How to Create Bootable USB Drive for Linux on Ubuntu
- Part 3: How to Create Linux Bootable USB Stick on macOS
- Summary
- Create a bootable USB stick with Rufus on Windows
- 2. Requirements
- 3. USB selection
- 4. Select the Ubuntu ISO file
- 5. Write the ISO
- 6. Additional downloads
- 7. Write warnings
- 8. Writing the ISO
- 9. Installation complete
- Finding help
- How to Create Ubuntu Bootable USB in Windows 10/8
- Requirements
- Step 1 – Download Ubuntu ISO
- Step 2 – Install Universal USB Installer
- Step 3 – Create Ubuntu Bootable USB
3 Ways to Create a Linux Bootable USB Stick
Linux is the most popular operating system being used on web servers. For system admin, Linux is the tool you have to be familiar with. To get started, you should install Linux on a machine first. That requires a bootable Linux USB. The bootable Linux USB is a convenient way to install Linux OS, but you need to have the right tools to create bootable USB. Just like any LiveCD, a Live Linux USB will not only let you go an installation, but also to test various hardware components like wireless drivers and so on. This article shows you how to create a bootable Linux USB on three OS platforms: Windows, Linux and macOS. For the purpose of this article, we’ll use an Ubuntu 18.04.1 LTS (Bionic Beaver) release.
Part 1: Linux Bootable USB Creator for Windows 10
For the Windows environment, LinuxLive USB Creator, also called Lili, is a pretty good utility. It is open-source, so if you’re not too keen on that you can, of course, try a proprietary software for burning ISO to a USB flash drive to create bootable media. However, LinuxLive USB Creator has an advantage in that it can even download the ISO file for you if you don’t already have it for a particular distro.
The process is fairly simple, so just follow the steps outlined below:
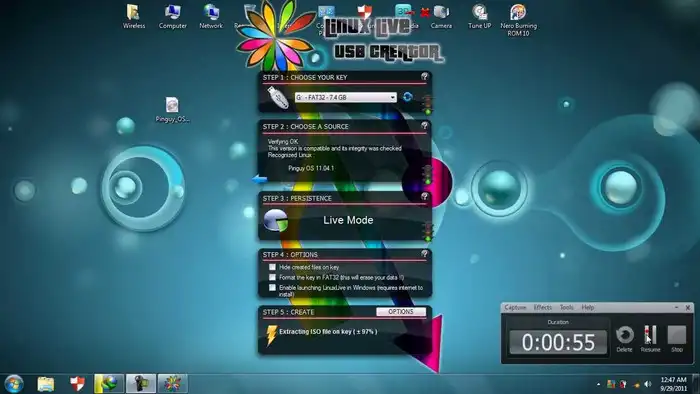
Step 1: Download LinuxLive USB Creator from here and install the program on a Windows PC.
Step 2 : Get the ISO file for Ubuntu 18.04.1 LiveCD from Ubuntu official website.
Step 3 : Launch LiLi and insert a USB drive into an available port.
Step 4 : In the software, select the USB and pick up the ISO file that you downloaded earlier. Once you select it, it will be imported into the program.
Step 5 : You can choose various options, such as formatting your USB (all data will be erased), make the extracted ISO files on the USB drive hidden and enable LinuxLive to launch in Windows, which requires an internet connection.
Step 6 : Finally, click on the lightning icon to begin the process of creating bootable Linux USB.
The USB can now be used to install this Ubuntu release on any machine, since it is a bootable media. The reason we’ve chosen Lili for this example is that it is perfect for experts and novices alike. New users can simply follow the steps and either install a live version or a persistent one. The traffic light indicators on each step will tell you whether or not you did it right. Simple and quick.
Part 2: How to Create Bootable USB Drive for Linux on Ubuntu
On an Ubuntu machine, you can easily create a bootable Linux USB with a built-in app called Make Startup Disk. It’s fairly simple to use if you’re familiar with Linux, and it also allows you to set persistence for when you reboot. Here are the steps to complete this task. The same Ubuntu release is used for this example as well.
Step 1 : In your Linux machine running Ubuntu, open the Dash and search using the term «USB Startup». Depending on the release version, it may be called something else. It should look something like this:
Step 2 : Select the ISO image that you downloaded before, and make sure the correct USB drive is displayed in the middle section under «Disk to use:».
Step 3 : Set reserve space if you want persistence. 300MB is usually enough, but you can set it higher. If not, select the «Discard on shutdown» option instead.
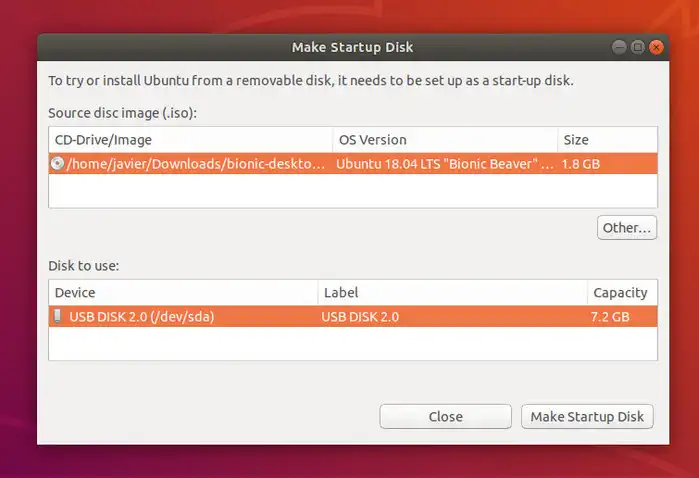
Step 4 : Double-check your settings and click «Make Startup Disk» on the bottom right.
Your bootable Linux USB is now ready for use. This is the easiest way to do it on a Linux machine running Ubuntu. It may have variations based on the version, but the principle is the same. You don’t need any external tools to create the bootable media.
Part 3: How to Create Linux Bootable USB Stick on macOS
On a Mac computer running Mac OS X or macOS, you can use UNetbootin. As with LinuxLive, if you don’t have the ISO for a particular Linux distro, the software will download it for you. Using the UNetbootin utility is quite simple. Follow the steps shown below:
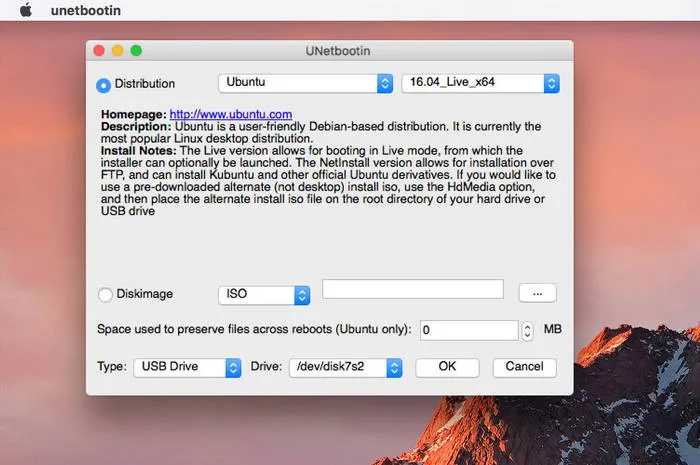
Step 1: Download UNetbootin from here. Make sure you get the Mac version (DMG file) and install it the way you normally install apps on your Mac, by dragging the icon into the Applications folder after double-clicking the setup file.
Step 2: Select the Linux distro and the version if you don’t have it, or else check the radio button against «Diskimage» and select the ISO file you downloaded earlier.
Step 3: Insert your USB flash drive. Set «Type:» to USB Drive and choose your USB from the dropdown menu. You can also set the reserve space for the Ubuntu files.
Step 4: Click OK to begin burning ISO to USB stick on Mac. You need to be a little careful when selecting the drive, because you don’t want to accidentally format any of your hard drive partitions. Other than that, there’s the issue of not being able to install Ubuntu on your Mac using this method. However, it can be used on other Linux or Windows PCs.
Summary
All of these methods involve some level of risk if you are an inexperienced user. Proceed with caution, or look for reliable third-party software that will do the job for you. You can also explore command line executions to burn ISO to a USB drive to create a bootable Linux USB.
Petty is editor in chief at UUByte and writes various topics about Windows and Mac to help people make the most of current technology.
Create a bootable USB stick with Rufus on Windows
This tutorial will show you how to create a bootable USB stick on Microsoft Windows using Rufus.
For most users we recommend balenaEtcher instead of Rufus which is simpler to use and also available on MacOS and Ubuntu. Instructions are now included in the primary Install Ubuntu Desktop tutorial.
Creating a bootable Ubuntu USB stick from Microsoft Windows is very simple and we’re going to cover the process in the next few steps.
Alternatively, we also have tutorials to help you create a bootable USB stick from both Ubuntu and Apple macOS.

2. Requirements
- A 4GB or larger USB stick/flash drive
- Microsoft Windows XP or later
- Rufus, a free and open source USB stick writing tool
- An Ubuntu ISO file. See Get Ubuntu for download links

Take note of where your browser saves downloads: this is normally a directory called ‘Downloads’ on your Windows PC. Don’t download the ISO image directly to the USB stick! If using Windows XP or Vista, download version 2.18 of Rufus.
3. USB selection
Perform the following to configure your USB device in Rufus:
- Launch Rufus
- Insert your USB stick
- Rufus will update to set the device within the Device field
- If the Device selected is incorrect (perhaps you have multiple USB storage devices), select the correct one from the device field’s drop-down menu

You can avoid the hassle of selecting from a list of USB devices by ensuring no other devices are connected.
4. Select the Ubuntu ISO file
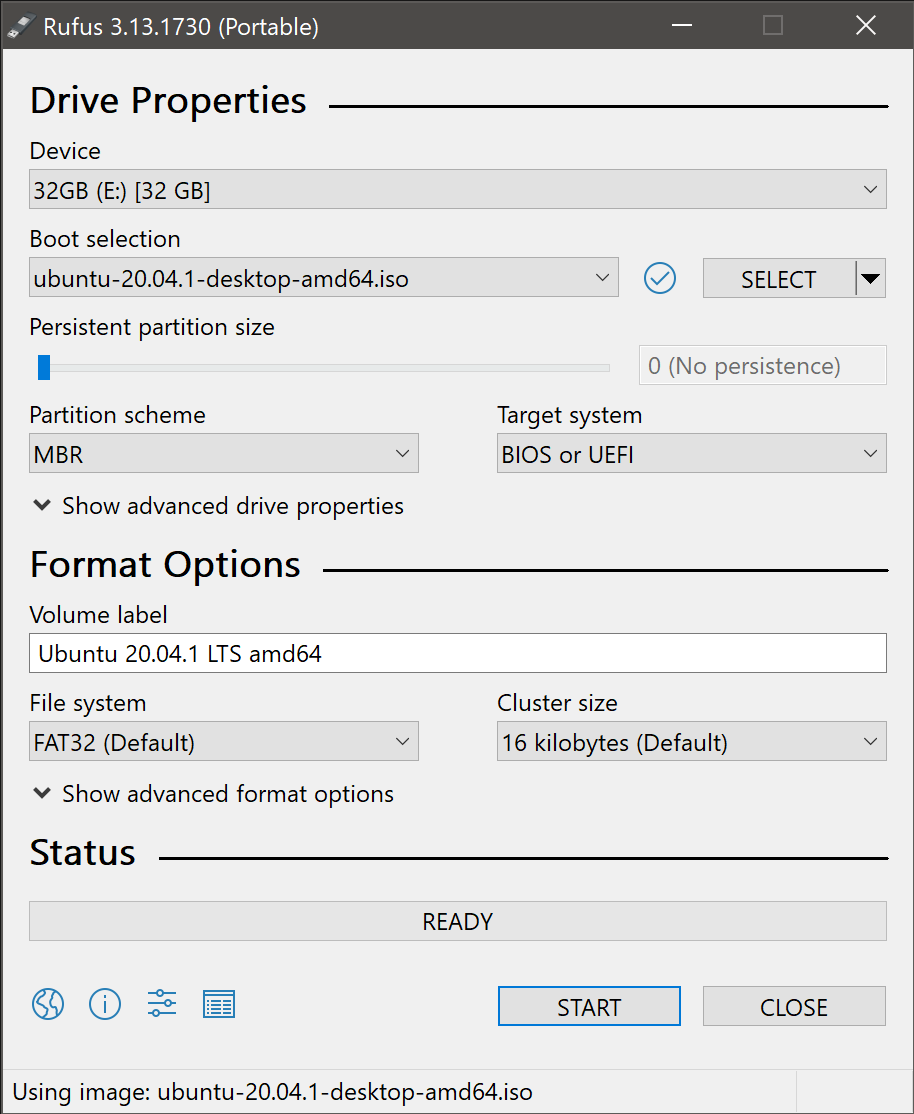
To select the Ubuntu ISO file you downloaded previously, click the SELECT to the right of “Boot selection”. If this is the only ISO file present in the Downloads folder you will only see one file listed.
Select the appropriate ISO file and click on Open.

5. Write the ISO
The Volume label will be updated to reflect the ISO selected.
Leave all other parameters with their default values and click START to initiate the write process.
6. Additional downloads
You may be alerted that Rufus requires additional files to complete writing the ISO. If this dialog box appears, select Yes to continue.

7. Write warnings
You will then be alerted that Rufus has detected that the Ubuntu ISO is an ISOHybrid image. This means the same image file can be used as the source for both a DVD and a USB stick without requiring conversion.
Keep Write in ISO Image mode selected and click on OK to continue.

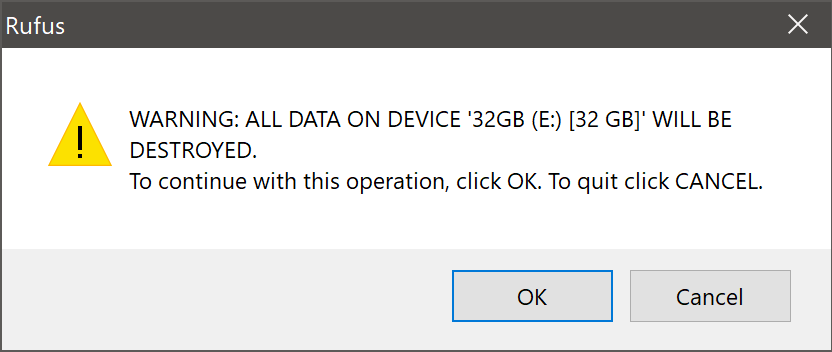
Rufus will also warn you that all data on your selected USB device is about to be destroyed. This is a good moment to double check you’ve selected the correct device before clicking OK when you’re confident you have.
If your USB stick contains multiple partitions Rufus will warn you in a separate pane that these will also be destroyed.
8. Writing the ISO
The ISO will now be written to your USB stick, and the progress bar in Rufus will give you some indication of where you are in the process. With a reasonably modern machine, this should take around 10 minutes. Total elapsed time is shown in the lower right corner of the Rufus window.

9. Installation complete
When Rufus has finished writing the USB device, the Status bar will be filled green and the word READY will appear in the center. Select CLOSE to complete the write process.

Congratulations! You now have Ubuntu on a USB stick, bootable and ready to go.
To use it you need to insert the stick into your target PC or laptop and reboot the device. It should recognise the installation media automatically during startup but you may need to hold down a specific key (usually F12) to bring up the boot menu and choose to boot from USB.
For a full walkthrough of installing Ubuntu, take a look at our install Ubuntu desktop tutorial.
Finding help
If you get stuck, help is always at hand:
How to Create Ubuntu Bootable USB in Windows 10/8
This tutorial will help you to create a bootable USB drive of Ubuntu in Windows 8/8.1 or Windows 10. After creating a bootable USB you can use this as Live USB or install it on disk.
Requirements
You are required following things to create Ubuntu bootable USB in Windows systems.
- An USB Drive
- Ubuntu ISO Image
- Universal USB Installer application
- A Windows System to create boot disk
Step 1 – Download Ubuntu ISO
You can easily download the Ubuntu ISO image from its official website. Download the Ubuntu Desktop or server edition as per your requirements.
Step 2 – Install Universal USB Installer
For this tutorial, I am going to use the Universal USB Installer utility on Windows to create a bootable USB drive. Use the below link to download this tool and install it on your Windows system.
Step 3 – Create Ubuntu Bootable USB
At this stage, You have installed Universal USB Installer on your system. Also have downloaded the Ubuntu ISO image. Now start the process of creating an Ubuntu bootable USB.
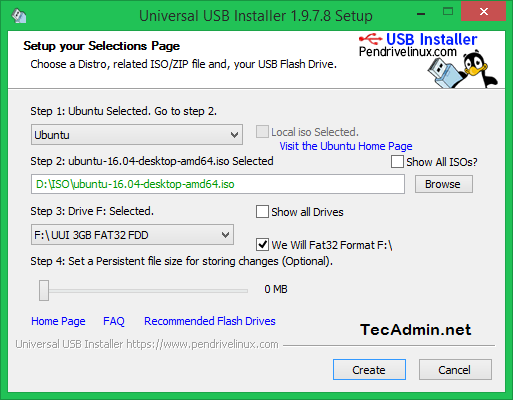
Start Universal USB Installer and select following options.
- Step 1: Select Ubuntu
- Step 2: Browse and select Ubuntu ISO image from your system.
- Step 3: Select the USB drive
Now click on Create button:
The installation process is in progress.
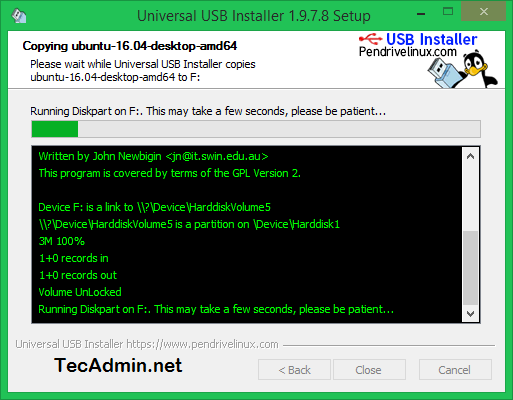
Wait for the installer to complete the process. This process will take time as per your operating system speed.
After completing the process, You will see a screen like this.
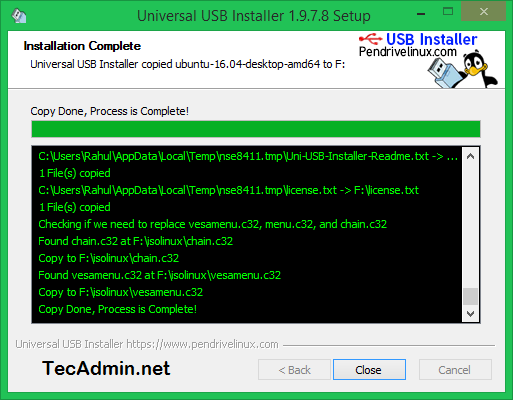
Your Ubuntu bootable USB is ready to use. Use this USB to use as live Ubuntu media or install Ubuntu operating system on your system.