DESCRIPTION
mkfs.exfat creates an exFAT filesystem by writing on a special file using the values found in the arguments of the command line. It is invoked automatically by mkfs(8) when it is given the -t exfat option.
As an example, to make a filesystem on the first partition on the first SCSI disk, use:
OPTIONS
-b, —boundary-align=alignment Specifies the alignment for the FAT and the start of the cluster heap. The alignment argument is specified in bytes or may be specified with m/M suffix for mebibytes or k/K suffix for kibibytes and should be a power of two. Some media like SD cards need this for optimal performance and endurance, in which case alignment should be set to half of the card’s native boundary unit size. If the card’s native boundary unit size is not known, refer to the following table of boundary unit sizes recommended by the SD Card Association.
| Card Capacity Range | Cluster Size | Boundary Unit | |
| ≤8 MiB | 8 KiB | 8 KiB | |
| >8 MiB | ≤64 MiB | 16 KiB | 16 KiB |
| >64 MiB | ≤256 MiB | 16 KiB | 32 KiB |
| >256 MiB | ≤1 GiB | 16 KiB | 64 KiB |
| >1 GiB | ≤2 GiB | 32 KiB | 64 KiB |
| >2 GiB | ≤32 GiB | 32 KiB | 4 MiB |
| >32 GiB | ≤128 GiB | 128 KiB | 16 MiB |
| >128 GiB | ≤512 GiB | 256 KiB | 32 MiB |
| >512 GiB | ≤2 TiB | 512 KiB | 64 MiB |
-c, —cluster-size=size Specifies the cluster size of the exFAT file system. The size argument is specified in bytes or may be specified with m/M suffix for mebibytes or k/K suffix for kibibytes and must be a power of two. -f, —full-format Performs a full format. This zeros the entire disk device while creating the exFAT filesystem. -h, —help Prints the help and exit. -L, —volume-label=label Specifies the volume label to be associated with the exFAT filesystem. —pack-bitmap Attempts to relocate the exFAT allocation bitmap so that it ends at the alignment boundary immediately following the FAT rather than beginning at that boundary. This strictly violates the SD card specification but may improve performance and endurance on SD cards and other flash media not designed for use with exFAT by allowing file-system metadata updates to touch fewer flash allocation units. Furthermore, many SD cards and other flash devices specially optimize the allocation unit where the FAT resides so as to support tiny writes with reduced write amplification but expect only larger writes in subsequent allocation units — where the exFAT bitmap would be placed by default. Specifying —pack-bitmap attempts to avoid the potential problems associated with issuing many small writes to the bitmap by making it share an allocation unit with the FAT. If there is insufficient space for the bitmap there, then this option will have no effect, and the bitmap will be aligned at the boundary as by default. -v, —verbose Prints verbose debugging information while creating the exFAT filesystem. -V, —version Prints the version number and exits.
SEE ALSO
Powered by archmanweb, using mandoc for the conversion of manual pages.
The website is available under the terms of the GPL-3.0 license, except for the contents of the manual pages, which have their own license specified in the corresponding Arch Linux package.
How to Format a USB Disk as exFAT on Linux [Graphically and Command Line]
For a long time FAT has been the default choice of filesystem for formatting disks. It is compatible with pretty much all the major operating systems.
The one major problem with FAT filesystem is that you cannot transfer a file larger than 4 GB. This means even if your USB disk has 32 GB of free space, if you try to transfer a ISO image or some other file greater than 4 GB in size, the transfer will fail.
This creates a problem in situation like when you are creating a bootable USB of Windows in Linux. You cannot use NTFS and FAT filesystem has that 4 GB size restrictions.
To overcome the limitations of FAT filesystem, Microsoft came up with exFAT filesystem. And in this tutorial, I’ll show you how to format a USB disk in exFAT filesystem.
Prerequisites
Starting Linux kernel 5.4, exFAT filesystem support is enabled in the Linux kernel itself. Check which Linux kernel version you are running. If it is kernel 5.4 or higher, you should be fine (mostly).
Otherwise, you can enable exFAT support explicitly.
In Ubuntu 20.04 and lower versions, you can use the following command:
sudo apt install exfat-fuse exfat-utilsFor Ubuntu 22.04 and higher, you should use this command instead:
sudo apt install exfat-fuse exfatprogsMethod 1: Format disk as exFAT using GNOME Disks tool
Formatting a drive using GNOME Disks is a straightforward job. It comes preinstalled in a number of Linux distributions.
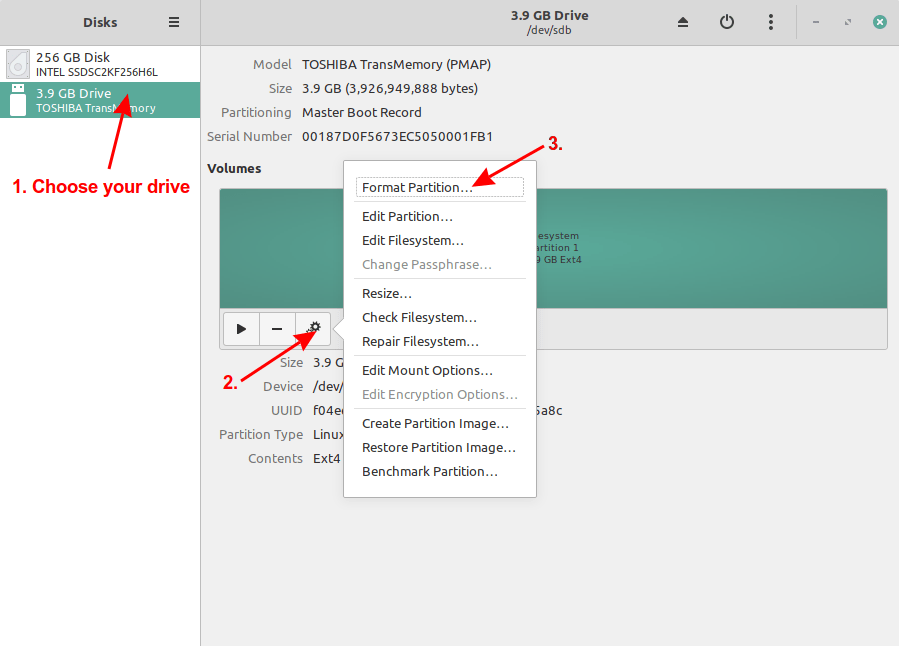
Plug in your external USB disk. Now, look for Disks in menu and open the GNOME Disks application. As a first step choose the drive that you want to format and follow the steps with me.
Warning: Pay attention to the disk you are selecting to format. Don’t format your main disk accidentally.
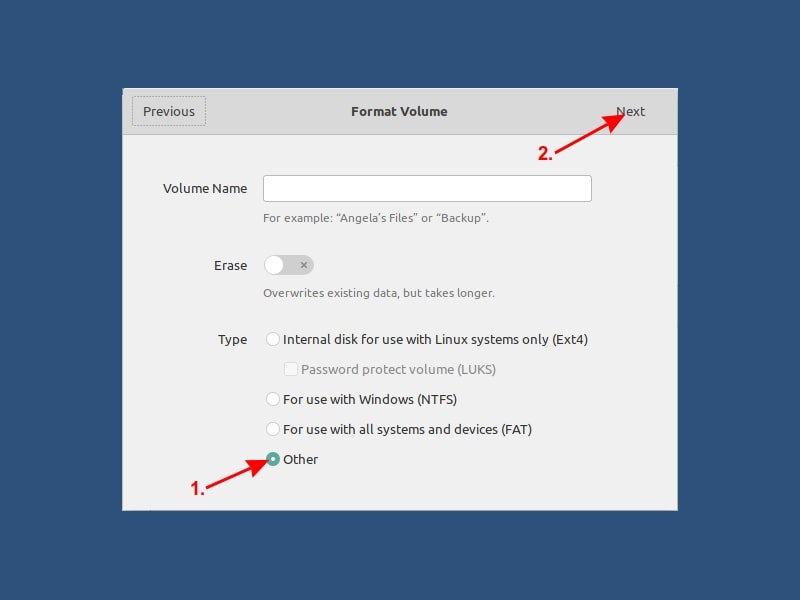
The commonly used file systems like Ext4, NTFS, FAT will appear first. To use exFAT, choose “Other” and then click on “Next“.
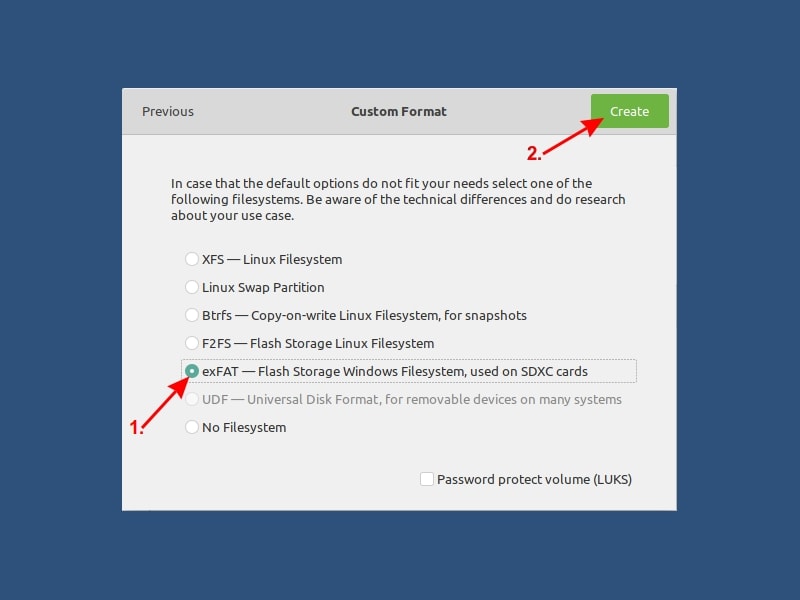
Final step: choose exFAT file system on this screen and then click Create. Job done!
See how easy it was to create a exFAT disk in Linux graphically? Now, let me show you the terminal method as well.
Method 2: Format disk as exFAT in Linux command line (for advanced users)
fdisk is a dialogue-driven command-line utility that creates and manipulates partition tables and partitions on a hard disk. In fact, it is considered one of the best partitioning tools for Linux.
Plug in your external hard disk then type the following command in the terminal:
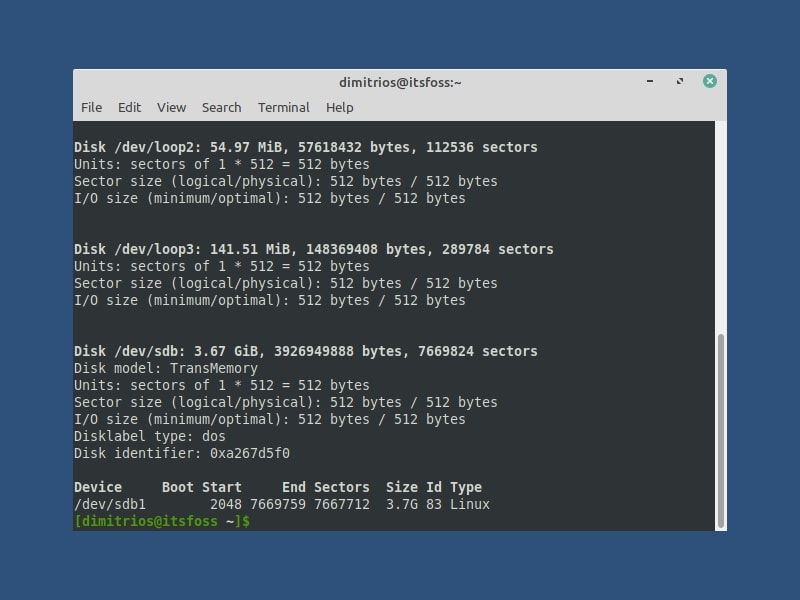
This will list down all the hard disks and partitions in your computer. Identify the partition that you want to format in your external hard disk. Size of the disks should give you a hint. For me, the USB disk was labelled as /dev/sdb1.
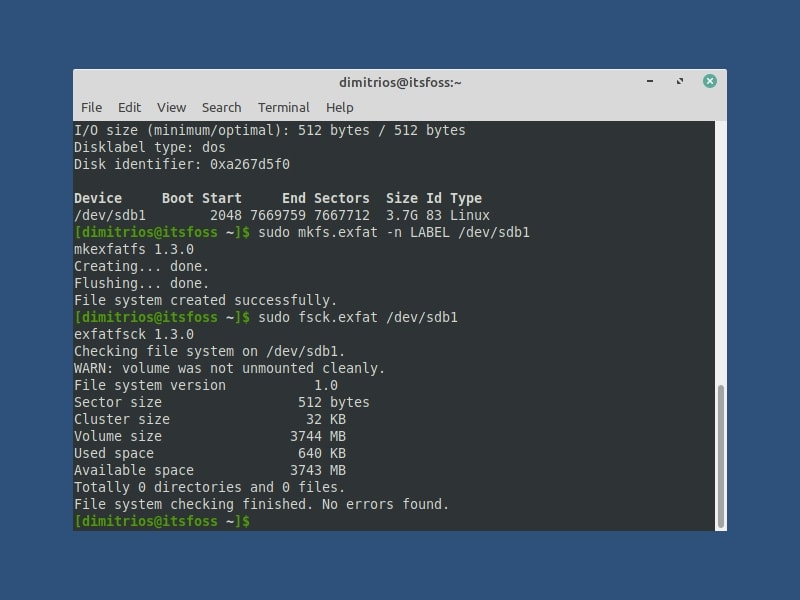
Once you have identified your USB disk, format it as exfat using the command below. Replace /dev/sdXn with your disk’s device ID. LABEL is basically the name you want to give to your disk like Data, MyUSB etc.
sudo mkfs.exfat -n LABEL /dev/sdXnOptionally, run fsck check to make sure the formatting has been done properly.
That’s it. Enjoy the exFAT disk.
Did you succeed in creating exFAT disk?
I hope you find this tutorial simple enough and a step forward to build a solid partitioning knowledge foundation.
Sometimes easy and simple tips and tricks will make you a better Linux in the long term. Our frequent readers know that first hand but if you discovered It’s FOSS recently, you may take the opportunity to explore our handy tutorials.
Don’t forget to subscribe and let me know your questions and suggestions in the comments below.
