- How to Create a New Ext4 File System (Partition) in Linux
- Creating a New Partition in Linux
- Formatting New Ext4 Partition
- Mounting New Ext4 Parition in File System
- Related Posts
- 13 thoughts on “How to Create a New Ext4 File System (Partition) in Linux”
- How to create filesystem on a Linux partition or logical volume
- Create filesystem
- Mount a filesystem
How to Create a New Ext4 File System (Partition) in Linux
The ext4 or fourth extended filesystem is a widely-used journaling file system for Linux. It was designed as a progressive revision of the ext3 file system and overcomes a number of limitations in ext3.
It has significant advantages over its predecessor such as improved design, better performance, reliability, and new features. Although it is best suited for hard drives, it can also be used on removable devices.
This article will show you how to create a new ext4 file system (partition) in Linux. We will first of all look at how to create a new partition in Linux, format it with the ext4 file system and mount it.
Note: For the purpose of this article:
- We will assume that you have added a new hard drive to your Linux machine, in which you will create the new ext4 partition, and
- If you are operating the system as an administrative user, use the sudo command to gain root privileges to run the commands shown in this article.
Creating a New Partition in Linux
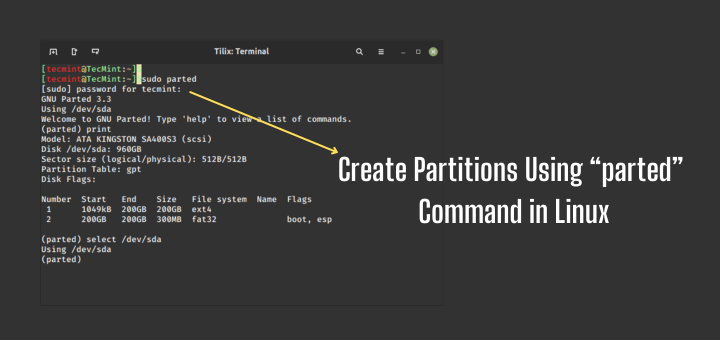
List the partitions using the fdisk -l or parted -l commands to identify the hard drive you want to partition.

Looking at the output in the screenshot above, we have two hard disks added on the test system and we will partition disk /dev/sdb .
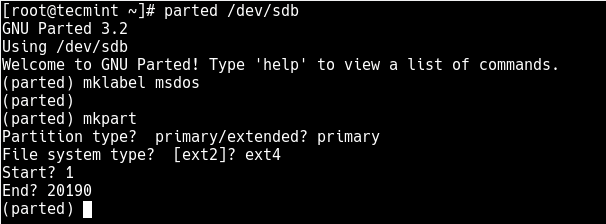
Now use parted command to start creating the partition on the selected storage device.
Then create a partition using the mkpart command, give it additional parameters like “primary” or “logical” depending on the partition type that you wish to create. Then select ext4 as the file system type, set the start and end to establish the size of the partition:
(parted) mkpart Partition type? primary/extended? primary File system type? [ext2]? ext4 Start? 1 End? 20190
To print the partition table on the device /dev/sdb or detailed information about the new partition, run the print command.
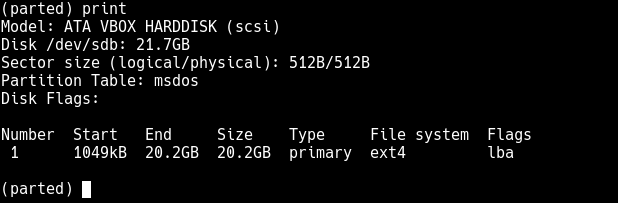
Now exit the program using the quit command.
Formatting New Ext4 Partition
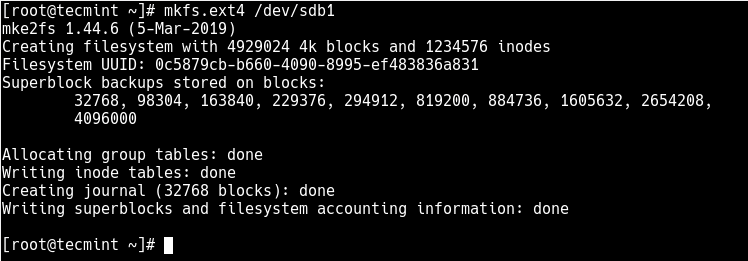
Next, you need to properly format the new partition with the ext4 file system type using the mkfs.ext4 or mke4fs command as follows.
# mkfs.ext4 /dev/sdb1 OR # mke4fs -t ext4 /dev/sdb1
Then label the partition using the e4label command as follows.
# e4label /dev/sdb1 disk2-part1 OR # e2label /dev/sdb1 disk2-part1
Mounting New Ext4 Parition in File System
Next, create a mount point and mount the newly created ext4 partition file system.
# mkdir /mnt/disk2-part1 # mount /dev/sdb1 //mnt/disk2-part1
Now using the df command, you can list all file systems on your system together with their sizes in a human readable format (-h) , and their mount points and file system types (-T) :
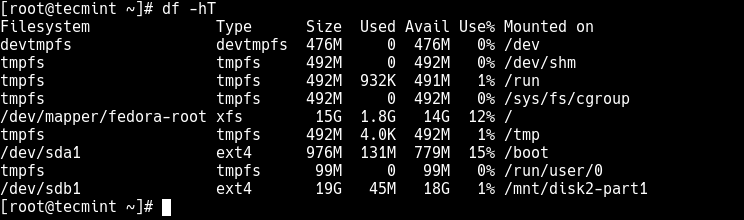
Lastly, add the following entry in your /etc/fstab to enable persistent mounting of the file system, even after a reboot.
/dev/sdb1 /mnt/disk2-part1 ext4 defaults 0 0
You might also like to read these following related articles:
That’s all! In this article, we’ve explained how to create a new partition in Linux, format it with ext4 file system type and mount it as a filesystem. For more information or to share any queries with us, use the feedback form below.
I am an experienced GNU/Linux expert and a full-stack software developer with over a decade in the field of Linux and Open Source technologies
Each tutorial at TecMint is created by a team of experienced Linux system administrators so that it meets our high-quality standards.
Related Posts
13 thoughts on “How to Create a New Ext4 File System (Partition) in Linux”
Hello, I don’t know how Ravi Saive found out the size of the partition, but I’ve found you can use percent to size the partition (you can reply 100% to the question End? and it uses the whole free space available) Reply
Another thing that is missing is what sector size should be considered (physical or logical). In this example, it did not matter because both were the same. However, in my case the two are not the same. Which to choose? I would think that it is the logical sector size, but if we are dealing with /dev/sda (in my case), perhaps this indicates the use of the physical sector size. Reply
This would be a wonderful tutorial if I knew how you got the size for the new partition. It seems that you pulled the number 20190 out of thin air! How do I get the right number if I want to use the whole disk? Reply
0% and 100% as start and end work. Looks like the author copied some really old instructions. mklabel gpt should be your go-to today, otherwise, you will get errors with disks over 2.5ishTB Reply
Thanks for this article. Is there a way of renaming /mnt/disk2-part1 to something else than “disk2-part1“? Reply
# e2abel /dev/sdb1 disk2-part1
I prefer to use GParted to do my disk manipulations. With GParted I do not need to learn and remember cryptic, unintuitive commands. With a GUI application, there is much less chance of using the wrong option or misspelling a command and completely wiping out the entire disk. Reply
People for whom these instructions would be beneficial do not use servers. OTOH, people who use or deal with servers have this procedure memorized. Judging by the questions and comments so far, it seems that the posters have very little idea of what is being done. By using a GUI tool like GParted, they would SEE what is happening with the disk they are trying to partition rather than having to imagine it. I am all for using CLI but when it is actually an improvement on GUI. This is 2021 and, in the 30 years of Linux’s existence, many CLI procedures have been released as GUI tools. For some reason, Linux tech writers are pushing the command line as if it was The Greatest Thing Since Sliced Bread. Sure, CLI may be l33t but it certainly IS NOT inviting and encouraging to new Linux users. How many articles are there extolling the virtues of MS-DOS or even the current Windows command line? Reply
How to create filesystem on a Linux partition or logical volume
In this article I will share the steps to create filesystem on a linux partition or a logical volume and mount it persistently or non-persistently in your Linux system.
On a UNIX system, everything is a file; if something is not a file, it is a process
This statement is true because there are special files that are more than just files (named pipes and sockets, for instance), but to keep things simple, saying that everything is a file is an acceptable generalization. A Linux system, just like UNIX, makes no difference between a file and a directory, since a directory is just a file containing names of other files. Programs, services, texts, images, and so forth, are all files. Input and output devices, and generally all devices, are considered to be files, according to the system.

In computing, a filesystem controls how data is stored and retrieved and helps organize the files on the storage media. Without a filesystem, information in storage would be one large block of data, and you couldn’t tell where one piece of information stopped and the next began. A filesystem helps manage all of this by providing names to files that store data and maintaining a table of files and directories—along with their start/end location, total size, etc.—on disks within the filesystem.
Create filesystem
Before we create filesystem we need a partition. For the sake of this article I have added a virtual disk to my vm and created a partition /dev/sdb . You can verify the list of available partitions using below command
[root@node1 ~]# lsblk NAME MAJ:MIN RM SIZE RO TYPE MOUNTPOINT sda 8:0 0 30G 0 disk ├─sda1 8:1 0 512M 0 part /boot └─sda2 8:2 0 27.5G 0 part ├─centos-root 253:0 0 25.5G 0 lvm / └─centos-swap 253:1 0 2G 0 lvm [SWAP] sdb 8:16 0 2G 0 disk └─sdb1 8:17 0 2G 0 part sr0 11:0 1 1024M 0 rom You can also get the list of available disks and partitions using lsblk
[root@node1 ~]# cat /proc/partitions major minor #blocks name 11 0 1048575 sr0 8 0 31457280 sda 8 1 524288 sda1 8 2 28844032 sda2 8 16 2097152 sdb 8 17 2096128 sdb1 253 0 26738688 dm-0 253 1 2097152 dm-1 9 0 2094080 md0 Decide what kind of filesystem you want to create, such as ext4, XFS, or anything else. Here are a few options:
[root@node1 ~]# mkfs. mkfs mkfs.cramfs mkfs.ext3 mkfs.fat mkfs.msdos mkfs.xfs mkfs.btrfs mkfs.ext2 mkfs.ext4 mkfs.minix mkfs.vfat
For this article I will use mkfs.ext4 to create filesystem with ext4 type.
[root@node1 ~]# mkfs.ext4 /dev/sdb1 mke2fs 1.42.9 (28-Dec-2013) Filesystem label= OS type: Linux Block size=4096 (log=2) Fragment size=4096 (log=2) Stride=0 blocks, Stripe width=0 blocks 131072 inodes, 524032 blocks 26201 blocks (5.00%) reserved for the super user First data block=0 Maximum filesystem blocks=536870912 16 block groups 32768 blocks per group, 32768 fragments per group 8192 inodes per group Superblock backups stored on blocks: 32768, 98304, 163840, 229376, 294912 Allocating group tables: done Writing inode tables: done Creating journal (8192 blocks): done Writing superblocks and filesystem accounting information: done
Mount a filesystem
After you create filesystem using mkfs, you must mount it in your operating system to be able to use it for storing data.
First, identify the UUID of your new filesystem. Issue the blkid command to list all known block storage devices and look for /dev/sdb1 in the output:
[root@node1 ~]# blkid /dev/sdb1 /dev/sdb1: UUID="dac636ff-cde2-4f26-8bfc-a2d7b7ab5aa4" TYPE="ext4"
Create a mount point for this newly created filesystem
[root@node1 ~]# mkdir /mount_point_for_sdb1
Next mount your partition /dev/sdb1 on this mount point
[root@node1 ~]# mount -t ext4 /dev/sdb1 /mount_point_for_sdb1
The df -h command shows which filesystem is mounted on which mount point.
[root@node1 ~]# df -h /mount_point_for_sdb1 Filesystem Size Used Avail Use% Mounted on /dev/sdb1 2.0G 6.0M 1.9G 1% /mount_point_for_sdb1
Substitute it with the UUID identified in the blkid command. Also, note that a new directory was created to mount /dev/sdb1 under /mount_point_for_sdb1 .
A problem with using the mount command directly on the command line (as in the previous step) is that the mount won’t persist across reboots. To mount the filesystem persistently, edit the /etc/fstab file to include your mount information:
UUID=dac636ff-cde2-4f26-8bfc-a2d7b7ab5aa4 /mount_point_for_sdb1 ext4 defaults 0 0
After you edit /etc/fstab , you can umount /mnt/mount_point_for_dev_sda1 and run the command mount -a to mount everything listed in /etc/fstab .
[root@node1 ~]# umount /mount_point_for_sdb1/
Next check if /dev/sdb1 is unmounted properly
[root@node1 ~]# df -h Filesystem Size Used Avail Use% Mounted on /dev/mapper/centos-root 25G 4.0G 20G 17% / devtmpfs 1.9G 0 1.9G 0% /dev tmpfs 1.9G 0 1.9G 0% /dev/shm tmpfs 1.9G 9.2M 1.9G 1% /run tmpfs 1.9G 0 1.9G 0% /sys/fs/cgroup /dev/sda1 488M 198M 255M 44% /boot tmpfs 379M 12K 379M 1% /run/user/42 tmpfs 379M 0 379M 0% /run/user/0
Next run mount -a to mount all the partitions declared in fstab
If everything went right, you can still list df -h and see your filesystem mounted:
[root@node1 ~]# df -h /mount_point_for_sdb1/ Filesystem Size Used Avail Use% Mounted on /dev/sdb1 2.0G 6.0M 1.9G 1% /mount_point_for_sdb1 Lastly I hope the steps from the article to create filesystem and mount it persistently or non-persistently on Linux was helpful. So, let me know your suggestions and feedback using the comment section.
Didn’t find what you were looking for? Perform a quick search across GoLinuxCloud
If my articles on GoLinuxCloud has helped you, kindly consider buying me a coffee as a token of appreciation.

For any other feedbacks or questions you can either use the comments section or contact me form.
Thank You for your support!!