- Create linux device file
- Автоматическое создание файлов устройств
- Операции с файлами
- null — драйвер
- Подведем итог
- How to Create Device Files in Linux Using mknod Command
- mknod Command Syntax
- 1. Create Unnamed Pipe in Linux
- 2. Create a Named Pipe in Linux
- 3. Create a Character Device File in Linux
- 4. Create a Block Device File in Linux
- 5. Create a Device File With Permissions
Create linux device file
Библиотека сайта rus-linux.net
Автоматическое создание файлов устройств
Ранее, в ядре 2.4, автоматическое создание файлов устройств выполнялось самим ядром в devfs с помощью вызова соответствующего API. Однако, по мере того, как ядро развивалось, разработчики ядра поняли, что файлы устройств больше связаны с пользовательским пространством и, следовательно, они должны быть именно там, а не в ядре. Исходя из этого принципа, теперь для рассматриваемого устройства в ядре в /sys только заполняется соответствующая информация о классе устройства и об устройстве. Затем в пользовательском пространстве эту информацию необходимо проинтерпретировать и выполнить соответствующее действие. В большинстве настольных систем Linux эту информацию собирает демон udev, и создает, соответственно, файлы устройств.
Демон udev можно с помощью его конфигурационных файлов настроить дополнительно и точно указать имена файлов устройств, права доступа к ним, их типы и т. д. Так что касается драйвера, требуется с помощью API моделей устройств Linux, объявленных в , заполнить в /sys соответствующие записи. Все остальное делается с помощью udev . Класс устройства создается следующим образом:
struct class *cl = class_create(THIS_MODULE, "");
Затем в этот класс информация об устройстве () заносится следующим образом:
device_create(cl, NULL, first, NULL, "", . );
Здесь, в качестве first указывается dev_t . Соответственно, дополняющими или обратными вызовами, которые должны вызыватся в хронологически обратном порядке, являются:
device_destroy(cl, first); class_destroy(cl);
Посмотрите на рис.1 на записи /sys , созданные с помощью chardrv — запись ( ) и с помощью mynull — запись ( ). Здесь также показан файл устройства, созданный с помощью udev по записи : , находящейся в файле dev .
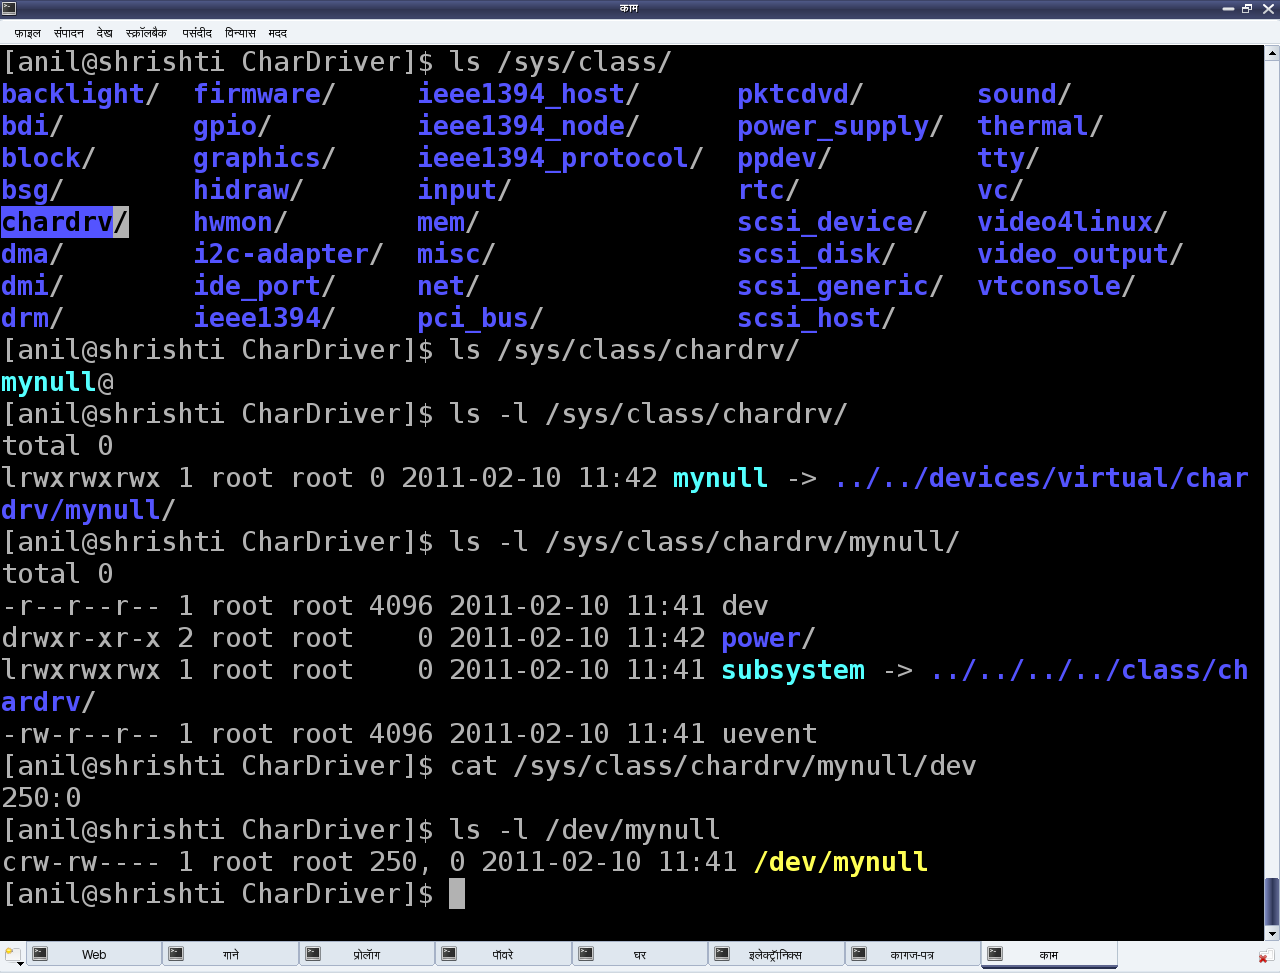
Рис.1: Автоматическое создание файла устройства
В случае, если указаны несколько младших номеров minor, API device_create() и device_destroy() могут вызываться в цикле и в этом случае окажется полезной строка ( ). Например, вызов функции device_create() в цикле с использованием индекса i будет иметь следующий вид:
device_create(cl, NULL, MKNOD(MAJOR(first), MINOR(first) + i), NULL, "mynull%d", i);
Операции с файлами
Независимо от того, что системные вызовы (или, в общем случае, операции с файлами), о которых мы рассказываем, применяются к обычным файлам, их также можно использовать и с файлами устройств. Т.е. мы можем сказать: если смотреть из пользовательского пространства, то в Linux почти все является файлами. Различие — в пространстве ядра, где виртуальная файловая система (VFS) определяет тип файла и пересылает файловые операции в соответствующий канал, например, в случае обычного файла или директория — в модуль файловой системы, или в соответствующий драйвер устройства в случае использования файла устройства. Мы будем рассматривать второй случай.
Теперь, чтобы VFS передала операции над файлом устройства в драйвер, ее следует об этом проинформировать. И это то, что называется регистрацией драйвером в VFS файловых операций. Регистрация состоит из двух этапов. (Код, указываемый в скобках, взят из кода «null -драйвера», который приведен ниже).
Во-первых, давайте занесем нужные нам файловые операции ( my_open , my_close , my_read , my_write , …) в структуру, описывающую файловые операции ( struct file_operations pugs_fops ) и ею инициализируем структуру, описывающую символьное устройство ( struct cdev c_dev ); используем для этого обращение cdev_init() .
Затем передадим эту структуру в VFS с помощью вызова cdev_add() . Обе операции cdev_init() и cdev_add() объявлены в . Естественно, что также надо закодировать фактические операции с файлами ( my_open , my_close , my_read , my_write ).
Итак, для начала, давайте все это сделаем как можно проще — скажем, максимально просто в виде «null драйвера».
null — драйвер
#include #include #include #include #include #include #include #include static dev_t first; // Global variable for the first device number static struct cdev c_dev; // Global variable for the character device structure static struct class *cl; // Global variable for the device class static int my_open(struct inode *i, struct file *f) < printk(KERN_INFO "Driver: open()\n"); return 0; >static int my_close(struct inode *i, struct file *f) < printk(KERN_INFO "Driver: close()\n"); return 0; >static ssize_t my_read(struct file *f, char __user *buf, size_t len, loff_t *off) < printk(KERN_INFO "Driver: read()\n"); return 0; >static ssize_t my_write(struct file *f, const char __user *buf, size_t len, loff_t *off) < printk(KERN_INFO "Driver: write()\n"); return len; >static struct file_operations pugs_fops = < .owner = THIS_MODULE, .open = my_open, .release = my_close, .read = my_read, .write = my_write >; static int __init ofcd_init(void) /* Constructor */ < printk(KERN_INFO "Namaskar: ofcd registered"); if (alloc_chrdev_region(&first, 0, 1, "Shweta") < 0) < return -1; >if ((cl = class_create(THIS_MODULE, "chardrv")) == NULL) < unregister_chrdev_region(first, 1); return -1; >if (device_create(cl, NULL, first, NULL, "mynull") == NULL) < class_destroy(cl); unregister_chrdev_region(first, 1); return -1; >cdev_init(&c_dev, &pugs_fops); if (cdev_add(&c_dev, first, 1) == -1) < device_destroy(cl, first); class_destroy(cl); unregister_chrdev_region(first, 1); return -1; >return 0; > static void __exit ofcd_exit(void) /* Destructor */ < cdev_del(&c_dev); device_destroy(cl, first); class_destroy(cl); unregister_chrdev_region(first, 1); printk(KERN_INFO "Alvida: ofcd unregistered"); >module_init(ofcd_init); module_exit(ofcd_exit); MODULE_LICENSE("GPL"); MODULE_AUTHOR("Anil Kumar Pugalia "); MODULE_DESCRIPTION("Our First Character Driver"); Светлана повторила обычный процесс сборки, добавив при этом некоторые новые проверочные шаги, а именно:
- Собрала драйвер (файл .ko ) с помощью запуска команды make .
- Загрузила драйвер с помощью команды insmod .
- С помощью команды lsmod получила список всех загруженных модулей.
- С помощью команды cat /proc/devices . получила список используемых старших номеров major.
- Поэкспериментировала с «null драйвером» (подробности смотрите на рис.2).
- Выгрузила драйвер с помощью команды rmmod .

Рис.2: Эксперименты с «null драйвером»
Подведем итог
Светлана олпределенно была довольна; она сама написала символьный драйвер, который работает точно также, как и стандартный файл устройства /dev/null . Чтобы понять, что это значит, проверьте пару для файла /dev/null , а также выполните с ним команды echo и cat .
Но Светлану стала беспокоить одна особенность. В своем драйвере она использовала свои собственные вызовы ( my_open , my_close , my_read , my_write ), но, к удивлению, они, в отличие от любых других вызовов файловой системы, работают таким необычным образом. Что же тут необычного? Необычно, по крайней мере с точки зрения обычных файловых операций, то, что чтобы Светлана не записывала, при чтении она ничего не могла получить. Как она сможет решить эту проблему? Читайте следующую статью.
How to Create Device Files in Linux Using mknod Command
In Linux, everything is a file, even physical devices such as disk drives, CD/DVD ROM, and floppy disks are represented using files. However, these files are not regular data files. Instead, these special files are called device files and they can generate or receive the data.
Usually, all the special files are present under the /dev directory. Some of the common examples of special files are /dev/null, /dev/zero, /dev/full, and /dev/sr0.
The special files can be of the type character or block. As the name suggests, the character files process one character at a time where as the block files process multiple characters at a time.
In this advanced guide, we will discuss how to create a device file using the mknod command. After following this guide, Linux users will be able to work with different kinds of device files confidently.
mknod Command Syntax
The syntax of the mknod command is slightly different than the other Linux commands. The main difference is that we need to specify the major and minor numbers while creating a character and block device files:
$ mknod [OPTIONS] [MAJOR] [MINOR] .
In the above syntax, the square brackets ([]) represent the optional arguments whereas angular brackets (<>) represent the mandatory arguments.
In Linux, the major number is used to specify the device driver that needs to be used. This number is assigned while registering a device driver.
In a similar way, the minor number is used to specify the actual device. We can find the reserved major and minor numbers in the Linux kernel’s documentation.
1. Create Unnamed Pipe in Linux
In Linux, we use pipes to enable inter-process communication. In Shell, the pipe is represented using the vertical line (|) . It reads the output of the previous process and sends it as the input to the next process.
Let’s understand this with a simple example:
In this example, we are using the pipe to read the output of the echo command and send it as the input to the wc command for further processing.
Here, we have used the vertical line (|) to create a pipe. However, this creates an unnamed pipe and its scope is limited to the current command only. In the next example, we will see how to create a named pipe.
2. Create a Named Pipe in Linux
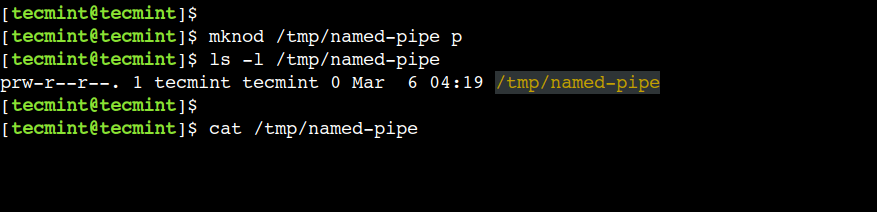
We can use the mknod command to create a named pipe. The named pipe resides on the file system just like any other regular file. However, its main purpose is to allow inter-process communication between unrelated processes.
First, let’s specify the device type as p to create a named pipe:
$ mknod /tmp/named-pipe p $ ls -l /tmp/named-pipe
Now, let’s try to read the file:
Here, we can see that the cat command is waiting infinitely:
Next, let’s open another terminal and write some data to the /tmp/named-pipe file:
$ echo "tecmint.com" > /tmp/named-pipe
Finally, head over to the first terminal to view the result:
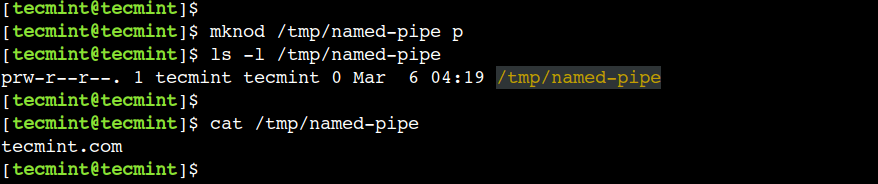
Here, we can see that the echo and cat commands are able to communicate using the named pipe.
3. Create a Character Device File in Linux
In a similar way, we can use the device type as c to create a character device. However, we must have to use the major and minor numbers while creating a character device.
Let’s use the ls command to find the major and minor numbers of the /dev/full device:

In the above output, the comma-separated pair of numbers i.e. 1, 7 represent the major and minor numbers respectively.
In Linux, the /dev/full device always returns the No space left on the device error. To understand this, let’s write some data to this device:

Now, let’s use the mknod command to create a new device that behaves the same as /dev/full device:
$ sudo mknod /tmp/full-device c 1 7
Next, let’s change the file permissions:
$ sudo chmod 666 /tmp/full-device $ ls -l /tmp/full-device
Finally, write some data to the newly created device:
$ echo "tecmint" > /tmp/full-device
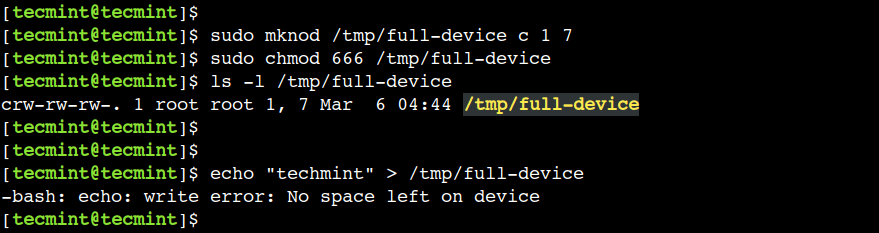
It is important to note that, the newly created character device behaves like the /dev/full device because of the same major and minor numbers.
4. Create a Block Device File in Linux
In addition to this, we can specify the device type as b to create a block device. To create a block device we must have to use the major and minor numbers.
In Linux, /dev/sr0 represents the CD/DVD ROM device. Now, let’s create a new block device that behaves the same as /dev/sr0.
First, let’s find out the major and minor numbers of the /dev/sr0:

In the above output, we can see that its major and minor numbers are 11 and 0 respectively.
Now, let’s create a new block device with the same major and minor numbers:
$ sudo mknod /tmp/dvd-rom b 11 0 $ ls -l /tmp/dvd-rom

Next, let’s mount the ISO image from the CD/DVD ROM to the /mnt directory and verify that the mount operation succeeds:
$ sudo mount /tmp/dvd-rom /mnt/ $ ls -1 /mnt/
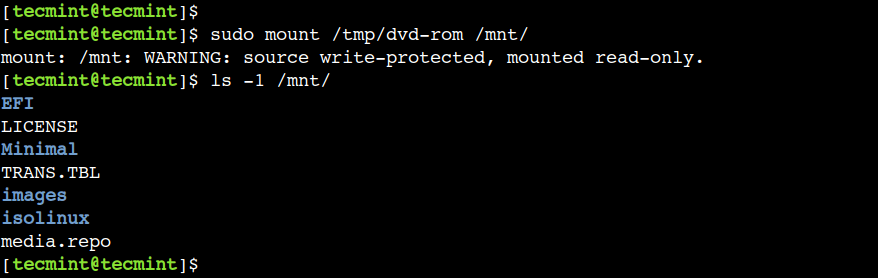
In this example, we can see that the /tmp/dvd-rom block device is able to access the ISO image from the CD/DVD ROM.
5. Create a Device File With Permissions
Sometimes, we need to modify the access permission of the device file before using it. In such cases, we have to use the chmod command. However, we can achieve the same result using the mknod command instead of using two separate commands.
To understand this, let’s use the -m option to set access permissions while creating a named pipe:
$ sudo mknod -m 444 /tmp/pipe-with-permissions p
Now, let’s verify that the permissions have been set properly:
$ ls -l /tmp/pipe-with-permissions

In this example, we used the -m option with the named pipe. However, we can use it with the character and block devices as well.
Do you know of any other best example of the mknod command in Linux? Let us know your views in the comments below.