- Create partition linux windows
- MBR, GPT, EFI – What’s the Difference?
- How to Create Partitions in macOS
- How to Create Partitions Linux
- Conclusion
- 3 Steps to Create Ext4 Partition in Windows 10, 8, 7|Freeware
- Need to create an ext4 partition from windows 10
- 3 Steps to create Ext4/Ext3/Ext2 partition in Windows
- Summary
- Free Partition Manager
- Still Need Help?
Create partition linux windows
Windows 10 can use as little as four primary partitions depending on your computer configuration—using the MBR partition scheme—or as many as 128 if you are using the newer GPT partition scheme. The GPT partition is technically unlimited, but Windows 10 will impose a limit of 128, but each is primary. Within a primary partition, you can have an extended primary partition and create additional logical partitions. Extended partitions work around the limits of MBR, but there are limitations associated with it, too, since they cannot be used to keep a bootable copy of Windows. This is where the advantage of the newer UEFI GPT standard comes in.
MBR, GPT, EFI – What’s the Difference?
These acronyms refer to your operating system’s partitioning and boot scheme to handle disks in Windows. MBR – known as the master boot record, has been around for many decades and accompanies the older BIOS (Basic Input Output System) used to boot older computers. When your computer starts, it checks the BIOS for a bootloader (Windows 10 known as winload.exe), which loads the operating system into the main memory. EFI – known as the extensible firmware interface, came into the mainstream more than a decade ago with systems such as the first Intel Macs and computers pre-loaded with Windows Vista. UEFI offers more advanced options than BIOS, supporting features such as a graphical user interface and mouse support, making it easier to configure boot and hardware settings. GPT – GUID or Global Unique Identifier Partition Table is the successor to MBR and is an integral part of modern UEFI systems for booting Windows. If you are using a drive that’s larger than 2 TBs, GPT is recommended. Check out our guide to learn more about configuring your computer boot options.
There are multiple ways to create a partition in Windows 10. For example, you can use the operating systems built-in Disk Management utility, Disk Part from the command line, or a third-party program such as Easeus Partition Home (free). (Note: We recommend you suspend BitLocker Drive Encryption before making changes to your partition.) Press Windows key + X and click Disk Management. Next, select the drive, right-click it, then click Shrink Volume to create a new logical partition.  Your ability to shrink the partition will depend on certain factors. According to Windows: You cannot shrink a volume beyond the point where any unmovable files are located.
 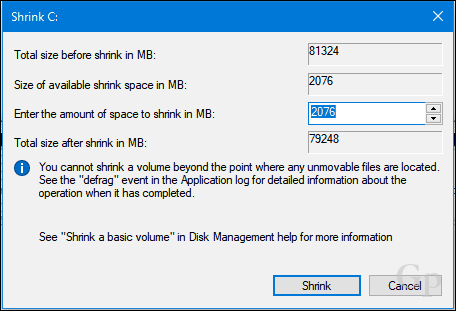 Clearly, I have more than 2 GB of free space available that I can shrink, so what’s blocking that? This can be attributed to many factors. First, files on the drive such as your hibernation file, page file, or shadow copy files used by System Restore and Previous versions might be in locations on the drive that cannot be moved. It turns out that the easiest thing you can do is temporarily disable all three to shrink the drive to the desired size. To disable hibernation, click Start, type: CMD, right-click CMD, then click Run as administrator. At the command prompt, type the following, then hit Enter, exit the command prompt, then restart your computer:
Click Start, type: CMD, right-click CMD, then click Run as administrator to disable System Protection. At the command prompt, type the following, then hit Enter, exit the command prompt, then restart your computer:
Disable-ComputerRestore -Drive C:
To disable Pagefile, click Start, type: CMD, right-click CMD, then click Run as administrator. At the command prompt, type each command, then hit Enter, exit the command prompt, then restart your computer:
wmic computersystem set AutomaticManagedPagefile=False wmic pagefileset where name="C:\\pagefile.sys" delete
Open Disk Management again, right-click the partition, then click Shrink. Choose the amount of space you would like to allocate for the partition. For my purposes, I will choose 3000 MBs (3 GBs) then click Shrink. 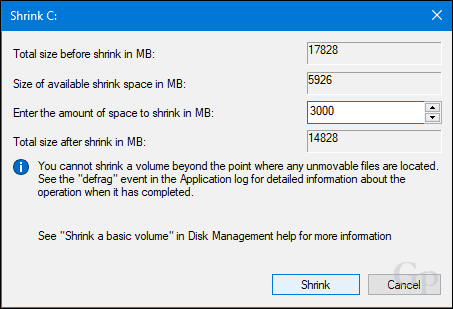 This will create a new unallocated partition within Disk Management. Currently, it is not usable, so you will need to initialize it. First, Right-click the partition, then click New Simple Volume…
 Click Next.
  If you want, you can shrink the partition even further to create additional partitions. For my purposes, I will stick with the current volume size. Click Next.
  You can assign an available drive letter so that the partition will be mounted in File Explorer. Click Next.
  You can give the volume a label so it can be easily recognized. You also have the option of choosing another file system such as FAT or FAT32. Click Next
  Click Finish to apply changes.
  Your new partition will show up in Disk Management and File Explorer as a local drive. You can store files there or even redirect your personal folders there.
  If you don’t want to go through all this trouble, you can download a free tool such as Easeus Partition Manager, and it will take care of all of this for you. One last thing: If disabled your hibernation, page file, or system protection, make sure you re-enable them all in an administrator command prompt:
- Enable hibernation: powercfg -h on
- Enable system protection: Enable-ComputerRestore -Drive C:
- Enable pagefile: wmic computersystem set AutomaticManagedPagefile=True
How to Create Partitions in macOS
As with most things in macOS, it’s dead simple. You can, of course, do this from the Terminal, but we are not gonna go there today. So instead, to create a simple partition, we will use Disk Utility, which you can find in the Finder > Applications > Utilities folder, or just press Command + Spacebar then type Disk Utility.

Select the drive you want to edit within the sidebar, then click the Partition button.

Select the slider on the pie chart, then drag it until the desired size is reached. Finally, click Apply to confirm changes.

Wait while changes are applied.


Proceed to label the drive.

How to Create Partitions Linux
Users shouldn’t feel apprehensive about partitioning in Linux; it’s just as easy to do as Windows 10 and macOS. For this article, I will be using Ubuntu Linux, but the same principles should work for any Gnome-based distro.
Partitioning in Linux is not really an out-of-the-box experience like it is on Windows 10 or macOS, but with third-party tools, it can be. For this purpose, I recommend you download the free GParted Editor from the Ubuntu software center. It’s a graphical partition manager that’s easy to understand and navigate. Of course, GParted also works on Windows too.

After setting up GParted, launch the app, then select the partition you want to edit. Next, Right-click on it, then click Resize/Move.

Click in the field, Free space following (MiB): enter the amount for the partition you want to create, then click Resize/Move.

Right-click the unallocated partition, then click New.

You can make further adjustments to the partition such as resize, choose whether you want it to be a primary or logical drive, file system, and label it. Click Add.

Click the green checkmark to apply your changes.

Wait while the partition scheme is modified.


Your new partition will now appear in the Launcher and File manager.

Conclusion
That’s a look at partitioning disks in popular desktop operating systems. Sure, there are other ways you can do this, but I thought I would cover the most convenient methods on each platform, whether using built tools or third-party solutions.
Let us know why you’re creating partitions on your hard drive and how it goes by dropping us a line in the comments.
3 Steps to Create Ext4 Partition in Windows 10, 8, 7|Freeware
When you need to create an Ext4 partition in Windows, the free AOMEI Partition Assistant Standard can help you a lot. It is able to create Ext4/3/2 partition under Windows environment without any efforts.

By Emily / Last Updated May 12, 2023
Need to create an ext4 partition from windows 10
«I am trying to install Linux operating system while keeping the existing Windows 10 installation so that I can make a dual-boot. So I need to create ext4 partition in my internal hard disk from windows 10. I have tried the Windows native Disk Management tool to create an Ext4 partition but found no such a file system offered. So is there any program to achieve this goal.»
The Ext4 journaling file system or fourth extended filesystem is a journaling file system for Linux operating system, developed as the successor to Ext3. If you want to dual boot Linux under Windows 10 environment, it is necessary to create an Ext4 partition for Linux data storage and installation. Since Ext4/3/2 partition cannot be recognized by Windows, it is not possible to create an Ext4 partition or format partition to Ext4 using Windows tools.
3 Steps to create Ext4/Ext3/Ext2 partition in Windows
Although Windows native tools cannot help create Ext4/3/2 partition, luckily, some free partition manager can make it done easily. The free AOMEI Partition Assistant Standard is one of them. It works well in all editions of Windows 10/8/7 and Windows XP/Vista. It is able to create or format Ext4 partition easily in Windows PC. Just click the below button to download the freeware and learn how to create an Ext4 partition in Windows 10.
Note: this demonstration is based on the situation where there is unallocated space available on the disk. If there is not, you can shrink another partition to get one.
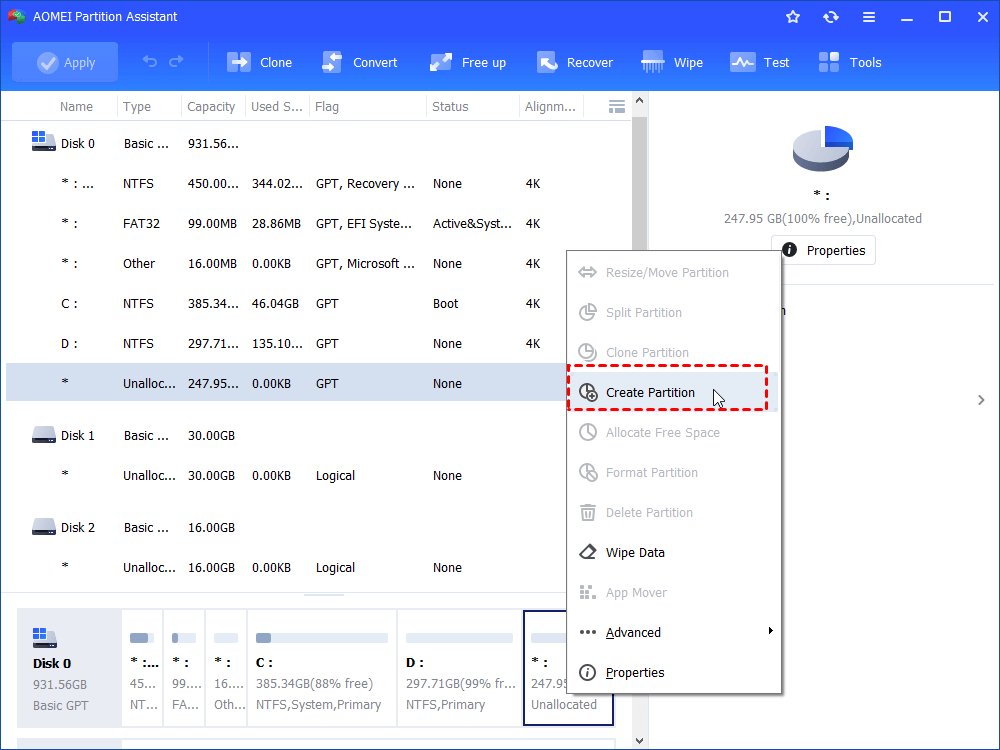
Step 1. Install and launch AOMEI Partition Assistant Standard. Right-click the unallocated space and choose “Create Partition”.
Step 2. Choose Ext4 in the file system and click “OK”.

Step 3. Finally, click on “Apply” to commit the pending operation.
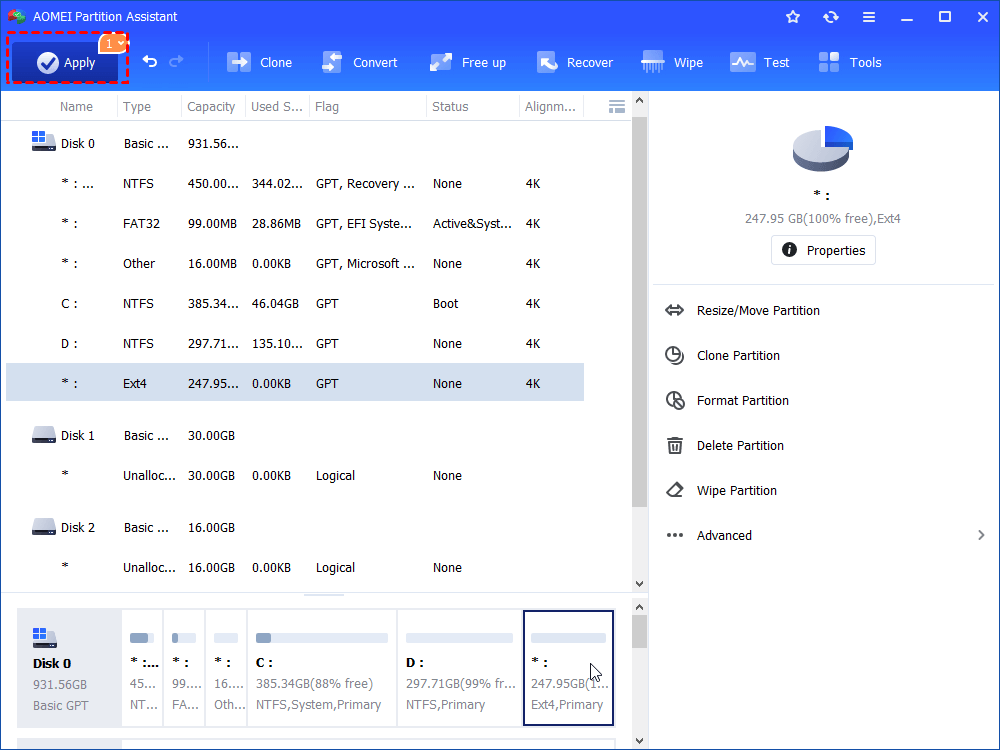
When it is finished, you will get an Ext4 partition on the disk. But you cannot see it in your Windows File Explorer because Windows operating system cannot recognize Ext file systems. Besides creating or formatting partition, this freeware is also able to delete/move/merge/clone partition and more.
Summary
So, with the free AOMEI Partition Assistant Standard, you can create Ext4 partition in Windows 10/8/7 by 3 simple steps. To unlock more advanced features like transfer OS to SSD, clone hard disk, convert disk to MBR/GPT without deleting partitions, allocate free space from one partition to another, ect, you can upgrade to AOMEI Partition Assistant Professional.
Free Partition Manager

- Resize and Move Partition
- System/Disk Clone
- Convert MBR/GPT Disk
- Check & Fix Disk Errors


Still Need Help?
Have your problem been solved? If not, please input query in the search box below.