- HowTo: Create Patch Using Diff Command – Linux
- Create a Patch for a Single File in Linux
- Apply a Patch to a File
- Undo a Patch
- Create a Patch for a Directory in Linux
- Apply a Patch to a Directory
- Undo a Patch
- How to Run “patch” Command in Linux?
- Syntax:
- Creating a Patch File Using “diff”:
- Source Code File 1:
- Source Code File 2:
- Checking Difference:
- Applying the Patch File:
- Take a Backup Before Applying Patch:
- Setting Backup File Version
- Validate Patch Files
- Reverse/Undo a Patch
- Conclusion:
- About the author
- Aqsa Maqbool
- How to create a patch for a whole directory to update it?
- 4 Answers 4
- 7 Patch Command Examples to Apply Diff Patch Files in Linux
- 1. Create a Patch File using diff
- 2. Apply Patch File using Patch Command
- 3. Create a Patch From a Source Tree
- 4. Apply Patch File to a Source Code Tree
- 5. Take a Backup before Applying the Patch using -b
- 6. Validate the Patch without Applying (Dry-run Patch File)
- 7. Reverse a Patch that is Already Applied (Undo a Patch)
HowTo: Create Patch Using Diff Command – Linux
If you have made some changes to the code and you would like to share these changes with others – the best way is to provide them as a patch file.
diff is the Linux command line tool that is used for creating patches (sometimes called diffs) and requires that you have two copies of the code: one with your changes and one without.
This article explains how to create a patch for a single file or for a whole directory using diff and how to apply this patch after.
Create a Patch for a Single File in Linux
Let’s say you have some original file.
You make some changes in it and save the result to a new updated file.
Cool Tip: Have forgotten the meaning of some term in Git? Not a problem! Simply read and bookmark this article! This article →
To create a patch file containing the changes you’ve made, run the following command:
$ diff -u OriginalFile UpdatedFile > PatchFile
Apply a Patch to a File
A person, who has the original file and wants to apply the changes you’ve made, can patch the original file with the below command:
Now the original file has the same content as the updated file.
Undo a Patch
To revert a previously applied to a file patch, use this command:
Create a Patch for a Directory in Linux
You recursively copy its content to some new directory and do the necessary updates in it.
To create a patch file containing the modifications you’ve made, run the following command:
$ diff -ruN OriginalDir UpdatedDir > PatchFile
| Option | Description |
|---|---|
| -r | Recursively compare any subdirectories found |
| -u | Create a diff file in the unified format |
| -N | Treat absent files as empty |
Apply a Patch to a Directory
A person, who has the original directory and wants to apply the changes you’ve made, has to copy the original directory and the patch file to some location (e.g. /tmp ), go to that location and apply the patch with this command:
| Option | Description |
|---|---|
| -p0 | Apply the patch to the same directory structure as when the patch was created |
Now the original directory contains the content of the updated directory.
Undo a Patch
Cool Tip: Trouble with a file character encoding? Find out how to fix it! Read more →
To revert a previously applied to a directory patch, use this command:
How to Run “patch” Command in Linux?
![]()
The “patch” is a command for adding patch files to source code or text files. It takes input as a patch file and applies differences to original files. We use the “diff” tool to get the difference.
The “diff” is abbreviated as “differences” and is used to compare the content of two files and list the changes in standard output.
A set of source codes makes up a piece of software. Developers build the source code that evolves over time. Getting a new file for each update is unrealistic or time-consuming. Therefore, the safest method is to distribute improvements only. The modifications are made to the old file, and then a new or patched file is created for the new software version.
This guide shows you how to use the “diff” command to generate a patch file and then apply it with the “patch” command.
Syntax:
The syntax of the “patch” command is as follows:
$ patch [ options ] [ originalfile [ patchfile ] ]
Creating a Patch File Using “diff”:
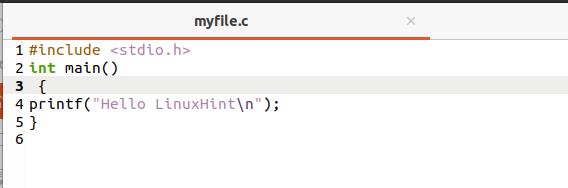
Source Code File 1:
Firstly, two different versions of a source code are required to create a patch file. The source code file I have created is named as “myfile.c”:s
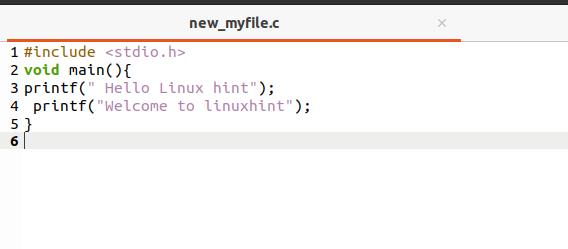
Source Code File 2:
Now, copy the content of myfile.c in the new_myfile.c, using:
Make some changes in the newly-created file:
Checking Difference:
Let’s create a patch file named as myfile.patch:

You can print the patch file by executing the command below:

Applying the Patch File:

Ensure that the patch file is in the directory where the source code file is placed.
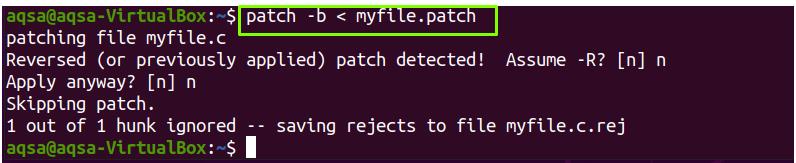
Take a Backup Before Applying Patch:
Use “-b” option to build a backup of the patch file:
Setting Backup File Version
If you need multiple backups of a single backup file, then use the “-V” option. It sets the version number of each backup file. Execute the command given below:

Validate Patch Files
If you want to verify or observe the outcome of patching, then use “–dry-run” option. It does not make any modification to the original file:

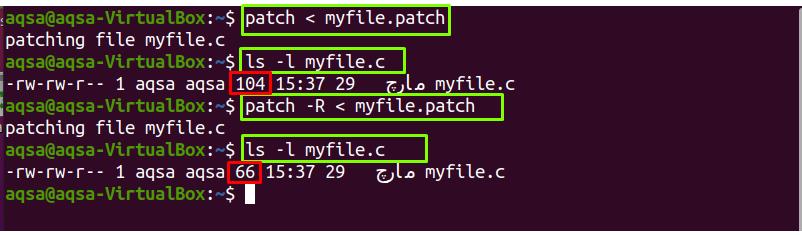
Reverse/Undo a Patch
The “-R” option is used to reverse or undo a patch that has already been applied.
Conclusion:
In Linux operating system, “patch” is a command that allows us to apply patch files to the source codes or configuration files. The patch file is used for software updating purposes. The difference between the original and new files is held in patch files and the “diff” command is used to get the difference or patch. We discussed the usage of the “diff” and the “patch” commands with a number of options such as making backups, dry-running, and reversing the applied patch.
About the author
Aqsa Maqbool
As a Software engineer, I am passionate to write about various IT related
articles but have deep interest in Linux. I spend most of my time reading Linux related blogs and IT related books. I want to serve the world with my writing skills.
How to create a patch for a whole directory to update it?
I know there are several threads on this already, but no one has fully explained exactly how to perform the initial diff to create the patch file, then how to apply that patch to the initial directory to update it. In my case, there is a directory of files that anyone can download from the web. I have taken that directory and made changes to it, and want to create a patch file such that others can apply it to the downloaded directory to reproduce exactly what I have in my modified directory. Help? What do I need to tell the other person with respect to how to apply my patch?
4 Answers 4
I just had this same problem — lots of advice on how to half do it. Well, here is what I did to get both the patching and unpatching to work:
- Put copies of both directories in say /tmp, so we can create the patch file, or if brave, get them side by side — in one directory.
- Run an appropriate diff on the two directories, old and new:
diff -ruN orig/ new/ > file.patch # -r == recursive, so do subdirectories # -u == unified style, if your system lacks it or if recipient # may not have it, use "-c" # -N == treat absent files as empty If a person has the orig/ directory, they can recreate the new one by running patch.
To Recreate the new folder from old folder and patch file:
- Move the patch file to a directory where the orig/ folder exists
- This folder will get clobbered, so keep a backup of it somewhere, or use a copy.
mv orig/ new/ # if the folder names are different I’m a mac guy so no idea. What you have to do is check the options for patch and diff on Cygwin. That’s why I added the comments above on what the options mean — so if one or the other program offers different options you can figure out what to change to get it to work. Conceptually all patch/diff programs should support the functionality.
@CharanPai «diff» does not support binary files, so I assume not. You might be able to create your own command file wrapper to do this. What you would do is binhex your binary data files — create a text file for each in binhex or similar ascii format. Then diff those files, and after the patch is applied, unbinhex the (possibly revised) binhex file bad into binary.
@DavidH is it possible to omit those outer directory names? Or is it neccessary that patch should contain new and orig directory names?
patch was patching the new/ not orig/ directory for me, but I found the -d option which allows you to say cd into that directory first before applying the patch and then you can adjust the -p N argument accordingly.
I needed to create a patch file and send it to someone so they could update their directory to match mine. There are many caveats with diff and patch however, so it ended up taking me hours to figure out something so conceptually simple. Absolute paths seem to be preferred over relative paths, and many of the options seem to have evolved from niche use cases. I finally figured out a solution based on David H’s answer, with additional tips from Lakshmanan Ganapathy):
- Back up your directory to directory.orig
- Modify your directory to reach the desired state
- Save diff from directory.orig to directory in file.patch so name matches for recipient
# to create patch: # copy backup to something like .orig alongside it cp -r / /.orig # create/update/delete files/folders in until desired state is reached # change working directory to cd / # create patch file alongside diff -Naru ../.orig . > ../file.patch # -N --new-file Treat absent files as empty. # -a --text Treat all files as text. # -r --recursive Recursively compare any subdirectories found. # -u -U NUM --unified[=NUM] Output NUM (default 3) lines of unified context. # to apply patch: # change working directory to cd / patch -s -p0 < /file.patch # -s or --silent or --quiet Work silently, unless an error occurs. # -pN or --strip=N Strip smallest prefix containing num leading slashes from files. # to undo patch (note that directories created by patch must be removed manually): # change working directory to cd / patch -Rs -p0 < /file.patch # -R or --reverse Assume that patch was created with the old and new files swapped. # -s or --silent or --quiet Work silently, unless an error occurs. # -pN or --strip=N Strip smallest prefix containing num leading slashes from files. 7 Patch Command Examples to Apply Diff Patch Files in Linux
When there is a security fix available for a particular software, we typically do a binary upgrade using the package management tools like yum or apt-get. But, there might be situation where you have installed a software by compiling it from the source code. In those situation, how do you apply the security fix to the software? The answer is to download the security patch and apply it to the original source code and re-compile the software. This tutorial explains how to create a patch file using diff, and apply it using patch command.
A patch file is a text file which contains the differences between two versions of the same file (or same source-tree). Patch file is created by using diff command.
1. Create a Patch File using diff
#include int main(int argc, char *argv[])
$ diff -u hello.c hello_new.c > hello.patch
--- hello.c 2014-10-07 18:17:49.000000000 +0530 +++ hello_new.c 2014-10-07 18:17:54.000000000 +0530 @@ -1,5 +1,6 @@ #include -int main()
2. Apply Patch File using Patch Command
The “patch” command takes a patch file as input and apply the differences to one or more original file(s), producing patched versions.
The hello.patch file contains the name of the file to be patched. Once the file is patched, both hello.c and hello_new.c will have the content.
3. Create a Patch From a Source Tree
The above example was so simple that it works only with one file. We will see how to create and apply patch for a complete source tree by taking “openvpn” source code as example. I’ve downloaded 2 version of openvpn, openvpn-2.3.2 and openvpn-2.3.4.
tar -xvzf openvpn-2.3.2.tar.gz tar -xvzf openvpn-2.3.4.tar.gz
diff -Naur /usr/src/openvpn-2.3.2 /usr/src/openvpn-2.3.4 > openvpn.patch
The above command will operate recursively and find the differences, and place those differences in the patch file.
4. Apply Patch File to a Source Code Tree
Please note that we are executing the command from /usr/src/. The patch file contains all the filenames in absolute path format( from root ). So when we execute from /usr/src, without the “-p” option, it will not work properly. -p3 tells the patch command to skip 3 leading slashes from the filenames present in the patch file. In our case, the filename in patch file is “/usr/src/openvpn-2.3.2/aclocal.m4”, since you have given “-p3”, 3 leading slashes, i.e. until /usr/src/ is ignored.
5. Take a Backup before Applying the Patch using -b
You can take a backup of the original file before applying the patch command using the -b option as shown below.
Now you will have a file name “hello.c.orig”, which is the backup of the original hello.c. You can also use -V to decide the backup filename format as shown below. Now you will have a file name “hello.c.~1~”.
6. Validate the Patch without Applying (Dry-run Patch File)
You can dry run the patch command to see if you are getting any errors, without patching the file using –dry-run option as shown below.
7. Reverse a Patch that is Already Applied (Undo a Patch)
You can notice from the filesize, that the patch, which is applied already is reversed when we used the -R option.