- Linux Proxy 101: How to Setup a Proxy Server on Linux
- How to Set up Proxies Temporarily on Linux
- Setting Proxies That Does Not Require Username/Password Authentication
- Setting Proxies with Username and Password Authentication
- Setting Proxies With Domain
- Handling @ Character in Password
- How to Set Up Permanent Proxies on Linux
- How To Verify Your Proxy Settings
- Create a SOCKS proxy on a Linux server with SSH to bypass content filters
- Set up SOCKS5 SSH tunnel
- Use SOCKS proxy in Chrome/Firefox
- Encrypted Traffic
- Bypassing firewall limitations
- Testing SOCKS5 proxy
Linux Proxy 101: How to Setup a Proxy Server on Linux
Are you trying to make use of proxies on your Linux-based computer? Then you have to configure it. This article will show you how to set up proxies on Linux to access the Internet.

The use of proxies cannot be overemphasized. With a proxy server, you can circumvent geolocationrestrictions, access localized web content, unblock websites, and make use of automation software. All the popular Operating Systems in the market have support for proxies, and Linux is not an exception.
An overwhelming number of Internet marketers and privacy concerns individuals on the Internet are using Linux-based operating systems. Surprisingly, a good number of them do not know how to configure proxies on their machine. If you’re one of them, you’re on the right page as you are going to be learning about Linux proxy settings here.
When it comes to setting proxies on Linux, you need to know that each distribution of Linux has its own specific configuration method. Not only that, but you also need to be aware that some applications can outrightly disregard your proxy setting and bypass it. Some of the applications would require proxies to set their own way.
Whatever the case may be, make sure you test the proxies and make sure they work before using them for the use case you set them up for. There are many ways of setting proxies on Linux. Some of these methods will be discussed below.
How to Set up Proxies Temporarily on Linux

Not everyone wants to make use of proxies all the time. For some users, the use of proxies has to be ones in a while when the need arises. And after using them for the required use case, they drop them and continue accessing the Internet with their real IP address. To set up proxies temporarily for the current session, you need to do that using the http_proxy & https_proxy environment variable. Launch the terminal and choose one of the options available to you below.
Setting Proxies That Does Not Require Username/Password Authentication
Setting proxies that require no username and password authentication are the easiest in Linux. This is because you only need to specify the server IP and Port. There are two classes of proxies that do not need username and password for authentication.
These are free/public proxies that are considered low quality and proxy servers that provide IP authentication as an alternative. Some providers even have IP authentication as the only means of authentication. For proxies like this, whitelist your device IP from the dashboard the proxy provider provided. After whitelisting the IP address, use the below command for setting the proxies temporarily.
# export http_proxy=http://SERVER:PORT/
Setting Proxies with Username and Password Authentication

When a proxy server requires you to authenticate using a username and password, then you need to modify the command above slightly to accommodate the username and password. Below is the modified code.
If the username and password are correct and you have a valid subscription, then you have set up proxies.
Setting Proxies With Domain
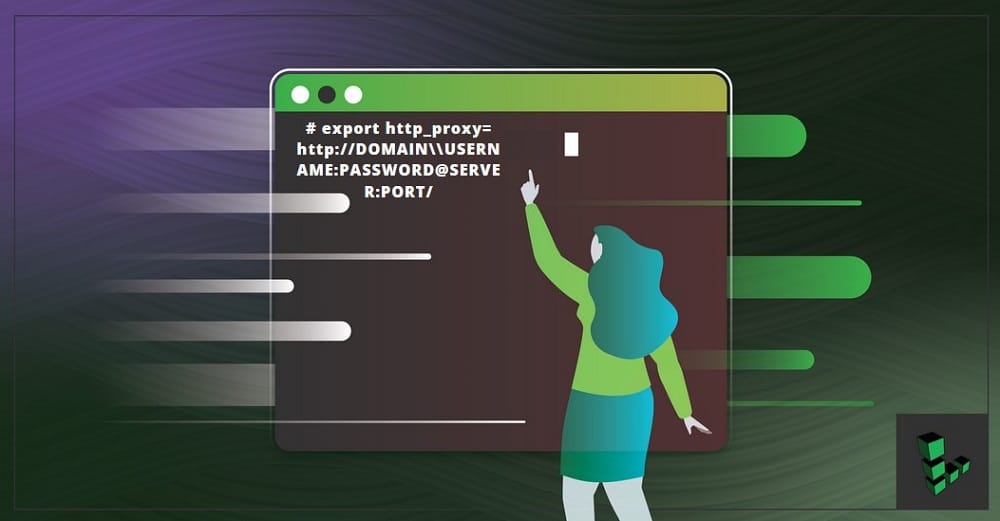
For proxies that require domain details to be setup, run the following modified code.
Handling @ Character in Password
Obviously, you wouldn’t have the @ as a character in your username. However, it commonly used in passwords. Use the below command when your username or password has the @ character.
Look at the code above; you will see a backslash (\) before the @.
How to Set Up Permanent Proxies on Linux

If you wouldn’t want to be setting proxies every now and then, then you need to set up proxies using the environment variable. This is done by modifying the file /etc/environment using the code below.
# echo “http_proxy=http://proxy.example.com:3128/” >> /etc/environment
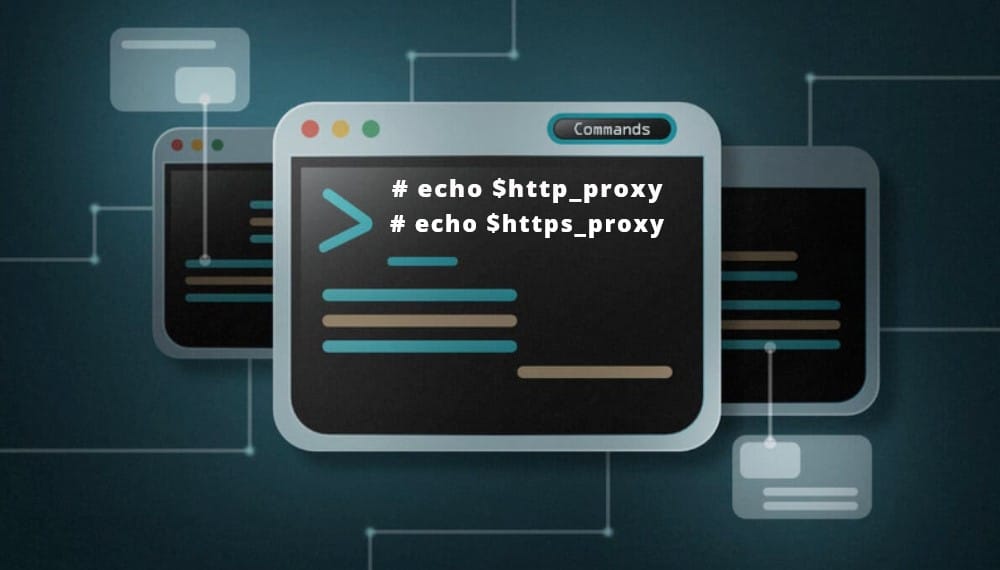
How To Verify Your Proxy Settings

Linux provides an easy way to check whether you have set up proxies on your machine or not. You will need to use the terminal to check this. Use the commands below. If their values are empty, then your proxies have not been set.
Some times, the above might return values, but your browser isn’t making use of them. Some browsers can decide to overlook your default proxy settings. To check if you’re accessing the Internet using the proxy IP address, visit the WhatIsMyIPAddress website – by click this link. The IP address which you use in accessing the Internet will be displayed. Also, for every software you intend to use, read about the software as some of them tend to disregard the global proxy settings – if that’s the case, you then have to set up proxies in the interface provided by that software.
If you are just concerned about privacy, then a VPN might be a better option. This is because unlike proxies that do not force all applications that access the Internet through them, VPN makes sure all Internet connections go through it. With a VPN set up, you will not have to worry about a particular software disregarding your proxies.
Setting proxies on Linux is actually very easy, especially if you know how to use the terminal – and if you don’t, I advise you to do. With just a few commands, you can get your Linux machine to work with a proxy server. However, do not just configure a proxy and think all your web requests will go through it. You need to confirm if the configuration was successful, and your applications aren’t ignoring it.
Create a SOCKS proxy on a Linux server with SSH to bypass content filters
Are you on a network with limited access? Is someone filtering your internet traffic, limiting your abilities? Well, if you have SSH access to _any _server, you can probably set up your own SOCKS5 proxy and tunnel all your traffic over SSH.
From that point on, what you do on your laptop/computer is sent encrypted to the SOCKS5 proxy (your SSH server) and that server sends the traffic to the outside.
It’s an SSH tunnel on steroids through which you can easily pass HTTP and HTTPs traffic.
And it isn’t even that hard. This guide is for Linux/Mac OSX users that have direct access to a terminal, but the same logic applies to PuTTy on Windows too.
Set up SOCKS5 SSH tunnel
You set up a SOCKS 5 tunnel in 2 essential steps. The first one is to build an SSH tunnel to a remote server.

Once that’s set up, you can configure your browser to connect to the local TCP port that the SSH client has exposed, which will then transport the data through the remote SSH server.
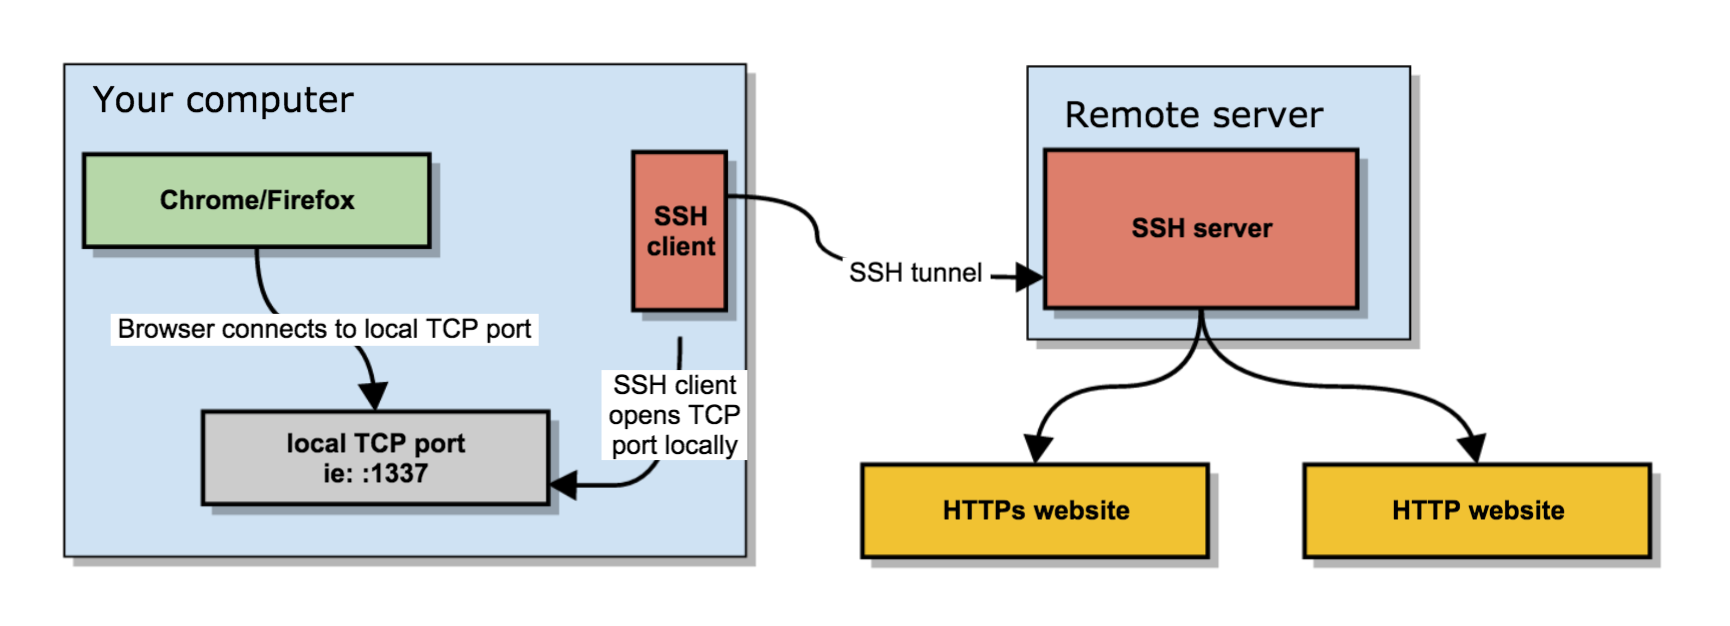
It boils down to a few key actions;
- You open an SSH connection to a remote server. As you open that connection, your SSH client will also open a local TCP port, available only to your computer. In this example, I’ll use local TCP port :1337.
- You configure your browser (Chrome/Firefox/…) to use that local proxy instead of directly going out on the internet.
- The remote SSH server accepts your SSH connection and will act as the outgoing proxy_/vpn_ for that SOCKS5 connection.
To start such a connection, run the following command in your terminal.
$ ssh -D 1337 -q -C -N user@ma.ttias.be
What that command does is;
- -D 1337 : open a SOCKS proxy on local port :1337 . If that port is taken, try a different port number. If you want to open multiple SOCKS proxies to multiple endpoints, choose a different port for each one.
- -C : compress data in the tunnel, save bandwidth
- -q : quiet mode, don’t output anything locally
- -N : do not execute remote commands, useful for just forwarding ports
- user@ma.ttias.be : the remote SSH server you have access to
Once you run that, ssh will stay in the foreground until you CTRL+C it to cancel it. If you prefer to keep it running in the background, add -f to fork it to a background command:
$ ssh -D 1337 -q -C -N -f user@ma.ttias.be
Now you have an SSH tunnel between your computer and the remote host, in this example ma.ttias.be .
Use SOCKS proxy in Chrome/Firefox
Next up: tell your browser to use that proxy. This is something that should be done per application as it isn’t a system-wide proxy.
In Chrome, go to the chrome://settings/ screen and click through to Advanced Settings. Find the Proxy Settings.
In Firefox, go to Preferences > Advanced > Network and find the Connection settings. Change them as such:
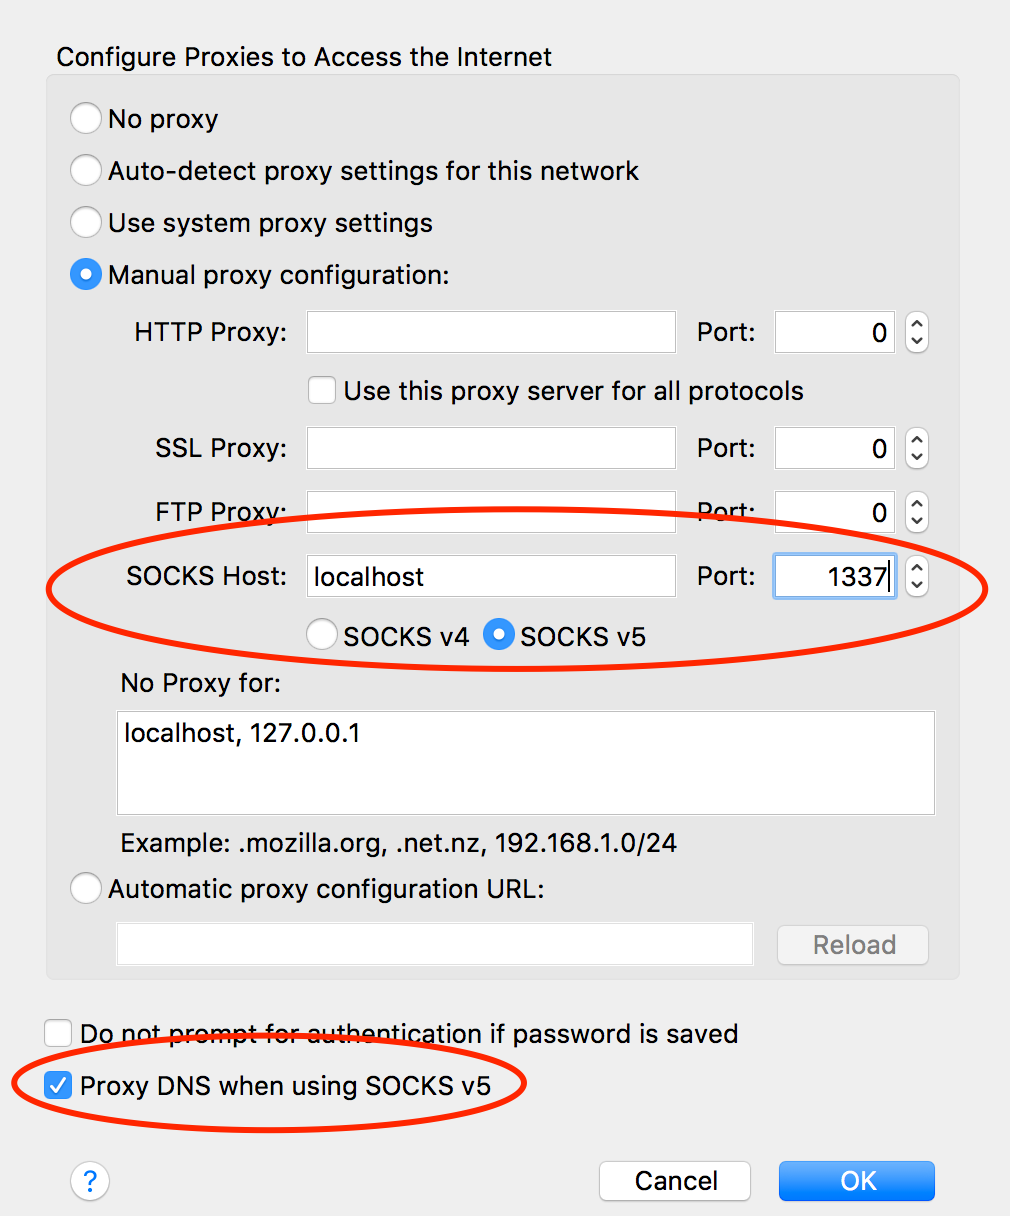
From now on, your browser will connect to localhost:1337 , which is picked up by the SSH tunnel to the remote server, which then connects to your HTTP or HTTPs sites.
Encrypted Traffic
This has some advantages and some caveats. For instance, most of your traffic is now encrypted.
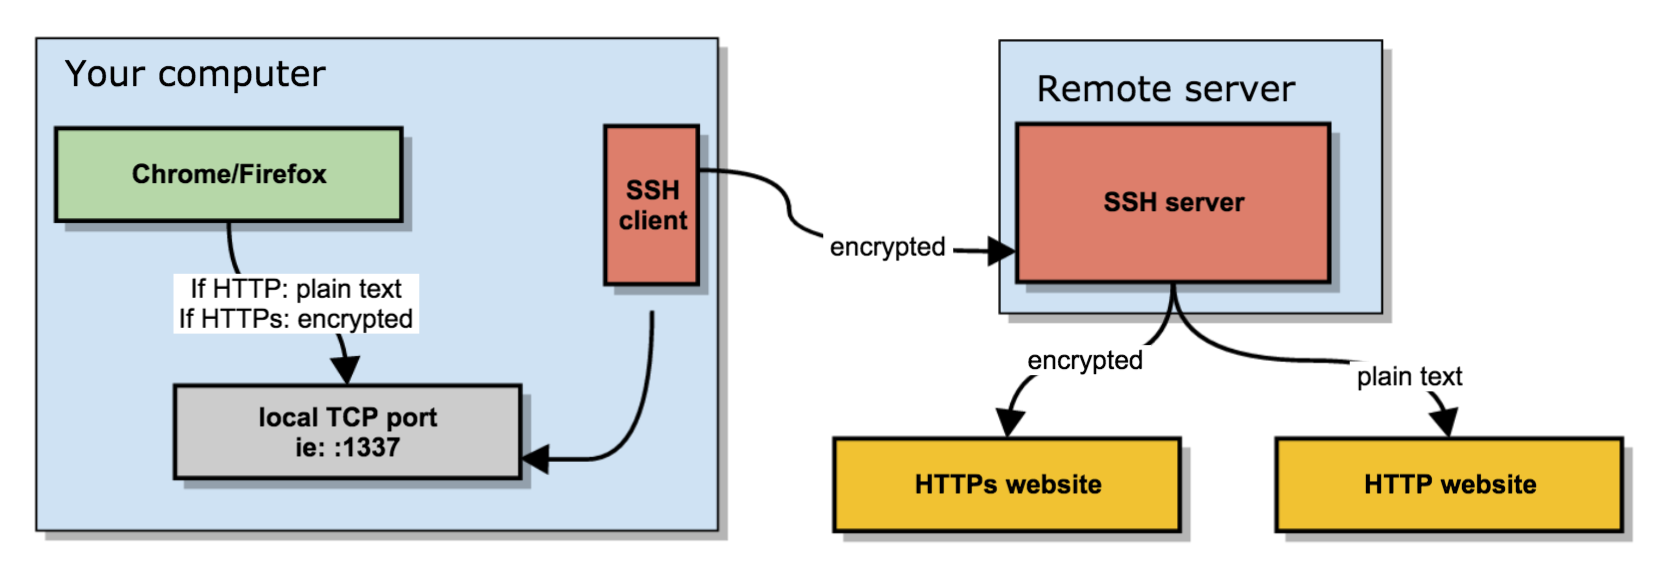
What you send between the browser and the local SOCKS proxy is encrypted if you visit an HTTPs site, it’s plain text if you visit an HTTP site.
What your SSH client sends between your computer and the remote server is always encrypted.
What your remote server does to connect to the requested website may be encrypted (if it’s an HTTPS site) or may be plain text, in case of plain HTTP.
Some parts of your SOCKS proxy are encrypted, some others are not.
Bypassing firewall limitations
If you’re somewhere with limited access, you might not be allowed to open an SSH connection to a remote server. You only need to get an SSH connection going, and you’re good to go.
So as an alternative, run your SSH server port on additional ports, like :80, :443 or :53: web and DNS traffic is usually allowed out of networks. Your best bet is :443, as it’s already an encrypted protocol and less chance of deep packet inspection middleware from blocking your connection because it doesn’t follow the expected protocol.
The chances of :53 working are also rather slim, as most DNS is UDP based and TCP is only use in either zone transfers or rare DNS occasions.
Testing SOCKS5 proxy
Visit any «what is my IP» website and refresh the page before and after your SOCKS proxy configuration.
If all went well, your IP should change to that of your remote SSH server, as that’s now the outgoing IP for your web browsing.
If your SSH tunnel is down, crashed or wasn’t started yet, your browser will kindly tell you that the SOCKS proxy is not responding.
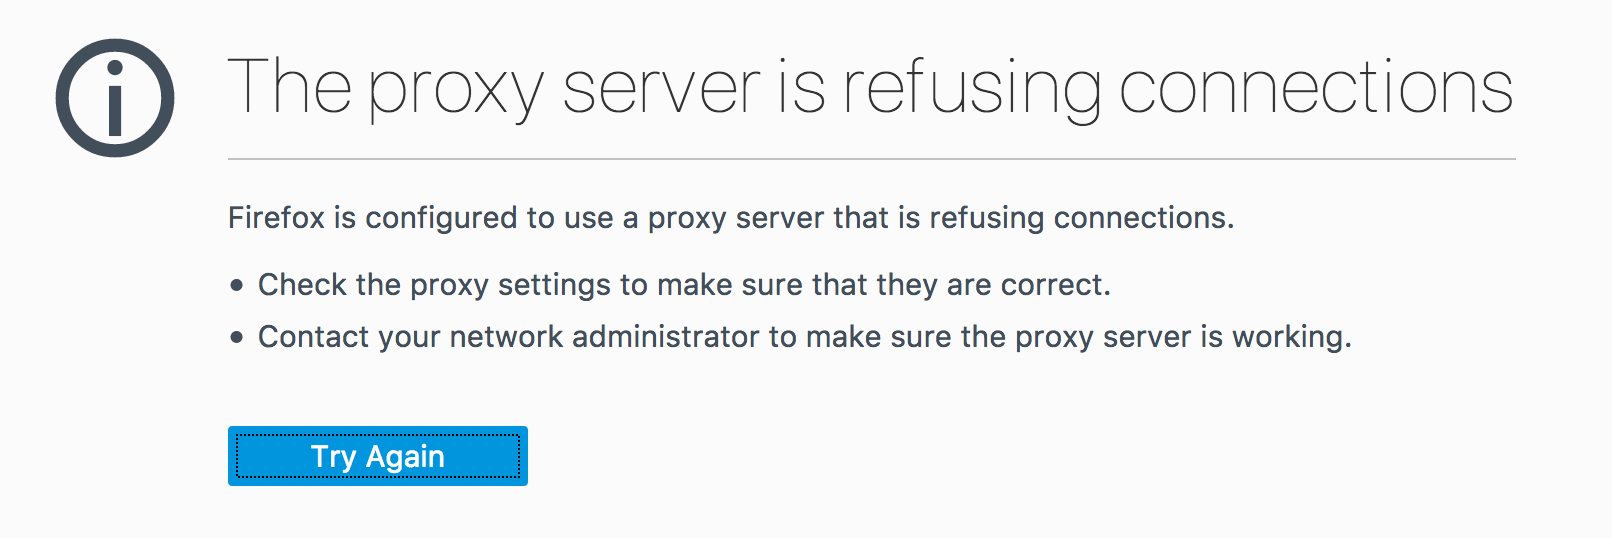
If that’s the case, restart the ssh command, try a different port or check your local firewall settings.