- Create a VPN connection from Linux Terminal
- Creating an L2TP VPN Connection in Linux
- Adding PPTP VPN Connection in Linux
- How to Set Up SSTP VPN Connection with Command Line on Linux?
- Configure OpenVPN Connection Using Linux Terminal
- How to set up a VPN on Linux in 5 minutes for free
- Update:
- Part 1: Changing your DNS
- Part 2: Setting up a VPN
- Further Reading
Create a VPN connection from Linux Terminal
In this article, we’ll look at how to create a VPN connection from the Linux terminal console and connect to a remote VPN server from the command line. Consider how to create L2TP, PPTP, OpenVPN, and SSTP VPN connections on Linux.
Creating an L2TP VPN Connection in Linux
You can use NetworkManager to create L2TP VPN connections from the Linux console.
To install NetworkManager with L2TP support, run the command:
# yum -y install NetworkManager-l2tp$ sudo add-apt-repository ppa:nm-l2tp/network-manager-l2tp $ sudo apt-get install network-manager-l2tp
To create a new L2TP VPN connection, use the command:
$ nmcli connection add connection.id [VPNConnectionName] con-name [VPNConnectionName] type VPN vpn-type l2tp ifname -- connection.autoconnect no ipv4.method auto vpn.data "gateway = [ipv4], ipsec-enabled = yes, ipsec-psk = 0s"$(base64 - [VPNConnectionName]
- [ipv4] — IP address or FQDN of L2TP/IPSEC VPN server
- [PSK] —Pre-Shared Key (PSK)
- [user] — VPN username
- [user-password] — user password
The settings for a new VPN connection are saved to the /etc/NetworkManager/system-connections/ file.
List all connections in NetworkManager:
Show information about the created VPN connection:
$ nmcli c show id [VPNConnectionName]To connect to the L2TP VPN server from the command line:
$ nmcli c up [VPNConnectionName]Error: Connection activation failed: Could not find source connection.
In this case, check the following:
- journactl logs;
- the default gateway is set for the physical interface (for example, ens33 );
- the br0 interface may be enabled on the server, but is not used. Try to remove it.
To disconnect from a VPN server, run:
$ nmcli c down [VPNConnectionName]Adding PPTP VPN Connection in Linux
To install a PPTP VPN client on Ubuntu/Debian:
$ sudo apt install pptp-linux$ sudo nano /etc/ppp/peers/PPTPAdd the following content:
pty "pptp YOUR_VPN_SERVER --nolaunchpppd --debug" name VPNUsername password VPNPassword remotename PPTP require-mppe-128 require-mschap-v2 refuse-eap refuse-pap refuse-chap refuse-mschap noauth debug persist maxfail 0 defaultroute replacedefaultroute usepeerdns
Save the file by pressing CTLR+X, Y -> Enter.
Change file permissions:
$ chmod 600 /etc/ppp/peers/PPTPTo connect to a PPTP VPN server, run the command:
How to Set Up SSTP VPN Connection with Command Line on Linux?
You can set up an SSTP connection to a VPN server on Linux. On Ubuntu, you can use the sstp package for nmcli.
$ sudo add-apt-repository ppa:eivnaes/network-manager-sstp $ sudo apt update $ sudo apt install network-manager-sstp sstp-clientThe following command is used to connect to the SSTP VPN server:
$ sudo sstpc --cert-warn --save-server-route --user --password usepeerdns require-mschap-v2 noauth noipdefault nobsdcomp nodeflateYou can save VPN server connection settings to a text file:
$ sudo nano /etc/ppp/peers/sstptest remotename sstptest linkname sstptest ipparam sstptest pty "sstpc --ipparam sstptest --nolaunchpppd sstpvpn.contoso.com" name user1 plugin sstp-pppd-plugin.so sstp-sock /var/run/sstpc/sstpc-sstp-test usepeerdns require-mppe require-mschap-v2 refuse-eap refuse-pap refuse-chap refuse-mschap nobsdcomp nodeflate Add the username and password for authentication on the VPN server to /etc/ppp/chap-secrets file:
# Secrets for authentication using CHAP # client server secret IP addresses user1 * xxxxxx *Now you can connect to the SSTP VPN server using the configured connection:
To send all traffic through the VPN connection, you need to add a route:
(usually, this is ppp0 device)
Or only traffic to specific networks/hosts:
$ sudo route add -net 192.168.2.0/24 dev ppp0Configure OpenVPN Connection Using Linux Terminal
Install the OpenVPN package on Linux:
- Debian, Ubuntu, Linux Mint, Kali Linux:
$ sudo apt-get update && apt-get upgrade $ sudo apt-get install openvpn# yum install epel-release –y. # yum install openvpn –yYou will need the *.ovpn configuration file to connect to an OpenVPN server. In order to connect to VPN using the client.ovpn file:
$ sudo openvpn --config /etc/openvpn/client.ovpn --daemonCheck that the VPN connection is established:
To end the OpenVPN connection, press CTRL+C (if the client is running without the --daemon parameter) or run the command:
In order for an OpenVPN connection to be automatically established when Linux starts, you need to create a separate systemd unit:
$ sudo vi /lib/systemd/system/OpenVPNClientCorp.service[Unit]
Description=Hide.me OpenVPN Client Corp
After=multi-user.target
[Service]
Type=idle
ExecStart=/usr/sbin/openvpn --config /etc/openvpn/client.ovpn
[Install]
WantedBy=multi-user.target
Change the file permissions:
$ sudo chmod 644 /lib/systemd/system/OpenVPNClientCorp.serviceAdd the new unit via systemctl:
$ sudo systemctl daemon-reload $ sudo systemctl enable OpenVPNClientCorp.serviceI can’t fix the error Error: Connection activation failed: Could not find source connection. can you help me?
How to set up a VPN on Linux in 5 minutes for free


In this short and overdue tutorial, we will set up a virtual private network (VPN) to help protect your online anonymity. I will not be covering much on what a VPN is or what these settings are. We’re going to set one up. Let’s get straight to it.
Windows Version:
Update:
If you have any issues run a test on ipleak.net to find out what exactly is leaking information then view this response and the one linked in it. If it doesn’t help solve your problem then post a comment with as much information as possible.
- Computer with Linux OS. I’m using Ubuntu. The commands may be different if you’re not on a Debian based distro.
- Admin/Sudo privileges
- Basic computer skills
- Basic knowledge of what a VPN is
Take note of everything you change and make backups in case something goes wrong. Also, for the record, I’m not affiliated with any of the sites linked here. Follow this tutorial at your own risk since you could mess up some settings.
Part 1: Changing your DNS
Your domain name server (DNS) can give away some information about you, so we will want to change that. Start by using a tool such as DNS leak test to see what information is visible. Then work on hiding it.
- We’re going to use OpenDNS. Head to their website and grab their two name server IP addresses that can be found on their Setup Guide Page
- 208.67.222.222
- 208.67.220.220
2. Edit: /etc/dhcp/dhclient.conf
In your terminal type or copy/paste the command below. Nano is a text editor in the terminal. If the file is located somewhere else on your machine google or look for it.
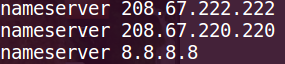
sudo nano /etc/dhcp/dhclient.confLook for the line that says “prepend domain-name-servers.” If it’s commented out with a # symbol at the beginning of the line, uncomment it by removing the #. Now change the line so it uses the IP addresses from OpenDNS, and add one more 8.8.8.8 like mine below. Your internet may temporarily stop working at this point!
prepend domain-name-servers 208.67.222.222, 208.67.220.220, 8.8.8.8;That line means it will use the first address, then the second if the first one fails, and finally 8.8.8.8 if the first two fail. This usually will not happen. We add 8.8.8.8 because by default it uses 3 addresses. If we don’t add the third one and the first two fail then your real address gets used. Now save and exit as shown below:
Press CTRL + O
Press ENTER
Press CTRL + X
This will save and close the file. Now we’ll need to restart network-manager with the next command.
sudo service network-manager restartYou should now check to see if it works. Enter the command below, and see if the nameservers show up. Do a DNS leak test on the website linked above.
Potential Issues
I did the steps, but the cat command only shows nameserver 127.0.1.1
Thanks to Dietmar and AnalyzeTrades for this issue/solution
Try commenting/removing dns=dnsmasq from /etc/NetworkManager/NetworkManager.conf
Part 2: Setting up a VPN
Fixing a DNS leak in web browser:
- In Firefox type about:config in your address bar and press Enter.
- On the config page search for: media.peerconnection.enabled
- Change it to false by double clicking on it.
- Restart Firefox.
I don’t know how this is done in other browsers.
Getting a Free VPN
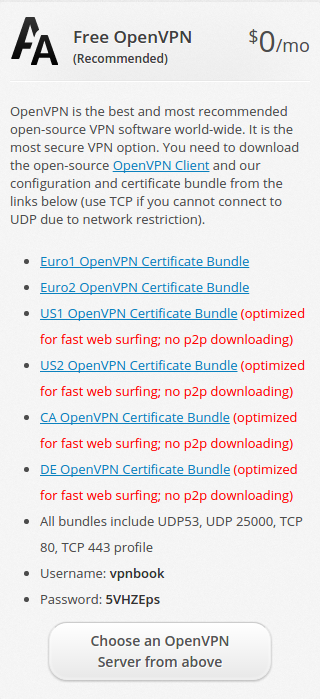
- Google for a free VPN, and make sure it’s good. I’ll be using VPNBook for the rest of the steps.
- On VPNBook, you just download the config file for the VPN you want. Copy the username and password. The password changes periodically, so you will need to get it again later. It doesn’t matter where you are located when choosing your config file. You can be in the U.S., download the Euro one, and appear to be from Europe.
3. After you extract the downloaded zip file, open your terminal again. Change to the directory where you extracted it, or right click and choose “Open in Terminal.” We have just a few more steps now.
4. Install OpenVPN to use the config.
sudo apt-get install openvpn5. Close your browser and anything connected to the internet. To use OpenVPN, enter the command below to run the config you want. Once it says “Initialization Complete,” you’re all set. You should keep the terminal open. If it fails, try a different VPN, or read the error and try to figure it out.
sudo openvpn vpnbook-ca1-tcp443.ovpn6. Finally, test if it works by doing another DNS leak test.

Congratulations if you made it this far and it works! Here’s a bonus simple bash script that you can run. You just need to change the password when needed.
Bash Script 1
credits to Adnan Rahić
cd /path/to/VPNBook.com-OpenVPN-Euro1username="vpnbook"password="he2qv5h"read -sp "Enter Sudo Password: " sudopasswordspawn sudo openvpn vpnbook-euro1-tcp443.ovpnexpect "password for $USER: "send "$sudopassword\r"expect "Enter Auth Username: "send "$username\r"expect "Enter Auth Password: "send "$password\r"expect "$ "This will start the VPN without the need to enter the username and password manually. The VPN will also stay running in the background. Here’s a script for killing it if the need arises.
Bash Script 2
#!/bin/bashecho "user: vpnbook"echo "pass: 5VHZEps"sudo openvpn vpnbook-ca1-tcp443.ovpnJust put that into a new file, right click > properties > permissions, and allow executing file as a program. This example uses the Canada tcp 443 config.
Further Reading
Here are a few great articles by Quincy Larson that talk about VPNs, internet privacy, and security.
If you’re interested in ethical hacking and security, there’s a free 15 hour course on YouTube.