Create a .desktop file that opens and execute a command in a terminal
I would like to know how to write the Exec command of a .desktop file to open a new terminal and execute a shell script in it. The shell script is working and accessible by all users. When launching the script from the terminal everything works, but it doesn’t when trying to launch the script from a .desktop file. Here are some combinations I have already tried:
Exec=gnome-terminal -x sh -c 'echo hello' Exec=sh -c 'gnome-terminal echo hello' Exec=sh -c 'echo hello' Exec=echo hello 5 Answers 5
The content of your desktop file should look like (see how to create a .desktop file using a text editor):
[Desktop Entry] Version=1.0 Name=Test Comment=Test the terminal running a command inside it Exec=gnome-terminal -e "bash -c 'echo hello;$SHELL'" Icon=utilities-terminal Terminal=false Type=Application Categories=Application; [Desktop Entry] Version=1.0 Name=Test Comment=Test the terminal running a command inside it Exec=bash -c 'echo hello;$SHELL' Icon=utilities-terminal Terminal=true Type=Application Categories=Application; In the first case, the Terminal field is set to false (perhaps contrary to your expectations) and in second case is set to true , but the result is in both cases the same.
It worked for me , however i want to launch a command with sudo , then when use launcher created it opens terminal asking-me for password . How do i launch a command and prevent this behavior ?
@EliasAlves A bit late, but for anyone else reading this: you cannot expect to run commands that require root privileges without being required to authenticate yourself. (Unless you explicitly configure your system to do that, which is generally a bad idea.)
I think the question is: how to make sure the terminal appears so that the terminal doesn’t disappear so that we can enter the credentials
!#/bin/bash gnome-terminal -e YOUR_COMMANDS Make the above file. Don’t forget to sudo chmod +x filename.sh
The problem with this solution is, that the terminal disappears immediately and a user is not capable to enter something.
at the end of your commands.
Like for me snapd isn’t something using full bandwidth of system to refresh snaps anytime almost I work at night.
So this worked for me to create a .sh file linked to a .desktop file.
Contents for .sh file were
echo | sudo -S systemctl stop snapd.service sudo systemctl disable snapd.service;$SHELL -S in the first line of the .sh file is used to send STDINPUT to the sudo command meaning direct execute without entering password.
Contents for the .desktop file were:
[Desktop Entry] Version=1.0 Name=Test Comment=Test the terminal running a command inside it Exec=gnome-terminal -e "/scripts/disable_snap.sh" Icon=terminal Terminal=true Type=Application Categories=Application; [Desktop Entry] Version=1.0 Name=Hello Exec=sh -c 'echo hello; $SHELL' Icon=utilities-terminal Terminal=true Type=Application As stated in desktop entry specification, Terminal=true tells the launcher to launch your script in a terminal window. The chosen Terminal Emulator depends on your default applications settings and Desktop Environment. In GNOME, it is gnome-terminal, in KDE, it is Konsole. (Without DE, in plain WM there is a bug in xdg-open, and Terminal=true just ignored, see issue)
You need this line to run your script and launch a shell after it.
Exec=sh -c 'echo hello; $SHELL' - sh -c ‘COMMAND’ run the «sh» binary found in $PATH which executes COMMAND (on many systems, sh is the symbolic link to bash , but for portability «sh» is prefered)
- echo hello; $SHELL does two things. First, it runs echo hello and then, after the execution of this command, launches $SHELL.
If you will not add some command that waits for you to exit, a terminal emulator will just run your program and exit.
P.S. If you just want not to close your terminal, you can do
Exec=sh -c 'echo hello; sleep 5' (read will wait for you to press Enter, sleep will just wait 5 seconds)
P.P.S $SHELL probably will be the same as last section in /etc/passwd in line with your user.
The value for $HOME, $USER, $SHELL, $PATH, $LOGNAME, and $MAIL are set ac‐ cording to the appropriate fields in the password entry.
Программа для создания desktop-файлов
В дистрибутивах GNU/Linux значки приложений в меню описываются специальными текстовыми файлами. Эти файлы имеют расширение .desktop и при установке приложения создаются автоматически. Но иногда бывают ситуации когда нужно самому создать такой файл. Это может быть когда у вас на руках имеется только исполняемый файл приложения, то есть когда приложение не упаковано должным образом. В некоторых дистрибутивах из коробки имеются программы для создания значков запуска, а в некоторых их нет и нужно искать такие приложения в репозиториях. Я создал свой вариант такой программы и в этом посте расскажу, что она из себя представляет.
Немного о desktop-файлах
Вот пример desktop-файла для консольной игры nsnake:
[Desktop Entry] Version=1.1 Type=Application Name=nsnake GenericName=Classic snake game on the terminal NoDisplay=false//отображать в меню Icon=nsnake Exec=nsnake Terminal=true//запускать в терминале Actions= Categories=ActionGame;Game; Keywords=snake;ncurses;textual;terminal;Тут и так все понятно, но я все-таки прокомментировал пару позиций. Самое главное, что нужно прописать это название приложения (Name), путь до исполняемого файла (Exec) и путь до иконки (Icon). Если иконки нет и нет желания ее искать или создавать, то некоторые окружения рабочего стола установят иконку по умолчанию.
Краткое описание
Исходники приложения находятся здесь. Программа довольно простая. Выглядит она вот так:
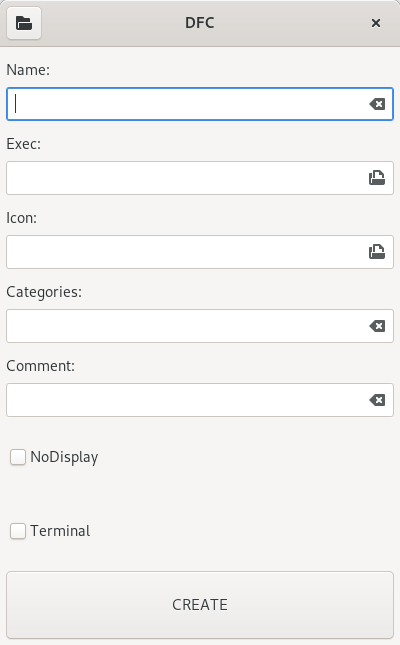
Нужно заполнить необходимые поля, отметить нужные чекбоксы и нажать кнопку CREATE. Программа запросит подтверждение и после согласия оповестит об успешном или неуспешном создании файла.
В хидербаре находится кнопка, при нажатии на которую в файловом менеджере откроется папка, находящаяся по пути /.local/share/applications. Именно там программа сохраняет созданные файлы.
Как работает
Приложение написано на языке Vala с помощью среды разработки GNOME Builder. Устанавливал самую свежую версию среды (40.0) из репозитория Flathub. Оказалось, что визуальный дизайнер в этой версии еще багованнее, чем в предыдущей, поэтому интерфейс делал в Glade.
После того как созданы значки в полях ввода и к ним, также как и к другим кнопкам, привязаны необходимые действия, записываем в переменную directory_path путь до папки с desktop-файлами. Также на всякий случай надо проверить наличие этой папки перед запуском приложения и если папка по каким-то причинам отсутствует, то вывести специальное сообщение и деактивировать кнопку CREATE, так как в этом случае в ней нет необходимости.
button_open.clicked.connect(on_open_directory); button_create.clicked.connect(on_create_file); directory_path = Environment.get_home_dir()+"/.local/share/applications"; GLib.File file = GLib.File.new_for_path(directory_path); if(!file.query_exists()) При нажатии на кнопку CREATE вызывается метод on_create_file:
private void on_create_file () < if(is_empty(entry_name.get_text()))GLib.File file = GLib.File.new_for_path(directory_path+"/"+entry_name.get_text().strip()+".desktop"); if(file.query_exists()) var dialog_create_desktop_file = new Gtk.MessageDialog(this,Gtk.DialogFlags.MODAL,Gtk.MessageType.QUESTION, Gtk.ButtonsType.OK_CANCEL, "Create file "+file.get_basename()+" ?"); dialog_create_desktop_file.set_title("Question"); Gtk.ResponseType result = (Gtk.ResponseType)dialog_create_desktop_file.run (); dialog_create_desktop_file.destroy(); if(result==Gtk.ResponseType.OK) < create_desktop_file();//создаем файл >>Он предназначен для проверки ввода имени файла и проверки возможных совпадений с именами уже существующих в папке файлов, а также для вывода запроса подтверждения на создание файла. Если все проверки пройдены и пользователь подтвердил создание файла, то вызывается метод create_desktop_file:
private void create_desktop_file()< string display; if(checkbutton_no_display.get_active())else < display="false"; >string terminal; if(checkbutton_terminal.get_active())else < terminal="false"; >string desktop_file="[Desktop Entry] Encoding=UTF-8 Type=Application NoDisplay="+display+" Terminal="+terminal+" Exec="+entry_exec.get_text().strip()+" Icon="+entry_icon.get_text().strip()+" Name="+entry_name.get_text().strip()+" Comment="+entry_comment.get_text().strip()+" Categories="+entry_categories.get_text().strip();//записываем содержимое будущего файла в переменную string path=directory_path+"/"+entry_name.get_text()+".desktop"; try < FileUtils.set_contents (path, desktop_file);//создаем файл >catch (Error e) < stderr.printf ("Error: %s\n", e.message); >GLib.File file = GLib.File.new_for_path(path); if(file.query_exists())else < alert("Error! Could not create file"); >>Чтобы просмотреть готовые файлы существует метод on_open_directory. Он срабатывает при нажатии на кнопку в хидербаре.
private void on_open_directory()< try< Gtk.show_uri_on_window(this, "file://"+directory_path, Gdk.CURRENT_TIME); >catch(Error e) < alert("Error!\n"+e.message); >>Для выбора исполняемого файла используется следующий код:
private void on_open_exec() < var file_chooser = new Gtk.FileChooserDialog ("Choose a file", this, Gtk.FileChooserAction.OPEN, "_Cancel", Gtk.ResponseType.CANCEL, "_Open", Gtk.ResponseType.ACCEPT); if (file_chooser.run () == Gtk.ResponseType.ACCEPT) < entry_exec.set_text(file_chooser.get_filename()); >file_chooser.destroy (); >А для выбора иконки код сложнее, так как данный диалог, помимо фильтра, содержит функционал предварительного просмотра изображения:
private void on_open_icon () < var file_chooser = new Gtk.FileChooserDialog ("Select image file", this, Gtk.FileChooserAction.OPEN, "_Cancel", Gtk.ResponseType.CANCEL, "_Open", Gtk.ResponseType.ACCEPT); Gtk.FileFilter filter = new Gtk.FileFilter (); file_chooser.set_filter (filter);//установка фильтра для изображений filter.add_mime_type ("image/jpeg"); filter.add_mime_type ("image/png"); Gtk.Image preview_area = new Gtk.Image (); file_chooser.set_preview_widget (preview_area);//установка области предпросмотра file_chooser.update_preview.connect (() => < string uri = file_chooser.get_preview_uri (); string path = file_chooser.get_preview_filename(); if (uri != null && uri.has_prefix ("file://") == true) < try < Gdk.Pixbuf pixbuf = new Gdk.Pixbuf.from_file_at_scale (path, 250, 250, true); preview_area.set_from_pixbuf (pixbuf);//установка изображения preview_area.show ();//показываем область предпросмотра >catch (Error e) < preview_area.hide ();//скрываем область предпросмотра >> else < preview_area.hide (); >>); if (file_chooser.run () == Gtk.ResponseType.ACCEPT) < entry_icon.set_text(file_chooser.get_filename()); >file_chooser.destroy (); >Метод для вывода сообщений пользователю:
private void alert (string str)
Чтобы проверить введено ли какое-либо значение в текстовое поле используется такой метод:
private bool is_empty(string str)
На этом все! Надеюсь, что пост был для Вас полезен.
Дополнительная ссылка на SourceForge. До встречи в следующих постах!