- How to make disk image with dd on Linux
- What is disk image?
- How to create whole disk image?
- How to create a partition image?
- How to create disk image using live CD or USB flash drive?
- How to restore disk image?
- Bonus tip
- How to Make Disk Images in Linux with DD Command
- Install LSSCSI Utility
- Check Disk Information
- Create a Clone Disk Image
- Restore the Drive from Clone Image
- Conclusion
- About the author
- Aqsa Yasin
- Create, Mount And Unmount .img Files In Ubuntu
How to make disk image with dd on Linux
Recently I had to send my notebook to service (by the way — it’s fifth time when it’s in service). When I sent my notebook first time, I made a full backup because service after repair usually delete all data on disk and install clean Windows to check if everything is OK. But when I sent my notebook third time I said ENOUGH! Every few months I had to install Linux Mint, configure it, install my apps and so on, and so on. Then I started to create images. So how to make disk image with dd on Linux and what is the disk image?
What is disk image?
Disk image is a one big file which contains every byte of some disk. Notice that it’s not a copy if files. DIsk image is created by special applications from low level disk reading. It means these applications read disk sectors byte by byte and write them to another disk creating one big file. It’s very useful when you want to change disk to another for instance HDD to SSD.
How to create whole disk image?
dd if=/dev/ORIGIN_DISK of=/dev/PLACE-TO-WRITE bs=64K conv=noerror,sync dd if=/dev/sda of=/dev/sdb bs=64K conv=noerror,sync How to create a partition image?
dd if=/dev/sda1 of=/dev/sdb1 bs=64K conv=noerror,sync Let’s stop here for a moment and see what we have here: if — input device/file of — output device/file bs=64K — The block size. Usually peope use 64K or 128K, but you can use other values if know what you do conv=noerror — dd will continue operation and ignore all read errors sync — add input blocks with zeros if there were any read errors (it means data offsets stay in sync)
How to create disk image using live CD or USB flash drive?

You should see similar to this:
Sometimes you can see different names of disk, eg. nvme for SSD M.2. To create disk image run this:
dd if=/dev/sda conv=sync,noerror bs=128K | gzip -c > SSD_image.gz DD will create compressed image of whole sda disk. The image will be in current directory. If you want to save it in another directory, tell dd where to save the image:
dd if=/dev/sda conv=sync,noerror bs=128K | gzip -c > /media/disk2/images/SSD_image.gz Above commands clone the entire hard disk, including the MBR, bootloader, all partitions, UUIDs, and data.
How to restore disk image?
gunzip -c SSD_image.gz | dd of=/dev/sda Bonus tip
dd if=/dev/sda conv=sync,noerror bs=128K status=progress | gzip -c > /media/disk2/images/SSD_image.gz ![]()
It would be great if you will comment or follow me on social media: Also you can visit my websites:
- Linux blog
- Web Agency website
How to Make Disk Images in Linux with DD Command
![]()
Whenever it comes to wiping, backing up, or restoring Linux files, you have few tools. Although there is one alternative that still works, regardless of the Linux distribution you’re using, and that is the DD command. Creating an image of a partition or cloning a complete hard disk drive are simply the acts of making a copy of the whole disk or partition, and it is very simple with the dd command. The DD command is good for cloning disks, backups, and restoration, among other things. In this guide, we will see how to make a disk image using the DD command. Make sure you have the Ubuntu Linux system installed.
DD circumvents this by making an identical replica of the whole hard drive or partitions. So if you recover this backup, your machine will be restored to its original state. You’ll regain access to your folders, games, browser history, and sometimes even device settings. We’ll want another drive with more capacity than the one we’re cloning to replicate your drive. There would most probably be a big hard drive for this purpose.
Install LSSCSI Utility
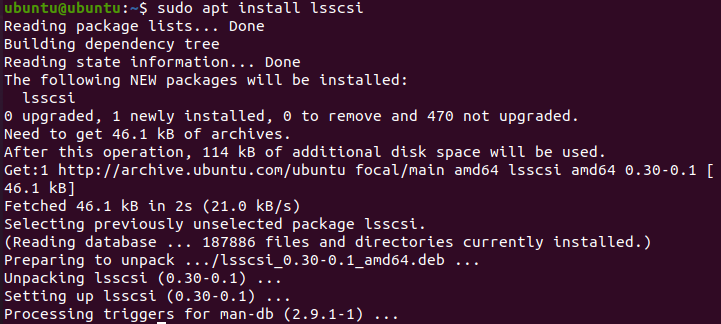
Open the command-line terminal of the Ubuntu 20.04 Linux system. Make sure to have the “lsscsi” utility installed on your system. If it is not installed, try to install it using the below “apt” command followed by the keyword “install” and “lsscsi”. It will take not more than 5 minutes to get installed, and you are good to go.
After installing the “lsscsi” utility, now it’s time to use it for listing all the storage devices of our Linux system. To list the storage drives and DVD’s execute the below command. You can see we have one disk drive and one cd/DVD device in our system.

Check Disk Information
Firstly, we have to find out some information regarding the disk drive “/dev/sda”. And for this reason, we have to use the “fdisk” instruction in our command-shell with sudo privileges as below.

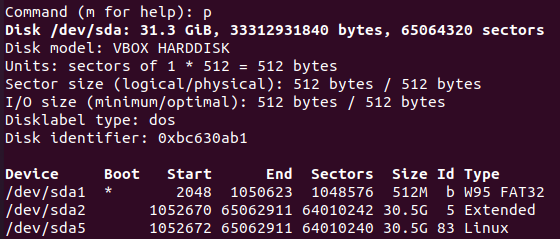
It will navigate to its command theme. Type “p” to check the information of disks as below. You can see it shows the total memory of the “/dev/sda” drive, its sectors, and bytes. It is showing the disk type as DOS. On the other hand, the last three lines of the snapshot show the partitions of the /dev/sda drive and their further information.
Create a Clone Disk Image
Now you have almost every piece of information regarding the “/dev/sda” drive. Press “q” to exit the commanding theme. Now, you are ready to make a disk image using the DD command. So, make yourself clear that the DD command always needs “sudo” privileges to execute. As we already know from the above image, the “/dev/sda” has three partitions, and we will make an image of one of them. So, we choose “sda1” for making its clone. You have to execute the below “DD” command followed by the “if” path and “of” path. The “if” path is of the input disk drive, which is meant to be cloned and the “of” path is for the output device disk, where it would be copied as an image. So, from this, you can understand that “sda1.img” is the cloned file for disk and sda1 is the actual drive. We have specified the bytes per second to be copied from one location to another. We assigned it a value of 1000. The command is as follows:
The output shows the number of records inputted and outputted from two locations, e.g., source and destination. It also shows the number of bytes with time seconds, copied into a destination in MB’s. This means that the clone has been effectively done.

Let’s check the destination image file to see if all the data from the source drive has been cloned into it properly or not. Use the below list command along with the path of an image file of the drive as:
The output shows the rights assigned to this image file, its size, and location. You can say that it has similar rights and size as the original disk drive have.

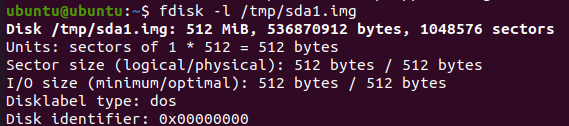
To see some more information regarding the disk image file, you have to try the below “fdisk” command followed by the flag “-l” as below.
The output shows the exact same information regarding this image file as we have seen for the original disk drive before creating this image file. It shows the size of the image drive, its total number of bytes, and total sectors.
Restore the Drive from Clone Image
Now, if you want to restore your original disk drive along with all the data it has, you have to use the DD command again to do so. While using the DD command, there is a little change in it. You have to swipe the input and output paths this time. This means you have to place the image disk file path into the “if” path, and in the “of” output path, you have to mention the location where you want to restore the image file data. Here is the command to restore the drive data from the image file:
The output shows the transfer of backup files into their actual destination. You can see the input and output number of total records and some further information regarding the numbers of bytes transferred, the total size of the disk image, and the time taken to transfer it.

Conclusion
Indeed, The method discussed before is the easiest and simplest way to clone a disk into an image file and restore the backup to get all the files and folders back.
About the author
Aqsa Yasin
I am a self-motivated information technology professional with a passion for writing. I am a technical writer and love to write for all Linux flavors and Windows.
Create, Mount And Unmount .img Files In Ubuntu
Recently I moved from Windows to Ubuntu on one of my laptops and since then I was trying to look for the way to create a VHDs or some sort of image files that I can use as a container. So I looked up for the solution and found a working solution scattered though places. So here I am putting it in a blog post to have all it in one place.
First we need to create an image file (.img) by using the dd command. The dd command is used to copy and convert the file. The reason it is not called cc is because it is already being used by C compiler. Here goes the command.
$ dd if=/dev/zero of=cdata.img bs=1G count=5
Note: The command execution time depends on the size of the image you have opted out for.
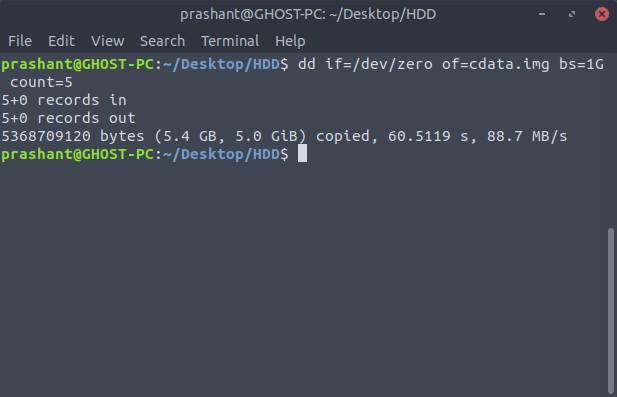
The if param stands for input file to refer the input file. As if , of stands for output file and this will create the .img file with the name you specify. The third param bs stands for block size . This will let you set the size of the image file. The G in the above command stands for GigaByte (GB). You can set the image size by specifying the block size. In this case G stands for GigaBytes (GB), K for KiloBytes (KB), T for TeraBytes (TB), P for Petabytes (PB) and so on. Here I am creating a 5 blocks of 1 GB each for the image file name cdata .
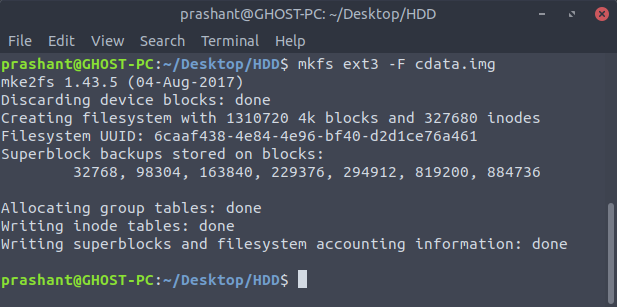
This command will create the .img file but you cannot mount this file as of yet. To do that you have to format the image so that it can have a file system. To do this make use of mkfs command.
I am creating an ext3 filesystem on my image file. -F is to force the operation. Here is the output of the command.
Now we can mount the image file by using the mount command:
$ sudo mount -o loop cdata.img ~/Desktop/HDD/
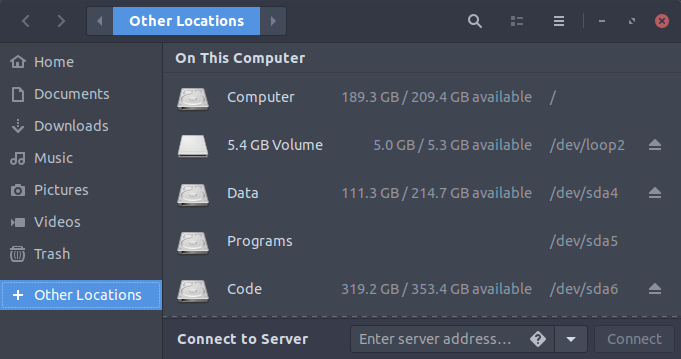
With the success of the above command, you can see the image mounted on your desktop. You can unmount the image by clicking the eject or unmount button as shown in the below screenshot or you can execute the umount command to do that.
Unmounting the image by using command line.