- What is Root User in Linux? [A Complete Guide]
- What is a Root User?
- Difference Between a Root User and a Non-Root User
- How to Create a Root User?
- Method 01: Creating Root User from GUI
- Method 02: Creating a Root User from the Command Prompt
- System Management Operations Exclusive to Root User
- Example 1: Installing Any Package in the System
- Example 2: Changing Permission of a File
- Example 3: Accessing Any File of the System
- Conclusion
- How to Add a User and Grant Root Privileges on Ubuntu 16.04
- Preflight Check
- Creating a User with Root Privileges
- Step 2: Grant Root Privileges
- Step 3: Verify New User
- Get Started Today!
- Related Articles:
- About the Author: Alison Gray
- add new user with root access in Linux
- 8 Answers 8
- The Right Way
- The Ugly Way
- The Wrong Way
What is Root User in Linux? [A Complete Guide]
The root user is one of the most vital parts of the system administration of the Linux operating system. Moreover, this user can affect the whole system by performing any task. In a multiuser system, the root users control the activity of other users. In this article, I will demonstrate a complete overview of what is root user in Linux.
What is a Root User?
The root user is the super user or administrator who has full access to all the system files, directories, and commands of the Linux operating system. This user can do any task which can change the security and stability of the whole system.
Difference Between a Root User and a Non-Root User
A root user is a user having superpowers who can perform all the administrative tasks (i.e. package installing, user removing, accessing any files or directories and many more) that can affect the whole system. On the other hand, a non-root user having limited privileges can not perform such administrative tasks that can affect the system.
How to Create a Root User?
In Linux, various ways are available to create a root user. Any user with root privileges can add a new root user in Linux from both the graphical user interface and the command line. Both of them are outlined below.
Method 01: Creating Root User from GUI
In the following section, I will create a root user from GUI(Graphical User Interface). To do so, follow the below procedures. Steps to follow: ➊ Find the view application button on the left corner of your home screen and left-click on it.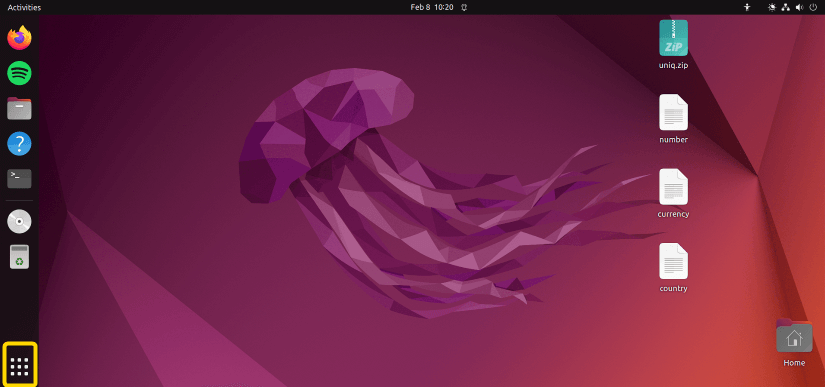 ➋ After that type settings in the search bar, then the Settings application will appear. After that Click on the Settings application.
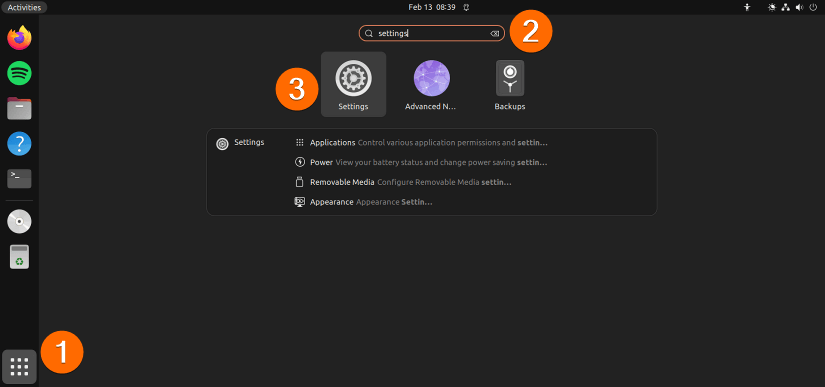 ➌ Then, type users on the search bar, by doing so, an option named Users will appear. Now, click on this Users option.
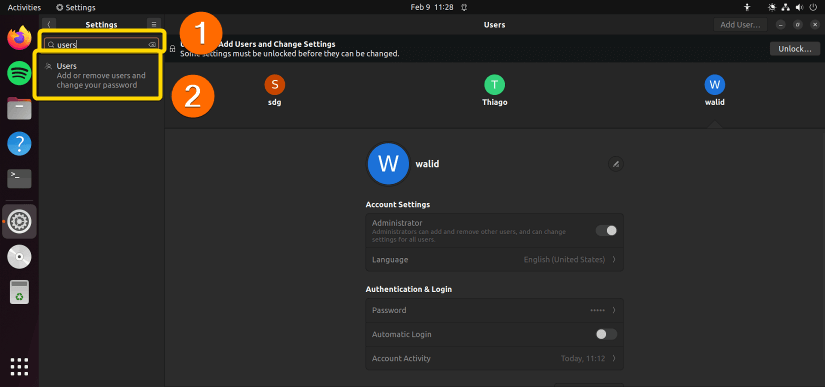 ➍ Now, click on the Unlock option which is in the top right corner of the Users window.
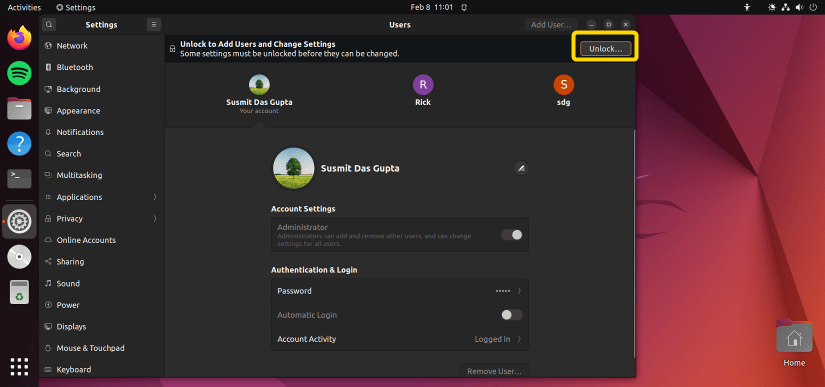 ➎ It will open a new prompt to authenticate the current root user. You have to put the password of the current root user and then click on the Authenticate option.
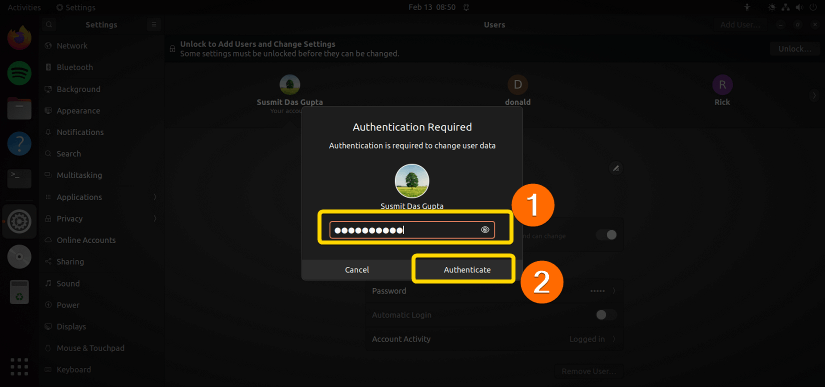 ➏ After that, a new option named Add User.. will appear on the top right corner of the Users window. Click on the Add User.. option.
 ➐ Then, a new Add User prompt will appear. You have to click on the Administrator option and then fill up the all pieces of information like Full Name, Username, and Password. Then finally, click on the Add option.
 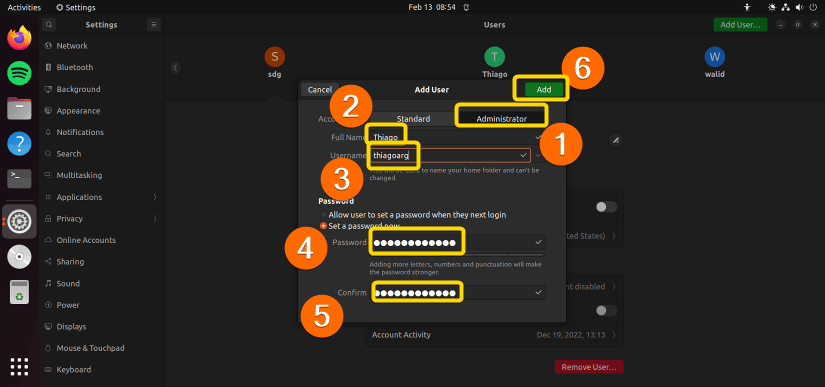 Output: In the following image, you can see I have created a new root user named Thiago.
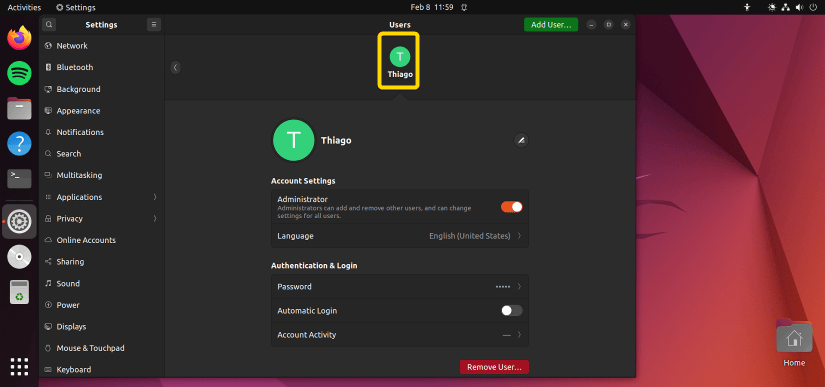
Method 02: Creating a Root User from the Command Prompt
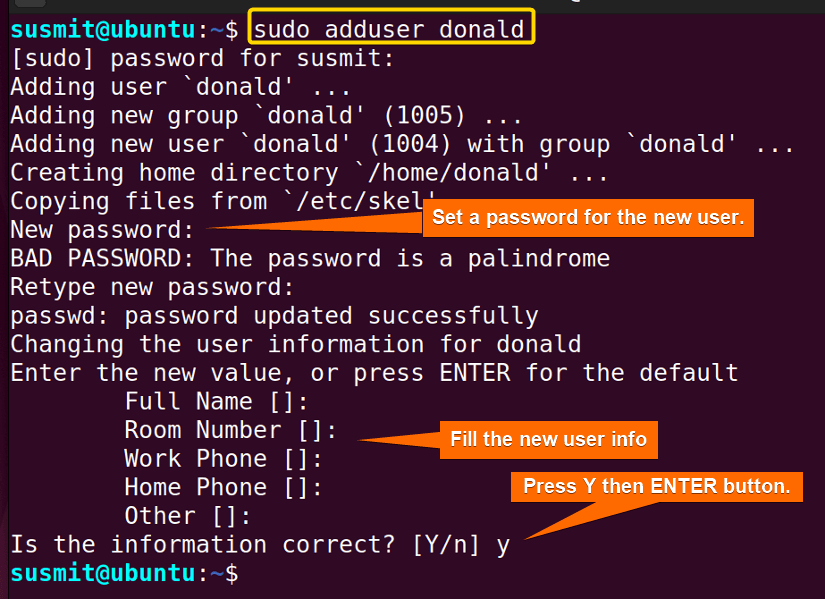
Here, I will create a root user from the command prompt. To do so, follow the below procedures. Steps to follow: ➊ Open the Ubuntu terminal. ➋ Then, type the following command then press ENTER button to create a new user named Donald.
➌ After creating a user named donald, copy the following command in the terminal and then press ENTER to add the donald user to the sudo group.
sudo usermod -aG sudo donald
➍ To check the group of the new root user named donald, type the following command and press ENTER.
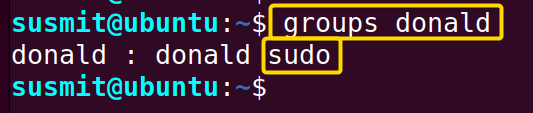
Output: The new user named donald belongs to the sudo group, this means that donald is a root user.
System Management Operations Exclusive to Root User
A root user in Linux can do all kinds of administrative tasks(i.e. package installing, user removing, accessing any files or directories and many more). In the following section, I have illustrated a few o the administrative tasks that only a root user can do.
Example 1: Installing Any Package in the System
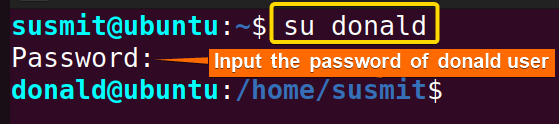
Only root users in Linux can install/remove packages in the system. Here, I will install the nano package with the root user named donald. To achieve so, follow the below procedures. Steps to follow: ➊ At first open the ubuntu terminal and type the following command to switch the user to the new root user named donald.
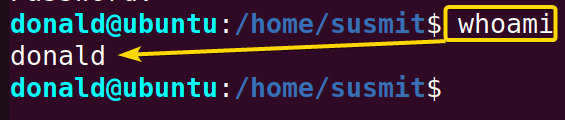
➋ To check the current user, type the following command and press ENTER.
➌ Then, copy the following command in the command prompt and press ENTER.
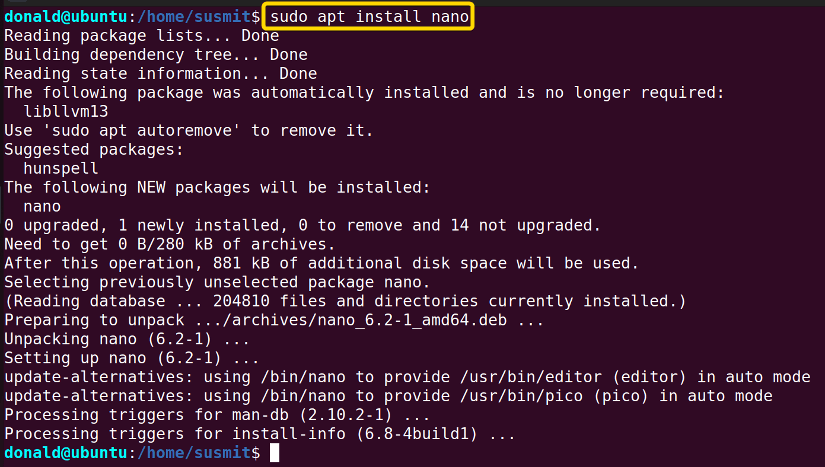
Note: The sudo command can only be used by a root user in Linux. Since donald is a root user, it can readily use the sudo command.
Example 2: Changing Permission of a File
A root user can alter the permission of any file and directory. Here, I will switch my current user to donald who is a root user. Then, I will change the writing permission of the Music directory. To do the task, follow the procedures given below. Steps to follow: ➊ At first, open the Ubuntu terminal. ➋ Then, type the following commands to the terminal and then press ENTER to check the permission information of all the files and directories inside the current directory.
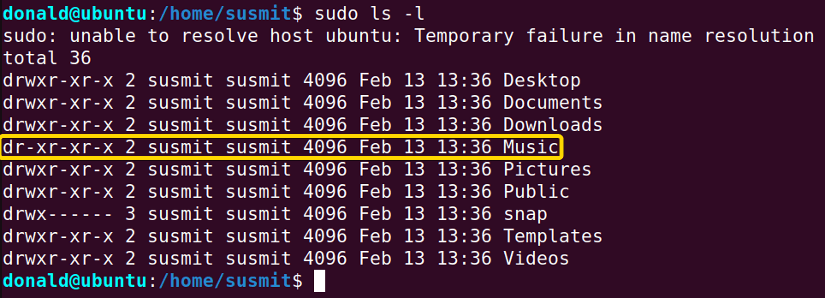
➌ Now, copy the following image to the terminal and then press ENTER to allow the writing permission of Music Directory for all(other, owner, and group).

➍ Then, type the following commands to the terminal and then press ENTER to check the permission information of all the files and directories inside the current directory.
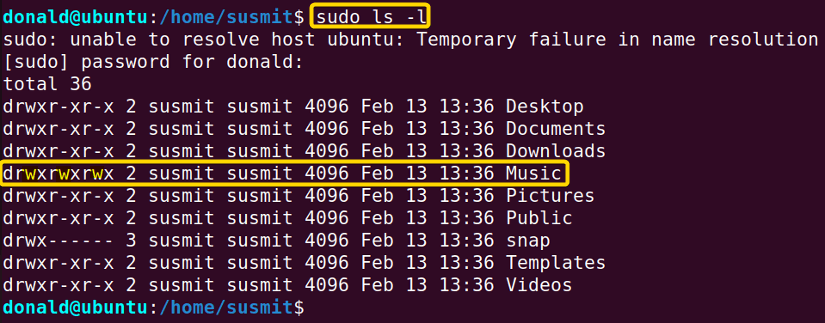
Output: The following image shows that as a root user (donald), I have altered the permission of the desired directory.
Example 3: Accessing Any File of the System
As a non-root user, you can not access the root or any other files. But as a root user, you can access the root or any other files. Here, I will first try to access the /root directory as the sdg user which is not a root user. Then, I will try to access the /root directory as the donald user who is a root user. To do so, follow the below procedures. Steps to follow: ➊ At first, open the Ubuntu terminal. ➋ After that, copy the following command on the terminal to switch the user to donald who is a root user.
➌ Next, tap the ENTER button. ➍ Then, type the following command on the command prompt to access the /root directory as the donald user who is a root user.
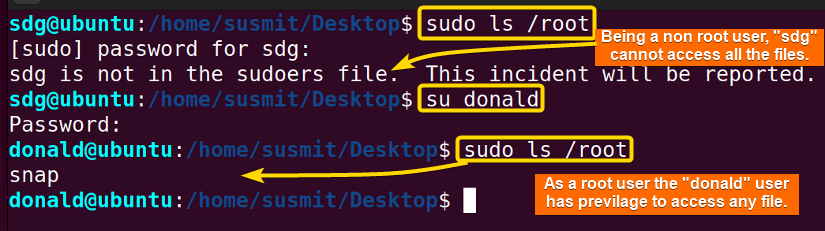
➎ Now, press the ENTER button. Output: The following image shows that the non-root user named sdg can not access the /root directory but the root user named donald can access the /root directory.
Conclusion
- What is Sudo in Linux [A Detailed Review]
- What is Root Partition in Linux? [A Complete Guide]
- What is Root Directory in Linux? [The Ultimate Guide]
- What is Root Access in Linux [With Practical Examples]
How to Add a User and Grant Root Privileges on Ubuntu 16.04
Ubuntu 16.04 LTS provides you the ability to add a user for anyone who plans on accessing your server. Creating a user is a basic setup but an important and critical one for your server security. In this tutorial, we will create a user and grant administrative access, known as root, to your trusted user.

Preflight Check
- We will need to open a terminal and log in as the root user.
- We will be working as that root user on a Linux Ubuntu 16.04 LTS server
Creating a User with Root Privileges
Create a username for your new user, in my example my new user is Tom:
You’ll then be prompted to enter a password for this user. We recommend using a strong password because malicious bots are programmed to guess simple passwords. If you need a secure password, this third-party password generator can assist with creating one.
~# adduser tom Adding user `tom' . Adding new group `tom' (1002) . Adding new user `tom' (1002) with group `tom' . Creating home directory `/home/tom' . Copying files from `/etc/skel' . Enter new UNIX password: Retype new UNIX password: passwd: password updated successfullyUsernames should be lowercase and avoid special characters. If you receive the error below, alter the username. ~# adduser Tom adduser: Please enter a username matching the regular expression configured via the NAME_REGEX[_SYSTEM] configuration variable. Use the `—force-badname’ option to relax this check or reconfigure NAME_REGEX.
Next, a text prompt will appear asking us to enter in info about your new user. Entering this information is subjective and is not required. This info can be skipped if needed by pressing enter in each field. We suggest adding in as much info as needed to track usage.
Enter the new value or press ENTER for the default Full Name []: Room Number []: Work Phone []: Home Phone []: Other []:Lastly, the system will ask you to review the information for accuracy. Enter Y to continue to our next step.
Is the information correct? [Y/n]Step 2: Grant Root Privileges
Assigning root access to a user is to grant the user the highest privilege on our system so caution is advised. Once out user Tom is added, he can make changes to the entire system as a whole, so it’s critical to only allow this access to users who need it. After this, Tom will be able to execute commands using the sudo option which is normally reserved for the root user.
Step 3: Verify New User
As root, you can switch to your new user with the su — command and then test to see if your new user has root privileges.
If the user has properly been granted root access the command below will show tom in the list.
That’s it! We have added a user and then granted that user root privileges on an Ubuntu 16.04 LTS server.
Get Started Today!
Would you like to learn more about setting up a new Ubuntu server? Give us a call at 800.580.4985, or open a chat or ticket with us to speak with one of our knowledgeable Solutions or Experienced Hosting advisors to learn how you can take advantage of these techniques right away!
Related Articles:
About the Author: Alison Gray
Alison Gray is currently an IT Project Manager at Liquid Web and has been with Liquid Web for nearly 10 years. In 2015, She earned her Bachelor’s Degree in Media and Information from Michigan State University. In her free time, she loves spending time with her girlfriend and 3 kids. You can usually find her at a basketball court or some sort of sporting event. If the weather’s right, she loves being outside in the yard finding some sort of yard work to do.

Join our mailing list to receive news, tips, strategies, and inspiration you need to grow your business
add new user with root access in Linux
I want to add new user and have/grant that new user to have all the root access, how can I do that ? I did sudo adduser —system testuser but this is not working as I expected. Thanks for help.
8 Answers 8
There are actually three ways you can do this: the right way, the wrong way, and the ugly way.
First, create a normal user account.
Then select one of the following:
The Right Way
Create a sudo entry for the wheel group in /etc/sudoers like this:
## Allows people in group wheel to run all commands %wheel ALL=(ALL) ALL ## Allows people in group sudoers to run all commands %sudoers ALL=(ALL) ALL Then add the user to the wheel group. Adding and removing users with administrative priviledges now becomes a function of remembering to add them to wheel, instead of creating an entry in sudo. The great thing about using wheel is that you can extend this mechanism into other authentication schemes that support groups, i.e. winbind/Active Directory, and reap the benefits in the process. You would accomplish this by mapping wheel to a group in your authentication schema that has admin privileges.
Note that some distributions use different administrative accounts. Wheel is a «traditional» approach to this, but you may encounter admin , adm , and other group accounts that serve the same purpose.
I have to give a point to Bart Silverstrim for pointing out that Ubuntu uses admin as the group for this purpose. He got to this first, although I didn’t notice an Ubuntu tag at the time. Again, it all depends on what distribution your are using.
The Ugly Way
Create a sudo entry for the user account in question and give then complete access. Again, you create the entry in /etc/sudoers like this:
## Allows just user "username" to run all commands as root username ALL=(ALL) ALL ADDED: ## For Ubuntu version: username ALL=(ALL:ALL)
This is great if you only have one (or two) normal accounts. It is ugly when you have a hundred accounts over multiple (geophysical) sites and have to constantly maintain the sudo file.
The Wrong Way
You can edit the /etc/passwd file and change the user account ID from whatever number it is, to 0 . That’s right, zero.
username:x:0:502::/home/username:/bin/bash See that third entry as zero? When you log into that account, you are, for all effective purposes, root . I do not recommend this. If you do not remember «who» you are, you can create all kinds of havoc as you start creating and touching files as root . You could also add your username to the root group. This has the same effect for file access but it creates other issues; programs will notice you are not user root and refuse to run, but you will gain access to files that belong to group root .
If you did this, you did use vipw instead of just editing with vi , right? (or whatever your favorite text editor is) After all, a single typo in this file can lock you out of your system — and that means a physical visit to the computer in question with a repair disc.