How to Create and Open tar Files on Linux
Files with the .tar extension, often called tarballs, are used for storing many files inside a single archive. Usually, but not always, tar files are compressed to save space. For example, gzip compression on a tar archive will change the file’s extension to .tar.gz , or just .tgz .
The tar format has been around since the early ’70s and is a preferred archive format on Linux systems. Files inside a tar archive will have their permissions, ownership, and other file data preserved – a feature that many other archive formats, such as ZIP, don’t offer.
The tar command is used to create tar archives and extract their contents. There are many options when it comes to creating tar files, particularly because there are many types of compression available on Linux. Opening tar files is a simple process, and it only takes a moment to learn how.
In this guide, we’ll go over all the tar commands you’ll need to know in order to create tar archives and extract files from tar archives.
Commands to Create tar Files
The main thing you need to know before creating a tar archive is what type of compression you wish to use. There are pros and cons to each, and our guide on what is the best compression tool in Linux may help you decide which to use. If in doubt, just default to gzip compression, as it’s widespread, quick, and efficient.
The two options you will always need are c (create) and f (file) to specify the name of the archive. Apart from that, simply list the files and directories that you wish to put into the tar archive.
Example 1. Create a tar archive with no compression – .tar file extension.
$ tar cf archive.tar file1 file2 file3
Example 2. Add the z option to create a tar archive with gzip compression – tar.gz or .tgz file extension.
$ tar czf archive.tar.gz file1 file2 file3
Example 3. Add the j option to create a tar archive with bzip2 compression – tar.bz2 file extension.
$ tar cjf archive.tar.bz2 file1 file2 file3
Example 4. Add the J option to create a tar archive with xz compression – tar.xz file extension.
$ tar cJf archive.tar.xz file1 file2 file3
Example 5. The v (verbose) option is helpful to see what files tar is currently adding to the archive.
$ tar czvf archive.tar.gz file1 file2 file3 file1 file2 file3
Example 6. You can also use zstandard compression – .tar.zst file extension.
$ tar acf archive.tar.zst file1 file2 file3
Commands to Open tar Files
Opening .tar files on the Linux command line is simple. The only two options you need are x (extract) and f (file) to specify the location of the archive.
Example 1. Extract files from a .tar archive.
Example 2. The same syntax is used to extract files from compressed tar archives.
$ tar xf archive.tar.gz $ tar xf archive.tar.bz2 $ tar xf archive.tar.xz etc.
Example 3. Use the -v (verbose) option to see which files the command is extracting.
$ tar xvf archive.tar.gz file1 file2 file3
Example 4. Use the -C (Change to directory before performing operation) option to extract files to a specific location.
$ tar xf archive.tar.gz -C /path/to/dir
Example 5. To see all the files inside a tarball, use the t option instead of x .
$ tar tf archive.tar.gz file1 file2 file3
Example 6. To extract specific files from a tarball, list their paths and names after the name of the archive.
$ tar xf archive.tar.gz file1 file2 file3 or $ tar xf archive.tar.gz file*
GUI Tool for Creating and Opening tar Files
In general, all Linux distributions and desktop environments come with a default GUI tool that can manage tar archives. The process for creating and opening tar files will be slightly different between various systems.
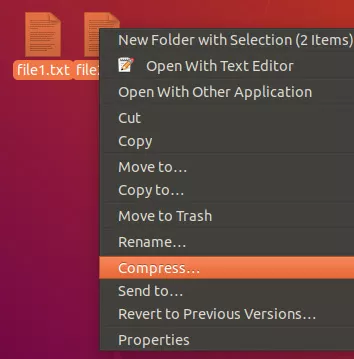
Usually, you can highlight multiple files and then right click one to create a tar archive. Here’s an example from the GNOME desktop environment on Ubuntu. In this case, the option is listed as “compress.”
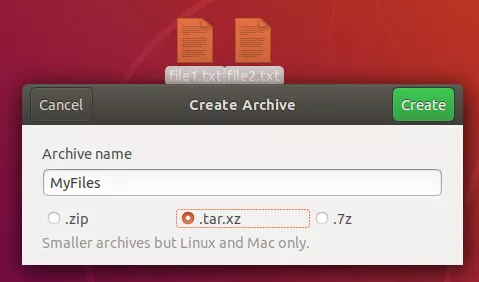
On the next prompt, you can choose to create a tar archive. In this case, a .tar.xz file.
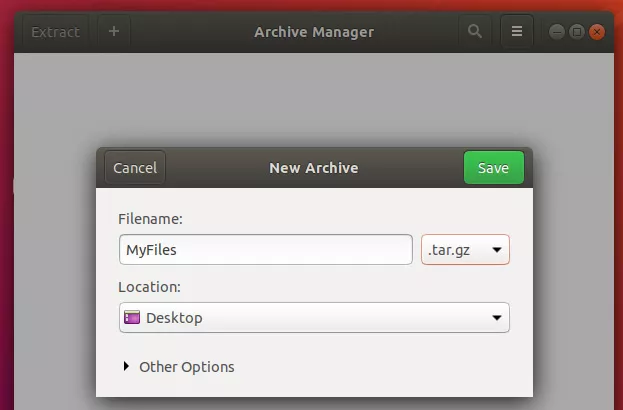
You’ll see more options available in the Archive Manager application itself (shown below), including gzip compression.
To open a tar file and extract its contents, you can open it with your system’s archive manager, or simply right click on it and find the “extract” option.
How to create tar file in Linux or Unix

TAR is a short form of tape archive. They are used to sequentially read or write data. Compiling a huge file list or deep directory structure into a single file (tar file) is what we are seeing in this post. This resulting single file sometimes termed as tarball as well.
Creating tape archives of files or directories is extremely important when you are planning to FTP a huge pile of them to another server. Since each file opens a new FTP session and closes it after transfer finishes, if the number of files is huge then FTP takes forever to complete data transfer (even if size of each file is small). Even if you have an ample amount of bandwidth, due to session open and close operations FTP slows down to knees. In such cases, archiving all files in single tarball makes sense. This single archive can transfer at maximum speed and making transfer quickly. After transfer, you can again expand the archive and get all files in place the same as the source.
Normally its good practice to first zip files or directories and then create a tape archive of it. Zipping reduces their size and tar packs these reduced size files in single tarball! In Linux or Unix, command tar is used to create a tar file. Let’s see different operations that can be handled by tar command.
How to create tar file :
To create tar file -c option is used with tar command. It should be followed with the filename of the archive, normally it should have *.tar extension. It for users to identify its a tar archive, because Linux/Unix really don’t care about an extension.
# tar -cvf file.tar file2 file3 file2 file3 # ll total 32 -rw-r--r-- 1 root users 40 Jan 3 00:46 file2 -rw-r--r-- 1 root users 114 Jan 3 00:46 file3 -rw-r--r-- 1 root users 10240 Jan 9 10:22 file.tar
In the above output, we have used -v (verbose mode) for -c option. file.tar is archive name specified and the end of the command is stuffed with a list of files to be added in the archive. The output shows filename on the terminal which is currently being added to the archive. Once all files are processed, you can see the new archive in the specified path.
To add directories in the tar file, you need to add directory path at end of the same command above.
# tar -cvf dir.tar dir4/ dir4/ dir4/file.tar dir4/file1 dir4/file3 dir4/file2
If you use a full absolute path in command then tar will remove leading / so making members path relative. When archive will be deflated then all members will have a path starting with the current working directory/specified directory rather than leading /
# tar -cvf dir2.tar /tmp/dir4 tar: Removing leading `/' from member names /tmp/dir4/ /tmp/dir4/file.tar /tmp/dir4/file1 /tmp/dir4/file3 /tmp/dir4/file2
You can see / being removed warning in output above.
How to view content of tar file :
Tar file content can be viewed without deflating it. -t i.e. table option does this task. It shows file permissions, ownerships, size, date timestamp, and relative file path.
# tar -tvf dir4.tar drwxr-xr-x root/users 0 2017-01-09 10:28 tmp/dir4/ -rw-r--r-- root/users 10240 2017-01-09 10:22 tmp/dir4/file.tar -rw-r--r-- root/users 10240 2017-01-09 10:21 tmp/dir4/file1 -rw-r--r-- root/users 114 2017-01-03 00:46 tmp/dir4/file3 -rw-r--r-- root/users 40 2017-01-03 00:46 tmp/dir4/file2
In the above output, you can see the mentioned parameters in the same sequence displayed. Relative file path means when this tar file extracts it will create files of directories in PWD or path specified in the command line. For example in the above output, if you extract this file in /home/user4/data directory then it will create tmp directory under /home/user4/data and extracts all files in it i.e. under /home/user4/data/tmp .
How to extract tar file :
-x option extracts files from the tar file. As explained above, it will extract files and directories within tar into a relative path.
# tar -xvf dir4.tar tmp/dir4/ tmp/dir4/file.tar tmp/dir4/file1 tmp/dir4/file3 tmp/dir4/file2 # ll total 36 -rw-r--r-- 1 root users 30720 Jan 9 10:28 dir4.tar drwxr-xr-x 3 root users 4096 Jan 9 10:46 tmp # ll tmp total 4 drwxr-xr-x 2 root users 4096 Jan 9 10:28 dir4 # ll tmp/dir4 total 32 -rw-r--r-- 1 root users 10240 Jan 9 10:21 file1 -rw-r--r-- 1 root users 40 Jan 3 00:46 file2 -rw-r--r-- 1 root users 114 Jan 3 00:46 file3 -rw-r--r-- 1 root users 10240 Jan 9 10:22 file.tar
In the above outputs, step by step you can see tmp and dir4 structure created by tar command and extracted all files within it.
There are also few more options supported by tar-like appending files in the existing archives, zipping, updating new files in the existing archives, etc. We will see them in another post later. Leave us comments if you have any queries or suggestions.
Related stuff:
- Difference between hard link and soft link
- How to save top command output in file
- 14 find command examples for Linux
- Beginner’s guide: 4 Linux group management commands
- Learn Rsync command with examples
- How to configure kubectl for AWS EKS
- sar command (Part I): All you need to know with examples
- Record Linux session using the script command
- bdf command formatted output in hpux
- File encryption / password protect file in HPUX
- Beginners guide to kill the process in Linux
- chage command in Linux for password aging control