- How to zip a file in Ubuntu [closed]
- 5 Answers 5
- gzip
- bzip2
- How To Zip Files in Linux
- Creating a Zip Archive in Linux
- Creating a ZIP Archive Selecting Only Specific File Types
- Create a ZIP archive Which Contains a Directory
- Change the Level of Data Compression for a ZIP Archive
- Extracting Zip Archives
- Extracting a ZIP Archive to a Specified Location
- Stay on the Cutting Edge
- Создаем zip-архивы в командной строке
- Создаем простой zip-архив
- Создаем zip-архив папки
- Создаем zip-архив с паролем
- Распаковка zip-архива
How to zip a file in Ubuntu [closed]
Closed. This question is not about programming or software development. It is not currently accepting answers.
This question does not appear to be about a specific programming problem, a software algorithm, or software tools primarily used by programmers. If you believe the question would be on-topic on another Stack Exchange site, you can leave a comment to explain where the question may be able to be answered.
I use Ubuntu. When I have to zip a folder I use the command zip folder.zip folder/ The result is an empty zipped folder! Where did all the files in the folder go?
I used information from this question and answer in a script, but I guess that’s not «programming» for some. The simple, perhaps «noob», questions are often the most useful and time saving on this website. Documentation is often marginal. The best way to learn and find answers fast is generally FAQ/Q&A. A community driven Q&A assists a lot of people where documentation fails. Should we make a new, competing website, if this is not welcomed here?
If you do this more than once, it might also be helpful to add -x «*.zip*» otherwise you inculde the «old» zipfile in your «new» zipfile
5 Answers 5
sudo apt-get install zip -y zip -r folder.zip folder The -r flag will tell it to be recursive, which may be needed for a directory.
In case you are just bundling fairly uncompressable stuff like jpg or mp3, you can opt for zero compression with -0 , i.e. zip -0 -r sample1.zip sample1/*
If zip command is not working then you need to install zip first. Here is the command which will install zip, gzip and tar.
sudo apt-get install zip gzip tar then you can zip, gzip or tar. zip the folder :
zip -r myzipped.zip my_folder Here are some more related useful commands :
unzip myzipped.zip tar -cvzf my.tar.gz directory_name tar -xvzf myzipped.tar.gz Regarding „some more useful“: creating a tar (‘tape archive’) and zip (aka creating the pkware zip file format format most popular under windows) are not at all the same thing.
check out solution below: You can create a simple zip file with zip command without using any options.
For example to create a zip file of text files first_file.txt, second_file.txt and third_file.txt run below command:
sudo zip newfile.zip first_file.txt second_file.txt third_file.txt adding: first_file.txt adding: second_file.txt adding: third_file.txt To zip a folder in linux use below command
For Example ( if static is a folder name)
Let’s take the question «How to zip a file in ubuntu» as «how to compress a file in Ubuntu».
Please note that you have the following trade-offs:
- Speed at compression time
- Speed at decompression time
- Size of archive
- Additional features (e.g. adding a password)
Also, you can distinguish creating an archive (multiple files in one file) and compressing it. If you see it as a two-step process ((1) Archive (2) compress) you can solve them independently.
Please also note that different compression algorithms shine in different scenarios. There is no single algorithm that is always best («no free lunch»)
# A file zip your_big_file # Archive a directory + compress it zip -r compressed.zip your_big_directory gzip
# -9: Use strongest (and slowest) compression gzip -9 your_big_file # Archive a directory + compress it # c, --create : Create a new archive. # -z, --gzip, --gunzip: filter the archive through gzip # -j, --bzip2 : filter the archive through bzip2 # -f, --file=ARCHIVE : Use archive file (or device) ARCHIVE. tar cvzf compressed.tar.gz your_big_directory/ bzip2
# -9: Use strongest (and slowest) compression bzip -9 your_big_file How To Zip Files in Linux
Compress files into a ZIP archive using the terminal emulator in Linux.
In this how-to, we’ll look at the zip command, a useful utility that enables us to specify lists of files, set a level of data compression and create compressed archives.
Whilst you become accustomed to these commands it’s good to work with example test files and directories and you should take extra care to ensure you are carefully following the instructions.
All the commands in this how-to will work on most Linux machines. We’ve used an Ubuntu 20.04 install but you could run this how-to on a Raspberry Pi. All of the how-to is performed via the Terminal. You can open a terminal window on most Linux machines by pressing ctrl, alt and t.
Creating a Zip Archive in Linux
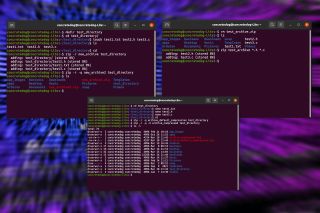
To begin, let’s create some empty test files and then add them to an archive. We’ll use the touch command to create files, the ls command to check that the files have been created and then the zip command to create a basic archive.
1. Create a test directory where we can safely try out the command. Change directory so that you are inside the new directory.
mkdir test_directory cd test_directory2. Create some test files to add to our archive. Note the 3 different file suffixes.
$ touch test1.txt test2.h test3.c 3. List the files to check that they have been created correctly.
4. Using the zip command, create a ZIP archive of the newly created files. To create a ZIP archive, we simply use the command zip followed by the name we are giving the archive and then a list of the files we wish to include in the archive. The following command will create a ZIP archive called test_archive.zip and the archive will include the three test files. Note that we don’t need to add the archive suffix .zip to the name of the archive when using the zip command.
zip test_archive test1.txt test2.h test3.c 5. Check that the ZIP archive has been created.
Creating a ZIP Archive Selecting Only Specific File Types
It’s possible to supply the zip command with arguments that only add specific file types to the archive. This is a powerful feature that is efficiently achieved on the command line.
1. Delete any previous test archives and check you still have the original three test files. Note that, unlike when creating the ZIP archive, you have to include the .zip file extension when referencing an existing archive.
2. Create a new ZIP archive which contains only the test files ending .h and .c . After creating the archive, if you check its contents it will only contain the files test2.h and test3.c and won’t contain test1.txt.
3. To check the contents use less.
Create a ZIP archive Which Contains a Directory
Often we need to make a ZIP archive containing directories which contain files, we can do this by adding the recursive argument -r to the zip command.
1. Delete the archives inside the test_directory but keep the other files. To avoid confusion it would be good practice to delete the archives leaving only the original files that we created.
2. Go up one directory and check that you are not inside the directory to archive. We can’t be inside the directory that we wish to add to the archive.
3. Create a ZIP archive containing the test_directory directory and its contents. Notice when you create the archive using the -r argument that you see a verbose output detailing each stage of the command as it descends into the directory and archives the files and folder.
zip -r new_archive test_directory 4. Make another similar ZIP archive using the -q (quiet) argument to disable the verbose output. You should see that this time that no steps are reported to the terminal in the creation of this archive. Then use ls to check the new archive has been created.
zip -r -q new_archive2 test_directory ls Change the Level of Data Compression for a ZIP Archive
By default, the zip command uses a compression value of 6 taken from a range of 0-9 with 0 being uncompressed and 9 being the maximum allowable level of compression. We can simply add a numerical argument to change the level of compression.
1. Add random data to the test files. Right now our test files test1.txt, test2.h and test3.c are empty. They have zero bytes of data but we can add random “garbage data” to the files using a quick terminal command that will dump 64MB into each file.
cd test_directory head -c 64M test1.txt head -c 64M test2.h head -c 64M test3.c 2. Return to the parent directory and create a new ZIP archive with the default compression level of 6.
cd zip -r -q archive_default_compression test_directory 3. Create another archive with the same contents but increase the compression level to 9. Check the details of the new archive and the previous archive using ls -l , you should see that the size of the new archive is smaller than the previous archive as the data compression has been increased.
$ zip -r -q -9 archive_compressed test_directory $ ls -l Extracting Zip Archives
We will create a ZIP archive called test_archive.zip which contains a directory test_directory which in turn contains 3 empty test files, test1.txt, test2.h, test3.c . To extract this archive we will use the unzip command.
1. Create a test folder containing the test files. After creating the test directory and files check the files have been created using ls before returning to the parent directory.
mkdir test_directory cd test_directory touch test1.txt test2.h test3.c ls cd 2. Create a ZIP archive called test_archive.zip that contains the test_directory. Check that the archive has been successfully created using ls. The zip command has two arguments, the name of the archive that we wish to create, and the source of the files to be put into the archive.
zip -r test_archive test_directory ls 3. Delete the un-archived directory. If we extract the test_archive.zip in the parent directory which contains the test_directory we would be asked if we want to replace or rename the archive.
4. Unzip the test_archive.zip file. Using unzip with no extra arguments we see a verbose output report of each step of extracting the archive.
Extracting a ZIP Archive to a Specified Location
Often we will want to extract an archive into a different specified location. We can add the-d argument to the unzip command to achieve this.
1. Extract the test_archive.zip to a specified directory. We can specify a relative or absolute location. In this example we extract the contents to the Music directory using a relative path. We could also pass an absolute path which provides the full path to the target location.After extracting the archive, move into the specified directory and use ls to check the archive has been extracted.
unzip test_archive.zip -d ./Music 2. Change directory and list the contents to verify the files have been extracted correctly.
With these few basic uses of the zip command you now have lots of options when creating ZIP archives in the linux terminal. Being able to select specific file types and being able to set the compression level in the terminal emulator gives quick access to these powerful tools that are often hard to find in a GUI application.
Stay on the Cutting Edge
Join the experts who read Tom’s Hardware for the inside track on enthusiast PC tech news — and have for over 25 years. We’ll send breaking news and in-depth reviews of CPUs, GPUs, AI, maker hardware and more straight to your inbox.
By submitting your information you agree to the Terms & Conditions and Privacy Policy and are aged 16 or over.
Jo Hinchliffe is a UK-based freelance writer for Tom’s Hardware US. His writing is focused on tutorials for the Linux command line.
Создаем zip-архивы в командной строке
Рассмотрим, как создавать и распаковывать zip архивы из командной строки.
Для создания архивов служит команда zip. У нее есть более 30 разных опций, но я рассмотрю простейшие примеры.
Создаем простой zip-архив
Для создания zip-архива просто выполняем команду zip, в первом аргументе указываем имя будущего архива, а во втором сам файл, который мы сжимаем:
Если нужно сжать несколько файлов то перечисляем их через пробел:
zip myarchive.zip myfile.txt yourfile.txt theirfile.txtСоздаем zip-архив папки
Чтобы заархивировать папку, используется ключ -r:
zip -r mydir.zip verygooddirСоздаем zip-архив с паролем
Очень важной функцией утилиты zip является возможность задания пароля на распаковку архива. Для этого применяется опция -P, после которой следует написать пароль:
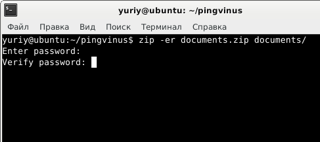
zip -P мойпароль -r mysecretdir.zip mysecretdirЕсли вы не хотите вводить пароль в командной строке у всех на виду, то можно использовать опцию -e, чтобы вместо ввода пароля в открытую, вводить его в срытом виде:
zip -er mysecretdir.zip mysecretdirПосле выполнения данной команды, вам будет предложено дважды ввести пароль. Сам пароль виден при этом не будет:
Enter password: Verify password:Распаковка zip-архива
Для того, чтобы разархивировать zip-архив, используется команда unzip. Ее можно запускать без опций, только указывая имя архива:
По умолчанию распаковка происходит в текущей директории. Чтобы распаковать архив в другую директорию, используется опция -d, после которой нужно указать путь до директории: