- How to Set Custom Resolution Using xrandr?
- How to set Custom Resolution Using xrandr Via Command Line?
- Conclusion
- How to Set A Custom Screen Resolution in Ubuntu Desktop
- Changing the Resolution or Orientation of the Screen Using Displays
- Changing the Resolution or Orientation of the Screen Using Xrandr
- Set Screen Resolution in Ubuntu
- How to Add Missing or Set Custom Display Resolution Using xrandr
- How to Set Custom Screen Resolution in Ubuntu Wayland & Xorg
- Before getting started:
- How to Tell the Display Device Name in Ubuntu:
- How to add video mode kernel parameter:
- Set Custom Resolution for Multiple Displays:
How to Set Custom Resolution Using xrandr?
The “xrandr” is a built-in command line tool to customize screen resolution, orientation, and refresh rates and fix monitor-related bugs. This tool is also beneficial for setting a system-supported custom resolution unavailable in the default display settings. The “xrandr” tool first adds the specified screen resolution in the display settings and then enables it on the screen.
This guide enlists the complete procedure to set the custom resolution using the “xrandr” command line tool.
How to set Custom Resolution Using xrandr Via Command Line?
First, the resolution of the current system is checked. Then, the custom resolutions are generated which are added as a mode using the xrandr utility. This process will set the custom resolution to your system.
Step 1: Check The Current System Resolution
First, execute the “xrandr” command without passing any argument to display the current screen resolution of the Linux system:
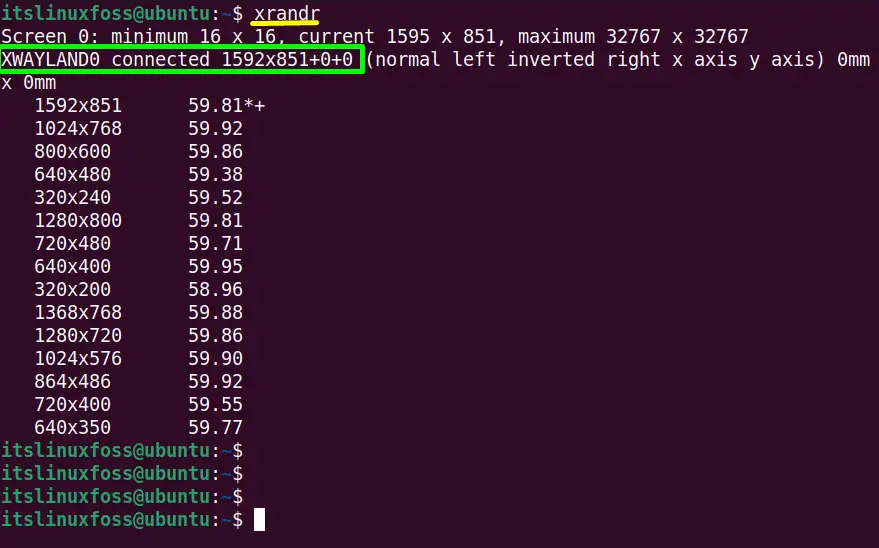
The output shows an active system monitor “XWAYLAND0” having a “1595×851” resolution and also the list of its other associated resolution.
Step 2: Generating the Custom Display Resolution
The “gtf(General Transfer Format)” provides the horizontal and vertical resolution and refresh rate in “Hz”. In this case, it is used to get the modeline (set screen resolution) string for the “xrandr” utility.
For this, specify the desired screen resolution, i.e., “1920 1080” and the refresh rate (60) with the “gtf” as a command like this:
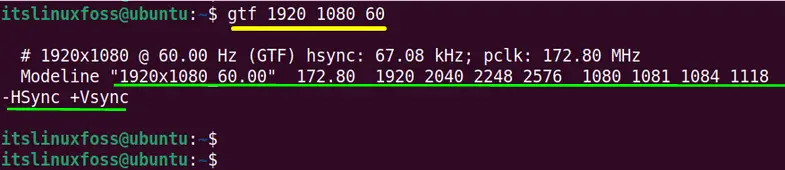
Copy the highlighted part of the “gtf” command output and run the “xrandr” command with the “– -newmode” option in this way:
$ xrandr --newmode "1920x1080_60.00" 172.80 1920 2040 2248 2576 1080 1081 1084 1118 -HSync +Vsync

- The values “172.80 1920 2040 2248 2576 1080 1081 1084 1118” represents the parameters of the new mode which specify the timing and resolution of the new mode.
- The “HSync” denotes the “horizontal sync” used for horizontal columns which indicates the beginning of the new line. The “VSync” represents the “Vertical sync” for vertical rows that denotes the start of the new field:
Step 3: Add the New Mode
Now, add the above specified “newmode” for the current monitor device “XWAYLAND0” using “xrandr” command with “addmode” flag:
$ xrandr --addmode XWAYLAND0 "1920x1080_60.00"

Step 4: Verify the Custom Resolution
Execute the “xrandr” command again to check whether the new custom version is applied or not:
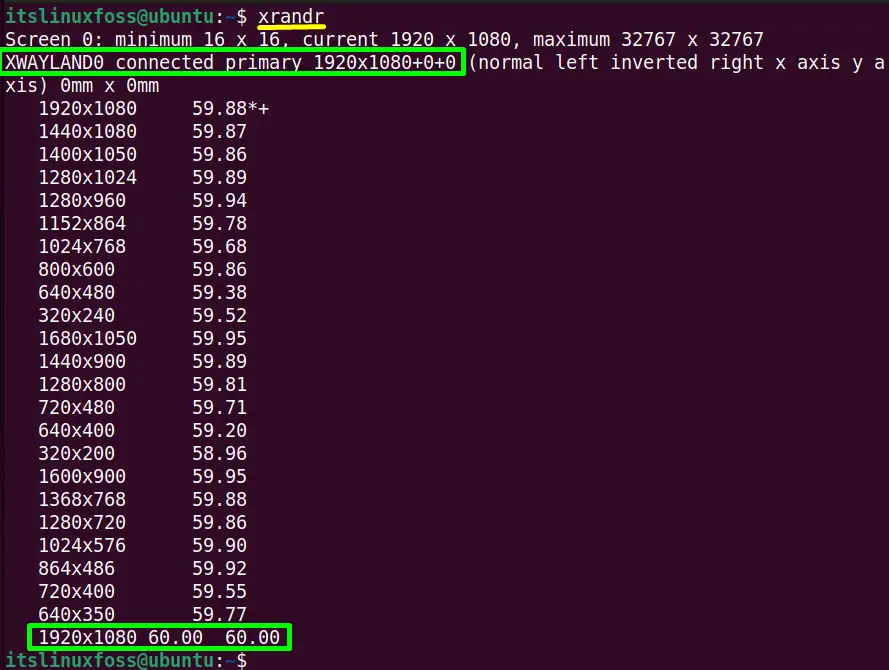
The custom display resolution “1920x1080_60” has been set as shown with the device name and at the bottom of the list.
Step 5: Set the Custom Resolution Permanently
The “XWAYLAND0” device screen resolution is set temporarily. After the system reboots, it will set back to the default resolution.
Now, open the “~/.profile” to save it permanently:
Add the “newmode” and “addmode” commands in the “~/.profile” file using the following command:
xrandr --newmode "1920x1080_60.00" 172.80 1920 2040 2248 2576 1080 1081 1084 1118 -HSync +Vsync xrandr --addmode XWAYLAND0 "1920x1080_60.00"
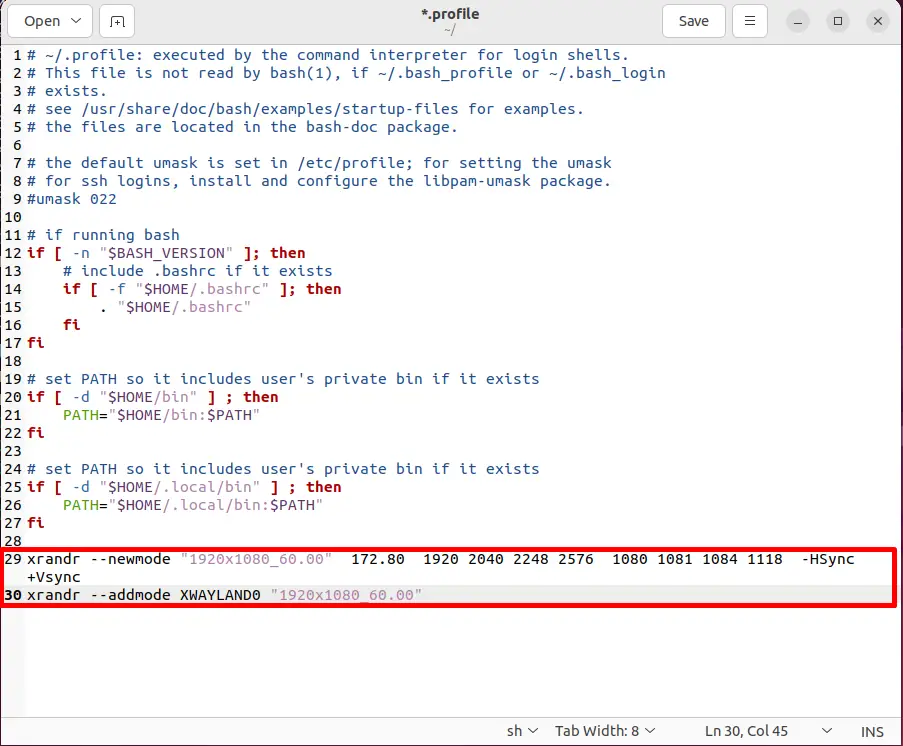
Click on the “Save” button to save the new changes in the file. The custom resolution has been set permanently for device “XWAYLAND0”.
Conclusion
In Linux, the pre-installed “xrandr” command offers the “newmode” and the “addmode” flags to set the custom resolution of the system monitor. The custom resolution is set temporarily, i.e., before rebooting. Access the “~/.profile” to permanently set the specified custom resolution.
This guide has illustrated a brief description of setting the custom resolution using the xrandr command in Linux.
How to Set A Custom Screen Resolution in Ubuntu Desktop
Is your screen (or external monitor) resolution is low? thus making the items on your screen look larger and less clear? Or do you want to simply increase the current maximum resolution or add a custom resolution?
In this article, we will show how to add missing or set custom display resolution in Ubuntu and its derivatives such as Linux Mint. By the end of this article, you will be able to set to a higher resolution, making content on your screen appear sharper and clearer.
Changing the Resolution or Orientation of the Screen Using Displays
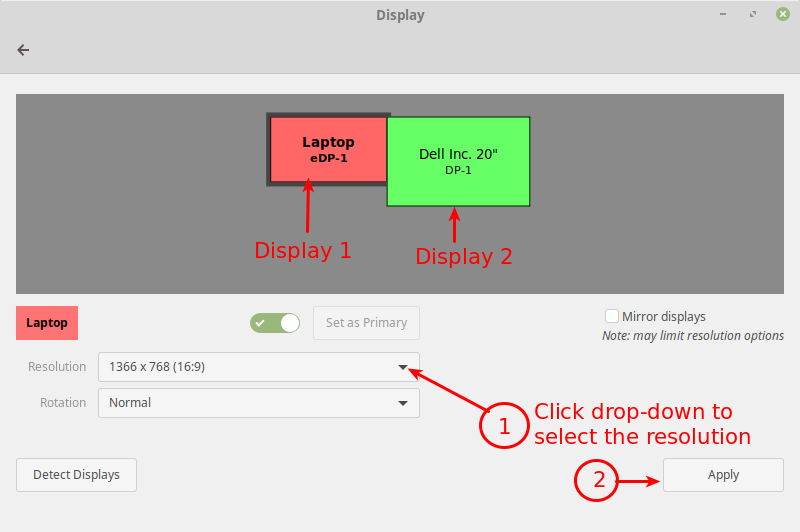
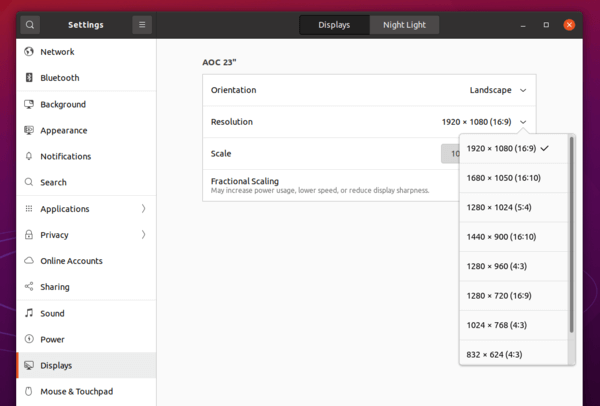
Normally, to change the resolution or orientation of the screen, you can use the Displays graphical user interface tool (open the Activities overview and type Displays, click to open it or System Menu then type Displays and open it).
Note: In case you have multiple displays connected to your computer (as shown in the following image), if they are not mirrored, you can have different settings on each display. To change the settings for a display device, select it in the preview area.
Next, select the resolution or scale you want to use, and choose the orientation then click Apply. Then select Keep This Configuration.
Changing the Resolution or Orientation of the Screen Using Xrandr
Alternatively, you can also use the powerful xrandr tool (a command-line interface to RandR (Resize and Rotate) X Window System extension) which is used to set the size, orientation and/or reflection of the outputs for a screen.
You can also use it to set the screen size or list all active monitors as shown.
$ xrandr --listactivemonitors

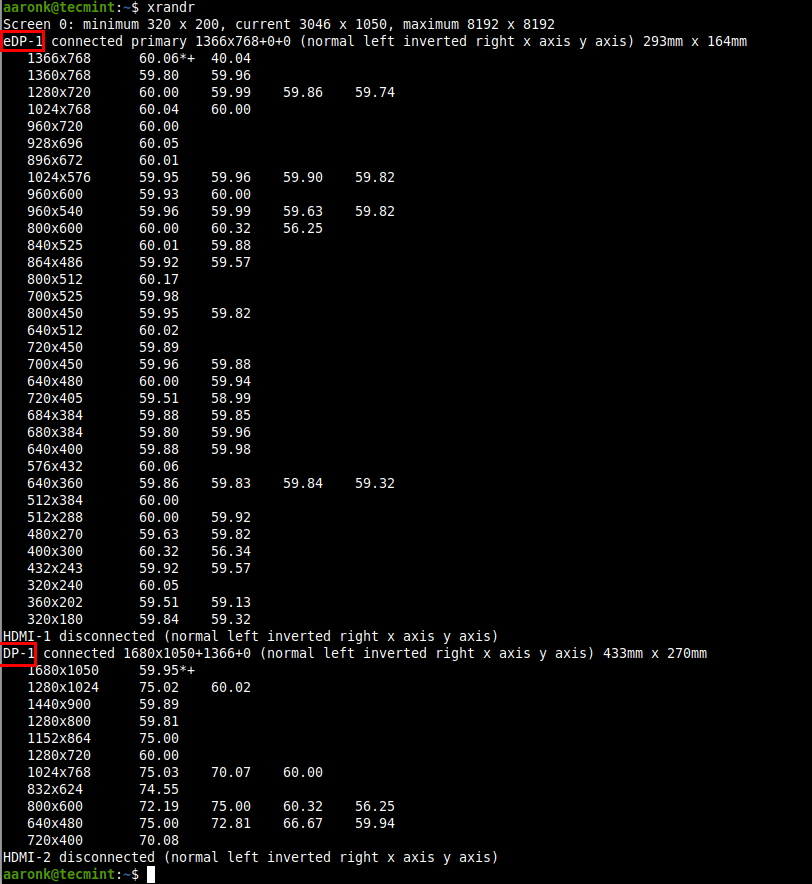
To show the names of different outputs available on your system and resolutions available on each, run xrandr without any arguments.
Set Screen Resolution in Ubuntu
To set the resolution for a screen for an external monitor named DP-1 to 1680×1050, use the —mode flag as shown.
$ xrandr --output DP-1 --mode 1680x1050
You can also set the refresh rate using the —rate flag as shown.
$ xrandr --output DP-1 --mode 1680x1050 --rate 75
You can also use the —left-of , —right-of , —above , —below , and —same-as options to arrange your screens either relatively to each other.
For example, I want my external monitor (DP-1) to be positioned left of the Laptop screen (eDP-1) in correspondence to the actual physical positioning:
$ xrandr --output DP-1 --left-of eDP-1
Keep in mind that any changes made using xrandr will only last until you log out or restart the system. To make xrandr changes persistently, use the xorg.conf configuration files for Xorg X server (run man xorg.conf for details on how to create a xorg.conf file) – this is the most effective method.
You can also use the ~/.xprofile file (add xrandr commands in it), however, there are some disadvantages of using this method, one is that this script is read fairly late in the startup process, thus it will not alter the resolution of the display manager (if you use one e.g lightdm).
How to Add Missing or Set Custom Display Resolution Using xrandr
It is possible to add a missing or custom display resolution e.g 1680 x 1000 to Displays panel, for a specific display device (DP-1), as explained below.
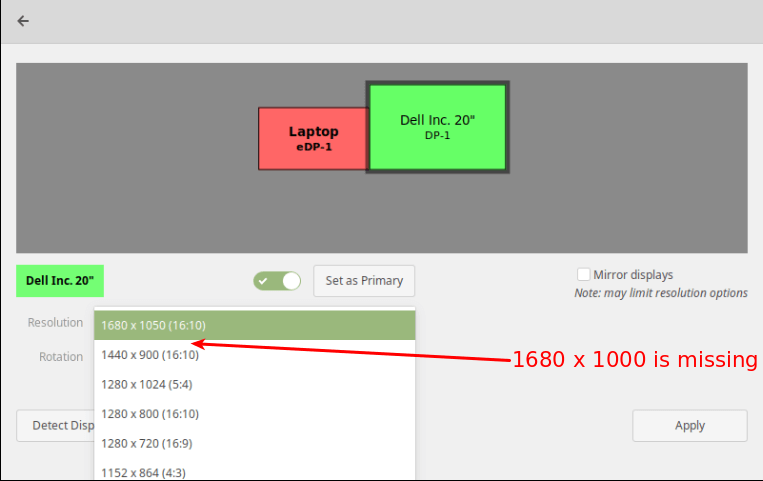
To add a missing or custom display resolution, you need to calculate the VESA Coordinated Video Timing (CVT) modes for it. You can do this using the cvt utility as follows.
For example, if you need a horizontal and vertical resolution of 1680 x 1000, run the following command.
Next, copy the Modeline (“1680x1000_60.00″ 139.25 1680 1784 1960 2240 1000 1003 1013 1038 -hsync +vsync) from the output of the cvt command and use it to create a new mode using the xrandr as shown.
$ xrandr --newmode "1680x1000_60.00" 139.25 1680 1784 1960 2240 1000 1003 1013 1038 -hsync +vsync
Then add the new mode to the display.
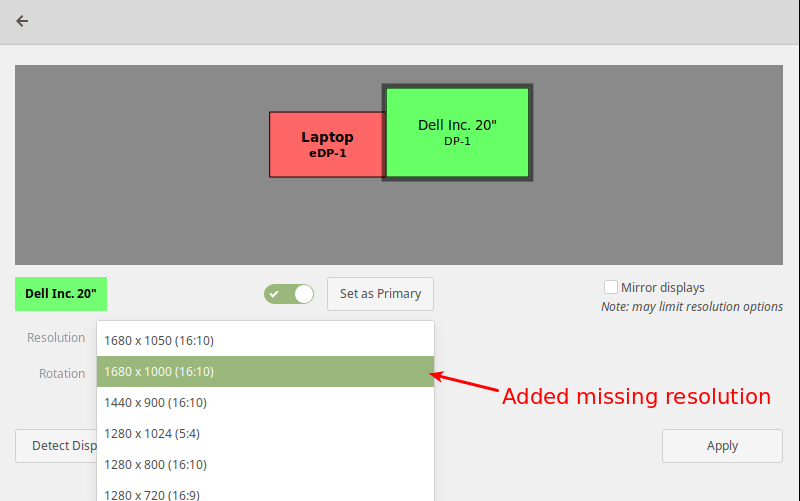
$ xrandr --addmode DP-1 "1680x1000_60.00"

Now open the Displays and check if the new resolution has been added.
The above changes are only temporary and work for the current session (they last until you log out or restart the system).
To add the resolution permanently, create a script called external_monitor_resolution.sh in the directory /etc/profile.d/.
$ sudo vim /etc/profile.d/external_monitor_resol.sh
Then add the following lines in the file:
xrandr --newmode "1680x1000_60.00" 139.25 1680 1784 1960 2240 1000 1003 1013 1038 -hsync +vsync xrandr --addmode DP-1 "1680x1000_60.00"
Save the changes and exit the file.
For more information on how xrandr works and how to use it, read its man page:
That brings us to the end of this article. If you have any thoughts to share or queries, reach us via the feedback form below.
How to Set Custom Screen Resolution in Ubuntu Wayland & Xorg
Since Ubuntu 21.04 uses Wayland as default display server, the previous method using xrandr does not longer work for adding custom screen resolution.
So this tutorial is going to show you another way to add your favorite screen resolution if it’s not available in Display settings.
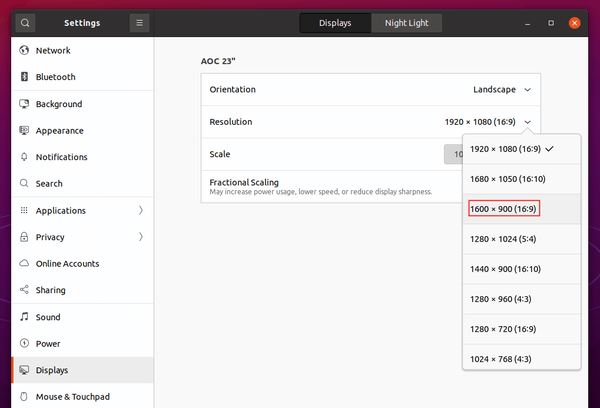
In the case, I’ve the default 1920X1080 (16:9) resolution. However, I prefer 1600X900 (16:9) a little more which is not available in settings.
Before getting started:
In this tutorial I’m going to add video mode option as Kernel parameter. The good side is that it works on both Wayland and Xorg.
- You can’t set custom resolution higher than the maximum one in Display settings. In my case (see the picture above), X resolution must be less than 1920, and Y resolution have to less than 1080.
- If you have dual-boot or multi-boot systems, below steps may not work for “other Linux” in Grub boot menu. For instance, I’ve Ubuntu 21.04 and Ubuntu 20.04 dual-boot in my laptop, the startup boot menu is handled by Grub for Ubuntu 21.04. It lists Ubuntu 21.04 as the first menu entry, custom Kernel parameter does not work for Ubuntu 20.04 in my case.
And after adding the parameter, the custom resolution should appear in Display settings, 1600×900 for instance:
How to Tell the Display Device Name in Ubuntu:
Firstly, you have to find out the current Display name. To do so, open terminal from the system application launcher:

When terminal opens, run command:
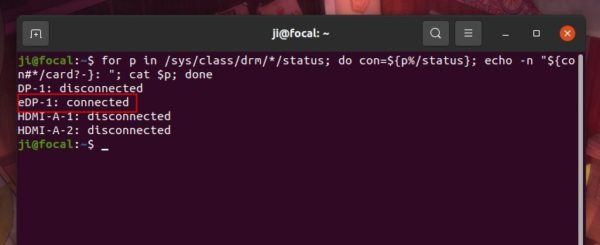
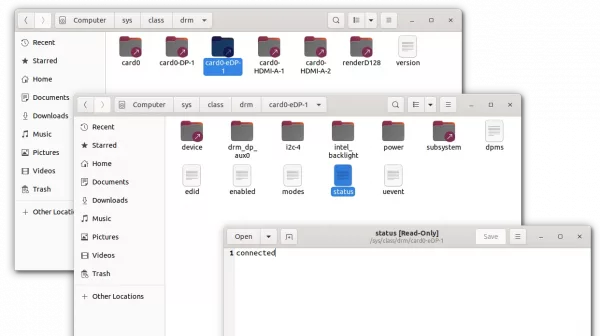
for p in /sys/class/drm/*/status; do con=$; \
echo -n «$: «; cat $p; done
This is a single command separated into 2 lines. It checks all the sub-folders under ‘/sys/class/drm‘ directory. For the sub-folder includes ‘status‘ file with ‘connected‘ as content, the folder name exclude ‘card?-‘ part is the device name we need.
As the picture shows, it’s eDP-1 in my case.
How to add video mode kernel parameter:
Option 1.) edit Grub configuration file.
a.) Open terminal from system app launcher. When it opens, run command to edit the config file:
sudo gedit /etc/default/grub
You may replace gedit with other text editor for Ubuntu based systems.
When it opens, add video=eDP-1:1600×[email protected], in my case, as value for “GRUB_CMDLINE_LINUX_DEFAULT”.
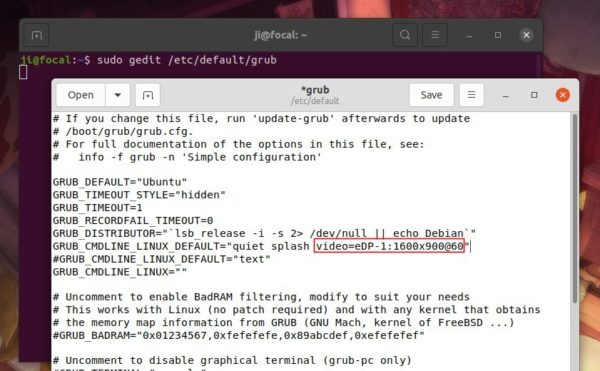
IMPORTANT: you have replace video=eDP-1:1600×[email protected]:
- eDP-1 is the Display Device Name, you can find it in previous step.
- 1600×900 is the desired screen resolution. Replace it with yours.
- 60 is the refresh rate. It’s OK to skip it, so it will be video=eDP-1:1600×900
There are more flags for the video mode kernel parameter. See the documentation for detail.
b.) Finally apply changes by running command:
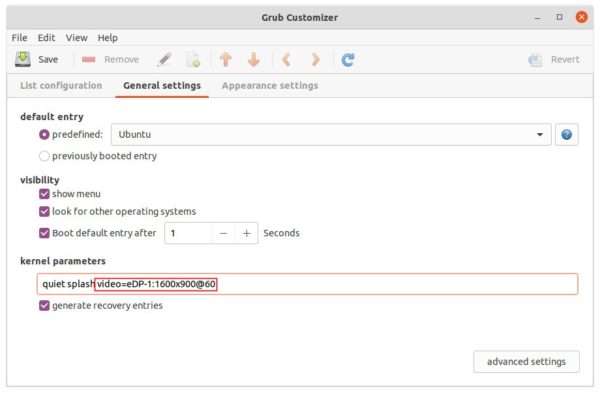
Option 2.) use Grub Customizer:
Grub-Customizer, the popular graphical tool offers an option to add the Kernel parameter.
Install it from Ubuntu Software if you don’t have it. Then launch it and navigate to General Settings tab. Finally add the value and click on Save button.
Set Custom Resolution for Multiple Displays:
If you have multiple monitors connected to your Ubuntu machine. It’s OK to set one screen resolution for all displays, or use more “video=” parameter for each display.
a.) To set one screen resolution for all displays, just skip the device name. For instance:
It will add 1600×900 screen resolution with 60 Hz refresh rate for all the connected displays.
b.) To add more “video=” parameter. For instance, I have two displays: eDP-1 and DP-1 connected. And to add 1360×700 for eDP-1 and 1600×900 for DP-1, use: