- Install DaVinci Resolve in Linux (Ubuntu, Arch, and Fedora)
- Fedora (NVIDIA)
- Fedora (AMD)
- Debian/Ubuntu (NVIDIA)
- Arch Linux (NVIDIA and AMD)
- Read next
- How to make an Apache Webserver with SSL
- The ULTIMATE RetroPie Setup Guide
- Installing Arch Linux the EASY WAY! – archfi Guide
- Comments ()
- Subscribe to TechHut Media
- Davinci Resolve On Linux – AMD GPU Drivers
- Related:
- How to Install DaVinci Resolve 16 on Linuxmint 20 with AMD Radeon Graphic Card
- 0. Prepare your driver
- 1. Prepare the extra libraries needed
- 2. Download the official DaVinci Resolve 16
- 3. Download the The MakeResolveDeb script to make the deb file for Linuxmint
- 4. Reboot
- Read further:
Install DaVinci Resolve in Linux (Ubuntu, Arch, and Fedora)

Installing DaVinci Resolve in Linux is not the easiest thing to do despite having native support. Resolve is a professional level video editor that requires a very specific environment to run properly. Below are the minimum requirements.
Minimum system requirements for Linux
- CentOS 7.3
- 16-32 GB of system memory
- Discrete GPU with at least 2GB of VRAM
- GPU which supports OpenCL 1.2 or CUDA 11
- NVIDIA/AMD Driver version – As required by your GPU
Important Note: Using the free version of DaVinci Resolve in Linux will require the use of uncompressed .mov files. These file sizes are LARGE, around 5-30gb for a 10min video. If this is a no go for you I’d recommend Kdenlive.
As you can see there are some hefty requirements for the software. This application will not run on integrated graphics and it’s very specific on the CentOS requirement. Luckily their are tools and other options for installing Resolve on Fedora, Debain/Ubuntu, and Arch based systems.
As of writing this, I’ve only had repeated success installing DaVinci Resolve with an AMD GPU in a Arch Linux system. So please refer the the Arch guide below if you’re running team red.
Fedora (NVIDIA)
If you are running Fedora AND have a NVIDIA GPU in you’re system you are in the best spot when it comes to running Resolve. Fedora and CentOS both fall under the umbrella of Red Hat Linux. Fedora is developed by the community backed Fedora project with this comes similar code thus we are able to use the files directly from Blackmagic Design.
First make sure you have the proper drivers. You’ll need RPM Fusion enabled. I recommend following the wiki, but you’ll need CUDA driver for sure. Install it using the command below.
sudo dnf install xorg-x11-drv-nvidia-cudaOnce you have the NVIDIA drivers properly set up on your system you’re you’re going to want to head over to Go to Blackmagic Design and download the official installer *.zip archive. Once downloaded open the terminal, go to the download directory and extract the files.
cd ~/Downloads unzip DaVinci_Resolve_Studio_17.1.1_Linux.zipNow we need to make sure the installer .run file can be extracted.
sudo chmod +x DaVinci_Resolve_17.1.1_Linux.runNow, we will run this command to execute the installer.
sudo ./DaVinci_Resolve_17.1.1_Linux.runWhen the installer opens running though it is fairly simple. Hit next, skim though the read me, agree to their terms of service, and click start install. And that’s it launch the application and have fun.
Fedora (AMD)
I had success one time using this guide on Reddit. When I tried to do it a second time my drivers had a error there was a white screen on boot. Proceed with caution and make sure your system is backup up with Timeshift or another tool. I do not recommend this, but here is the resource.
Debian/Ubuntu (NVIDIA)
First lets update our system and grab some dependencies.
sudo apt update sudo apt upgrade sudo apt-get install fakeroot xorrisoNow, lets make sure we have the proper NVIDIA drivers installed.
sudo apt-get install nvidia-driver nvidia-opencl-icd libcuda1 libglu1-mesa sudo apt-get install libnvidia-encode1Next you’re going to want to head over to Go to Blackmagic Design and download the official installer *.zip archive. Then head over to Daniel Tufvesson | MakeResolveDeb and download the latest MakeResolveDeb into the same directory.
Now we are going to want to extract the archived files we downloaded. Easiest way is to open a terminal application and run the following command. Change directory as needed.
cd ~/Downloads unzip DaVinci_Resolve_Studio_17.1.1_Linux.zip tar zxvf makeresolvedeb_1.5.0_multi.sh.tar.gzOnce extacted you should have these two files in the directory.
DaVinci_Resolve_Studio_17.1.1_Linux.run makeresolvedeb_1.5.0_multi.shWith the terminal open in the correct directory we are going to use the makesolvedeb script to convert the .run file into a proper installation file for debian based systems. Run the following command.
./makeresolvedeb_1.5.0_multi.sh DaVinci_Resolve_Studio_17.1.1_Linux.runThis will take a bit and be resource intensive. When indicated by the last line saying “[DONE]” and the reported number of errors 0 you can move on to the next step.
Now we will use dpkg to install the Debian package. Make sure you replace the file name with the proper version.
sudo dpkg -i davinci-resolve_17.1.1-mrd1.0_amd64.debThat’s it! The package is installed and it should open with no errors if everything was set up correctly. Please note, occasionally there are issues with the first welcome screen. You may need to force close this and re-open the application.
Most content in this section was pulled from Daniel Tufvesson | MakeResolveDeb please refer here for updated information, and FAQ.
Arch Linux (NVIDIA and AMD)
First, lets get our proper GPU drivers. One of the awesome things about Arch is the AUR and the community around it. Luckily for us the Arch community has packaged the amdgpu-pro drivers so it’s an easy installation. You will need AUR access so make sure you have yay or pamac .
AMD GPU Drivers
yay -S amdgpu-pro-libgl opencl-amdNVIDIA GPU Drivers
pacman -Syu nvidia nvidia-utils opencl-nvidiaNow that we have the proper drivers the AUR is going to come in again to help us out. Just run the command below to install resolve. As a reminder if you paid for the full version you’ll want the -studio package. For the free version, install 2 davinci-resolve and for the Studio version, install davinci-resolve-studio.
And that it! You have it installed. If you’re running a AMD card their are a few more things to do as this will require the progl script to run.
To launch DaVinci Resolve with the AMD pro drivers you will need to run this in termial.
progl /opt/resolve/bin/resolveYou will notice opening the .desktop application with application menus will result in… nothing happening. We need to fix this by adding the progl command to our .desktop file within usr/share/applications . Open terminal and run the following command,
sudo nano usr/share/applications/com.blackmagicdesign.resolve.desktopYou should see something that looks like this in nano:
Version=1.0 Type=Application Name=DaVinci Resolve GenericName=DaVinci Resolve Comment=Revolutionary new tools for editing. > Path=/opt/resolve/ Exec=/opt/resolve/bin/resolve %u Terminal=false MimeType=application/x-resolveproj; Icon=/opt/resolve/graphics/DV_Resolve.png StartupNotify=true Name[en_US]=DaVinci Resolve StartupWMClass=resolveAll we need to do is add progl after Exec= as if we were running it in termial. Should look something like this.
Exec=progl /opt/resolve/bin/resolve %uHit ctrl-o to save out the file. Restart or logout of your desktop environment and it should open with no errors! (Tested this in gnome. To restart press alt+F2 then input ‘r’)
For more information including detailed driver support and other helpful info the Arch wiki is a great place to be: DaVinci Resolve – ArchWiki.
If you have any other suggestions, tip, tricks, or updates let us know down below!
Read next

How to make an Apache Webserver with SSL
Creating yourself a basic Apache webserver is often the first step in your web development journey. Apache is the base requirement for many web applications and products. Better yet you can use an Apache webserver to host your self-made or generated static websites with something like HUGO. In this video

The ULTIMATE RetroPie Setup Guide
Nothing is better than sitting back and playing some of your favorite games when you were a kid, or even better; showing the next generation some of the awesome games that we grew up with. In this guide we will be setting up our very own RetroPie console using the

Installing Arch Linux the EASY WAY! – archfi Guide
This is a simple installation script written in bash by the developer MatMoul 2. This will allow you to install Arch by selecting various options and packages instead of needing to run commands.
Comments ()
Subscribe to TechHut Media
Don’t miss out on the latest tech and open-source news. Subscribe now for FREE or become a member to get access to the library of members-only content.
Davinci Resolve On Linux – AMD GPU Drivers
Welcome to the wild and wacky world of Davinci Resolve on Linux! This guide will walk you through setting a up a Resolve workstation with a discrete or integrated AMD GPU.
0. Download and install Ubuntu 22.04.1 LTS. This is a workstation so we’re going to pick the lesser of three evils.
1. Download the Radeon™ Software for Linux® version 22.40 debian package for Ubuntu 22.04.1.

2. Install the AMD Radeon debian package.
3. Update the system repositories.
sudo apt update && sudo apt upgrade
4. Install the AMD Radeon drivers and OpenCL
amdgpu-install --vulkan=pro --opencl=rocr,legacy
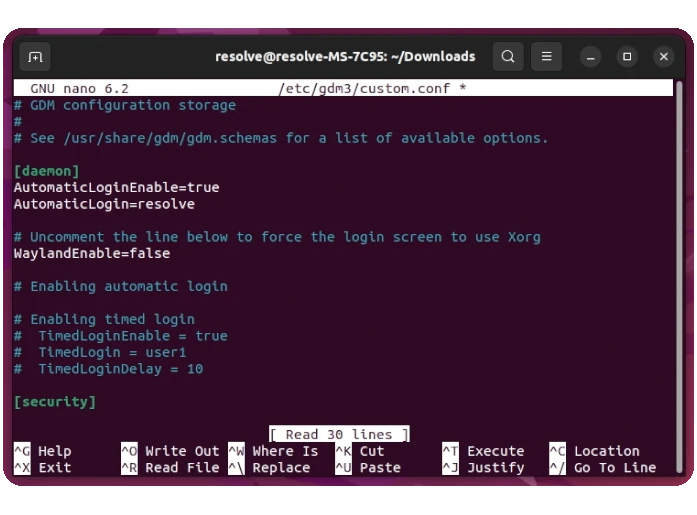
5. Disable Wayland by changeing #WaylandEnable=false to WaylandEnable=false
sudo nano /etc/gdm3/custom.conf
6. Reboot the system
7. Add user to the video and render groups.
sudo usermod -a -G video yourusername sudo usermod -a -G render yourusername
8. Instal Davinci Resolve dependencies
sudo apt install libfuse2 libapr1 libaprutil1 libxcb-composite0 libxcb-cursor0 libxcb-damage0 libxcb-xinerama0 libxcb-xinput0 ocl-icd-libopencl1
9. Download and extract the Davinci Resolve archive
10. Run the Davinci Resolve installer

11. Pick a fight with the black box of nothingness. Legend has it this box exists only to be force-closed.

12. Launch Davinci Resolve and confirm that it’s using OpenCL
Davinci Resolve > System > Memory and GPU

13. Davinci Resolve limitations and quirks on Linux.
- No VST plugin support on Linux because Blackmagic can’t be arsed.
- ALSA is the only available audio backend.
- YouTube account integration does not work in Linux.
- No AAC audio import or export because reasons.
- The free version of Davinci Resolve does not import mp4 video or mp3 audio.
Related:
How to Install DaVinci Resolve 16 on Linuxmint 20 with AMD Radeon Graphic Card
Although Linuxmint usually has built in driver support for AMD graphic card, sometimes we still need to install extra support for some application. Usually it’s supposed to be painless, however, I did run into some issues.
0. Prepare your driver
Under linuxmint, menu > system info , you shall be able to see your graphic card’s name. Search for its driver on AMD site. For instance mine is:
AMD Radeon RX 5600 OEM/5600 XT / 5700/5700 XT
Download the version for Ubuntu x86 64bit for Ubuntu 20.04.1. You will get a zip file. Unzip it. You can rename the folder to something easy to remember but I am too lazy.
cd Downloads/amdgpu-pro-20.40-1147286-ubuntu-20.04 ./amdgpu-pro-install -y --opencl=pal,legacy 
Previously I tried other script which somehow didn’t properly install the OpenCL and I got this error. I’ve since goolged like crazy, posted in two forums, and read tons of posts and discussed with another friend about this. in the end I uninstalled whatever I installed previously, and re-downloaded the package again (just to make sure it’s not corrupted) and reinstalled it like above, and finally got it to work! I hope if you followed my above instruction you don’t need to go through the same pain I have been through.
1. Prepare the extra libraries needed
sudo apt install libssl1.1 ocl-icd-opencl-dev fakeroot xorriso - libssl1.1, ocl-icd-opencl-dev needed for running DaVinci Resolve
- fakeroot, xorriso for generating the deb (since the official DaVinci Resolve linux package is only made for CentOS)
2. Download the official DaVinci Resolve 16
Click on the Linux, note Studio is the paid version with more features, if you want to download the free one just download the DaVinci Resolve 16.
Extract the zip in your Downloads folder, and you will see the file named DaVinci_Resolve_16.2.7_Linux.run. Don’t do anything yet as this one is made for CentOS. In next step we will have a bash script to make it into a installation file that’s suitable for Linuxmint.
3. Download the The MakeResolveDeb script to make the deb file for Linuxmint
The instruction is pretty straight forward from here. Basically you download and extract everything into one folder, and make sure they have exactly the same name. The script here makes the previous .run file we have into a .deb file, then it’s suitable to install on Linuxmint.
4. Reboot
After everything, don’t forget to reboot for things to work properly. If everything goes well you should be able to run DaVinci Resolve on your computer.
Read further:
- OpenCL on Linux — I hope you will not need to read it, I used it for trouble shooting.
- DaVinci Resolve’s own forum — You will likely find more related information here